


主要使用css的transform属性进行左右滑动,代码如下
<script setup lang="ts">
const props = defineProps({
images: []
})
const data = ref({
imgUrlList:[], //图片数据
imgActiveIndex: 0, // 当前移动图片的索引值
imgDistance: 0, // 每次移动的距离
firstIndex: 0,//一组图片的第一张索引
lastIndex: 3 //一组图片的最后一张索引
});
if (props.images) {
//将传进来的数据赋值给定义的数据
data.value.imgUrlList = props.images;
}
const imgStyle = computed(() => {
return {
transform: `translate3d(${data.value.imgDistance}px, 0, 0)` // 计算移动的距离(x,y,z)
}
})
function changeImg(item, index) {
data.value.imgActiveIndex = index
}
function goToSlide(currentIndex){
//向右移动
if(currentIndex > data.value.imgActiveIndex){
if(currentIndex >= data.value.firstIndex && currentIndex <= data.value.lastIndex){
//当前索引在区间内,不做操作
}else{
let oldLastIndex = data.value.lastIndex;
//设置区间
data.value.firstIndex = currentIndex - 3;
data.value.lastIndex = currentIndex;
//移动步数
let rightSetp = data.value.lastIndex - oldLastIndex;
//向后移动
let index = 0
const temp = window.setInterval(() => {
if (index < (48 * rightSetp)) {
data.value.imgDistance -= 2 // 每次向右移动的距离
index++
return
} else {
window.clearInterval(temp)
}
}, 0);
}
}
//向左移动
if(currentIndex < data.value.imgActiveIndex){
if(currentIndex >= data.value.firstIndex && currentIndex <= data.value.lastIndex){
//当前索引在区间内,不做操作
}else{
let oldLastIndex = data.value.lastIndex;
//设置区间
data.value.firstIndex = currentIndex;
data.value.lastIndex = currentIndex + 3;
//移动步数
let leftSetp = oldLastIndex - data.value.lastIndex;
//向前移动
let index = 0
const temp = window.setInterval(() => {
if (index < (48 * leftSetp)) {
data.value.imgDistance += 2 // 每次向右移动的距离
index++
return
} else {
window.clearInterval(temp)
}
}, 0);
}
}
//设置当前索引
data.value.imgActiveIndex = currentIndex
}
function imgLeft() {
//当前索引减1
data.value.imgActiveIndex--
if(data.value.imgActiveIndex >= data.value.firstIndex && data.value.imgActiveIndex <= data.value.lastIndex){
//当前索引在区间内,不做操作
}else{
//判断当前索引是否小于最小值
if(data.value.imgActiveIndex >= 0){
//更新区间范围
data.value.firstIndex --;
data.value.lastIndex --;
//向前移动
let index = 0
const temp = window.setInterval(() => {
if (index < 48) {
data.value.imgDistance += 2 // 每次向右移动的距离
index++
return
} else {
window.clearInterval(temp)
}
}, 0);
}
}
}
function imgRight() {
//当前索引加1
data.value.imgActiveIndex ++
if(data.value.imgActiveIndex >= data.value.firstIndex && data.value.imgActiveIndex <= data.value.lastIndex){
//当前索引在区间内,不做操作
}else{
//判断当前索引是否超出最大值
if(data.value.imgActiveIndex <= data.value.imgUrlList.length - 1){
//更新区间范围
data.value.firstIndex ++;
data.value.lastIndex ++;
//向后移动
let index = 0
const temp = window.setInterval(() => {
if (index < 48) {
data.value.imgDistance -= 2 // 每次向右移动的距离
index++
return
} else {
window.clearInterval(temp)
}
}, 0);
}else if(data.value.imgActiveIndex > data.value.imgUrlList.length - 1){
//最后一张
//设置当前索引
data.value.imgActiveIndex = 0;
//更新区间范围
data.value.firstIndex = 0;
data.value.lastIndex = 3;
//移动到最开始
let index = 0
const temp = window.setInterval(() => { // 利用定时器实现图片左右移动的动画效果
if (index < Math.abs((((data.value.imgUrlList.length -1) - 3) * -96)/2)) { // 取绝对值再除
data.value.imgDistance += 2 // 每次向左移动的距离 (移动总距离为48*this.imgDistance)
index++
return
} else {
window.clearInterval(temp) // 移动完清除定时器
}
}, 0)
}
}
}
</script>
<template>
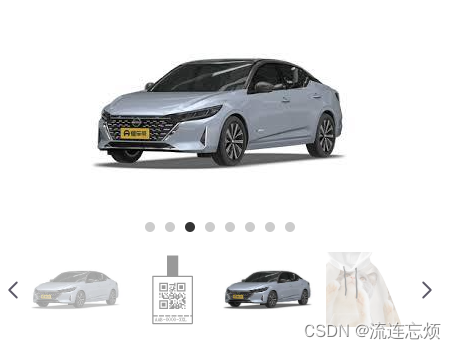
<div class="img_carousel_container">
<!--大图-->
<div class="main_container">
<img :src="data.imgUrlList[data.imgActiveIndex]">
<!-- 小圆点 -->
<div class="carousel-dots">
<span v-for="(dot, index) in images.length" :key="index" :class="{ 'active-dot': data.imgActiveIndex === index }" @click="goToSlide(index)"></span>
</div>
</div>
<div class="thumb_container">
<!--左箭头-->
<VIcon
v-if="data.imgActiveIndex != 0"
size="30"
icon="tabler-chevron-left"
@click="imgLeft()"
/>
<div v-else style="width: 30px"></div>
<!--缩略图-->
<div class="img_carousel_thumb">
<div class="thumb_img" v-for="(item,index) in data.imgUrlList" :key="index" :style="imgStyle" @click="changeImg(item, index)">
<img :class="index === data.imgActiveIndex ? 'img_active' : 'img_unactive'" :src="item">
</div>
</div>
<!--右箭头-->
<VIcon
v-if="data.imgUrlList.length > 4"
size="30"
icon="tabler-chevron-right"
@click="imgRight()"
/>
<div v-else style="width: 30px"></div>
</div>
</div>
</template>
<style lang="scss" scoped>
.carousel-dots {
position: absolute;
bottom: 10px;
left: 50%;
transform: translateX(-50%);
}
.carousel-dots span {
display: inline-block;
width: 10px;
height: 10px;
border-radius: 50%;
background-color: #ccc;
margin: 0 5px;
cursor: pointer;
}
.carousel-dots .active-dot {
background-color: #333;
}
/*容器*/
.img_carousel_container{
width: 444px;
height: 350px;
display: flex;
flex-direction: column;
align-items: center;
/*大图*/
.main_container {
width: 386px;
height: 270px;
position: relative;
img{
max-width: 100%; /* 图片最大宽度为容器宽度 */
max-height: 100%; /* 图片最大高度为容器高度 */
position: absolute; /* 绝对定位 */
top: 0; /* 顶部对齐 */
left: 0; /* 左边对齐 */
right: 0; /* 右边对齐 */
bottom: 0; /* 底部对齐 */
margin: auto; /* 自动外边距,居中显示 */
}
}
/*缩略图*/
.thumb_container{
width: 444px;
height: 75px;
margin-top: 5px;
display: flex;
flex-direction: row;
align-items: center;
overflow: hidden;
.img_carousel_thumb{
width: 386px;
display: flex;
flex-direction: row;
align-items: center;
overflow: hidden;
.thumb_img{
flex-shrink: 0;
width: 96px;
height: 75px;
img{
max-width: 100%; /* 图片最大宽度为容器宽度 */
max-height: 100%; /* 图片最大高度为容器高度 */
position: absolute; /* 绝对定位 */
top: 0; /* 顶部对齐 */
left: 0; /* 左边对齐 */
right: 0; /* 右边对齐 */
bottom: 0; /* 底部对齐 */
margin: auto; /* 自动外边距,居中显示 */
}
}
}
}
}
/*图片选中*/
.img_active{
opacity: 1;
}
/*图片未选中*/
.img_unactive{
opacity: 0.4;
}
</style>


 2418
2418


 被折叠的 条评论
为什么被折叠?
被折叠的 条评论
为什么被折叠?
 到【灌水乐园】发言


