


springboot 如何开启定时任务
基础版本
一、在启动类上面加上 @EnableScheduling 即可开启定时
@SpringBootApplication
@EnableAsync
@EnableScheduling
public class ScheduleApplication {

    public static void main(String[] args) {
        SpringApplication.run(ScheduleApplication .class, args);
    }
}
二、创建定时任务类
@Component
@Slf4j
public class WorkbenchProgressStatJob {


    @Autowired
    WorkbenchProgressService workbenchProgressService;


    @Scheduled(cron = "0 0 9,12,18 * * ?")
    @Transactional(rollbackFor = Exception.class)
    public void doStatJob()  {

        log.info("===============  WorkbenchProgressStatJob start at {} ===============", DateFormatUtils.format(new Date(), "yyyy-MM-dd HH:mm:ss"));

        log.info("===============  WorkbenchProgressStatJob end at {} ===============", DateFormatUtils.format(new Date(), "yyyy-MM-dd HH:mm:ss"));
    }
}
我这里演示的是每天 9点、12点、18点执行一次任务,所以 在 @Scheduler注解里面使用了 cron表达式
0 0 9,12,18 * * ?
这里看到的 @Scheduled注解,不止可以用cron参数 也可以使用 fixedDelay() 或者 fixedRate() 参数,
fixedDelay() :以固定时间间隔来分割上一次任务执行和下一次任务执行。 也就是上一次任务执行完成之后,开始计算时间,时间达到设置的数字, 开始下一次任务执行。 毫秒为单位
fixedRate():以固定时间间隔来分割每一次的任务调用,这里和上一个有区别的地方是,他不会等到上一次任务执行结束才开始计算时间, 而是上一次任务执行开始,就开始计算。 如果任务执行耗时比较长,设置的时间间隔比较短,那么可能上一次还没执行玩,第二次已经开始。
多线程进阶版
前面的基础版本是单线程,如果有多个定时任务,其中一个任务耗时比较长,那么其他的任务就会被卡住,可能无法达到预期的定时执行的效果。
这个时候,给任务加上多线程,就能避免这个问题了。
新增多线程配置类
@Configuration
@EnableAsync
public class ExecutorConfig {

    @Bean("taskExecutor")
    public Executor taskExecutor(){
        ThreadPoolTaskExecutor taskExecutor = new ThreadPoolTaskExecutor();
        taskExecutor.setCorePoolSize(10);
        taskExecutor.setMaxPoolSize(20);
        taskExecutor.setQueueCapacity(20);
        taskExecutor.setKeepAliveSeconds(60);
        taskExecutor.setThreadNamePrefix("taskExecutor-schedule-");
        taskExecutor.setWaitForTasksToCompleteOnShutdown(true);
        taskExecutor.setAwaitTerminationSeconds(60);
        return taskExecutor;
    }
}
在定时任务上添加注解 @Async
    @Scheduled(fixedDelay = 1000)
    @Async
    @Transactional(rollbackFor = Exception.class)
    public void doStatJob1() throws InterruptedException {
        log.info("doStatJob1 start");
        Thread.sleep(10000);
        log.info("doStatJob1 end");
    }
这样这个定时任务会提交到线程池中去执行,如果有多个一样的任务同事执行,只要没有把线程池占慢 都可以执行下去。
如果每个定时任务都想多线程执行,那么直接将 @Async注解提取到 定时任务配置类的类上面去就可以了。
模拟测试
基础版:
	 @Scheduled(fixedDelay = 1000)
    @Transactional(rollbackFor = Exception.class)
    public void doStatJob1() throws InterruptedException {
        log.info("doStatJob1 start");
        Thread.sleep(10000);
        log.info("doStatJob1 end");
    }


    @Scheduled(fixedDelay = 1000)
    @Transactional(rollbackFor = Exception.class)
    public void doStatJob2() throws InterruptedException {
        log.info("doStatJob2 start");
        Thread.sleep(10000);
        log.info("doStatJob2 end");
    }
结果:
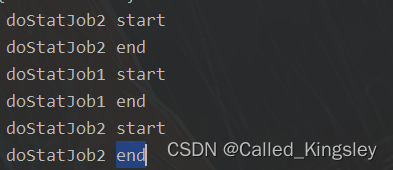
多线程版:
    @Scheduled(fixedDelay = 1000)
    @Async
    @Transactional(rollbackFor = Exception.class)
    public void doStatJob1() throws InterruptedException {
        log.info("doStatJob1 start");
        Thread.sleep(10000);
        log.info("doStatJob1 end");
    }


    @Scheduled(fixedDelay = 1000)
    @Async
    @Transactional(rollbackFor = Exception.class)
    public void doStatJob2() throws InterruptedException {
        log.info("doStatJob2 start");
        Thread.sleep(10000);
        log.info("doStatJob2 end");
    }
结果:


 390
390


 被折叠的 条评论
为什么被折叠?
被折叠的 条评论
为什么被折叠?
 到【灌水乐园】发言


