


文章目录
一、自定义认证
1. 自定义资源权限规则
- /index 公共资源
- /hello 受保护资源
 在项目中添加如下配置就可以实现对资源权限规则的设定:
@Configuration
public class WebSecurityCfg extends WebSecurityConfigurerAdapter {
    @Override
    protected void configure(HttpSecurity http) throws Exception {
        http.authorizeRequests(req -> {
            // 注意:这里放行的内容必须在验证之前
            // mvcMatchers匹配资源,permitAll放行该资源,无需认证授权,直接访问
            req.mvcMatchers("/index").permitAll();
            // anyRequest所有请求,都需要认证才可访问
            req.anyRequest().authenticated();
            // formLogin()  开启表单认证
        }).formLogin();
    }
}
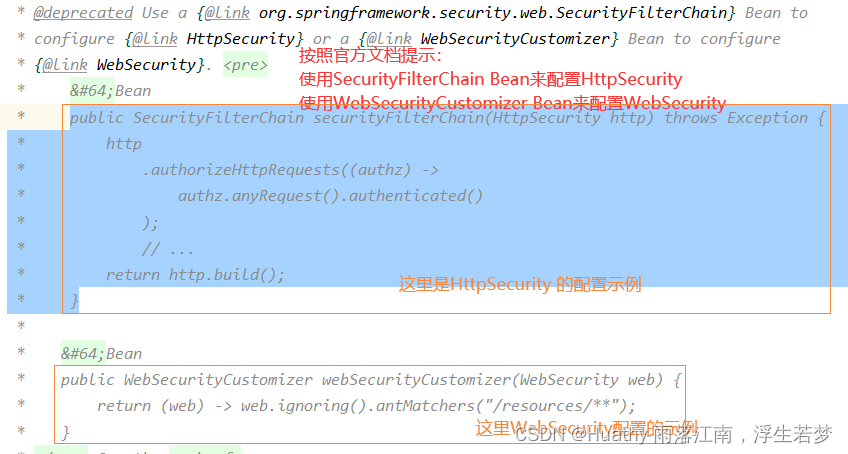
由于官方提示WebSecurityConfigurerAdapter 已过时,我们按照官方提示来使用以下新的配置:
// 注意这里必须加上注解@EnableWebSecurity,否则配置不能生效
@EnableWebSecurity
public class SecurityCfg {
    @Bean
    public SecurityFilterChain securityFilterChain(HttpSecurity http) throws Exception {
        http.authorizeHttpRequests(req -> {
            req.mvcMatchers("/index").permitAll();
            req.anyRequest().authenticated();
        }).formLogin();
        return http.build();
    }
}
二、自定义登录页面
1. 引入thymeleaf依赖,并配置
<dependency>
    <groupId>org.springframework.boot</groupId>
    <artifactId>spring-boot-starter-thymeleaf</artifactId>
</dependency>
spring:
  thymeleaf:
    cache: false
    prefix: classpath:/templates/
    suffix: .html
    check-template-location: true
    encoding: UTF-8
    mode: HTML
    servlet:
      content-type: text/html
2. 配置SecurityCfg的securityFilterChain实例
@EnableWebSecurity
public class SecurityCfg {
@Bean
public SecurityFilterChain securityFilterChain(HttpSecurity http) throws Exception {
http.authorizeHttpRequests(req -> {
req.mvcMatchers("/index", "/page/login.html").permitAll();
req.anyRequest().authenticated();
});
//loginPage 指定默认登陆页面。这里需要注意:在自定义登陆页面后,必须指定登录地址
http.formLogin().loginPage("/page/login.html").loginProcessingUrl("/doLogin")
// 对参数用户名、密码的参数名进行设置
.usernameParameter("uname").passwordParameter("pwd")
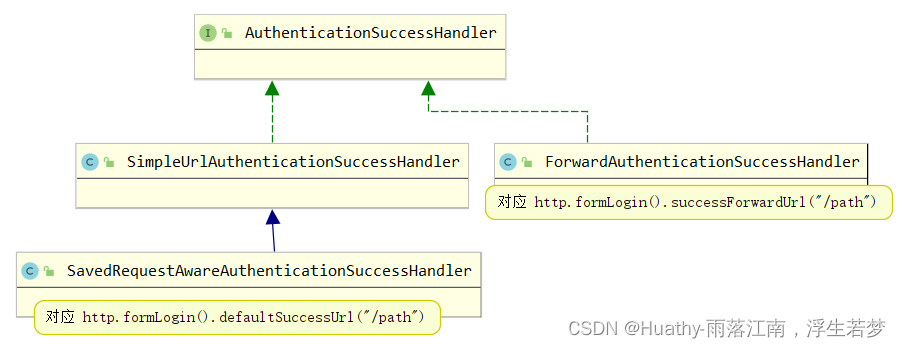
// 设置默认成功页面 成功重定向。 注意:与successForwardUrl只能设置一个
.defaultSuccessUrl("/hi");
// 成功 转发
// .successForwardUrl("/hi");
// 禁用csrf跨站请求伪造攻击防护
http.csrf().disable();
return http.build();
}
}
3. 编写login.html
<!-- @author:Huathy
     @CSDN: https://blog.csdn.net/qq_40366738 -->
<!DOCTYPE html>
<html lang="en" xmlns:th="http://www.thymeleaf.org">
<head>
    <meta charset="UTF-8">
    <title>登录</title>
</head>
<body>
<h1>用 户 登 录</h1>
<!-- th:action="@{/doLogin}这里必须这样写,请求地址localhost:port/doLogin  否则请求地址为page/下面 -->
<form method="post" th:action="@{/doLogin}">
<!--  这里需要注意:如果要使用自定义的参数名称必须在SecurityFilterChain中进行配置  -->
    UserName: <input name="uname" type="text" value="admin"/><br/>
    Password: <input name="pwd" type="text" value="admin"/><br/>
    <!--    这里在security自带的还有一个隐藏的csrf的属性。csrf:跨站请求伪造攻击-->
    <!--    <input name="_csrf" type="hidden" value="xxx">-->
    <input type="submit" value="登录">
</form>
</body>
</html>
注意:
- SecurityFilterChain中需要先暂时关闭CSRF跨站请求伪造攻击防御。
http.csrf().disable(); - 指定登陆页面,必须同时指定登录地址。
http.formLogin().loginPage("/page/login.html").loginProcessingUrl("/doLogin") - 成功返回页
defaultSuccessUrl("/hi")与successForwardUrl("/hi")只能配置一个。前者默认重定向redirect到refer地址,如果没有refer就跳转defaultURL,可以通过alwaysUse参数配置是否要回跳之前访问的URL。后者默认使用forward转发到设定的URL地址。
三、自定义登录成功处理
在前后端分离的情况下,登录成功之后不需要跳转页面,而是需要返回一个JSON通知前端是否登录成功。这时,可以通过自定义AuthenticationSuccessHandler来实现。
package org.springframework.security.web.authentication;

public interface AuthenticationSuccessHandler {
    default void onAuthenticationSuccess(HttpServletRequest request, HttpServletResponse response, FilterChain chain, Authentication authentication) throws IOException, ServletException {
        this.onAuthenticationSuccess(request, response, authentication);
        chain.doFilter(request, response);
    }
// 覆盖该方法即可
    void onAuthenticationSuccess(HttpServletRequest request, HttpServletResponse response, Authentication authentication) throws IOException, ServletException;
}
1. 编写JsonAuthenticationSuccessHandler处理器,返回JSON数据
package com.hx.demo.handler;

import com.fasterxml.jackson.databind.ObjectMapper;
import org.springframework.security.core.Authentication;
import org.springframework.security.web.authentication.AuthenticationSuccessHandler;

/**
 * @author Huathy
 * @date 2023-02-28 22:56
 * @description 自定义的成功处理器,返回JSON数据
 */
public class JsonAuthenticationSuccessHandler implements AuthenticationSuccessHandler {
    @Override
    public void onAuthenticationSuccess(HttpServletRequest request, HttpServletResponse response, Authentication authentication) throws IOException, ServletException {
        Map<String, Object> result = new HashMap<>();
        result.put("msg", "登录成功");
        result.put("code", 200);
        result.put("authentication", authentication);
        response.setContentType("application/json;charset=UTF-8");
        String jsonData = new ObjectMapper().writeValueAsString(result);
        response.getWriter().write(jsonData);
    }
}
2. 修改SecurityFilterChain 配置
@EnableWebSecurity
public class SecurityCfg2 {
    @Bean
    public SecurityFilterChain securityFilterChain(HttpSecurity http) throws Exception {
        http.authorizeHttpRequests(req -> {
            req.mvcMatchers("/index", "/page/login.html").permitAll();
            req.anyRequest().authenticated();
        });
        //loginPage 指定默认登陆页面。这里需要注意:在自定义登陆页面后,必须指定登录地址
        http.formLogin().loginPage("/page/login.html").loginProcessingUrl("/doLogin")
                // 对参数用户名、密码的参数名进行设置
                .usernameParameter("uname").passwordParameter("pwd")
                // 认证成功处理器
                .successHandler(new JsonAuthenticationSuccessHandler());
        // 禁用csrf跨站请求伪造攻击防护
        http.csrf().disable();
        return http.build();
    }
}
四、自定义登录失败页面跳转,信息显示
通过debug类org.springframework.security.web.authentication.SimpleUrlAuthenticationFailureHandler#saveException,可以知道以下内容:
如果是forward,异常信息存入request
如果是redirect默认,异常信息存入session
key:SPRING_SECURITY_LAST_EXCEPTION

1. 修改SecurityFilterChain 配置
@EnableWebSecurity
public class SecurityCfg2 {
    @Bean
    public SecurityFilterChain securityFilterChain(HttpSecurity http) throws Exception {
        http.authorizeHttpRequests(req -> {
            req.mvcMatchers("/index", "/page/login.html").permitAll();
            req.anyRequest().authenticated();
        });
        //loginPage 指定默认登陆页面。这里需要注意:在自定义登陆页面后,必须指定登录地址
        http.formLogin().loginPage("/page/login.html").loginProcessingUrl("/doLogin")
                // 对参数用户名、密码的参数名进行设置
                .usernameParameter("uname").passwordParameter("pwd")
                // 认证成功处理器
                .successHandler(new JsonAuthenticationSuccessHandler())
                .failureForwardUrl("/page/login.html");
//                .failureUrl("/page/login.html");
        // 禁用csrf跨站请求伪造攻击防护
        http.csrf().disable();
        return http.build();
    }
}
2. 修改login.html
<!-- @author:Huathy
     @CSDN: https://blog.csdn.net/qq_40366738 -->
<!DOCTYPE html>
<html lang="en" xmlns:th="http://www.thymeleaf.org">
<head>
    <meta charset="UTF-8">
    <title>登录</title>
</head>
<body>
<!-- 增加错误信息配置,这里从SESSION中获取或者从Request中获取 -->
<h5>错误信息:</h5>
<div>req:<span th:text="${SPRING_SECURITY_LAST_EXCEPTION}"></span></div>
<div>session:<span th:text="${session.SPRING_SECURITY_LAST_EXCEPTION}"></span></div>

<h1>用 户 登 录</h1>
<form method="post" th:action="@{/doLogin}">
    <!--  这里需要注意:如果要使用自定义的参数名称必须在SecurityFilterChain中进行配置  -->
    UserName: <input name="uname" type="text" value="admin"/><br/>
    Password: <input name="pwd" type="text" value="123"/><br/>
    <!--    这里在security自带的还有一个隐藏的csrf的属性。csrf:跨站请求伪造攻击-->
    <!--    <input name="_csrf" type="hidden" value="xxx">-->
    <input type="submit" value="登录">
</form>

</body>
</html>
五、自定义登录失败处理器
这里与自定义登录成功处理器类似

1. 修改SecurityFilterChain配置
@EnableWebSecurity
public class SecurityCfg2 {
    @Bean
    public SecurityFilterChain securityFilterChain(HttpSecurity http) throws Exception {
        http.authorizeHttpRequests(req -> {
            req.mvcMatchers("/index", "/page/login.html").permitAll();
            req.anyRequest().authenticated();
        });
        //loginPage 指定默认登陆页面。这里需要注意:在自定义登陆页面后,必须指定登录地址
        http.formLogin().loginPage("/page/login.html").loginProcessingUrl("/doLogin")
                // 对参数用户名、密码的参数名进行设置
                .usernameParameter("uname").passwordParameter("pwd")
                // 认证成功处理器
                .successHandler(new JsonAuthenticationSuccessHandler())
                .failureHandler(new JsonAuthenticationFailHandler());
        // 禁用csrf跨站请求伪造攻击防护
        http.csrf().disable();
        return http.build();
    }
}
2. 编写JsonAuthenticationFailHandler
package com.hx.demo.handler;

import com.fasterxml.jackson.databind.ObjectMapper;
import org.springframework.security.core.AuthenticationException;
import org.springframework.security.web.authentication.AuthenticationFailureHandler;

/**
 * @author Huathy
 * @date 2023-03-01 19:37
 * @description
 */
public class JsonAuthenticationFailHandler implements AuthenticationFailureHandler {
    @Override
    public void onAuthenticationFailure(HttpServletRequest request, HttpServletResponse response, AuthenticationException exception) throws IOException, ServletException {
        Map<String, Object> result = new HashMap<>();
        result.put("msg", "登录失败");
        result.put("code", 500);
        result.put("exception", exception.getMessage());
        response.setContentType("application/json;charset=UTF-8");
        String jsonData = new ObjectMapper().writeValueAsString(result);
        response.getWriter().write(jsonData);
    }
}
六、注销登录
SpringSecurity中也提供了注销登录配置,在开发时也可以按照自己需求对注销进行个性化定制。默认是开启注销登录的。默认地址为:http://ip:prot/path/logout。
1. 单个注销登录请求配置
@EnableWebSecurity
public class SecurityCfg2 {
    @Bean
    public SecurityFilterChain securityFilterChain(HttpSecurity http) throws Exception {
        http.authorizeHttpRequests(req -> {
            req.mvcMatchers("/index", "/page/login.html").permitAll();
            req.anyRequest().authenticated();
        });
        //loginPage 指定默认登陆页面。这里需要注意:在自定义登陆页面后,必须指定登录地址
        http.formLogin().loginPage("/page/login.html").loginProcessingUrl("/doLogin")
                // 对参数用户名、密码的参数名进行设置
                .usernameParameter("uname").passwordParameter("pwd")
                // 认证成功处理器
                .successHandler(new JsonAuthenticationSuccessHandler())
                .failureHandler(new JsonAuthenticationFailHandler());
        http.logout().logoutUrl("logout")   //注销登录URL,默认请求方式为GET请求
                .invalidateHttpSession(true)    // 会话失效httpSession,默认true
                .clearAuthentication(true)     // 清除认证信息,默认true
                .logoutSuccessUrl("/index.html");   // 注销登录,成功跳回首页
        // 禁用csrf跨站请求伪造攻击防护
        http.csrf().disable();
        return http.build();
    }
}
- 通过logout()方法开启注销配置
- logoutUrl()指定退出登录请求地址,默认GET请求,路径 /logout
- invalidateHttpSession 退出时是否是session失败,默认true
- clearAuthentication退出时是否清除认证信息,默认true
- logoutSuccessUrl 退出登录时跳转地址
2. 多个注销登录请求接口配置
如果项目中需要多个注销接口,可以通过配置,还可以指定请求方法。
@EnableWebSecurity
public class SecurityCfg2 {
    @Bean
    public SecurityFilterChain securityFilterChain(HttpSecurity http) throws Exception {
        http.authorizeHttpRequests(req -> {
            req.mvcMatchers("/index", "/page/login.html").permitAll();
            req.anyRequest().authenticated();
        });
        //loginPage 指定默认登陆页面。这里需要注意:在自定义登陆页面后,必须指定登录地址
        http.formLogin().loginPage("/page/login.html").loginProcessingUrl("/doLogin")
                // 对参数用户名、密码的参数名进行设置
                .usernameParameter("uname").passwordParameter("pwd")
                // 认证成功处理器
                .successHandler(new JsonAuthenticationSuccessHandler())
//                .failureForwardUrl("/page/login.html");
//                .failureUrl("/page/login.html");
                .failureHandler(new JsonAuthenticationFailHandler());
        // 这里只配置一个也可以,修改默认请求方式。
        http.logout().logoutRequestMatcher(new OrRequestMatcher(
                new AntPathRequestMatcher("/logout", RequestMethod.GET.name()),
                new AntPathRequestMatcher("/unLogin", RequestMethod.GET.name())
        ));
        // 禁用csrf跨站请求伪造攻击防护
        http.csrf().disable();
        return http.build();
    }
}
七、自定义注销登录处理器

1. 修改SecurityFilterChain配置
http.logout().logoutSuccessHandler(new JsonLogoutSucceessHandler());
@EnableWebSecurity
public class SecurityCfg2 {
    @Bean
    public SecurityFilterChain securityFilterChain(HttpSecurity http) throws Exception {
        http.authorizeHttpRequests(req -> {
            req.mvcMatchers("/index", "/page/login.html").permitAll();
            req.anyRequest().authenticated();
        });
        //loginPage 指定默认登陆页面。这里需要注意:在自定义登陆页面后,必须指定登录地址
        http.formLogin().loginPage("/page/login.html").loginProcessingUrl("/doLogin")
                // 对参数用户名、密码的参数名进行设置
                .usernameParameter("uname").passwordParameter("pwd")
                // 认证成功处理器
                .successHandler(new JsonAuthenticationSuccessHandler())
                .failureHandler(new JsonAuthenticationFailHandler());
        http.logout().logoutSuccessHandler(new JsonLogoutSucceessHandler());
        // 禁用csrf跨站请求伪造攻击防护
        http.csrf().disable();
        return http.build();
    }
}
八、获取用户认证信息
1. SecurityContextHolder
SpringSecurity学习(一)整体架构——1.3 SecurityContextHolder
 服务器端session默认为无操作后30分钟过期。
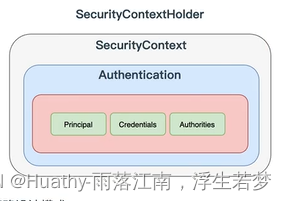
实际上SecurityContextHolder中存储的是SecurityContext,在SecurityContext中存储的是Authentication。
 这种设计模式,是典型的策略模式(适配器模式)。
// 这里只对关键部分代码做截取
package org.springframework.security.core.context;
public class SecurityContextHolder {
	public static final String MODE_THREADLOCAL = "MODE_THREADLOCAL";
	public static final String MODE_INHERITABLETHREADLOCAL = "MODE_INHERITABLETHREADLOCAL";
	public static final String MODE_GLOBAL = "MODE_GLOBAL";
	private static final String MODE_PRE_INITIALIZED = "MODE_PRE_INITIALIZED";
	private static void initialize() {
		initializeStrategy();
		initializeCount++;
	}
	private static void initializeStrategy() {
		if (MODE_PRE_INITIALIZED.equals(strategyName)) {
			Assert.state(strategy != null, "When using " + MODE_PRE_INITIALIZED
					+ ", setContextHolderStrategy must be called with the fully constructed strategy");
			return;
		}
		if (!StringUtils.hasText(strategyName)) {
			// Set default
			strategyName = MODE_THREADLOCAL;
		}
		if (strategyName.equals(MODE_THREADLOCAL)) {
			strategy = new ThreadLocalSecurityContextHolderStrategy(); return;
		}
		if (strategyName.equals(MODE_INHERITABLETHREADLOCAL)) {
			strategy = new InheritableThreadLocalSecurityContextHolderStrategy(); return;
		}
		if (strategyName.equals(MODE_GLOBAL)) {
			strategy = new GlobalSecurityContextHolderStrategy(); return;
		}
		// Try to load a custom strategy
	}
	public static void clearContext() {
		strategy.clearContext();
	}
	public static SecurityContext getContext() {
		return strategy.getContext();
	}
}
MODE_THREADLOCAL(默认存储策略)
本地线程策略,是将SecurityContext存放在ThreadLocal中。而ThreadLocal的特点是在哪个线程中存储,就在哪个线程中读取。由于默认情况下,一个请求无论经过多少Filter到达Servlet,都是由一个线程处理的,所以其实非常适合web应用。但如果在业务代码中开启了子线程,那么在子线程中是无法获取用户登录数据的。
MODE_INHERITABLETHREADLOCAL
这种存储模式,适用于多线程环境,如果希望在子线程中也能获取到用户登录数据,可以采用该种模式。
MODE_GLOBAL
这种存储模式实际上是将数据保存在一个静态变量中,在JavaWeb开发中,很少使用。
2. SecurityContextHolderStrategy
通过SecurityContextHolder可以得知,SecurityContextHolderStrategy接口用来定义存储策略方法。
public interface SecurityContextHolderStrategy {
	/**
	 * 清除存储的SecurityContext对象。Clears the current context.
	 */
	void clearContext();
	/**
	 * 获取存储的SecurityContext对象。Obtains the current context.
	 */
	SecurityContext getContext();
	/**
	 * 设置存储的SecurityContext对象。Sets the current context.
	 */
	void setContext(SecurityContext context);
	/**
	 * 创建一个空的SecurityContext对象。Creates a new, empty context implementation, for use by
	 */
	SecurityContext createEmptyContext();
}

3. 测试
- 修改HiController中的hi接口方法
@RestController
public class HiController {
    @RequestMapping("/hi")
    public String hi() {
        Authentication authentication = SecurityContextHolder.getContext().getAuthentication();
        System.out.println("身份信息:authentication.getPrincipal() = " + authentication.getPrincipal());
        System.out.println("权限信息:authentication.getAuthorities() = " + authentication.getAuthorities());
        System.out.println("凭证信息:authentication.getCredentials() = " + authentication.getCredentials());
        new Thread(()->{
            Authentication authentication1 = SecurityContextHolder.getContext().getAuthentication();
            System.out.println("子线程 - 身份信息: = " + authentication1);
        }).start();
        return "<h1>HI Spring Security</h1>";
    }
}
MODE_THREADLOCAL

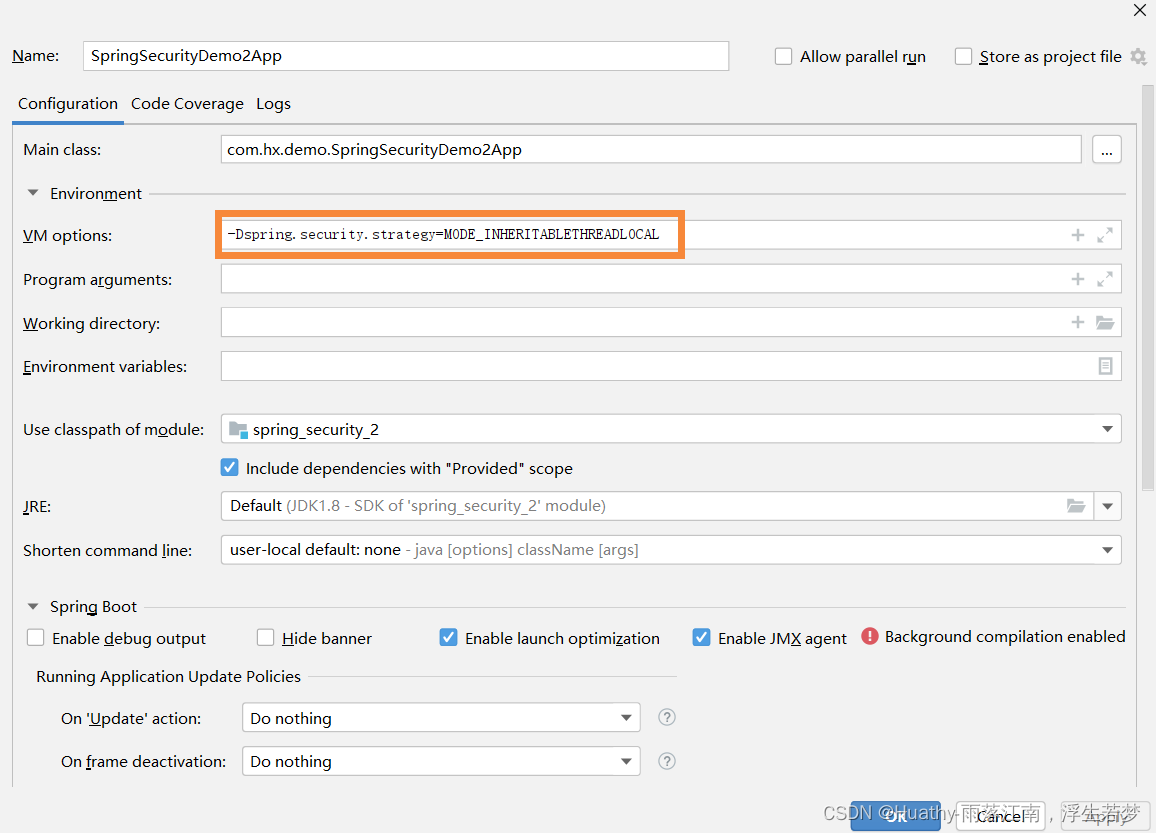
MODE_INHERITABLETHREADLOCAL
需要配置VM启动参数-Dspring.security.strategy=MODE_INHERITABLETHREADLOCAL
这种模式下,启动多线程,会拷贝父线程的数据

九、页面中获取用户认证信息
由于这是传统的web开发获取方式,这里只做简单的使用案例:
- 引入依赖
<dependency>
    <groupId>org.thymeleaf.extras</groupId>
    <artifactId>thymeleaf-extras-springsecurity5</artifactId>
    <version>3.0.4.RELEASE</version>
</dependency>
- 导入命名空间,与页面编写
<!-- @author:Huathy
@CSDN: https://blog.csdn.net/qq_40366738 -->
<!DOCTYPE html>
<html lang="en"
xmlns:th="http://www.thymeleaf.org"
xmlns:sec="http://www.thymeleaf.org/extras/spring-security"
>
<head>
<meta charset="UTF-8">
</head>
<body>
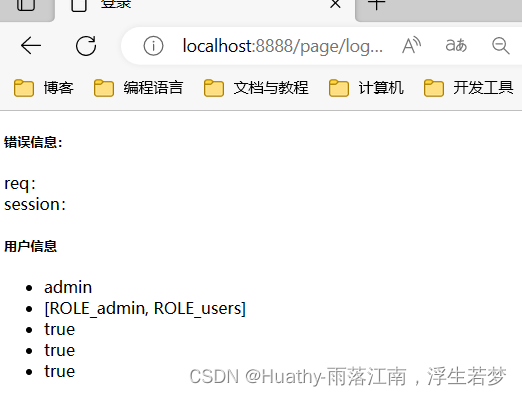
<h5>用户信息</h5>
<ul>
<li sec:authentication="principal.username"></li>
<li sec:authentication="principal.authorities"></li>
<li sec:authentication="principal.accountNonExpired"></li>
<li sec:authentication="principal.accountNonLocked"></li>
<li sec:authentication="principal.credentialsNonExpired"></li>
</ul>
</body>
</html>
- 访问:http://localhost:8888/page/logout.html
附:
- 本文所涉及源码地址:https://gitee.com/huathy/study-all


 938
938


 被折叠的 条评论
为什么被折叠?
被折叠的 条评论
为什么被折叠?
 到【灌水乐园】发言


