


会话管理
一、简介
当浏览器调用登录接口登录成功后,服务端与客户端建立会话,浏览器每次请求都会携带sessionId,服务端根据sessionId来判断用户身份。浏览器关闭后,服务端session不会自动销毁,需要开发者手动调用session销毁方法,或者等待session到期自动销毁。在springSecurity中,与HttpSession相关的功能由SessionManagementFilter和SessionAuthenticationStrategy接口来处理。SessionManagementFilter过滤器将Session相关操作委托给SessionAuthenticationStrategy接口完成。
二、会话并发管理
会话并发管理就是在当前系统中,同一个用户可以创建多少个会话(一个用户可以在多少设备同时登录)。默认情况下没有限制,但是开发者可以在SpringSecurity中对此进行限制。应用场景:单会话登录。
开启会话管理
修改SpringSecurityConfig配置
@EnableWebSecurity
public class SecurityConfig {
    @Bean
    public SecurityFilterChain securityFilterChain(HttpSecurity http) throws Exception {
        http.authorizeHttpRequests(req -> {
            req.anyRequest().authenticated();
        });
        http.formLogin();
        // 禁用csrf跨站请求伪造攻击防护
        http.csrf().disable();
        // 开启会话管理
        http.sessionManagement()
                // 允许最大会话1个客户端
                .maximumSessions(1);
        return http.build();
    }
    // session创建、销毁监听。这里不加上也可以实现。
    @Bean
    public HttpSessionEventPublisher httpSessionEventPublisher(){
        return new HttpSessionEventPublisher();
    }
}
 1. sessionManagement()用来开启会话管理、maximumSessions指定会话的并发数为1
2. HttpSessionEventPublisher提供一个HttpSessionEventPublisher实例。SpringSecurity通过一个Map来维护当前的HttpSession记录,当会话销毁时,就从集合中移除一条HttpSession记录。HttpSessionEventPublisher实现了HttpSessionListener接口,可以监听到HttpSession的创建和销毁时间,并将HttpSession的创建、销毁时间发布出去,这样当HttpSession销毁时,SpringSecurity就可以感知到该事件。
三、会话失效处理
1. 传统Web开发处理
@EnableWebSecurity
public class SecurityConfig {
    @Bean
    public SecurityFilterChain securityFilterChain(HttpSecurity http) throws Exception {
        http.authorizeHttpRequests(req -> {
            req.anyRequest().authenticated();
        });
        http.formLogin();
        // 禁用csrf跨站请求伪造攻击防护
        http.csrf().disable();
        // 开启会话管理
        http.sessionManagement()
                // 允许最大会话1个客户端
                .maximumSessions(1)
        // 当会话失效的跳转页面
        .expiredUrl("/login");
        return http.build();
    }
}
2. 前后端分离的会话失效处理
@EnableWebSecurity
public class SecurityConfig {
    @Bean
    public SecurityFilterChain securityFilterChain(HttpSecurity http) throws Exception {
        http.authorizeHttpRequests(req -> {
            req.anyRequest().authenticated();
        });
        http.formLogin();
        // 禁用csrf跨站请求伪造攻击防护
        http.csrf().disable();
        // 开启会话管理
        http.sessionManagement()
                // 允许最大会话1个客户端
                .maximumSessions(1)
                .expiredSessionStrategy(event -> {
                    HttpServletResponse response = event.getResponse();
                    response.setContentType(MediaType.APPLICATION_JSON_VALUE);
                    response.setCharacterEncoding("UTF-8");
                    Result result = Result.fail("当前会话已过期,请重新登录");
                    String resultStr = new ObjectMapper().writeValueAsString(result);
                    response.getWriter().println(resultStr);
                    response.flushBuffer();
                });
        return http.build();
    }
}
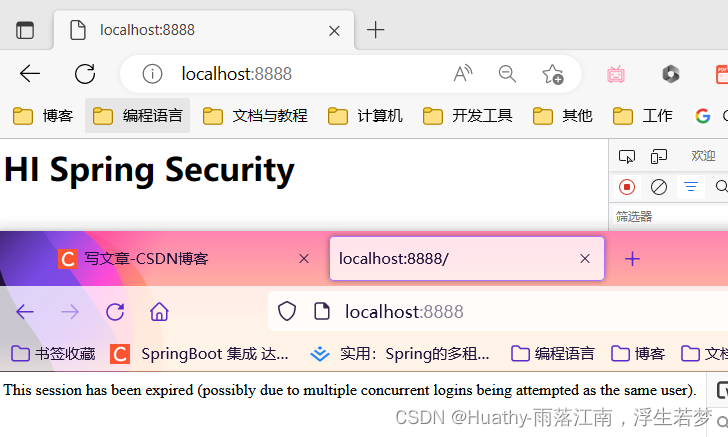
3. 禁止其他设备再次登录
默认的效果是一种被挤下线的效果,后面登录的用户会把前面的用户挤下线。SpringSecurity也支持禁止后来者登录,即一旦当前用户登录成功,后续无法再次是用相同的用户登录,直到当前用户主动注销。
底层实现:SpringSecurity底层在内存维护了一个Map结构,当用户在A设备登录后,会存入Map。当用户同时在B设备登录时,就会去判断是否已经登录。但是这种实现逻辑在分布式系统中存在问题。
// 开启会话管理
http.sessionManagement()
        // 允许最大会话1个客户端
        .maximumSessions(1)
        // 登录之后禁止重复登录
        .maxSessionsPreventsLogin(true)
        // 当会话失效的跳转页面
//        .expiredUrl("/login");
        .expiredSessionStrategy(event -> {
            HttpServletResponse response = event.getResponse();
            response.setContentType(MediaType.APPLICATION_JSON_VALUE);
            response.setCharacterEncoding("UTF-8");
            Result result = Result.fail("当前会话已过期,请重新登录");
            String resultStr = new ObjectMapper().writeValueAsString(result);
            response.getWriter().println(resultStr);
            response.flushBuffer();
        }) ;
4. 集群下会话共享的解决方案
前面所讲的会话管理都是基于单机的会话管理,如果是集群环境,前面所说的会话管理方案就会失效。此时可以使用spring-session结合redis实现session共享。
引入依赖
<dependency>
    <groupId>org.springframework.boot</groupId>
    <artifactId>spring-boot-starter-data-redis</artifactId>
</dependency>
<dependency>
    <groupId>org.springframework.session</groupId>
    <artifactId>spring-session-data-redis</artifactId>
</dependency>
修改SecurityConfig
@EnableWebSecurity
public class SecurityConfig {
    @Autowired
    private FindByIndexNameSessionRepository findByIndexNameSessionRepository;
    @Bean
    public SecurityFilterChain securityFilterChain(HttpSecurity http) throws Exception {
        http.authorizeHttpRequests(req -> {
            req.anyRequest().authenticated();
        });
        http.formLogin();
        // 禁用csrf跨站请求伪造攻击防护
        http.csrf().disable();
        http.logout();
        // 开启会话管理
        http.sessionManagement()
                // 允许最大会话1个客户端
                .maximumSessions(1)
                // 登录之后禁止重复登录
                .maxSessionsPreventsLogin(true)
                // 当会话失效的跳转页面
//        .expiredUrl("/login");
                // 指定将session交给谁管理
                .sessionRegistry(sessionRegistry())
                .expiredSessionStrategy(event -> {
                    HttpServletResponse response = event.getResponse();
                    response.setContentType(MediaType.APPLICATION_JSON_VALUE);
                    response.setCharacterEncoding("UTF-8");
                    Result result = Result.fail("当前会话已过期,请重新登录");
                    String resultStr = new ObjectMapper().writeValueAsString(result);
                    response.getWriter().println(resultStr);
                    response.flushBuffer();
                }) ;
        return http.build();
    }

    @Bean
    public SessionRegistry sessionRegistry() {
        return new SpringSessionBackedSessionRegistry<>(findByIndexNameSessionRepository);
    }

    // 如果指定了 .sessionRegistry(sessionRegistry()) 就不需要session发布了。否则循环依赖将无法启动
//    @Bean
//    public HttpSessionEventPublisher httpSessionEventPublisher() {
//        return new HttpSessionEventPublisher();
//    }
}
CSRF漏洞保护
一、CSRF漏洞保护简介
CSRF(Cross-Site Request Forgery跨站请求伪造)。
CSRF攻击是一种挟持用户在当前以登录的浏览器上发送恶意请求的攻击方法。相对于XSS(跨站脚本攻击)利用用户对指定网站的信任,CSRF是利用网站对用户浏览器的信任。简单说CSRF是攻击者通过技术手段欺骗用户浏览器,访问一个用户曾认证过的网站,并执行恶意请求,eg:发送邮件、消息、转账、购买。由于客户说已经在该网站认证,所以该网站会认为是真正的用户在操作。
1. 例子
假设嘻嘻登录了某银行APP进行转账操作,转账链接如下https://localhost:8888/withdraw?account=whx&mount=2000&for=dy,这时有个危险网站中的图片存在以下链接:
<img src="https://localhost:8888/withdraw?account=whx&mount=2000&for=huathy" />
一旦用户打开网站,图片链接将会自动发出,由于是同一个浏览器并且没有注销登录,所以请求会自动携带cookie有效信息。
2. 案例演示
在SecurityConfig配置中关闭csrf防御
@EnableWebSecurity
public class SecurityConfig {

    @Bean
    public SecurityFilterChain securityFilterChain(HttpSecurity http) throws Exception {
        http.authorizeHttpRequests(req -> {
            req.anyRequest().authenticated();
        });
        http.formLogin();
        // 禁用csrf跨站请求伪造攻击防护
        http.csrf().disable();
        http.logout();
        return http.build();
    }
}
编写服务
@RestController
public class HiController {
    @RequestMapping("/")
    public String hi() {
        return "<h1>HI Spring Security</h1>";
    }

    @RequestMapping("/withdraw")
    public String withdraw(String account, String amount, String forAccount) {
        return String.format("接收到请求参数 <br> account:%s <br> amount:%s<br> forAccount:%s", account, amount, forAccount);
    }
}
编写恶意页面(这里直接点击html在浏览器打开)
<!-- @author:Huathy
     @CSDN: https://blog.csdn.net/qq_40366738 -->
<!DOCTYPE html>
<html lang="en">
<head>
    <meta charset="UTF-8">
    <title>CSRF</title>
</head>
<body>
<form action="http://localhost:8888/withdraw">
    <input name="account" value="whx" type="hidden">
    <input name="amount" value="2000" type="hidden">
    <input name="forAccount" value="dy" type="hidden">
    <input type="submit" value=" click me ">
</form>
</body>
</html>
二、CSRF防御
CSRF攻击的根源在于浏览器默认的身份认证机制(自动携带当前网站的cookie信息),虽然该机制可以保证请求是来自用户的某个浏览器,但是无法确定这个请求用户是否授权。攻击者和用户发送的请求相同,意味着无法拒绝恶意攻击请求。如果能在合法请求中携带一个攻击者无法获取的参数,那么就可以区分二者请求,从而拒绝服务攻击请求。在SpringSecurity中提供了令牌同步模式机制来防御CSRF攻击。
1. 令牌同步模式
目前主流的CSRF攻击防御方案。具体的操作就是在每个HTTP请求中,除了默认自动携带的cookie参数,再提供一个安全的、随机生成的字符串,成为csrf令牌。这个csrf令牌由服务端生成,在httpSession中保存一份。每当请求到达,将携带的csrf令牌于服务端令牌比对,不相等则过滤该请求。
注意:一些外部站点链接到我们网站,故要求请求是幂等的,这样对于GET、HEAD、Options、Trace等方法没必要使用CSRF令牌,强行使用可能导致令牌泄露。
2. 开启csrf防御配置
@EnableWebSecurity
public class SecurityConfig {
    @Bean
    public SecurityFilterChain securityFilterChain(HttpSecurity http) throws Exception {
        http.authorizeHttpRequests(req -> {
            req.anyRequest().authenticated();
        });
        http.formLogin();
        // 禁用/开启csrf跨站请求伪造攻击防御
//         http.csrf().disable();
        http.csrf();
        http.logout();
        return http.build();
    }
}
测试查看index.html源码
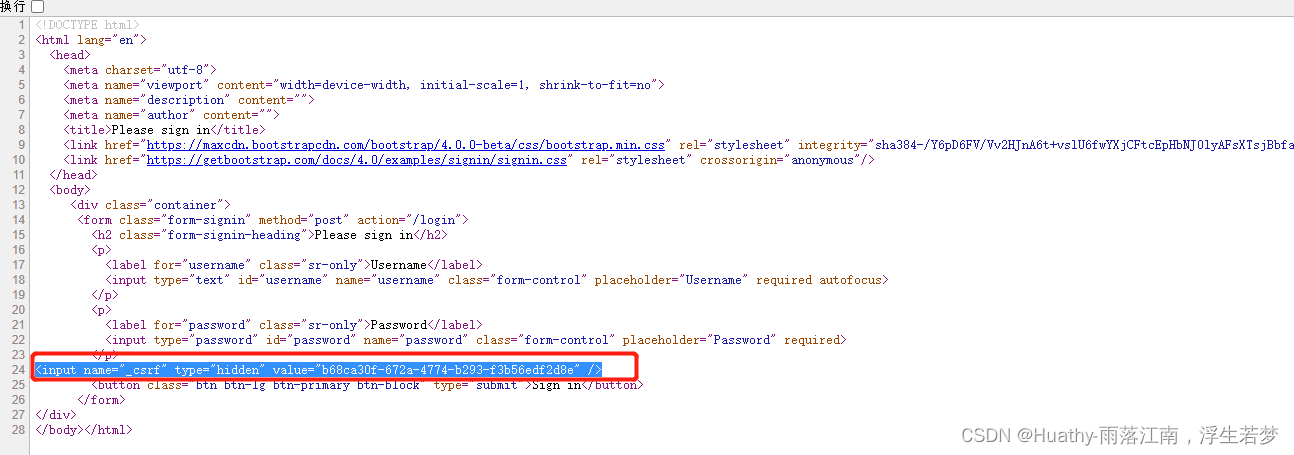
3. 前后端分离使用CSRF
在前后端不分离的系统中,csrf_token默认保存在session作用域。${_csrf.token}
前后端分离开发时,只需要将生成CSRF放入cookie中,并在请求时获取cookie中令牌信息进行提交即可。而请求时需要在header按照指定规则组装才可以验证通过。
修改CSRF存入Cookie
http.csrf().csrfTokenRepository(CookieCsrfTokenRepository.withHttpOnlyFalse());
详细代码:
@EnableWebSecurity
@Slf4j
public class SecurityConfig2_split {
    @Autowired
    private AuthenticationConfiguration authenticationConfiguration;

    @Bean
    public SecurityFilterChain securityFilterChain(HttpSecurity http) throws Exception {
        http.authorizeHttpRequests(req -> {
            req.anyRequest().authenticated();
        });
        http.formLogin();
        // 禁用/开启csrf跨站请求伪造攻击防御
//        http.csrf().disable();
        http.csrf()
                // 修改令牌存储机制,为cookie存储。csrf存入cookie。withHttpOnlyFalse允许前端获取。默认为session。
                .csrfTokenRepository(CookieCsrfTokenRepository.withHttpOnlyFalse());
        http.logout();
        log.info("  === 替换为了 loginFilter() ===  ");
        http.addFilterAt(loginFilter(), UsernamePasswordAuthenticationFilter.class);
        return http.build();
    }

    @Bean
    public LoginFilter loginFilter() throws Exception {
        log.info(" === loginFilter init  ===");
        LoginFilter loginFilter = new LoginFilter();
        //  指定接受json的用户名密码参数名称
        loginFilter.setFilterProcessesUrl("/dologin");
        loginFilter.setUsernameParameter("uname");
        loginFilter.setPasswordParameter("pwd");
        loginFilter.setAuthenticationManager(authenticationConfiguration.getAuthenticationManager());
        loginFilter.setAuthenticationSuccessHandler((req, resp, authentication) -> {
            Map<String, Object> resMap = new HashMap<>();
            resMap.put("用户信息", authentication.getPrincipal());
            resMap.put("authentication", authentication);
            Result result = Result.success(resMap);
            resp.setContentType("application/json;charset=UTF-8");
            String jsonData = new ObjectMapper().writeValueAsString(result);
            resp.setStatus(HttpStatus.OK.value());
            resp.getWriter().write(jsonData);
        });
        loginFilter.setAuthenticationFailureHandler((req, resp, exception) -> {
            Result result = Result.fail("登录失败", exception.getMessage());
            resp.setContentType("application/json;charset=UTF-8");
            String jsonData = new ObjectMapper().writeValueAsString(result);
            resp.getWriter().write(jsonData);
        });
        return loginFilter;
    }
}
测试
- 访问登陆页面查看cookie,获取csrfToken(XSRF-TOKEN)
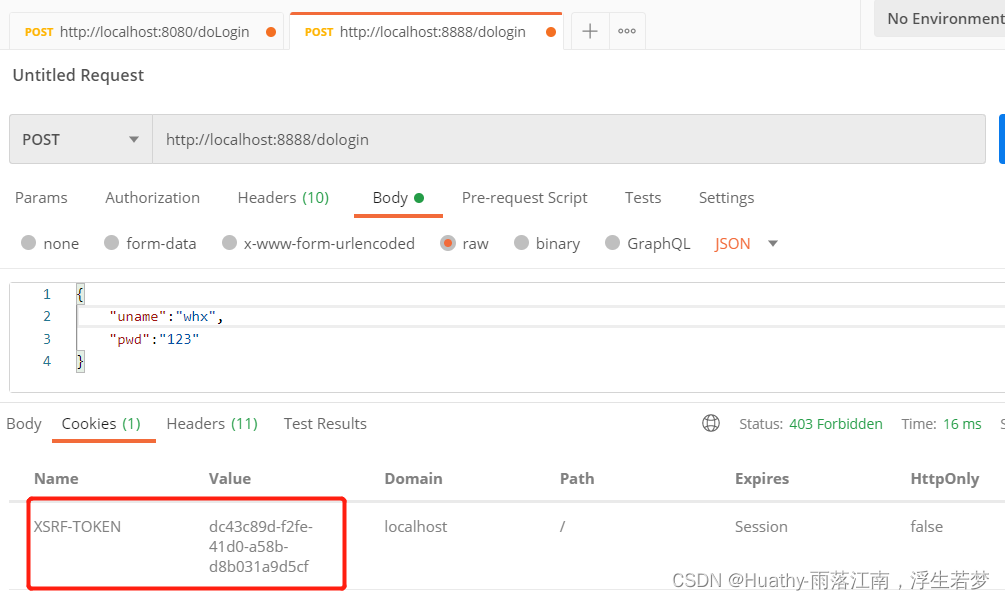
2. 携带令牌
- 在请求头带上csrfToken(X-XSRF-TOKEN)
 - 也可以在参数中携带令牌
key:"_csrf" value:"xxx"


 1276
1276


 被折叠的 条评论
为什么被折叠?
被折叠的 条评论
为什么被折叠?
 到【灌水乐园】发言


