


单测的分类
- 单元测试(Unit Testing)是一种软件开发中的测试方法,它的主要目的是确保软件中的最小可测试单元(通常是函数、方法或类)在被单独测试和验证时能够按照预期工作。尽管单元测试有很多优点,如提高代码质量、减少Bug、简化调试过程等,但它也存在一些缺点:
- 增加开发时间:如要求覆盖率到80%甚至90%,或者入参几十个难以构造,单测时间占比可能超过30%。
- 需要维护:随着代码的改变,特别是大规模的重构,单元测试也需要相应地更新和维护,增加开发的负担。
- 无法发现对其他类的影响:单元测试主要关注单个单元的行为,无法发现与多个单元交互或整个系统相关的问题。
- 按照接口、场景维度调用对应的方法。
- 优点有:
- 减少开发时间:mock框架搭起来后只需要构造入参、和个别新增的下游依赖。
- 维护成本低:接口内部的重构不会影响到单测的入参和出参。
- 可以发现对其他类的影响:一次调用涉及到多个类,可以测出对其他类甚至其他接口的影响。
- 缺点有:
- 分支逻辑覆盖困难。如果接口涉及10个串联的类,每个类有2个分支,则需要构造1024个入参,远超方法维度单测的20个。
- 优点有:
- 所以最好能同时使用两种单测,做到优势互补。
- 方法的单测:覆盖入参少、业务分支多的场景。
- 接口、场景的单测:覆盖主干接口。
方法的单测
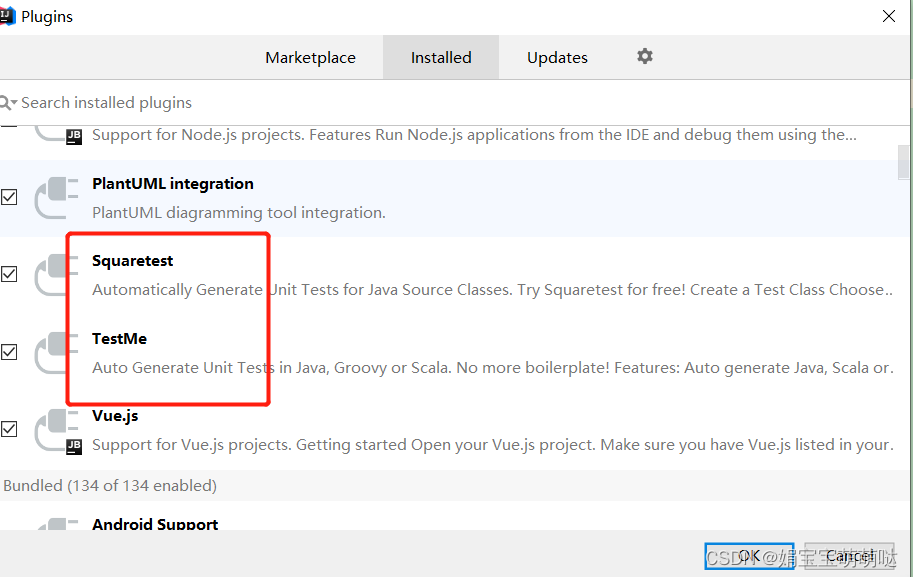
推荐用更智能的squaretest生成单测模板后,手工调整。
生成工具的对比
- squaretest
- 优点:
- 生成测试用例相对智能,自动生成入参、覆盖部分if分支。
- 缺点:
- 只有30天的免费试用期,之后需要付费使用。事实上点掉reminder后可以继续使用。
- 优点:
- TestMe
- 优点:
- 简单易用,适合初学者或小型项目使用。
- 缺点:
- 生成的测试用例不够全面或深入, 需要手动填充输入参数、写分支逻辑。
- 优点:
- EvoSuite
- 优点:
- 作为Maven插件使用,方便集成到Java项目中。
- 缺点:
- 社区支持相对较少,遇到问题时可能难以得到及时帮助。
- 配置和使用可能相对复杂,需要一定的学习成本,如需要引入groovy等外部依赖
- 优点:
- diffblue
- 优点:
- 与IntelliJ IDEA集成良好,使用方便。
- 支持多种编程语言和框架。
- 缺点:
- 商用版本收费较高,对于个人用户或小型团队可能不太友好。
- 生成单测较慢,一个类近1Min。
- 优点:
生成步骤
-
安装插件
-
引入依赖
    <dependency>
      <groupId>org.springframework.boot</groupId>
      <artifactId>spring-boot-starter-test</artifactId>
      <version>2.1.1.RELEASE</version>
    </dependency>
    <dependency>
      <groupId>org.junit.jupiter</groupId>
      <artifactId>junit-jupiter</artifactId>
      <version>5.8.2</version>
    </dependency>
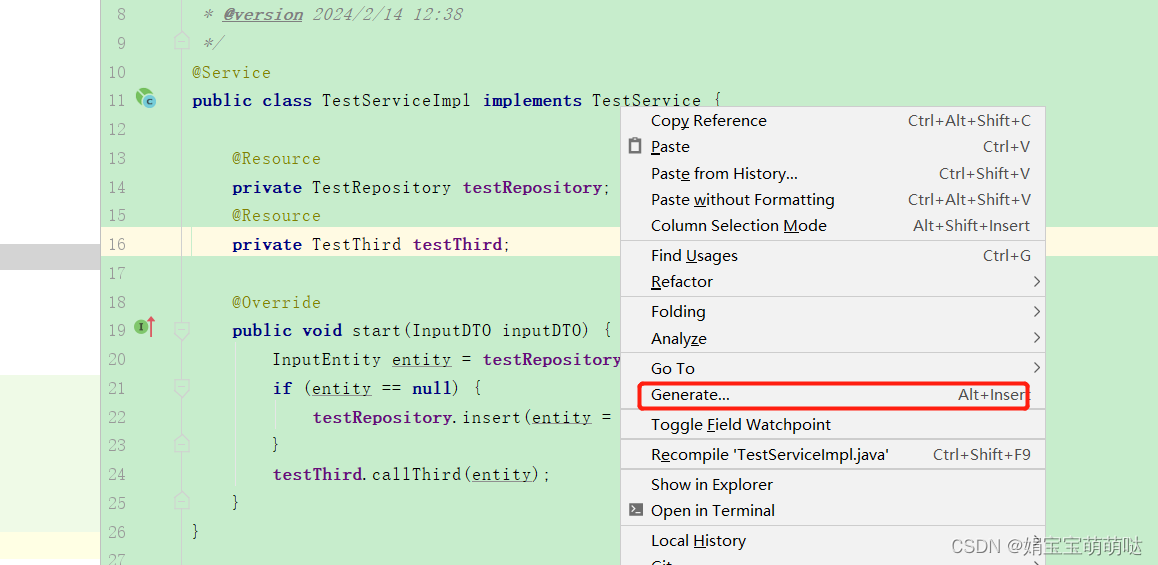
- 编写业务代码
@Service
public class TestServiceImpl implements TestService {

    @Resource
    private TestRepository testRepository;
    @Resource
    private TestThird testThird;

    @Override
    public void start(InputDTO inputDTO) {
        if (testRepository.select(inputDTO.getId())==null) {
            testRepository.insert(new InputEntity());
        }
        testThird.callThird(new InputEntity());
    }
}
- 生成单测
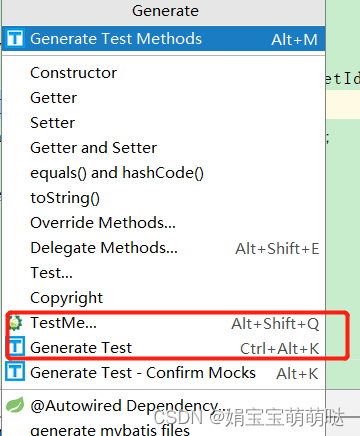
- 单测生成结果
class TestServiceImplTestSquaretest {

    @Mock
    private TestRepository mockTestRepository;
    @Mock
    private TestThird mockTestThird;

    @InjectMocks
    private TestServiceImpl testServiceImplUnderTest;

    @BeforeEach
    void setUp() {
        initMocks(this);
    }

    @Test
    void testStart() {
        // Setup
        final InputDTO inputDTO = new InputDTO();
        inputDTO.setName("name");
        inputDTO.setId(0);
        final InputDetail inputDetail = new InputDetail();
        inputDetail.setName("name");
        inputDTO.setInputDetail(inputDetail);

        // Configure TestRepository.select(...).
        final InputEntity inputEntity = new InputEntity();
        inputEntity.setId(0);
        inputEntity.setName("name");
        when(mockTestRepository.select(0)).thenReturn(inputEntity);

        // Run the test
        testServiceImplUnderTest.start(inputDTO);

        // Verify the results
        verify(mockTestThird).callThird(any(InputEntity.class));
    }

    @Test
    void testStart_TestRepositorySelectReturnsNull() {
        // Setup
        final InputDTO inputDTO = new InputDTO();
        inputDTO.setName("name");
        inputDTO.setId(0);
        final InputDetail inputDetail = new InputDetail();
        inputDetail.setName("name");
        inputDTO.setInputDetail(inputDetail);

        when(mockTestRepository.select(0)).thenReturn(null);

        // Run the test
        testServiceImplUnderTest.start(inputDTO);

        // Verify the results
        verify(mockTestRepository).insert(any(InputEntity.class));
        verify(mockTestThird).callThird(any(InputEntity.class));
    }
}
class TestServiceImplTestTestMe {

    @Mock
    TestRepository testRepository;
    @Mock
    TestThird testThird;
    @InjectMocks
    TestServiceImpl testServiceImpl;

    @BeforeEach
    void setUp() {
        MockitoAnnotations.initMocks(this);
    }

    @Test
    void testStart() {
        when(testRepository.select(anyInt())).thenReturn(new InputEntity());
        when(testRepository.insert(any())).thenReturn(Integer.valueOf(0));

        testServiceImpl.start(new InputDTO());
    }
}
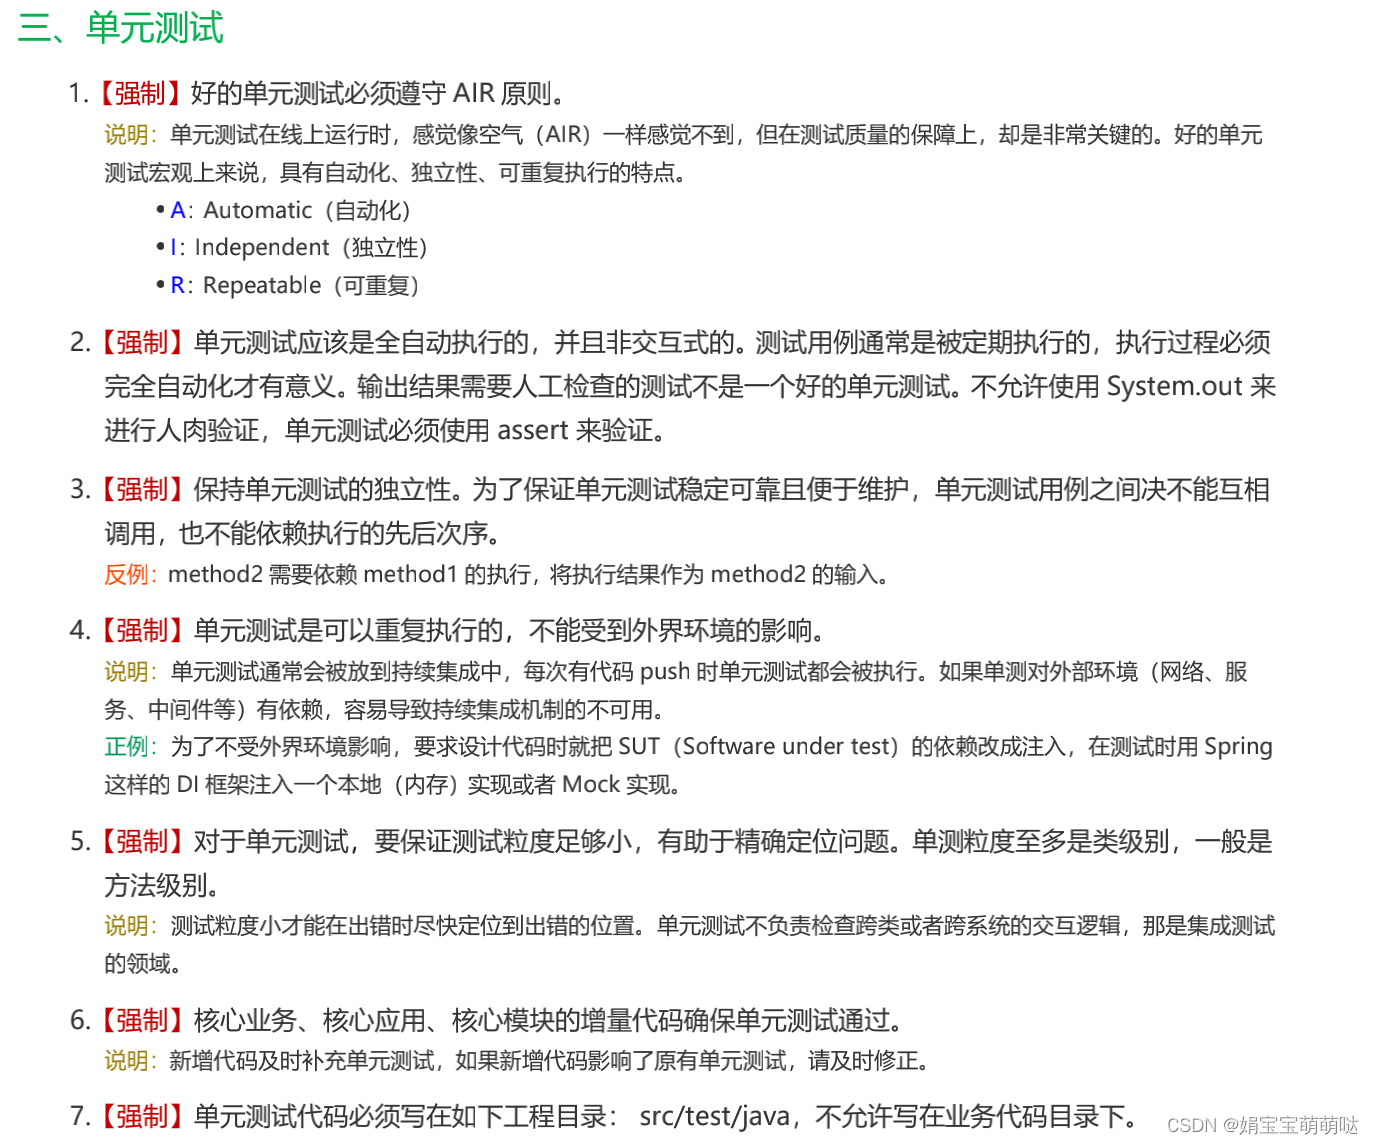
单测规范
接口的单测
mock步骤
mock外部依赖,启动容器,调用接口
- 编写外部依赖的mock类
@Service
public class TestThirdImpl implements TestThird {

    @Override
    public void callThird(InputEntity entity) {
        System.out.println("TestThirdImpl callThird");
    }
}
//mock
public class TestThirdMockImpl implements TestThird {

    public void callThird(InputEntity entity) {
        System.out.println("TestThirdMockImpl callThird");
    }
}
- 替换容器中的beanDefinition
@Configuration
public class MockConfig {

    @Bean
    public BeanDefinitionRegistryPostProcessor beanDefinitionRegistryPostProcessor() {
        return new BeanDefinitionRegistryPostProcessor() {
            @Override
            public void postProcessBeanDefinitionRegistry(BeanDefinitionRegistry registry) throws BeansException {
                //移除依赖的bean
                registry.removeBeanDefinition("testThirdImpl");
                //获取Mockbean的定义
                BeanDefinition beanDe = BeanDefinitionBuilder.rootBeanDefinition(TestThirdMockImpl.class).getBeanDefinition();
                //注册mockbean
                registry.registerBeanDefinition("testThirdImpl", beanDe);
            }

            @Override
            public void postProcessBeanFactory(ConfigurableListableBeanFactory beanFactory) throws BeansException {

            }
        };
    }
}
- test模块中启动容器,并调用入口方法
@RunWith(SpringJUnit4ClassRunner.class)
@SpringBootTest(classes = TestApplication.class)
public class TestApplicationTest {

    @Resource
    private TestService testService;

    @Test
    public void start() {
        testService.start(new InputDTO());
    }

}
部分依赖mock的方式
- 数据库。用h2数据库mock。
public class MockDataSource extends HikariDataSource {

    public MockDataSource() {
        this.setDriverClassName("org.h2.Driver");
        this.setJdbcUrl("jdbc:h2:mem:test;DB_CLOSE_DELAY=-1;MODE=MySQL;");
        this.setRegisterMbeans(true);
        this.setPoolName("mock");
    }
}
场景的单测
将接口单测组合
@RunWith(SpringJUnit4ClassRunner.class)
@SpringBootTest(classes = TestApplication.class)
public class TestApplicationTest {

    @Resource
    private TestService testService;

    @Test
    public void start() {
        testService.start(new InputDTO());
        testService.end(new InputDTO());
    }

}
参考
- 告别加班/解放双手提高单测覆盖率之Java 自动生成单测代码神器推荐
- 单元测试 - 单元测试集成方案
- JUnit 5 User Guide
- 关于testNG和JUnit的对比
- JUnit 5 单元测试教程
- Junit5文档
- 单元测试自动生成工具EvoSuite的简单使用
- 使用BeanDefinitionRegistryPostProcessor动态注入BeanDefinition
- 使用h2数据库支持单元测试
- 使用H2数据库来模拟进行单元测试
- H2官网
- 关于springboot项目(@SpringBootTest单元测试类)找不到配置文件问题
- Run Both JUnit 4 and Junit5 With Maven Surefire Plugin
- 解决 Spring Boot 启动时 TypeNotPresentExceptionProxy / ArrayStoreException 异常
- Maven的单元测试没有执行的问题


 416
416


 被折叠的 条评论
为什么被折叠?
被折叠的 条评论
为什么被折叠?
 到【灌水乐园】发言


