


接上篇:《APIsix 实操秘籍:基础概念入门篇(上)》
链接: link
文章目录
2、核心概念
2.2、关键术语
2.2.12、Secret
密钥是指 APISIX 运行过程中所需的任何敏感信息,它可能是核心配置的一部分(如 etcd 的密码),也可能是插件中的一些敏感信息。APISIX 中常见的密钥类型包括:
- 一些组件(etcd、Redis、Kafka 等)的用户名、密码
- 证书的私钥
- API 密钥
- 敏感的插件配置字段,通常用于身份验证、hash、签名或加密
APISIX Secret 允许用户在 APISIX 中通过一些密钥管理服务(Vault 等)来存储密钥,在使用的时候根据 key 进行读取,确保密钥在整个平台中不以明文的形式存在。
其工作原理如图所示:
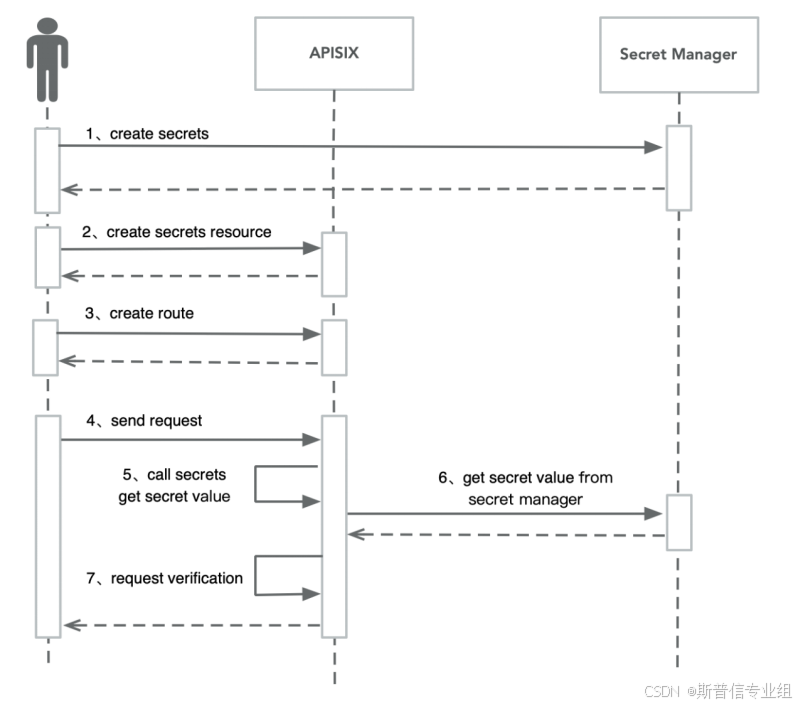
APISIX 目前支持通过以下方式存储密钥:
- 环境变量
- HashiCorp Vault
你可以在以下插件的 consumer 配置中通过指定格式的变量来使用 APISIX Secret 功能,比如 key-auth 插件。
如果某个配置项为:key: "$ENV://ABC",当 APISIX Secret 中没有检索到 $ENV://ABC 对应的真实值,那么 key 的值将是 "$ENV://ABC" 而不是 nil。
2.2.12.1 使用环境变量管理密钥
使用环境变量来管理密钥意味着你可以将密钥信息保存在环境变量中,在配置插件时通过特定格式的变量来引用环境变量。APISIX 支持引用系统环境变量和通过 Nginx env 指令配置的环境变量。
引用方式:
$ENV://$env_name/$sub_key
- env_name: 环境变量名称
- sub_key: 当环境变量的值是 JSON 字符串时,获取某个属性的值
如果环境变量的值是字符串类型,如:
export JACK_AUTH_KEY=abc
则可以通过如下方式引用:
$ENV://JACK_AUTH_KEY
如果环境变量的值是一个 JSON 字符串,例如:
export JACK={"auth-key":"abc","openid-key": "def"}
则可以通过如下方式引用:
# 获取环境变量 JACK 的 auth-key
$ENV://JACK/auth-key
# 获取环境变量 JACK 的 openid-key
$ENV://JACK/openid-key
在 key-auth 插件中使用:
第一步:APISIX 实例启动前创建环境变量
export JACK_AUTH_KEY=abc
第二步:在 key-auth 插件中引用环境变量
curl http://127.0.0.1:9180/apisix/admin/consumers \
-H 'X-API-KEY: edd1c9f034335f136f87ad84b625c8f1' -X PUT -d '
{
    "username": "jack",
    "plugins": {
        "key-auth": {
            "key": "$ENV://JACK_AUTH_KEY"
        }
    }
}'
通过以上步骤,可以将 key-auth 插件中的 key 配置保存在环境变量中,而不是在配置插件时明文显示。
2.2.12.2 使用 Vault 管理密钥
使用 Vault 来管理密钥意味着你可以将密钥信息保存在 Vault 服务中,在配置插件时通过特定格式的变量来引用。APISIX 目前支持对接 Vault KV 引擎的 V1 版本。
引用方式:
$secret://$manager/$id/$secret_name/$key
- manager: 密钥管理服务,可以是 Vault、AWS 等
- APISIX Secret 资源 ID,需要与添加 APISIX Secret 资源时指定的 ID 保持一致
- secret_name: 密钥管理服务中的密钥名称
- key:密钥管理服务中密钥对应的 key
在 key-auth 插件中使用:
第一步:在 Vault 中创建对应的密钥,可以使用如下命令:
vault kv put apisix/jack auth-key=value
第二步:通过 Admin API 添加 Secret 资源,配置 Vault 的地址等连接信息:
curl http://127.0.0.1:9180/apisix/admin/secrets/vault/1 \
-H 'X-API-KEY: edd1c9f034335f136f87ad84b625c8f1' -X PUT -d '
{
    "uri": "https://127.0.0.1:8200",
    "prefix": "apisix",
    "token": "root"
}'
如果使用 APISIX Standalone 版本,则可以在 apisix.yaml 文件中添加如下配置:
secrets:
  - id: vault/1
    prefix: apisix
    token: root
    uri: 127.0.0.1:8200
第三步:在 key-auth 插件中引用 APISIX Secret 资源,填充秘钥信息:
curl http://127.0.0.1:9180/apisix/admin/consumers \
-H 'X-API-KEY: edd1c9f034335f136f87ad84b625c8f1' -X PUT -d '
{
    "username": "jack",
    "plugins": {
        "key-auth": {
            "key": "$secret://vault/1/jack/auth-key"
        }
    }
}'
通过上面两步操作,当用户请求命中 key-auth 插件时,会通过 APISIX Secret 组件获取到 key 在 Vault 中的真实值。
2.3、APIsix配置文件
apisix:
  node_listen: 9080              # APISIX的启动端口
  enable_admin: true             # 是否启用admin
  enable_admin_cors: true         # 允许CORS访问
  enable_debug: false             # debug模式
  enable_dev_mode: false          # True的时候nginx只会启动一个worker进程
  enable_reuseport: true          # True的时候nginx配置启动SO_REUSEPORT.
  enable_ipv6: true				  # ipv6
  config_center: etcd             # etcd: 使用etcd做配置同步
                                  # yaml: 获取 `/usr/local/apisix/conf/apisix.yaml` 以同步配置
  #proxy_protocol:                 # 代理协议配置
  #  listen_http_port: 9181    # 具有http代理协议的端口
  #  listen_https_port: 9182       #  具有https代理协议的端口
#  enable_tcp_pp: true           # 为tcp代理启用代理协议,它适用于stream_proxy。
  #  enable_tcp_pp_to_upstream: true # 启用上游服务器的代理协议
  proxy_cache:                     #代理缓存配置
    cache_ttl: 10s                 # 如果上游未指定缓存时间,则为默认缓存时间    zones:                         # 缓存参数
    - name: disk_cache_one         # 在管理api中按名称使用哪个缓存
      memory_size: 50m             # 共享内存的大小,用于存储缓存索引      disk_size: 1G                # 磁盘的大小,用于存储缓存数据
      disk_path: "/tmp/disk_cache_one"
      cache_levels: "1:2"           # 缓存的层次结构级别
  #  - name: disk_cache_two
  #    memory_size: 50m
  #    disk_size: 1G
  #    disk_path: "/tmp/disk_cache_two"
  #    cache_levels: "1:2"

  allow_admin:                  # 参考http://nginx.org/en/docs/http/ngx_http_access_module.html#allow
    - 192.168.0.0/16              # 如果列表为空, 所有ip都能接受(笔者测试失败)
    - 127.0.0.0/16

  #   - "::/64"					 # ipv6配置
  # port_admin: 9180              # use a separate port
  # https_admin: true             # 使用https协议访问admin, apisix默认会读取conf/apisix_admin_api.crt和conf/apisix_admin_api.key作为证书.
  admin_api_mtls:               # 以下配置与port_admin和https_admin相关
    admin_ssl_cert: ""             # 自签名服务器端证书路径
    admin_ssl_cert_key: ""         # 自签名服务器端密钥路径
    admin_ssl_ca_cert: ""          # 自签名CA证书路径.CA用来签名所有admin api调用者的证书

  # 使用admin api所用的默认token
  # 注意: 为了保护admin API, 强烈建议更改这个值
  # 关闭这个配置意味着admin api不需要任何认证
  admin_key:
    -
      name: "admin"
      key: edd1c9f034335f136f87ad84b625c8f1
      role: admin                 # admin: 管理所有的配置数据
                                  # viewer: 只能查看所有的配置数据
    -
      name: "viewer"
      key: 4054f7cf07e344346cd3f287985e76a2
      role: viewer

  delete_uri_tail_slash: false    # delete the '/' at the end of the URI
  router:
    http: 'radixtree_uri'         # radixtree_uri: 基于基数树的uri匹配
                                  # radixtree_host_uri: 基于基数树的uri+host匹配
    ssl: 'radixtree_sni'          # radixtree_sni: 基于基数树的sni匹配
  # stream_proxy:                 # TCP/UDP proxy TCP/UDP代理, 下不详述
  #   tcp:                        # TCP proxy port list
  #     - 9100
  #     - 9101
  #   udp:                        # UDP proxy port list
  #     - 9200
  #     - 9211
  # dns_resolver:                   # If not set, read from `/etc/resolv.conf`
  #  - 1.1.1.1
  #  - 8.8.8.8
  dns_resolver_valid: 30          # dns结果有效时间30s
  resolver_timeout: 5             # 解析超时时间
  ssl:
    enable: true
    enable_http2: true
     listen_port: 9443
    ssl_protocols: "TLSv1.2 TLSv1.3"
    ssl_ciphers: "ECDHE-ECDSA-AES128-GCM-SHA256:ECDHE-RSA-AES128-GCM-SHA256:ECDHE-ECDSA-AES256-GCM-SHA384:ECDHE-RSA-AES256-GCM-SHA384:ECDHE-ECDSA-CHACHA20-POLY1305:ECDHE-RSA-CHACHA20-POLY1305:DHE-RSA-AES128-GCM-SHA256:DHE-RSA-AES256-GCM-SHA384"
    key_encrypt_salt: "edd1c9f0985e76a2"    #  如果不设置, 会保留原始的ssl key到etcd
                                            #  如果设置了, 必须是长度为16的字符串, 并且该字符串会对ssl key 以AES-128-CBC算法加密
                                            #  !!! 千万不要在保存ssl之后更改, 否则将不能解密保存的ssl keys !!
#  discovery: eureka               # 服务发现中心
nginx_config:                     # 用以渲染生成nginx_config.conf模板的配置
  error_log: "logs/error.log"
  error_log_level: "warn"         # warn,error可选值
  worker_rlimit_nofile: 20480     # 每个worker process可以打开的文件数量, 应当大于worker_connections
  worker_shutdown_timeout: 240s     # 正常关闭worker进程的超时时间
  event:
    worker_connections: 10620
  http:
    access_log: "logs/access.log"
    keepalive_timeout: 60s         # keep-alive 客户端连接在服务端的超时时间
    client_header_timeout: 60s     # 读取客户端请求头的超时事件, 一旦超时, 返回408给客户端
    client_body_timeout: 60s       # 读取客户端请求体的超时事件, 一旦超时, 返回408给客户端
    send_timeout: 10s              # 发送响应给客户端的超时时间, 超时之后, 连接会被关闭
    underscores_in_headers: "on"   # 默认允许在请求头中使用下划线
    real_ip_header: "X-Real-IP"    # 参考http://nginx.org/en/docs/http/ngx_http_realip_module.html#real_ip_header
    real_ip_from:                  # 参考http://nginx.org/en/docs/http/ngx_http_realip_module.html#set_real_ip_from
      - 127.0.0.1
      - 'unix:'
    #lua_shared_dicts:              # 在nginx.conf中添加定制的共享缓存, 定制共享缓存的格式是:`cache-key: cache-size`
    #  ipc_shared_dict: 100m

etcd:
  host:                           #可以定义同一etcd集群的多个etcd主机地址。
    - "http://127.0.0.1:2379"     # 多个etcd地址
  prefix: "/apisix"               # apisix 配置前缀
  timeout: 30                     # 30 seconds
  # user: root                     # root username for etcd
  # password: 5tHkHhYkjr6cQY        # root password for etcd
#eureka:
#  host:                           # 可以在同一个erueka集群中定义多个eureka地址
#    - "http://127.0.0.1:8761"
#  prefix: "/eureka/"
#  fetch_interval: 30              # 默认获取间隔30秒
#  weight: 100                     # 默认weight 100
#  timeout:
#    connect: 2000                 # 默认 2000ms
#    send: 2000                    # 默认 2000ms
#    read: 5000                    # 默认 5000ms

plugins:                          # apisix可使用的插件列表
  - example-plugin
  - limit-req
  - limit-count
  - limit-conn
  - key-auth
  - basic-auth
  - prometheus
  - node-status
  - jwt-auth
  - zipkin

stream_plugins:							# apisix可使用的流插件
  - mqtt-proxy

更改配置完成之后使用命令 apisix reload 使配置生效, 或者apisix stop; apisix start 重新启动apisix
3、开启APIsix之旅
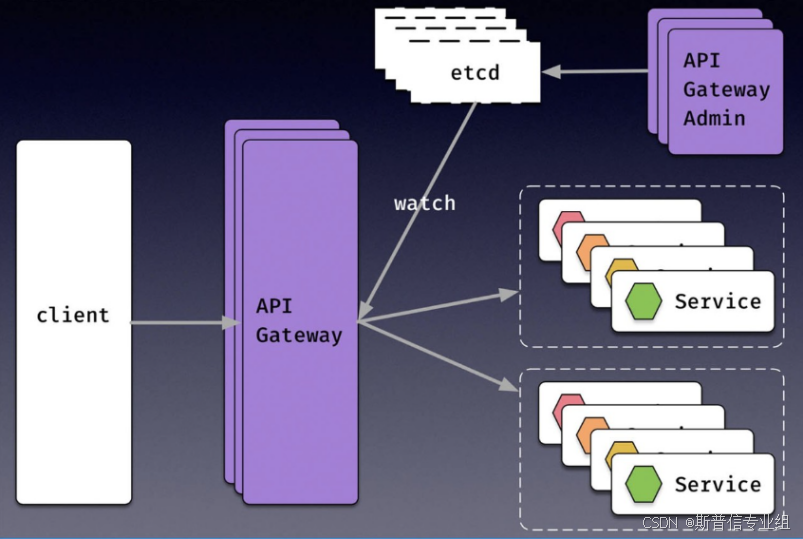
3.1、APISIX 网关高可用部署架构图
使用多etcd节点确保数据高可用存储
3.2、裸金属部署
部署ETCD
wget https://github.com/etcd-io/etcd/releases/download/v3.4.13/etcd-v3.4.13-linux-amd64.tar.gz
tar -xvf etcd-v3.4.13-linux-amd64.tar.gz && \
cd etcd-v3.4.13-linux-amd64 && \
sudo cp -a etcd etcdctl /usr/bin/
# add OpenResty source
sudo yum install yum-utils
sudo yum-config-manager --add-repo https://openresty.org/package/centos/openresty.repo
# install OpenResty and some compilation tools
sudo yum install -y openresty curl git gcc openresty-openssl-devel unzip
# install LuaRocks
curl https://raw.githubusercontent.com/apache/apisix/master/utils/linux-install-luarocks.sh -sL | bash -
# start etcd server
nohup etcd &
# 防火墙关闭
systemctl stop firewalld.service
systemctl disable firewalld.service
setenforce 0
sed -i 's/SELINUX=enforcing/SELINUX=disabled/' /etc/selinux/config
•
部署APIsix
$ mkdir apisix-2.3
$ wget https://archive.apache.org/dist/apisix/2.3/apache-apisix-2.3-src.tgz
$ tar zxvf apache-apisix-2.3-src.tgz -C apisix-2.3
安装依赖包•
$ make deps
检查版本•
$ ./bin/apisix version
如果报错:ERROR: Please check the version of OpenResty and Lua, OpenResty 1.19 + LuaJIT or OpenResty before 1.19 + Lua 5.1 is required for Apache APISIX.
解决:wget https://openresty.org/download/openresty-1.19.3.2.tar.gz
tar -xf openresty-1.19.3.2.tar.gz
./configure --prefix=/usr/local/openresty --with-http_stub_status_module
gmake && gmake install
启动服务•
$ ./bin/apisix start
部署Dashboard
https://github.com/apache/apisix-dashboard
https://github.com/apache/apisix-dashboard/blob/master/docs/en/latest/deploy.md
•
web依赖安装
node安装
https://nodejs.org/en/download/
•
yarn 安装
https://yarnpkg.com/getting-started/install
•
克隆工程
git clone -b v2.4 https://github.com/apache/apisix-dashboard.git
编译
cd apisix-dashboard
make build
启动服务
cd output
./manager-api
nohup ./manager-api &
通过浏览器进行访问
•
http://ip:9080
3.3、Docker部署
克隆项目
#将 Apache APISIX 的 Docker 镜像下载到本地
git clone https://github.com/apache/apisix-docker.git
# 将当前的目录切换到 apisix-docker/example 路径下
cd apisix-docker/example
# 运行 docker-compose 命令,安装 Apache APISIX
docker-compose -p docker-apisix up -d
Apache APISIX 已支持 ARM64 架构。如果您正在使用 ARM64,请在最后一步执行 docker-compose -p docker-apisix -f docker-compose-arm64.yml up -d。
http://ip:9080
3.4、Helm部署apisix
通过 Helm 安装 APISIX
helm repo add apisix https://charts.apiseven.com
helm repo update
helm pull apisix apisix/apisix
修改apisix副本数量和管理员API凭据
vim values.yaml
- 修改Values.admin.credentials.admin参数,建议修改 Admin API 的 key,保护 APISIX 的安全。
- Values.apisix.replicaCount参数,默认apisix副本数为1,修改为3
3.5、升级迁移指南
3.5.1、升级规划及数据迁移方案
Etcd备份恢复迁移
恢复集群首先需要来自etcd成员的键空间的快照。快速可以是用etcdctl snapshot save命令从活动成员获取,或者是从etcd数据目录复制member/snap/db文件. 例如,下列命令快照在$ENDPOINT上服务的键空间到文件 snapshot.db:
etcdctl --endpoints $ENDPOINT snapshot save snapshot.db
为了恢复集群,需要的只是一个简单的快照 “db” 文件。使用 etcdctl snapshot restore 的集群恢复创建新的 etcd 数据目录;所有成员应该使用相同的快照恢复。恢复覆盖某些快照元数据(特别是,成员ID和集群ID);成员丢失它之前的标识。这个元数据覆盖防止新的成员不经意间加入已有的集群。因此为了从快照启动集群,恢复必须启动一个新的逻辑集群。
在恢复时快照完整性的检验是可选的。如果快照是通过 etcdctl snapshot save 得到的,它将有一个被 etcdctl snapshot restore 检查过的完整性hash。如果快照是从数据目录复制而来,没有完整性hash,因此它只能通过使用 --skip-hash-check 来恢复。
恢复初始化新集群的新成员,带有新的集群配置,使用 etcd 的集群配置标记,但是保存 etcd 键空间的内容。继续上面的例子,下面为一个3成员的集群创建新的 etcd 数据目录(m1.etcd, m2.etcd, m3.etcd):
etcdctl snapshot restore snapshot.db \
--name m1 \
--initial-cluster m1=http:/host1:2380,m2=http://host2:2380,m3=http://host3:2380 \
--initial-cluster-token etcd-cluster-1 \
--initial-advertise-peer-urls http://host1:2380
etcdctl snapshot restore snapshot.db \
--name m2 \
--initial-cluster m1=http:/host1:2380,m2=http://host2:2380,m3=http://host3:2380 \
--initial-cluster-token etcd-cluster-1 \
--initial-advertise-peer-urls http://host2:2380
etcdctl snapshot restore snapshot.db \
--name m3 \
--initial-cluster m1=http:/host1:2380,m2=http://host2:2380,m3=http://host3:2380 \
--initial-cluster-token etcd-cluster-1 \
--initial-advertise-peer-urls http://host3:2380
3.5.2、Kstone大规模etcd集群治理
Kstone 通用的 etcd 治理开源项目,Kstone 项目拥有诸多特性:
- 集群管理:Kstone 不仅支持关联已有集群,而且内置了一个高级版的 kstone-etcd-operator, 它将可以帮助你在 K8s 集群上高可靠的部署 etcd 集群。所以,无论你是存量的 Kubernetes 的 etcd 集群管理诉求,还是你希望创建新的 etcd 集群提供给注册中心、APISIX 网关、配置存储等业务场景使用,kstone 都可以实现以上各类场景的 etcd 集群管理。
- 集群巡检:Kstone 项目沉淀了腾讯内部大规模的etcd集群治理经验,提供了丰富的集群巡检策略,如数据一致性、资源对象数、健康度、热点Key、db满等策略,将帮助你及时发现隐患,提升 etcd 集群稳定性。
- 数据备份:Kstone 提供分钟级的 etcd 数据备份能力,支持将数据备份到腾讯云 COS 等对象存储。同时,我们还支持通过 kstone-etcd-operator 创建 Learner 实现数据跨城热备。
- 集群监控:Kstone 支持集群关联和创建时自动开启监控,内置了丰富的 grafana metrics 视图,将帮助你提高定位问题效率。
- 数据迁移:Kstone 将提供大规模 etcd 集群数据自动迁移能力,并支持多种迁移算法(etcd v2版本到v3版本,etcd v3 版本到 v3 版本,冷迁移,热迁移等)。自动化迁移能力,将帮助你大幅提升集群稳定性。
- 智能诊断:Kstone 将提供 etcd 集群诊断诊断功能,为你分析集群各类隐患,输出 etcd 专家级优化建议。
- 可视化:Kstone 提供了一个 web 系统,帮助你轻轻松松完成 etcd 集群管理,涵盖集群管理、监控、巡检、备份、etcd 数据可视化查看。
部署简单:Kstone 提供了 helm 一键部署能力,极大简化了部署复杂度。
3.6、常规插件
3.6.1、batch-requests
batch-requests 插件可以一次接受多个请求并以 HTTP pipeline 的方式在网关发起多个 HTTP 请求,合并结果后再返回客户端。
在客户端需要访问多个 API 的情况下,这将显著提高性能。
外部批处理请求的 HTTP 请求头(除了以 开始的请求头,例如:)适用于批处理中的每个请求。Content-Content-Type
如果在外部请求和单个调用中都指定了相同的 HTTP 请求头,则单个调用的请求头优先。
接口:
该插件会增加 接口。/apisix/batch-requests (你需要通过 public-api 插件来暴露它。)
该插件默认是禁用状态,你可以在配置文件(./conf/config.yaml)添加如下配置启用 batch-requests 插件:
plugins:
  - ...
  - batch-requests
配置插件:
默认情况下,可以发送到 /apisix/batch-requests 的最大请求体不能大于 1 MiB。你可以通过 apisix/admin/plugin_metadata/batch-requests 更改插件的此配置:
curl http://127.0.0.1:9180/apisix/admin/plugin_metadata/batch-requests \
-H 'X-API-KEY: edd1c9f034335f136f87ad84b625c8f1' -X PUT -d '
{
    "max_body_size": 4194304
}'
元数据:
| 名称 | 类型 | 必选项 | 默认值 | 有效值 | 描述 |
|---|---|---|---|---|---|
| max_body_size | integer | 是 | 1048576 | [1, …] | 请求体的最大大小,单位:bytes。 |
请求和响应格式:
该插件会为 apisix 创建一个 /apisix/batch-requests 的接口,用来处理批量请求。
| 参数名 | 类型 | 必选项 | 默认值 | 描述 |
|---|---|---|---|---|
| query | object | 否 | 给所有请求都携带的 query string。 | |
| headers | object | 否 | 给所有请求都携带的 header。 | |
| timeout | number | 否 | 30000 | 聚合请求的超时时间,单位为 ms。 |
| pipeline | array[HttpRequest] | 是 | HTTP 请求的详细信息。 |
HttpRequest:
| 参数名 | 类型 | 必选项 | 默认值 | 有效值 | 描述 |
|---|---|---|---|---|---|
| version | string | 否 | 1.1 | [1.0, 1.1] | 请求所使用的 HTTP 协议版本。 |
| method | string | 否 | GET | [“GET”, “POST”, “PUT”, “DELETE”, “PATCH”, “HEAD”, “OPTIONS”, “CONNECT”, “TRACE”] | 请求使用的 HTTP 方法。 |
| query | object | 否 | 独立请求所携带的 query string, 如果 Key 和全局的有冲突,以此设置为主。 | ||
| headers | object | 否 | 独立请求所携带的 header, 如果 Key 和全局的有冲突,以此设置为主。 | ||
| path | string | 是 | HTTP 请求路径。 | ||
| body | string | 否 | HTTP 请求体。 | ||
| ssl_verify | boolean | 否 | false | 验证 SSL 证书与主机名是否匹配。 |
响应参数:
返回值是一个 HttpResponse 的数组。
HttpResponse
| 参数名 | 类型 | 描述 |
|---|---|---|
| status | integer | HTTP 请求的状态码。 |
| reason | string | HTTP 请求的返回信息。 |
| body | string | HTTP 请求的响应体。 |
| headers | object | HTTP 请求的响应头。 |
| 修改自定义URI,可以通过 public-api 插件设置自定义 URI。只需要在创建路由时设置所需的 URI 并更改 public-api 插件的配置: |
curl http://127.0.0.1:9180/apisix/admin/routes/br \
-H 'X-API-KEY: edd1c9f034335f136f87ad84b625c8f1' -X PUT -d '
{
    "uri": "/batch-requests",
    "plugins": {
        "public-api": {
            "uri": "/apisix/batch-requests"
        }
    }
}'
3.6.2、redirect
redirect 插件可用于配置 URI 重定向。
| 名称 | 类型 | 必选项 | 默认值 | 有效值 | 描述 |
|---|---|---|---|---|---|
| http_to_https | boolean | 否 | false | [true,false] | 当设置为 true 并且请求是 HTTP 时,它将被重定向具有相同 URI 和 301 状态码的 HTTPS,原 URI 的查询字符串也将包含在 Location 头中。 |
| uri | string | 否 | 要重定向到的 URI,可以包含 NGINX 变量。例如:/test/index.htm, u r i / i n d e x . h t m l , uri/index.html, uri/index.html,{uri}/index.html,https://example.com/foo/bar。如果你引入了一个不存在的变量,它不会报错,而是将其视为一个空变量。 | ||
| regex_uri | array[string] | 否 | 将来自客户端的 URL 与正则表达式匹配并重定向。当匹配成功后使用模板替换发送重定向到客户端,如果未匹配成功会将客户端请求的 URI 转发至上游。和 regex_uri 不可以同时存在。例如:[“^/iresty/(.)/(.)/(.*)”,“/$1-$2-$3”] 第一个元素代表匹配来自客户端请求的 URI 正则表达式,第二个元素代表匹配成功后发送重定向到客户端的 URI 模板。 | ||
| ret_code | integer | 否 | 302 [200, …] | HTTP 响应码 | |
| encode_uri | boolean | 否 | false | [true,false] | 当设置为 true 时,对返回的 Location Header 按照 RFC3986的编码格式进行编码。 |
| append_query_string | boolean | 否 | false | [true,false] | 当设置为 true 时,将原始请求中的查询字符串添加到 Location Header。如果已配置 uri 或 regex_uri 已经包含查询字符串,则请求中的查询字符串将附加一个&。如果你已经处理过查询字符串(例如,使用 NGINX 变量 $request_uri),请不要再使用该参数以避免重复。 |
- http_to_https、uri 和 regex_uri 只能配置其中一个属性。
- http_to_https、和 append_query_string 只能配置其中一个属性。
- 当开启 http_to_https 时,重定向 URL 中的端口将按如下顺序选取一个值(按优先级从高到低排列)
- 从配置文件(conf/config.yaml)中读取 plugin_attr.redirect.https_port。
- 如果 apisix.ssl 处于开启状态,读取 apisix.ssl.listen 并从中随机选一个 port。
- 使用 443 作为默认 https port。
启用插件:
以下示例展示了如何在指定路由中启用 redirect 插件:
curl http://127.0.0.1:9180/apisix/admin/routes/1  \
-H 'X-API-KEY: edd1c9f034335f136f87ad84b625c8f1' -X PUT -d '
{
    "uri": "/test/index.html",
    "plugins": {
        "redirect": {
            "uri": "/test/default.html",
            "ret_code": 301
        }
    },
    "upstream": {
        "type": "roundrobin",
        "nodes": {
            "127.0.0.1:80": 1
        }
    }
}'
你也可以在新的 URI 中使用 NGINX 内置的任意变量:
curl http://127.0.0.1:9180/apisix/admin/routes/1  \
-H 'X-API-KEY: edd1c9f034335f136f87ad84b625c8f1' -X PUT -d '
{
    "uri": "/test",
    "plugins": {
        "redirect": {
            "uri": "$uri/index.html",
            "ret_code": 301
        }
    },
    "upstream": {
        "type": "roundrobin",
        "nodes": {
            "127.0.0.1:80": 1
        }
    }
}'
测试插件:
通过上述命令启用插件后,可以使用如下命令测试插件是否启用成功。
curl http://127.0.0.1:9080/test/index.html -i
HTTP/1.1 301 Moved Permanently
Date: Wed, 23 Oct 2019 13:48:23 GMT
Content-Type: text/html
Content-Length: 166
Connection: keep-alive
Location: /test/default.html
...
通过上述返回结果,可以看到响应码和响应头中的 Location 参数,它表示该插件已启用。
以下示例展示了如何将 HTTP 重定向到 HTTPS:
curl http://127.0.0.1:9180/apisix/admin/routes/1  \
-H 'X-API-KEY: edd1c9f034335f136f87ad84b625c8f1' -X PUT -d '
{
    "uri": "/hello",
    "plugins": {
        "redirect": {
            "http_to_https": true
        }
    }
}'
基于上述例子进行测试:
curl http://127.0.0.1:9080/hello -i
HTTP/1.1 301 Moved Permanently
...
Location: https://127.0.0.1:9443/hello
...
禁用插件:
当你需要禁用 redirect 插件时,可以通过如下命令删除相应的 JSON 配置,APISIX 将会自动重新加载相关配置,无需重启服务:
curl http://127.0.0.1:9180/apisix/admin/routes/1  \
-H 'X-API-KEY: edd1c9f034335f136f87ad84b625c8f1' -X PUT -d '
{
    "uri": "/test/index.html",
    "plugins": {},
    "upstream": {
        "type": "roundrobin",
        "nodes": {
            "127.0.0.1:80": 1
        }
    }
}'
3.6.3、Gzip
gzip 插件能动态设置 NGINX 的压缩行为,该插件要求 Apache APISIX 运行在 APISIX-Base 上。
属性
| 名称 | 类型 | 必选项 | 默认值 | 有效值 | 描述 |
|---|---|---|---|---|---|
| types | array[string] or “*” | 否 | [“text/html”] | 动态设置 gzip_types 指令,特殊值 “*” 匹配任何 MIME 类型。 | |
| min_length | integer | 否 | 20 | >= 1 | |
| comp_level | integer | 否 | 1 | [1, 9] | 动态设置 gzip_comp_level 指令。 |
| http_version | number | 否 | 1.1 | 1.1, 1.0 | 动态设置 gzip_http_version 指令。 |
| buffers.number | integer | 否 | 32 | >= 1 | 动态设置 gzip_buffers 指令。 |
| buffers.size | integer | 否 | 4096 | >= 1 | 动态设置 gzip_buffers 指令。 |
| vary | boolean | 否 | false | 动态设置 gzip_vary 指令。 |
|启用插件
以下示例展示了如何在指定路由中启用 gzip 插件:
curl -i http://127.0.0.1:9180/apisix/admin/routes/1  \
-H 'X-API-KEY: edd1c9f034335f136f87ad84b625c8f1' -X PUT -d '
{
    "uri": "/index.html",
    "plugins": {
        "gzip": {
            "buffers": {
                "number": 8
            }
        }
    },
    "upstream": {
        "type": "roundrobin",
        "nodes": {
            "127.0.0.1:1980": 1
        }
    }
}'
通过上述命令启用插件后,可以使用如下命令测试插件是否启用成功:
curl http://127.0.0.1:9080/index.html -i -H "Accept-Encoding: gzip"
HTTP/1.1 404 Not Found
Content-Type: text/html; charset=utf-8
Transfer-Encoding: chunked
Connection: keep-alive
Date: Wed, 21 Jul 2021 03:52:55 GMT
Server: APISIX/2.7
Content-Encoding: gzip

Warning: Binary output can mess up your terminal. Use "--output -" to tell
Warning: curl to output it to your terminal anyway, or consider "--output
Warning: <FILE>" to save to a file.
禁用插件
当你需要禁用 gzip 插件时,可以通过以下命令删除相应的 JSON 配置,APISIX 将会自动重新加载相关配置,无需重启服务:
curl http://127.0.0.1:9180/apisix/admin/routes/1  \
-H 'X-API-KEY: edd1c9f034335f136f87ad84b625c8f1' -X PUT -d '
{
    "uri": "/index.html",
    "upstream": {
        "type": "roundrobin",
        "nodes": {
            "127.0.0.1:1980": 1
        }
    }
}'
3.6.4、Real-ip
real-ip 插件用于动态改变传递到 Apache APISIX 的客户端的 IP 地址和端口。
它的工作方式和 NGINX 中的 ngx_http_realip_module 模块一样,并且更加灵活。该插件要求 APISIX 运行在 APISIX-Base 上。
属性
| 名称 | 类型 | 必选项 | 有效值 | 描述 |
|---|---|---|---|---|
| source | string | 是 | 任何 NGINX 变量,如 arg_realip 或 http_x_forwarded_for 。 | 动态设置客户端的 IP 地址和端口。如果该值不包含端口,则不会更改客户端的端口。 |
| trusted_addresses | array[string] | 否 | IP 或 CIDR 范围列表。 | 动态设置 set_real_ip_from 字段。 |
| recursive | boolean | 否 | true 或者 false,默认是 false | 如果禁用递归搜索,则与受信任地址之一匹配的原始客户端地址将替换为配置的source中发送的最后一个地址。如果启用递归搜索,则与受信任地址之一匹配的原始客户端地址将替换为配置的source中发送的最后一个非受信任地址。 |
|如果 source 属性中设置的地址丢失或者无效,该插件将不会更改客户端地址。
启用插件:
以下示例展示了如何在指定路由中启用 real-ip 插件:
curl -i http://127.0.0.1:9180/apisix/admin/routes/1  \
-H 'X-API-KEY: edd1c9f034335f136f87ad84b625c8f1' -X PUT -d '
{
    "uri": "/index.html",
    "plugins": {
        "real-ip": {
            "source": "arg_realip",
            "trusted_addresses": ["127.0.0.0/24"]
        },
        "response-rewrite": {
            "headers": {
                "remote_addr": "$remote_addr",
                "remote_port": "$remote_port"
            }
        }
    },
    "upstream": {
        "type": "roundrobin",
        "nodes": {
            "127.0.0.1:1980": 1
        }
    }
}'
禁用插件
当你需要禁用 real-ip 插件时,可以通过以下命令删除相应的 JSON 配置,APISIX 将会自动重新加载相关配置,无需重启服务:
curl http://127.0.0.1:9180/apisix/admin/routes/1  \
-H 'X-API-KEY: edd1c9f034335f136f87ad84b625c8f1' -X PUT -d '
{
    "uri": "/index.html",
    "upstream": {
        "type": "roundrobin",
        "nodes": {
            "127.0.0.1:1980": 1
        }
    }
}'
curl http://127.0.0.1:9180/apisix/admin/routes/1  \
-H 'X-API-KEY: edd1c9f034335f136f87ad84b625c8f1' -X PUT -d '
{
    "uri": "/index.html",
    "upstream": {
        "type": "roundrobin",
        "nodes": {
            "127.0.0.1:1980": 1
        }
    }
}'
server-info 插件可以定期将服务基本信息上报至 etcd。
服务信息中每一项的含义如下:
| 名称 | 类型 | 描述 |
|---|---|---|
| boot_time | integer | APISIX 服务实例的启动时间(UNIX 时间戳),如果对 APISIX 进行热更新操作,该值将被重置。普通的 reload 操作不会影响该值。 |
| id | string | APISIX 服务实例 id。 |
| etcd_version | string | etcd 集群的版本信息,如果 APISIX 和 etcd 集群之间存在网络分区,该值将设置为 “unknown”。 |
| version | string | APISIX 版本信息。 |
| hostname | string | 部署 APISIX 的主机或 Pod 的主机名信息。 |
该插件在 Control API 下暴露了一个 API 接口 /v1/server_info。
启用插件:
该插件默认是禁用状态,你可以在配置文件(./conf/config.yaml)中添加如下配置启用 server-info 插件。
plugins:                          # plugin list
  - ...
  - server-info
自定义服务信息上报配置
我们可以在 ./conf/config.yaml 文件的 plugin_attr 部分修改上报配置。
下表是可以自定义配置的参数:
| 名称 | 类型 | 默认值 | 描述 |
|---|---|---|---|
| report_ttl | integer | 36 | etcd 中服务信息保存的 TTL (单位:秒,最大值:86400,最小值:3) |
| 以下是示例是通过修改配置文件(conf/config.yaml)中的 plugin_attr 部分将 report_ttl 设置为 1 分钟: |
plugin_attr:
  server-info:
    report_ttl: 60
测试插件,在启用 server-info 插件后,可以通过插件的 Control API 来访问到这些数据:
curl http://127.0.0.1:9090/v1/server_info -s | jq .
{
  "etcd_version": "3.5.0",
  "id": "b7ce1c5c-b1aa-4df7-888a-cbe403f3e948",
  "hostname": "fedora32",
  "version": "2.1",
  "boot_time": 1608522102
}
如果你想禁用插件,可以将 server-info 从配置文件中的插件列表删除,重新加载 APISIX 后即可生效。
plugins:    # plugin list
  - ...
3.6.6、ext-plugin-pre-req
ext-plugin-pre-req 插件用于在执行内置 Lua 插件之前和在 Plugin Runner 内运行特定的 External Plugin。
属性
| 名称 | 类型 | 必选项 | 默认值 | 有效值 | 描述 |
|---|---|---|---|---|---|
| conf | array | 否 | [{“name”: “ext-plugin-A”, “value”: “{“enable”:“feature”}”}] | 在 Plugin Runner 内执行的插件列表的配置。 | |
| allow_degradation | boolean | 否 | false | [false, true] | 当 Plugin Runner 临时不可用时是否允许请求继续,当值设置为 true 时则自动允许请求继续。 |
以下示例展示了如何在指定路由中启用 ext-plugin-pre-req 插件:
curl -i http://127.0.0.1:9180/apisix/admin/routes/1  \
-H 'X-API-KEY: edd1c9f034335f136f87ad84b625c8f1' -X PUT -d '
{
    "uri": "/index.html",
    "plugins": {
        "ext-plugin-pre-req": {
            "conf" : [
                {"name": "ext-plugin-A", "value": "{\"enable\":\"feature\"}"}
            ]
        }
    },
    "upstream": {
        "type": "roundrobin",
        "nodes": {
            "127.0.0.1:1980": 1
        }
    }
}'
通过上述命令启用插件后,可以使用如下命令测试插件是否启用成功:
curl -i http://127.0.0.1:9080/index.html
在返回结果中可以看到刚刚配置的 Plugin Runner 已经被触发,同时 ext-plugin-A 插件也已经被执行。
当你需要禁用 ext-plugin-pre-req 插件时,可通过以下命令删除相应的 JSON 配置,APISIX 将会自动重新加载相关配置,无需重启服务:
curl http://127.0.0.1:9180/apisix/admin/routes/1  \
-H 'X-API-KEY: edd1c9f034335f136f87ad84b625c8f1' -X PUT -d '
{
    "uri": "/index.html",
    "upstream": {
        "type": "roundrobin",
        "nodes": {
            "127.0.0.1:1980": 1
        }
    }
}'
3.6.7、ext-plugin-post-req
ext-plugin-post-req 插件的功能与 ext-plugin-pre-req 插件的不同之处在于:ext-plugin-post-req 插件是在内置 Lua 插件执行之后且在请求到达上游之前工作。
3.6.8、ext-plugin-post-resp
ext-plugin-post-resp 插件用于在执行内置 Lua 插件之前和在 Plugin Runner 内运行特定的 External Plugin。
ext-plugin-post-resp 插件将在请求获取到上游的响应之后执行。
启用本插件之后,APISIX 将使用 lua-resty-http 库向上游发起请求,这会导致:
- proxy-control 插件不可用
- proxy-mirror 插件不可用
- proxy-cache 插件不可用
- APISIX 与上游间的双向认证 功能尚不可用
External Plugin 执行的结果会影响当前请求的响应。
属性
| 名称 | 类型 | 必选项 | 默认值 | 有效值 | 描述 |
|---|---|---|---|---|---|
| conf | array | 否 | [{“name”: “ext-plugin-A”, “value”: “{“enable”:“feature”}”}] | 在 Plugin Runner 内执行的插件列表的配置。 | |
| allow_degradation | boolean | 否 | false | [false, true] | 当 Plugin Runner 临时不可用时是否允许请求继续,当值设置为 true 时则自动允许请求继续。 |
以下示例展示了如何在指定路由中启用 ext-plugin-post-resp 插件:
curl -i http://127.0.0.1:9180/apisix/admin/routes/1  \
-H 'X-API-KEY: edd1c9f034335f136f87ad84b625c8f1' -X PUT -d '
{
    "uri": "/index.html",
    "plugins": {
        "ext-plugin-post-resp": {
            "conf" : [
                {"name": "ext-plugin-A", "value": "{\"enable\":\"feature\"}"}
            ]
        }
    },
    "upstream": {
        "type": "roundrobin",
        "nodes": {
            "127.0.0.1:1980": 1
        }
    }
}'
通过上述命令启用插件后,可以使用如下命令测试插件是否启用成功:
curl -i http://127.0.0.1:9080/index.html
在返回结果中可以看到刚刚配置的 Plugin Runner 已经被触发,同时 ext-plugin-A 插件也已经被执行。
当你需要禁用 ext-plugin-post-resp 插件时,可通过以下命令删除相应的 JSON 配置,APISIX 将会自动重新加载相关配置,无需重启服务:
curl http://127.0.0.1:9180/apisix/admin/routes/1  \
-H 'X-API-KEY: edd1c9f034335f136f87ad84b625c8f1' -X PUT -d '
{
    "uri": "/index.html",
    "upstream": {
        "type": "roundrobin",
        "nodes": {
            "127.0.0.1:1980": 1
        }
    }
}'
3.6.9、Workflow
workflow 插件引入 lua-resty-expr 来提供复杂的流量控制功能。
属性:
| 名称 | 类型 | 必选项 | 默认值 | 有效值 | 描述 |
|---|---|---|---|---|---|
| rules.case | array[array] | 是 | 由一个或多个{var, operator, val}元素组成的列表,类似这样:{{var, operator, val}, {var, operator, val}, …}}。例如:{“arg_name”, “==”, “json”},表示当前请求参数 name 是 json。这里的 var 与 NGINX 内部自身变量命名保持一致,所以也可以使用 request_uri、host 等;对于 operator 部分,目前已支持的运算符有 ==、=、~、>、<、in、has 和 ! 。关于操作符的具体用法请参考 lua-resty-expr 的 operator-list 部分。 | ||
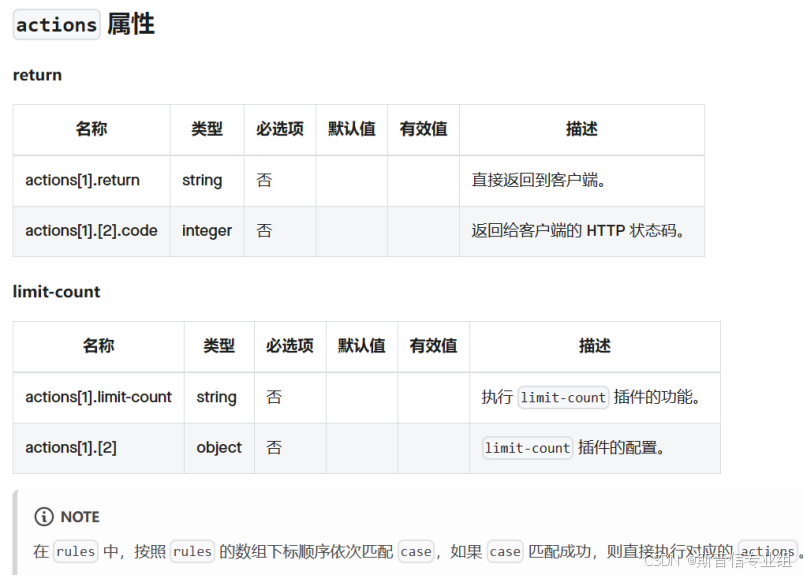
| rules.actions | array[object] | 是 | 当 case 成功匹配时要执行的 actions。目前,actions 中只支持一个元素。actions 的唯一元素的第一个子元素可以是 return 或 limit-count。 |
以下示例展示了如何在路由中启用 workflow 插件:
curl http://127.0.0.1:9180/apisix/admin/routes/1 \
-H 'X-API-KEY: edd1c9f034335f136f87ad84b625c8f1' -X PUT -d '
{
    "uri":"/hello/*",
    "plugins":{
        "workflow":{
            "rules":[
                {
                    "case":[
                        ["uri", "==", "/hello/rejected"]
                    ],
                    "actions":[
                        [
                            "return",
                            {"code": 403}
                        ]
                    ]
                },
                {
                    "case":[
                        ["uri", "==", "/hello/v2/appid"]
                    ],
                    "actions":[
                        [
                            "limit-count",
                            {
                                "count":2,
                                "time_window":60,
                                "rejected_code":429
                            }
                        ]
                    ]
                }
            ]
        }
    },
    "upstream":{
        "type":"roundrobin",
        "nodes":{
            "127.0.0.1:1980":1
        }
    }
}'
如上,我们启用了 workflow 插件,如果请求与 rules 中的 case 匹配,则会执行对应的 actions。
示例 1: 如果请求的 uri 是 /hello/rejected,则返回给客户端状态码 403
curl http://127.0.0.1:9080/hello/rejected -i
HTTP/1.1 403 Forbidden
......

{"error_msg":"rejected by workflow"}
示例 2: 如果请求的 uri 是 /hello/v2/appid,则执行 limit-count 插件,限制请求的数量为 2,时间窗口为 60 秒,如果超过限制数量,则返回给客户端状态码 429
curl http://127.0.0.1:0080/hello/v2/appid -i
HTTP/1.1 200 OK

curl http://127.0.0.1:0080/hello/v2/appid -i
HTTP/1.1 200 OK

curl http://127.0.0.1:0080/hello/v2/appid -i
HTTP/1.1 429 Too Many Requests
示例 3: 如果请求不能被任何 case 匹配,则 workflow 不会执行任何操作
curl http://127.0.0.1:0080/hello/fake -i
HTTP/1.1 200 OK
当你需要禁用 workflow 插件时,可以通过以下命令删除相应的 JSON 配置,APISIX 将会自动重新加载相关配置,无需重启服务:
curl http://127.0.0.1:9180/apisix/admin/routes/1 \
-H 'X-API-KEY: edd1c9f034335f136f87ad84b625c8f1' -X PUT -d '
{
    "uri":"/hello/*",
    "upstream": {
        "type": "roundrobin",
        "nodes": {
            "127.0.0.1:1980": 1
        }
    }
}'


 480
480

 被折叠的 条评论
为什么被折叠?
被折叠的 条评论
为什么被折叠?
 到【灌水乐园】发言


