


SSH项目搭建实例----部分注解实现简单员工管理系统
运行环境:eclipse+tomcat 8.5+MySQL
项目搭建:spring 4.*+struts 2+hibernate(3)
	项目源代码地址为:
	https://download.csdn.net/download/qq_40484618/10898634
- 本项目基于Dynamic web项目基础上进行搭建SSH框架,未用到maven,因此不存在pom.xml进行对所需 .jar包的管理。项目所需的 jar包均为手动导入,保存在项目路径/WEB-INF/lib/路径下
- 关于项目部分代码的讲解,将以代码注释的形式给出。
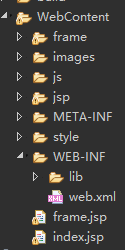
- 项目目录结构:
- 实体类------Model模型

package entity;

import java.util.HashSet;
import java.util.Set;

import javax.persistence.CascadeType;
import javax.persistence.Column;
import javax.persistence.FetchType;
import javax.persistence.GeneratedValue;
import javax.persistence.GenerationType;
import javax.persistence.Id;
import javax.persistence.OneToMany;
import javax.persistence.Table;

import org.hibernate.annotations.Entity;

@Entity
@Table(name="Department")
/*
 * @Entity  声明当前类为hibernate映射到数据库中的实体类
 * @Table	声明table的名称
 */
 //部门类
public class Department {
	@Id	  //声明此列为主键,作为映射对象的标识符
	/**
     *  @GeneratedValue注解来定义生成策略
     *  GenerationType.TABLES 当前主键的值单独保存到一个数据库的表中
     *  GenerationType.SEQUENCE  利用底层数据库提供的序列生成标识符
     *  GenerationType.IDENTITY 采取数据库的自增策略
     *  GenerationType.AUTO 根据不同数据库自动选择合适的id生成方案,这里使用mysql,为递增型
     */
	@GeneratedValue(strategy = GenerationType.AUTO)
	private Integer did;

	@Column(name = "dname",nullable=false)
	private String dname;

	@Column(name = "ddesc",nullable=false)
	private String ddesc;

	@OneToMany(mappedBy="Department",fetch=FetchType.LAZY,cascade=CascadeType.ALL)
	/*
	 * 一对多:一个部门对应多个员工
	 * mappedBy:写一方要生成的表名.
	 * fetch=FetchType.LAZY:是延迟加载.
	 * cascadeType:ALL:就是对所有的增,删,改查都在这实现一对一关系;
	 */
	private Set<Employee> employees = new HashSet<>();

	public Integer getDid() {
		return did;
	}
	public void setDid(Integer did) {
		this.did = did;
	}
	public String getDname() {
		return dname;
	}
	public void setDname(String dname) {
		this.dname = dname;
	}
	public String getDdesc() {
		return ddesc;
	}
	public void setDdesc(String ddesc) {
		this.ddesc = ddesc;
	}
	public Set<Employee> getEmployees() {
		return employees;
	}
	public void setEmployees(Set<Employee> employees) {
		this.employees = employees;
	}

	public Department(Integer did, String dname, String ddesc) {
		super();
		this.did = did;
		this.dname = dname;
		this.ddesc = ddesc;
	}

	public Department() {
		super();
	}
}
package entity;

import java.util.Date;

import javax.persistence.Column;
import javax.persistence.Entity;
import javax.persistence.GeneratedValue;
import javax.persistence.GenerationType;
import javax.persistence.Id;
import javax.persistence.JoinColumn;
import javax.persistence.ManyToOne;
import javax.persistence.Table;
import javax.persistence.Temporal;
import javax.persistence.TemporalType;

@Entity
@Table(name="Employee")
/*
 * @Entity  声明当前类为hibernate映射到数据库中的实体类
 * @Table	声明table的名称
 */
 //员工类
public class Employee {
	@Id	 //声明此列为主键,作为映射对象的标识符
	/**
     *  @GeneratedValue注解来定义生成策略
     *  GenerationType.TABLES 当前主键的值单独保存到一个数据库的表中
     *  GenerationType.SEQUENCE  利用底层数据库提供的序列生成标识符
     *  GenerationType.IDENTITY 采取数据库的自增策略
     *  GenerationType.AUTO 根据不同数据库自动选择合适的id生成方案,这里使用mysql,为递增型
     */
	@GeneratedValue(strategy = GenerationType.AUTO)
	private Integer eid;

	@Column(name = "ename",nullable=false)
	private String ename;

	@Column(name = "sex",nullable=false)
	private String sex;

	@Column(name = "birthday",nullable=false)
	@Temporal(TemporalType.DATE)
	private Date birthday;

	@Column(name = "joinDate",nullable=false)
	@Temporal(TemporalType.DATE)
	private Date joinDate;

	@Column(name = "eno",nullable=false)
	private String eno;

	@Column(name = "username",nullable=false)
	private String username;

	@Column(name = "password",nullable=false)
	private String password;

	@ManyToOne
	@JoinColumn(name="did")
	// 多对一:即多个员工对应一个部门。name属性为Department类的主键(@Id)值
	private Department department;

	public Integer getEid() {
		return eid;
	}

	public void setEid(Integer eid) {
		this.eid = eid;
	}

	public String getEname() {
		return ename;
	}

	public void setEname(String ename) {
		this.ename = ename;
	}

	public String getSex() {
		return sex;
	}

	public void setSex(String sex) {
		this.sex = sex;
	}

	public Date getBirthday() {
		return birthday;
	}

	public void setBirthday(Date birthday) {
		this.birthday = birthday;
	}

	public Date getJoinDate() {
		return joinDate;
	}

	public void setJoinDate(Date joinDate) {
		this.joinDate = joinDate;
	}

	public String getEno() {
		return eno;
	}

	public void setEno(String eno) {
		this.eno = eno;
	}

	public String getUsername() {
		return username;
	}

	public void setUsername(String username) {
		this.username = username;
	}

	public String getPassword() {
		return password;
	}

	public void setPassword(String password) {
		this.password = password;
	}

	public Department getDepartment() {
		return department;
	}

	public void setDepartment(Department department) {
		this.department = department;
	}

	public Employee(Integer eid, String ename, String sex, Date birthday, Date joinDate, String eno, String username,
			String password, Department department) {
		super();
		this.eid = eid;
		this.ename = ename;
		this.sex = sex;
		this.birthday = birthday;
		this.joinDate = joinDate;
		this.eno = eno;
		this.username = username;
		this.password = password;
		this.department = department;
	}

	public Employee() {
		super();
	}
}
映射文件:Department.hbm.xml,Employee.hbu.xml 可由上述注解自动映射
- 配置 web.xml文件
<?xml version="1.0" encoding="UTF-8"?>
<web-app xmlns:xsi="http://www.w3.org/2001/XMLSchema-instance" xmlns="http://xmlns.jcp.org/xml/ns/javaee" xsi:schemaLocation="http://xmlns.jcp.org/xml/ns/javaee http://xmlns.jcp.org/xml/ns/javaee/web-app_3_1.xsd" id="WebApp_ID" version="3.1">
  <display-name>sshpro</display-name>

  <!-- Spring过滤器配置 -->
  <filter>
	 <filter-name>OpenSessionInViewFilter</filter-name>
	 <filter-class>org.springframework.orm.hibernate3.support.OpenSessionInViewFilter</filter-class>
  </filter>
  <filter-mapping>
    <filter-name>OpenSessionInViewFilter</filter-name>
	<url-pattern>*.action</url-pattern>
  </filter-mapping>

  <!-- Struts2核心过滤器 -->
   <!-- 两次name需保持一致,且与配置文件名称保持一致,即struts.xml -->
  <filter>
  	<filter-name>struts</filter-name>
  	<filter-class> org.apache.struts2.dispatcher.ng.filter.StrutsPrepareAndExecuteFilter</filter-class>
  </filter>
  <filter-mapping>
  	<filter-name>struts</filter-name>
  	<url-pattern>/*</url-pattern>
  </filter-mapping>

  <!-- Spring的核心监听器 -->
  <listener>
  	<listener-class>org.springframework.web.context.ContextLoaderListener</listener-class>
  </listener>
  <!-- Spring的配置文件 applicationContext.xml -->
  <context-param>
  	<param-name>contextConfigLocation</param-name>
  	<param-value>classpath:applicationContext.xml</param-value>
  </context-param>

  <!-- 项目的欢迎页面 -->
  <welcome-file-list>
  	<welcome-file>index.jsp</welcome-file>
  </welcome-file-list>
</web-app>
- 日志文件------log4j.properties
### direct log messages to stdout ###
log4j.appender.stdout=org.apache.log4j.ConsoleAppender
log4j.appender.stdout.Target=System.out
log4j.appender.stdout.layout=org.apache.log4j.PatternLayout
log4j.appender.stdout.layout.ConversionPattern=%d{ABSOLUTE} %5p %c{1}:%L - %m%n

### direct messages to file mylog.log ###
log4j.appender.file=org.apache.log4j.FileAppender
log4j.appender.file.File=c:/mylog.log
log4j.appender.file.layout=org.apache.log4j.PatternLayout
log4j.appender.file.layout.ConversionPattern=%d{ABSOLUTE} %5p %c{1}:%L - %m%n

### set log levels - for more verbose logging change 'info' to 'debug' ###

log4j.rootLogger=info, stdout
- 链接数据库------jdbc.properties
jdbc.driverClass=com.mysql.jdbc.Driver		//数据库驱动
jdbc.url=jdbc:mysql://localhost:3306/ssh_employee?useUnicode=true&characterEncoding=UTF-8	//数据库url,修改为本地的数据库名称
jdbc.username=root	//本地数据库用户名
jdbc.password=root	//本地数据库密码
- 配置Spring------applicationContext.xml
<?xml version="1.0" encoding="UTF-8"?>
<beans
    xmlns="http://www.springframework.org/schema/beans"
    xmlns:context="http://www.springframework.org/schema/context"
    xmlns:aop="http://www.springframework.org/schema/aop"
    xmlns:tx="http://www.springframework.org/schema/tx"
    xmlns:xsi="http://www.w3.org/2001/XMLSchema-instance"
    xmlns:p="http://www.springframework.org/schema/p"
    xsi:schemaLocation="http://www.springframework.org/schema/beans
                        http://www.springframework.org/schema/beans/spring-beans-3.2.xsd
                        http://www.springframework.org/schema/aop
                        http://www.springframework.org/schema/aop/spring-aop-3.2.xsd
                        http://www.springframework.org/schema/context
                        http://www.springframework.org/schema/context/spring-conte
最低0.47元/天 解锁文章


 4862
4862


 被折叠的 条评论
为什么被折叠?
被折叠的 条评论
为什么被折叠?
 到【灌水乐园】发言


