


小程序云开发笔记
微信小程序云开发
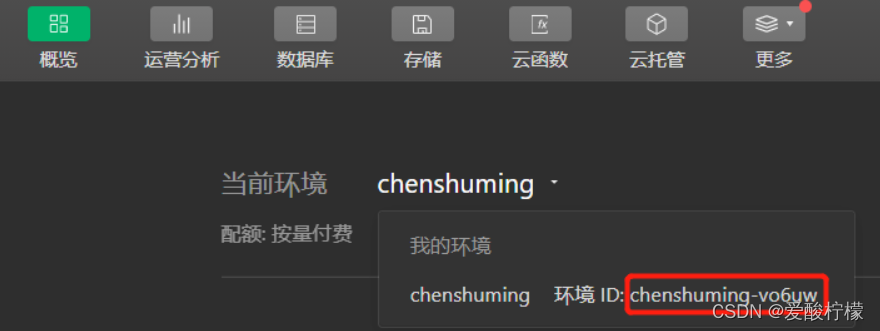
一、小程序云开发初始化
参考博客:https://xiaoshitou.blog.csdn.net/article/details/112391688
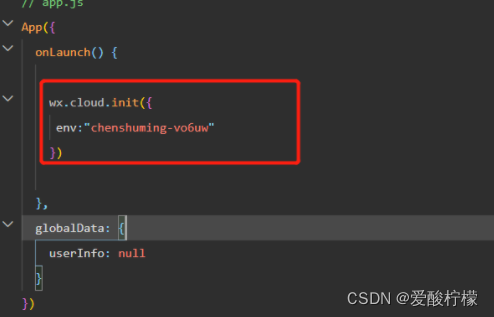
// app.js
App({
  onLaunch() {

    wx.cloud.init({
     env:"chenshuming-vo6uw"
    })
  }
})
二、云数据库
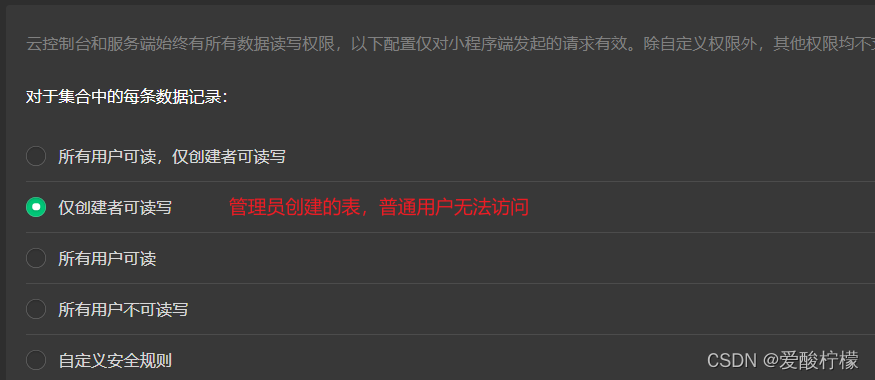
1、数据库权限管理
默认控制台创建的表只能有管理员才能访问
2、云数据库增删改查
查询所有数据
//获取表的所有数据
wx.cloud.database().collection('goods').get({
      success(res){
        console.log("请求成功",res)
      },
      fail(err){
        console.log("请求失败",err);
      }
    })


//es6的简介写法
wx.cloud.database().collection('goods').get().then(res =>{
    console.log("请求成功",res)
}).catch(err =>{
    console.log("请求失败",err)
})
条件查询
  wx.cloud.database().collection('goods').where({
    name:'苹果'
  }).get().then(res=>{
    console.log("请求成功",res)
  })

//复杂条件查询:https://developers.weixin.qq.com/miniprogram/dev/wxcloud/reference-sdk-api/database/command/Command.gt.html
var db = wx.cloud.database()
const _ = db.command
wx.cloud.database().collection('goods').where({
    price:_.gt(10)
}).get().then(res=>{
    console.log("请求成功",res.data)
})
单条数据查询
//doc后面传入数据id
wx.cloud.database().collection('goods').doc("c462c81061b7232f021385c758360ff5").get().then(res=>{
    console.log("查询单条数据成功",res)
  })
添加数据
wx.cloud.database().collection('goods').add({
        data:{
          name:"西瓜",
          price:20
        }
      }).then(res=>{
        console.log("添加成功", res)
 })
修改数据
删除或修改只能操作自己创建的数据(通过openid区分)
wx.cloud.database().collection('goods').doc("c0ca0aed61bc728e00d1281b5787e0d7").update({
    data:{
        name:"梨",
        price:20
    }
}).then(res=>{
    console.log("修改成功", res)
})
删除数据
wx.cloud.database().collection('goods').doc("c0ca0aed61bc728e00d1281b5787e0d7").remove().then(res=>{
    console.log("删除成功", res)
})
搜索
 //我这里简单起见就把搜索词写死,正常应该用户输入的
    let searchKey = '小石头'
    let db = wx.cloud.database()
    let _ = db.command

    db.collection('news')
      .where(_.or([
        {//标题
          title: db.RegExp({ //使用正则查询,实现对搜索的模糊查询
            regexp: searchKey,
            options: 'i', //大小写不区分
          }),
        },
        {//描述
          desc: db.RegExp({
            regexp: searchKey,
            options: 'i',
          }),
        }
      ])).get()
      .then(res => {
        console.log('查询成功', res)
      })
       .catch(res => {
        console.log('查询失败', res)
      })
案例
输出数据库的内容,点击数据后能获得数据的id
<view wx:for="{{list}}">
  <view bindtap="goDetail" data-id="{{item._id}}">商品名:{{item.name}}</view>
</view>
后台
onLoad: function (options) {
        wx.cloud.database().collection('goods').get().then(res =>{
          this.setData({
            list:res.data
          })
          console.log("请求成功",res.data)
      }).catch(err =>{
          console.log("请求失败",err)
      })
  },
  goDetail(e){
      console.log(e.currentTarget.dataset.id);
      wx.navigateTo({
        url: '/pages/index/index?id='+e.currentTarget.dataset.id,
      })
  },


//跳转页获取参数
onLoad(e){
    console.log("id是",e.id)
}
通过表单添加数据:
输入商品名称
<input class="inputclass"  type="text" bindinput="getName" />
//后台获取数据并添加到数据库
getName(res){
      console.log(res.detail.value);
  },
排序
wx.cloud.database().collection('goods').orderBy("name",'asc').get().then(res =>{
    this.setData({
        list:res.data
    })
 //降序:desc
返回规定条数数据
wx.cloud.database().collection('goods').limit(2).get().then(res =>{
    this.setData({
        list:res.data
    })
分页
//skip表示从第及条数开始
wx.cloud.database().collection('goods').skip(2).get().then(res =>{
    this.setData({
        list:res.data
  })
三、云函数
1、初始化
新建文件夹,配置"cloudfunctionRoot":"/cloud"
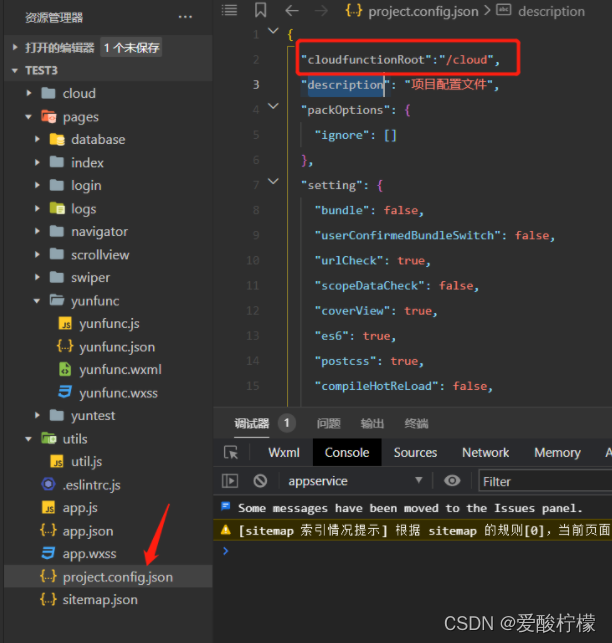
创建云函数

2、调用云函数
//方法一
wx.cloud.callFunction({
          name:'getData',
          success(res){
            console.log('请求云函数成功',res)
          },fail(err){
            console.log('请求云函数失败',res)
          }
        })

//方法二
 wx.cloud.callFunction({
          name:'getData'
        }).then(res=>{
            console.log('请求云函数成功',res)
          }).catch(err=>{
            console.log('请求云函数失败',res)
          })
3、云函数操作数据库
查询,和本地操作数据库一样,一次请求数据上限为100条
exports.main = async (event, context) => {
  return cloud.database().collection('goods').get()
}
更新数据:
 wx.cloud.callFunction({
          name:'getValues',
          data:{
            id:"d20aea5861bc701a00a9048317846ce1",
            name:"香蕉"
          },
          success(res){
            console.log('请求云函数成功',res)
          },fail(err){
            console.log('请求云函数失败',err)
          }
        })


exports.main = async (event, context) => {

  return cloud.database().collection('goods').doc(event.id).update({
      data:{
        name:event.name
      }
  })

}
其他操作类似
四、云存储
1、上传图片
//选择图片
choseImg(){
    var that = this
    //上传图片第一步
    wx.chooseImage({
      count: 1,  //可以选择多少张图片
      sizeType: ['original', 'compressed'],
      sourceType: ['album', 'camera'], //设置图片来源
      success (res) {
        const tempFilePaths = res.tempFilePaths
        that.uploadImg(tempFilePaths[0])   //要上传图片的临时地址
      }
    })
  },
      //上传文件
  uploadImg(temFile){
    console.log(temFile)
    wx.cloud.uploadFile({
      cloudPath:'test.jpg',
      filePath: temFile,
      success (res){
        const data = res.data
        console.log("上传成功")
        //do something
      },fail(res){
        console.log("上传失败")
      }
    })
  }
显示图片,点击图片后全屏播放
//图片点击事件
 imgYu:function(event){
   var src = event.currentTarget.dataset.src;//获取data-src
   //var imgList = event.currentTarget.dataset.list;//获取data-list
  var imgList = this.data.images
   //图片预览
   wx.previewImage({
   current: src, // 当前显示图片的http链接
   urls: imgList // 需要预览的图片http链接列表
   })
   },
<view wx:for="{{list}}" wx:key="id" >
 <view>{{item.name}}</view>
 <view>
 <image bindtap="imgYu" data-list="{{item.imgPath}}" src="{{item.imgPath}}" 	show-menu-by-longpress="true"> </image>
 </view>
</view>
2、上传视频
//选择视频
choseVedio(){
    var that = this
    wx.chooseVideo({
      sourceType: ['album','camera'],
      maxDuration: 60,
      camera: 'back',
      success(res) {
        that.uploadVedio(res.tempFilePath,"test.mp4")
        console.log(res.tempFilePath)
      }
    })
  },
      //上传文件
  uploadVedio(temFile,fileName){
    console.log(temFile)
    wx.cloud.uploadFile({
      cloudPath:fileName,
      filePath: temFile,
      success (res){
        const data = res.data
        console.log("上传成功")
        //do something
      },fail(res){
        console.log("上传失败")
      }
    })
  },
3、上传文件
可以上传所有文件
 chooseFile(){
    var that = this
    wx.chooseMessageFile({
      count: 10,
      type: 'all',
      success (res) {
        // tempFilePath可以作为img标签的src属性显示图片
        const tempFilePaths = res.tempFiles
        that.uploadFile(tempFilePaths[0].path,tempFilePaths[0].name)
      }
    })
  },
      //上传文件
  uploadFile(temFile,fileName){
    console.log(temFile)
    wx.cloud.uploadFile({
      cloudPath:fileName,
      filePath: temFile,
      success (res){
        const data = res.data
        console.log("上传成功")
        //do something
      },fail(res){
        console.log("上传失败")
      }
    })
  }
4、下载文件
wx.cloud.downloadFile({
  fileID: 'cloud://chenshuming-vo6uw.6368-chenshuming-vo6uw-1300611849/test.jpg',
  success: res => {
    // get temp file path
    console.log(res.tempFilePath)
  },
  fail: err => {
    // handle error
  }
})


下载并打开
wx.cloud.downloadFile({
  fileID: 'cloud://chenshuming-vo6uw.6368-chenshuming-vo6uw-1300611849/test.jpg',
  success: function (res) {
    const filePath = res.tempFilePath
    wx.openDocument({
      filePath: filePath,
      success: function (res) {
        console.log('打开文档成功')
      }
    })
  }
})
五、分页
1、本地js分页
js
getData(e){
    console.log(e.currentTarget.dataset.page)
    this.getList(e.currentTarget.dataset.page)

  },


  getList(pageNum){
    var that = this
    wx.cloud.database().collection('goods')
    .skip(20*(pageNum-1))   //从21开始获取20条
    .get({
      success(res){
        that.setData({
          list:res.data
        })
        console.log("请求成功",res)
      },
      fail(err){
        console.log("请求失败",err);
      }
    })
  }
wxml
<!--pages/fenye/fenye.wxml-->
<view wx:for="{{list}}" wx:key="_id" wx:for-index="index">
  <view>{{index}} -----{{item.name}}
  </view>
</view>
<button bindtap="getData" data-page="1">第一页</button>
<button  bindtap="getData" data-page="2">第二页</button>
实现下拉时页面内容增加:
pageNum = 0 //全局变量
/**
   * 页面上拉触底事件的处理函数
   */下·
  onReachBottom: function () {
      //提示加载中
      console.log("下拉了页面")
       wx.showLoading({
        title: '加载中',
      })
      var that = this
      //页码加一
      pageNum = pageNum + 1
      wx.cloud.database().collection('goods')
      .skip(pageNum*20)   //从21开始获取20条
      .get({
        success(res){
            //追加数据
          that.setData({
            list:that.data.list.concat(res.data) //将查询结果拼接到原list中
          })
            //提示加载完成
             wx.hideLoading({
            title: '加载成功',
          })
            //提示到底了
            if(res.data.length <= 0){
                wx.showToast({
                     icon:"none",
                    title:"没有更多数据了"
                })
            }
          console.log("请求成功",res)
        },
        fail(err){
          console.log("请求失败",err);
        }
      })
  }
wxml
<view wx:for="{{list}}" wx:key="_id" wx:for-index="index">
  <view class="list">{{index}} -----{{item.name}}
  </view>
</view>
2、云函数分页
wx.cloud.callFunction({
          name:'getData',
            data:{
				len:len, // 携带参数调用云函数
                pageNum:pageNum
            },
          success(res){
            console.log('请求云函数成功',res)
          },fail(err){
            console.log('请求云函数失败',res)
          }
        })


 1859
1859


 被折叠的 条评论
为什么被折叠?
被折叠的 条评论
为什么被折叠?
 到【灌水乐园】发言


