


嵌入式第一个基于库函数的跑马灯实验
-
项目的框架
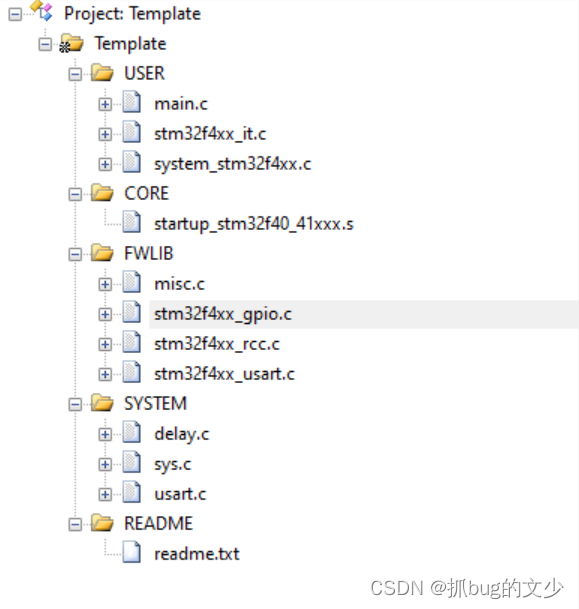
首先搭建基本框架,项目需要的文件仅有:misc.c、stm32f4xx_gpio.c、stm32f4xx_rcc.c、stm32f4xx_usart.c(正点原子的串口文件),此外删除多余的文件,减少编译时间,如下图所示:
-
主要的函数
-1个初始化函数:void GPIO_Init(GPIO_TypeDef* GPIOx, GPIO_InitTypeDef* GPIO_InitStruct);
-2读取输入电平函数:
uint8_t GPIO_ReadInputDataBit(GPIO_TypeDef* GPIOx,uint16_tGPIO_Pin);
uint16_t GPIO_ReadInputData(GPIO_TypeDef* GPIOx)
-2个读取输出电平函数:
uint8_t GPIO_ReadOutputDataBit(GPIO_TypeDef* GPIOx,uint16_tGPIO_Pin);
uint16_t GPIO_ReadOutputData(GPIO_TypeDef* GPIOx);
-4个设置输出电平函数:
void GPIO_SetBits(GPIO_TypeDef* GPIOx,uint16_tGPIO_Pin);
void GPIO_ResetBits(GPIO_TypeDef* GPIOx,uint16_tGPIO_Pin);
void GPIO_WriteBits(GPIO_TypeDef* GPIOx,uint16_tGPIO_Pin,BitAction BitVal);
void GPIO_Write(GPIO_TypeDef* GPIOx,uint16_t PortVal); -
开始先程序
-1首先简历文件夹HARDWARE,在此文件夹下面建立项目项目有关文件夹比如led,在led下分别新建led.c和led.h,并且把此两个文件分别导入。然后写led.h文件 -
led.c 的代码,主要进行初始化,里面的参数通过goto查看指定参数,不能自己填写代码如下:
#include "led.h"
#include "stm32f4xx.h"

void LED_Init(void)
{
	GPIO_InitTypeDef GPIO_InitStructure;
	RCC_AHB1PeriphClockCmd(RCC_AHB1Periph_GPIOF,ENABLE);

	//f9
	GPIO_InitStructure.GPIO_Pin=GPIO_Pin_9;
	GPIO_InitStructure.GPIO_Mode=GPIO_Mode_OUT;
	GPIO_InitStructure.GPIO_OType=GPIO_OType_PP;
	GPIO_InitStructure.GPIO_PuPd=GPIO_PuPd_UP;
	GPIO_InitStructure.GPIO_Speed=GPIO_Speed_50MHz;

GPIO_Init(GPIOF,&GPIO_InitStructure);
	GPIO_SetBits(GPIOF,GPIO_Pin_9);
	//f10
		GPIO_InitStructure.GPIO_Pin=GPIO_Pin_10;
	GPIO_InitStructure.GPIO_Mode=GPIO_Mode_OUT;
	GPIO_InitStructure.GPIO_OType=GPIO_OType_PP;
	GPIO_InitStructure.GPIO_PuPd=GPIO_PuPd_UP;
	GPIO_InitStructure.GPIO_Speed=GPIO_Speed_50MHz;

GPIO_Init(GPIOF,&GPIO_InitStructure);
	GPIO_SetBits(GPIOF,GPIO_Pin_10);
}
- led.h的代码
#ifndef __LED_H

#define __LED_H


void LED_Init(void);


#endif
- main.c的代码
#include "stm32f4xx.h"
#include "led.h"
#include "delay.h"


int main(void)
{
	delay_init(168);
	LED_Init();  //³õʼ»¯

	while(1){
		GPIO_SetBits(GPIOF,GPIO_Pin_9);
		GPIO_SetBits(GPIOF,GPIO_Pin_10);
		delay_ms(500);

			GPIO_ResetBits(GPIOF,GPIO_Pin_9);
			GPIO_ResetBits(GPIOF,GPIO_Pin_10);

		delay_ms(500);
	}

}
实现结果:两个等同时闪烁


 1336
1336


 被折叠的 条评论
为什么被折叠?
被折叠的 条评论
为什么被折叠?
 到【灌水乐园】发言


