


面向对象
什么是面向对象
- 把客观对象抽象成属性数据和对数据的相关操作,把内部细节和不想关的信息隐藏起来,
- 把同一个类型的客观对象的属性数据和操作绑定在一起,封装成类,
- 并且允许分成不同层次进行抽象,通过继承实现属性和操作的共享
- 面向对象的分析 OOA
- 面向对象的设计 OOD
- 面向对象的编程 OOP
概念
- 类、对象(实例)
- 父类是公共的
class Animal{
    constructor(name) {
        this.name=name;
    }
    eat() {
        console.log(`${this.name} eat`)
    }
}
let animal=new Person('动物');
animal.eat();
继承
- 子类继承父类
- 继承可以把公共方法抽离出来,提高复用,减少冗余
class Animal{
    constructor(name) {
        this.name=name;
    }
    eat() {
        console.log(`${this.name} eat`)
    }
    speak() {

    }
}
let animal=new Animal('动物');
animal.eat();

class Dog extends Animal{
    constructor(name,age) {
        super(name);
        this.age=age;
    }
    speak() {
        console.log(`${this.name} is barking!`);
    }
}
let dog=new Dog('🐶',5);
dog.eat();
dog.bark();
封装
- 把数据封装起来
- 减少耦合,不该外部访问的不要让外部访问
- 利于数据的接口权限管理
- ES6 目前不支持,一般认为_开头的都会私有的,不要使用
- 实现
- public:公有修饰符,可以在类内或者类外使用public修饰的属性或者行为,默认修饰符
- protected:受保护的修饰符,可以本类和子类中使用protected修饰的属性和行为
- private : 私有修饰符,只可以在类内使用private修饰的属性和行为
class Animal {
    public name;
    protected age;
    private weight;
    constructor(name,age,weight) {
        this.name=name;
        this.age=age;
        this.weight=weight;
    }
}
class Person extends Animal {
    private money;
    constructor(name,age,weight,money) {
        super(name,age,weight);
        this.money=money;
    }
    getName() {
        console.log(this.name);
    }
    getAge() {
        console.log(this.age);
    }
    getWeight() {
        console.log(this.weight);
    }
}
let p=new Person('zfpx',9,100,100);
console.log(p.name);
console.log(p.age);
console.log(p.weight);
module: {
        rules: [
            {
                test: /\.js$/,
                use: {
                    loader: 'babel-loader',
                    options: {
                        presets:["@babel/preset-env"]
                    }
                }
            },
            {
                test: /\.ts$/,
                use: {
                    loader: 'ts-loader'
                }
            }
        ]
    }
多态
- 同一个接口可以不同实现
- 保持子类的开放性和灵活性
- 面向接口编程
class Animal {
    public name;
    protected age;
    private weight;
    constructor(name,age,weight) {
        this.name=name;
        this.age=age;
        this.weight=weight;
    }
}
class Person extends Animal {
    private money;
    constructor(name,age,weight,money) {
        super(name,age,weight);
        this.money=money;
    }
    speak() {
        console.log('你好!');
    }
}
class Dog extends Animal {
    private money;
    constructor(name,age,weight) {
        super(name,age,weight);
    }
    speak() {
        console.log('汪汪汪!');
    }
}

let p=new Person('zfpx',10,10,10);
p.speak();
let d=new Dog('zfpx',10,10);
d.speak();
设计原则
- 按哪一种思路或者标准来实现功能
- 功能相同,可以有不同设计的方式
- 需求如果不断变化,设计的作用才能体现出来
SOLID五大设计原则
| 首字母 | 指代 | 概念 |
|---|---|---|
| S | 单一职责原则 | 单一功能原则认为对象应该仅具有一种单一功能的概念。 |
| O | 开放封闭原则 | 开闭原则认为“软件体应该是对于扩展开放的,但是对于修改封闭的”的概念。 |
| L | 里氏替换原则 | 里氏替换原则认为“程序中的对象应该是可以在不改变程序正确性的前提下被它的子类所替换的”的概念。参考 契约式设计。 |
| I | 接口隔离原则 | 接口隔离原则认为“多个特定客户端接口要好于一个宽泛用途的接口”[5] 的概念。 |
| D | 依赖反转原则 | 依赖反转原则认为一个方法应该遵从“依赖于抽象而不是一个实例”[5] 的概念。依赖注入是该原则的一种实现方式。 |
单一职责原则
- Single responsibility principle
- 一个程序只做好一件事
- 如果功能特别复杂就进行拆分
开放封闭原则
- Open Closed Principle
- 对扩展开放,对修改关闭
- 增加需求时,扩展新代码,而非修改已有代码
- 这是软件设计的终极目标
src/utils/request.js
function parseJSON(response) {
  return response.json();
}

function checkStatus(response) {
  if (response.status >= 200 && response.status < 300) {
    return response;
  }

  const error = new Error(response.statusText);
  error.response = response;
  throw error;
}


export default function request(url, options) {
  return fetch(url, options)
    .then(checkStatus)
    .then(parseJSON)
    .then(data=>{data})
    .catch(err => ({ err }));
}
L 里氏替换原则
- Liskov Substitution Principle
- 子类能覆盖父类
- 父类能出现的地方子类就能出现
- JS使用比较少
I 接口隔离原则
- Interface Segregation Principle
- 保持接口的单一独立,避免出现胖接口
- JS中没有接口,使用较少
- 类似于单一职责原则,更关注接口
D 依赖倒置原则
- Dependence Inversion Principle
- 面向接口编程,依赖于抽象而不依赖于具体实现
- 使用方只关注接口而不关注具体类的实现
- JS中使用较少(没有接口,弱类型)
工厂模式
简单工厂模式
- 简单工厂模式是由一个工厂对象决定创建出哪一种产品类的实例
类图
代码
class Plant{
    constructor(name) {
        this.name=name;
    }
    grow() {
        console.log('growing~~~~~~');
    }
}
class Apple extends Plant{
    constructor(name) {
        super(name);
        this.taste='甜';
    }
}
class Orange extends Plant{
    constructor(name) {
        super(name);
        this.taste='酸';
    }
}
class Factory{
    static create(name) {
        switch (name) {
            case 'apple':
                return new Apple('苹果');
            case 'orange':
                return new Orange('橘子');
        }
    }
}
let apple=Factory.create('apple');
console.log(apple);
let orange=Factory.create('orange');
console.log(orange);
经典场景
jQuery
class jQuery{
    constructor(selector){
        let elements = Array.from(document.querySelectorAll(selector));
        let length = elements?elements.length:0;
        for(let i=0;i<length;i++){
            this[i]=elements[i];
        }
        this.length = length;
    }
    html(){

    }
}
window.$ = function(selector){
   return new jQuery(selector);
}
React
class Vnode{
    constructor(tag,attrs,children){
        this.tag = tag;
        this.attrs = attrs;
        this.children = children;
    }
}
React.createElement = function(tag,attrs,children){
  return new Vnode(tag,attr,children);
}
工厂方法模式
- 工厂方法模式Factory Method,又称多态性工厂模式。
- 在工厂方法模式中,核心的工厂类不再负责所有的产品的创建,而是将具体创建的工作交给子类去做。
类图
代码
class Plant{
    constructor(name) {
        this.name=name;
    }
    grow() {
        console.log('growing~~~~~~');
    }
}
class Apple extends Plant{
    constructor(name) {
        super(name);
        this.taste='甜';
    }
}
class Orange extends Plant{
    constructor(name) {
        super(name);
        this.taste='酸';
    }
}
class AppleFactory{
    create() {
        return new Apple();
    }
}
class OrangeFactory{
    create() {
        return new Orange();
    }
}
const settings={
    'apple': AppleFactory,
    'orange':OrangeFactory
}
let apple=new settings['apple']().create();
console.log(apple);
let orange=new settings['orange']().create();
console.log(orange);
抽象工厂模式
- 抽象工厂模式是指当有多个抽象角色时,使用的一种工厂模式
- 抽象工厂模式可以向客户端提供一个接口,使客户端在不必指定产品的具体的情况下,创建多个产品族中的产品对象
类图
代码
class Button{
    render() {

    }
}
class AppleButton{
    render() {
       console.log('苹果按钮');
    }
}
class WindowButton{
    render() {
       console.log('Windows按钮');
    }
}

class Icon{
    render() {

    }
}
class AppleIcon{
    render() {
       console.log('苹果图标');
    }
}
class WindowIcon{
    render() {
       console.log('Windows图标');
    }
}
class Factory{
    createButton() {}
    createIcon() {}
}
class AppleFactory{
    createButton() {
        return new AppleButton();
    }
    createIcon() {
        return new AppleButton();
    }
}
class WindowsFactory{
    createButton() {
        return new WindowButton();
    }
    createIcon() {
        return new WindowIcon();
    }
}
const settings={
    'apple': AppleFactory,
    'windows':WindowsFactory
}
let appleFactory=new settings['apple']();
appleFactory.createButton().render();
appleFactory.createIcon().render();

let windowsFactory=new settings['windows']();
windowsFactory.createButton().render();
windowsFactory.createIcon().render();
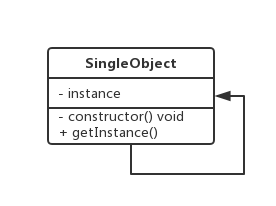
单例模式
适用于共享,同时处理一个
类图
代码
typescript
class Window {
    constructor(name) {
        this.name = name;
    }
    static getInstance(name) {
        if (!this.instance) {
            this.instance = new Window(name);
        }
        return this.instance;
    }
}

var w1 = Window.getInstance();
var w2 = Window.getInstance();
console.log(w1 === w2);
ES5单例模式
let  Window = function(name) {
    this.name=name;
}
Window.prototype.getName=function () {
    console.log(this.name);
}
Window.getInstance=(function () {
    let window=null;
    return function (name) {
        if (!window)
           window=new Window(name);
        return window;
    }
})();
let window=Window.getInstance('zfpx');
window.getName();
透明单例
let Window=(function () {
    let window;
    let Window=function (name) {
        if (window) {
            return window;
        } else {
            this.name=name;
            return (window=this);
        }
    }
    Window.prototype.getName=function () {
        console.log(this.name);
    }
    return Window;
})();

let window1=new Window('zfpx');
let window2=new Window('zfpx');
window1.getName();
console.log(window1 === window2)
单例与构建分离
function Window(name) {
    this.name=name;
}
Window.prototype.getName=function () {
    console.log(this.name);
}

let createSingle=(function () {
    let instance;
    return function (name) {
        if (!instance) {
            instance=new Window();
        }
        return instance;
    }
})();

let window1=new createSingle('zfpx');
let window2=new createSingle('zfpx');
window1.getName();
console.log(window1 === window2)
封装变化
function Window(name) {
    this.name=name;
}
Window.prototype.getName=function () {
    console.log(this.name);
}

let createSingle=function (Constructor) {
    let instance;
    return function () {
        if (!instance) {
            Constructor.apply(this,arguments);
            Object.setPrototypeOf(this,Constructor.prototype)
            instance=this;
        }
        return instance;
    }
};
let CreateWindow=createSingle(Window);
let window1=new CreateWindow('zfpx');
let window2=new CreateWindow('zfpx');
window1.getName();
console.log(window1 === window2)
命名空间
-
用户编写的代码与内部的类/函数/常量或第三方类/函数/常量之间的名字冲突。
-
为很长的标识符名称创建一个别名(或简短)的名称,提高源代码的可读性。 jQuery
let $ = {
  ajax(){},
  get(){},
  post(){}
}
let utils={};
utils.def=function (namespace,fn) {
    let namespaces=namespace.split('.');
    let fnName=namespaces.pop();
    let current=utils;
    for (let i=0;i<namespaces.length;i++){
        let namespace=namespaces[i];
        if (!current[namespace]) {
            current[namespace]={};
        }
        current=current[namespace];
    }
    current[fnName]=fn;
}
utils.def('dom.attr',function (key) {
    console.log('dom.attr');
});
utils.def('dom.html',function (html) {
    console.log('dom.html');
});
utils.def('string.trim',function () {
    console.log('string.trim');
});
utils.dom.attr('src');
utils.string.trim(' aaa ');
场景
jQuery
if(window.jQuery!=null){
  return window.jQuery;
}else{
    //init~~~~~~~
}
模态窗口
class Login{
    constructor() {
        this.element=document.createElement('div');
        this.element.innerHTML=(
            `
            用户名 <input type="text"/>
            <button>登录</button>
            `
        );
        this.element.style.cssText='width: 100px; height: 100px; position: absolute; left: 50%; top: 50%; display: block;';
        /* this.element.style.width='100px';
        this.element.style.height='100px';
        this.element.style.position='absolute';
        this.element.style.left='50%';
        this.element.style.top='50%'; */
        document.body.appendChild(this.element);
    }
    show() {
        this.element.style.display='block';
    }
    hide() {
        this.element.style.display='none';
    }
}
Login.getInstance=(function () {
    let instance;
    return function () {
        if (!instance) {
            instance=new Login();
        }
        return instance;
    }
})();

document.getElementById('showBtn').addEventListener('click',function (event) {
    Login.getInstance().show();
});
document.getElementById('hideBtn').addEventListener('click',function (event) {
    Login.getInstance().hide();
});
store
function createStore(reducer) {
    let state;
    let listeners=[];
    function getState() {
        return state;
    }
    function dispatch(action) {
        state=reducer(state,action);
        listeners.forEach(l=>l());
    }
    function subscribe(listener) {
        listeners.push(listener);
        return () => {
            listeners = listeners.filter(item => item!=listener);
            console.log(listeners);
        }
    }
    dispatch({});
    return {
        getState,
        dispatch,
        subscribe
    }
}
let store = createStore();
缓存
let express=require('express');
let fs=require('fs');
let cache={};
let app=express();
app.get('/user/:id',function (req,res) {
    let id=req.params.id;
    let user=cache.get(id);
    if (user) {
        res.json(user);
    } else {
        fs.readFile(`./users/${id}.json`,'utf8',function (err,data) {
            let user=JSON.parse(data);
            cache.put(id,user);
            res.json(user);
        });
    }
});

app.get('/user',function (req,res) {
    let user=req.query;
    fs.writeFile(`./users/${user.id}.json`,JSON.stringify(user),(err) => {
        console.log(err);
        res.json({code: 0,data: '写入成功'});
    });
});
app.listen(3000);
LRU缓存
- lru-cache
- 为LRU Cache设计一个数据结构,它支持两个操作:
- 1)get(key):如果key在cache中,则返回对应的value值,否则返回-1
- 2)set(key,value):如果key不在cache中,则将该(key,value)插入cache中(注意,如果cache已满,则必须把最近最久未使用的元素从cache中删除);如果key在cache中,则重置value的值。
/**
- 用一个数组来存储数据,给每一个数据项标记一个访问时间戳
- 每次插入新数据项的时候,先把数组中存在的数据项的时间戳自增,并将新数据项的时间戳置为0并插入到数组中
- 每次访问数组中的数据项的时候,将被访问的数据项的时间戳置为0。
- 当数组空间已满时,将时间戳最大的数据项淘汰。
*/
class LRUCache{
    constructor(capacity) {
        this.capacity=capacity;
        this.members=[];
    }
    put(key,value) {
        let found=false;
        let oldestIndex=-1;
        let oldestAge=-1;
        for (let i=0;i<this.members.length;i++){
            let member=this.members[i];
            if (member.age > oldestAge) {
                oldestIndex=i;
                oldestAge=member.age;
            }
            if (member.key==key) {
                this.members[i]={key,value,age: 0};
                found=true;
            } else {
                member++;
            }
        }
        if (!found) {
            if (this.members.length>=this.capacity) {
                this.members.splice(oldestIndex,1);
            }
            this.members[this.members.length]={
                key,
                value,
                age:0
            }
        }
    }
    get(key) {
        for (let i=0;i<this.members.length;i++){
            let member=this.members[i];
            if (member.key==key) {
                member.age=0;
                return member.value;
            }
        }
        return -1;
    }
}

let cache=new LRUCache(3);
cache.put('1',1);
cache.put('2',2);
cache.put('3',3);
console.log(cache.get('1'));
console.log(cache.get('2'));
console.log(cache.get('3'));
cache.put('4',4);
console.log(cache.get('1'));
console.log(cache.get('4'));
console.log(cache);
适配器模式
- 旧的接口和使用者不兼容
- 中间加一个适配器转换接口
代码
class Power{
    charge() {
        return '220V';
    }
}

class Adapter{
    constructor() {
        this.power=new Power();
    }
    charge() {
        let power=this.power.charge();
        return `${power} => 12V`;
    }
}

class Client{
    constructor() {
        this.adapter=new Adapter();
    }
    use() {
        console.log(this.adapter.charge());
    }
}
new Client().use();
场景
插件适配
- 适配参数
- 适配后端接口数据
function ajax(options){
  let _default = {
      method:'GET',
      dataType:'json'
  }
  for(let attr in options){
    _default[attr] = options[attr]||_default[attr];
  }
}

function get(url){
  let options = {method:'GET',url};
  ajax(options);
}
promisify
let fs=require('fs');
function promisify(readFile) {
    return function (filename,encoding) {
        return new Promise(function (resolve,reject) {
            readFile(filename,encoding,function (err,data) {
                if (err)
                    reject(err);
                else
                    resolve(data);
            })
        });
    }
}
let readFile=promisify(fs.readFile);
readFile('./1.txt','utf8').then(data => console.log(data));
jquery
let $=require('jquery');
$.ajax({
    url,
    type: 'POST',
    dataType: 'json',
    data:{id:1}
});

let $={
    ajax(options) {
        fetch(options.url,{
            method: options.type,
            body:JSON.stringify(options.data)
        })
    }
}
computed
<!DOCTYPE html>
<html lang="en">
<head>
    <meta charset="UTF-8">
    <meta name="viewport" content="width=device-width, initial-scale=1.0">
    <meta http-equiv="X-UA-Compatible" content="ie=edge">
    <script src="https://cdn.bootcss.com/vue/2.5.17/vue.js"></script>
    <title>vue</title>
</head>
<body>
<div id="root">
<p>{{name}}</p>
<p>{{upperName}}</p>
</div>
<script>
let vm=new Vue({
    el: '#root',
    data: {
        name:'zfpx'
    },
    computed: {
        upperName() {
            return this.name.toUpperCase();
        }
    }
});
</script>
</body>
</html>
装饰器模式
- 在不改变其原有的结构和功能为对象添加新功能
- 装饰比继承更加灵活
代码
class Duck{
    eat(food) {
        console.log('吃${food}');
    }
}

class TangDuck{
    constructor() {
        this.duck=new Duck();
    }
    eat() {
        this.duck.eat();
        console.log('谢谢');
    }
}
包装器
装饰器模式是将一个对象嵌入另一个对象之中,实际上相当于这个对象被另一个对象包装起来,形成一条包装链。请求随着这条链条依次传递到所有的对象,每个对象有处理这个请求的机会。
class Coffee{
  make(water){
    return `${water}+咖啡`;
  }
  cost(){
      return 10;
  }
}

class MilkCoffee{
    constructor(parent){
        this.parent = parent;
    }
    make(water){
        return `${this.parent.make(water)}+牛奶`;
    }
    cost(){
        return this.parent.cost()+1;
    }
}

class SugerCoffee{
    constructor(parent){
        this.parent = parent;
    }
    make(water){
        return `${this.parent.make(water)}+糖`;
    }
    cost(){
        return this.parent.cost()+2;
    }
}
let coffee = new Coffee();
let milkCoffee = new MilkCoffee(coffee);
let milksugerCoffee = new SugerCoffee(milkCoffee);
console.log(milksugerCoffee.make('水')+'='+milksugerCoffee.cost());
AOP
-
在软件业,AOP为Aspect Oriented Programming的缩写,意为:面向切面编程
-
可以通过预编译方式和运行期动态代理实现在不修改源代码的情况下给程序动态统一添加功能的一种技术
Function.prototype.before = function(beforeFn){
    let _this = this;
    return function(){
        beforeFn.apply(this,arguments);
        return _this.apply(this,arguments);
    }
}
Function.prototype.after = function(afterFn){
    let _this = this;
    return function(){
         _this.apply(this,arguments);
        afterFn.apply(this,arguments);
    }
}
function buy(money,goods){
  console.log(`花${money}买${goods}`);
}
buy = buy.before(function(){
    console.log(`向媳妇申请1块钱.`);
});
buy = buy.after(function(){
    console.log(`把剩下的2毛钱还给媳妇.`);
});
buy(.8,'盐');
场景
埋点
埋点分析,是网站分析的一种常用的数据采集方法
- 埋点方式
- 服务器层面的:主要是通过客户端的请求进行分析
- 客户端层面的:通过埋点进行相应的分析
- 代码埋点
- 自动化埋点:通过AOP思想对相应的方法进行统计
- 第三方实现 百度、友盟等…
<body>
    <button data-name="西瓜" id="watermelon">西瓜</button>
    <button data-name="苹果" id="apple">苹果</button>
<script>
 let watermelon = document.getElementById('watermelon');
 let apple = document.getElementById('apple');
 Function.prototype.after = function(afterFn){
    let _this = this;
    return function(){
         _this.apply(this,arguments);
        afterFn.apply(this,arguments);
    }
}

 function click(){
     console.log('点击'+this.dataset.name);
 }
 click = click.after(function(){
     let img = new Image();
     img.src = `http://localhost:3000?name=${this.dataset.name}`;
 });
 Array.from(document.querySelectorAll('button')).forEach(function(button){
    button.addEventListener('click',click);
 });
let express = require('express');
let app = express();
app.get('/',function(req,res){
   console.log('name',req.query.name);
   res.end('ok');
});
app.listen(3000);
表单校验
<body>
    <form action="">
        用户名<input type="text" name="username" id="username">
        密码<input type="text" name="password" id="password">
        <button id="submit-btn" >提交</button>
    </form>
    <script>
         Function.prototype.before = function(beforeFn){
            let _this = this;
            return function(){
                let ret = beforeFn.apply(this,arguments);
                if(ret)
                _this.apply(this,arguments);
            }
        }
      function submit(){
          alert('提交表单');
      }
      submit= submit.before(function(){
          let username = document.getElementById('username').value;
          if(username.length<6){
              return alert('用户名不能少于6位');
          }
          return true;
      });
      submit = submit.before(function(){
          let username = document.getElementById('username').value;
          if(!username){
              return alert('用户名不能为空');
          }
          return true;
      });


      document.getElementById('submit-btn').addEventListener('click',submit);
防CSRF攻击
- CSRF通过伪装来自受信任用户的请求来利用受信任的网站
受信任网站
let express = require('express');
let bodyParser = require('body-parser');
let session = require('express-session');
let path = require('path');
let app = express();
app.use(bodyParser.json());
app.use(bodyParser.urlencoded({extended:true}));
app.use(session({
    resave:true,
    secret:'zfpx',
    saveUninitialized:true
}));
app.set('view engine','ejs');
app.set('views',path.resolve('views'));
app.engine('html',require('ejs').__express);
let users = {};
app.get('/login',function(req,res){
  res.render('login.html');
});
app.post('/login',function(req,res){
    let body = req.body;
    users[body.username] = 100;
    req.session.username = body.username;
    res.json({code:0,data:'登录成功'});
});
app.get('/money',function(req,res){
   res.send(users[req.session.username]+"元");
});
app.get('/withdraw',function(req,res){
    let token = req.session.token =  Math.random()+'';
    res.cookie('token',token);
    res.render('withdraw.html');
});
app.post('/withdraw',function(req,res){
    //users[req.session.username] -= (req.body.money?Number(req.body.money):10);
    //res.json({code:0,data:'取款成功'});
    console.log(req.body.token, req.session.token)
      if(req.body.token== req.session.token){
        users[req.session.username] -= (req.body.money?parseInt(req.body.money):10);
        res.json({code:0,data:'取款成功'});
      }else{
        res.json({code:1,data:'取款失败'});
      }
});
app.listen(3000);
login
<body>
    <a href="http://localhost:3000/money">查看余额</a>
    <a href="http://localhost:3000/withdraw">取款</a>
    用户名 <input type="text" name="username" id="username">
    <button onclick="login()">提交</button>
    <script>
        function ajax(method,url,data){
            let xhr = new XMLHttpRequest;
            xhr.open(method,url,true);
            xhr.setRequestHeader('Content-Type','application/json');
            xhr.onreadystatechange = function(){
                if(xhr.readyState == 4 && xhr.status == 200){
                    console.log(xhr.responseText);
                }
            }
            xhr.send(JSON.stringify(data));
        }
        function login(){
            let username = document.getElementById('username').value;
            ajax('POST','/login',{username});
        }
    </script>
</body>
取款
<body>
    金额 <input type="text" name="money" id="money">
    <button onclick="login()">提交</button>
    <script>
        Function.prototype.before = function(beforeFn){
            let _this = this;
            return function(){
                beforeFn.apply(this,arguments);
                return _this.apply(this,arguments);
            }
        }

        function ajax(method,url,data){
            let xhr = new XMLHttpRequest;
            xhr.open(method,url,true);
            xhr.setRequestHeader('Content-Type','application/json');
            xhr.onreadystatechange = function(){
                if(xhr.readyState == 4 && xhr.status == 200){
                    console.log(xhr.responseText);
                }
            }
            xhr.send(JSON.stringify(data));
        }
        ajax = ajax.before(function(method,url,data){
            let result = document.cookie.match(/(^|; )token=(.+?)($|; )/);
            console.log(result,result);
            data.token = result[2];
        });
        function login(){
            let money = document.getElementById('money').value;
            ajax('POST','/withdraw',{money});
        }
    </script>
</body>
非信任网站
let express = require('express');
let path = require('path');
let app = express();
app.set('view engine','ejs');
app.set('views',path.resolve('views'));
app.engine('html',require('ejs').__express);

app.get('/',function(req,res){
  res.render('csrf.html');
});
app.get('/form',function(req,res){
  res.render('form.html');
});

app.listen(4000);
csrf
<body>
    <img src="https://www.baidu.com/img/bd_logo1.png"/>
    <iframe src="/form" frameborder="0" style="width:0;height:0"></iframe>
</body>
form
<body>
        <form id="myform" action="http://localhost:3000/withdraw" method="POST">
            <input type="text" name="money" id="money" value="10">
        </form>
        <script>
                setTimeout(function(){
                   document.getElementById('myform').submit();
                },100);
            </script>
</body>
支持decorators
-
babel-plugin-proposal-decorators
"plugins": [
  ["@babel/plugin-proposal-decorators", { "legacy": true }],
  ["@babel/plugin-proposal-class-properties", { "loose" : true }]
]
7.3.5 类decorators
`js @testable class Person{
} function testable(target) { target.testable=true; } console.log(Person.testable);
```js
let Hooks={
    componentWillMount() {
        console.log('componentWillMount');
    },
    componentDidMount() {
        console.log('componentDidMount');
    }
}
function mixins(...others) {
    return function (target) {
        Object.assign(target.prototype,...others);
    }
}
@mixins(Hooks)
class Component{

}
let c=new Component();
console.log(c);
方法decorators
function readonly(target,attr,descriptor) {
    descriptor.writable=false;
}
class Circle{
    @readonly
    PI=3.14;
}
let c=new Circle();
c.PI=100;
console.log(c.PI)
function logger(target,attr,descriptor) {
    let oldVal=descriptor.value;
    descriptor.value=function (...args) {
        console.log(`参数:${args}`);
        return oldVal(...args);
    }
}
class Caculator{
    @logger
    sum(a,b) {
        return a+b;
    }
}
let c=new Caculator();
let ret=c.sum(1,2);
console.log(ret);
let {readonly}=require('core-decorators');
function deprecate(msg,options) {
    return function (target,attr,descriptor) {
        //DEPRECATION Caculator#sum: This function will be removed in future versions.
        let oldVal=descriptor.value;
        descriptor.value=function (...args) {
            let message=msg? msg:`DEPRECATION ${target.constructor.name}#${attr}: This function will be removed in future versions.`;
            let see=options&&options.url? `see ${options.url}`:``;
            console.warn(message+'\r\n'+see);
            return oldVal(...args);
        }
    }
}
class Caculator{
    @readonly PI=3.14;
    @deprecate
    sum(a,b) {
        return a+b;
    }
    @deprecate('stop using this')
    minus(a,b) {
        return a-b;
    }
    @deprecate('stop using this',{url:'http://www.baidu.com'})
    multiply(a,b) {
        return a*b;
    }
}
let c=new Caculator();
c.PI=5;
console.log(c.PI);
let ret=c.sum(1,2);
console.log(ret);
let ret2=c.minus(2,1);
console.log(ret2);
let ret3=c.multiply(2,1);
console.log(ret3);
代理模式
- 由于一个对象不能直接引用另外一个对象,所以需要通过代理对象在这两个对象之间起到中介作用
- 可以在使用者和目标对象之间加一个代理对象,通过代理可以实现控制
代码
class Goole{
    constructor() {    }
    get() {
        return 'google';
    }
}

class Proxy {
    constructor() {
        this.google=new Goole();
    }
    get() {
        return this.google.get();
    }
}
let proxy = new Proxy();
let ret = proxy.get();
console.log(ret);
场景
事件委托
- 事件捕获指的是从document到触发事件的那个节点,即自上而下的去触发事件
- 事件冒泡是自下而上的去触发事件
- 绑定事件方法的第三个参数,就是控制事件触发顺序是否为事件捕获。true为事件捕获;false为事件冒泡,默认false。
<body>
    <ul id="list">
        <li>1</li>
        <li>2</li>
        <li>3</li>
    </ul>
<script>
  let list = document.querySelector('#list');
  list.addEventListener('click',event=>{
       alert(event.target.innerHTML);
  });
</script>
</body>
图片懒加载
app.js
let express=require('express');
let path=require('path')
let app=express();
app.get('/images/loading.gif',function (req,res) {
    res.sendFile(path.join(__dirname,req.path));
});
app.get('/images/:name',function (req,res) {
    setTimeout(() => {
        res.sendFile(path.join(__dirname,req.path));
    }, 2000);
});
app.get('/',function (req,res) {
    res.sendFile(path.resolve('index.html'));
});
app.listen(8080);
index.html
<!DOCTYPE html>
<html lang="en">
<head>
    <meta charset="UTF-8">
    <meta name="viewport" content="width=device-width, initial-scale=1.0">
    <meta http-equiv="X-UA-Compatible" content="ie=edge">
    <title>Document</title>
    <style>
        *{
            padding:0;
            margin:0;
        }
        ul,li{
            list-style:none;
        }
        #background{
            position:absolute;
            border:1px solid green;
            right:10px;
            top:10px;
        }
        #background li{
            float:left;
            margin-left:10px;
            text-align:center;
            border:1px solid red;
            border-radius:5px;
        }
        #myImage{
            width:600px;
            height:400px;
            margin:100px auto;
        }
        #myImage img{
            width:100%;
            height:100%;
        }
    </style>
</head>
<body>
    <ul id="background">
        <li data-src="/images/bg1.jpg">图片1</li>
        <li data-src="/images/bg2.jpg">图片2</li>
    </ul>
    <div id="myImage">
    </div>
<script>
 let container = document.querySelector('#background');
 let myImage = document.querySelector('#myImage');
 let Background = (function(){
     let img = new Image();
     myImage.appendChild(img);
     return {
         set(src){
             img.src = src;
         }
     }
 })();
 let LoadingBackground = (function(){
     let img = new Image();
     img.onload = function(){
         Background.set(this.src);
     }
     return {
         set(src){
            Background.set(`/images/loading.gif`);
            img.src = src;
         }
     }
 })();
 container.addEventListener('click',function(event){
     let src = event.target.dataset.src;
     LoadingBackground.set(src+'?ts='+Date.now());
 });
</script>
</body>
</html>
- 更符合单一职责原则和开闭原则
防抖代理
todo.html
<body>
    <ul id="todos">
    </ul>
<script>
    let todos = document.querySelector('#todos');
    window.onload = function(){
        fetch('/todos').then(res=>res.json()).then(response=>{
            todos.innerHTML = response.map(item=>`<li "><input value="${item.id}" type="checkbox" ${item.completed?"checked":""}/>${item.text}</li>`).join('');
        });
    }
    function toggle(id){
       fetch(`/toggle/${id}`).then(res=>res.json()).then(response=>{
            console.log('response',response);
        });
    }
    todos.addEventListener('click',function(event){
        let checkbox = event.target;
        let id = checkbox.value;
        toggle(id);
    });
</script>
</body>
todos.html
<body>
    <ul id="todos">
    </ul>
<script>
    let todos = document.querySelector('#todos');
    window.onload = function(){
        fetch('/todos').then(res=>res.json()).then(response=>{
            todos.innerHTML = response.map(item=>`<li "><input value="${item.id}" type="checkbox" ${item.completed?"checked":""}/>${item.text}</li>`).join('');
        });
    }
    function toggle(id){
       fetch(`/toggle/${id}`).then(res=>res.json()).then(response=>{
            console.log('response',response);
        });
    }
    let LazyToggle = (function(id){
        let ids = [];
        let timer;
        return function(id){
            ids.push(id);
            if(!timer){
              timer = setTimeout(function(){
                  toggle(ids.join(','));
                  ids = null;
                  clearTimeout(timer);
                  timer = null;
              },2000);
            }
        }
    })();
    todos.addEventListener('click',function(event){
        let checkbox = event.target;
        let id = checkbox.value;
        LazyToggle(id);
    });
</script>
app.js
let express=require('express');
let app=express();
app.use(express.static(__dirname));
let todos=[
    {id: 1,text: 'a',completed: false},
    {id: 2,text: 'b',completed: false},
    {id: 3,text: 'c',completed: false},
];
app.get('/todos',function (req,res) {
    res.json(todos);
});
app.get('/toggle/:id',function (req,res) {
    let id=req.params.id;
    todos = todos.map(item => {
        if (item.id==id) {
            item.completed=!item.completed;
        }
        return item;
    });
    res.json({code:0});
});
app.listen(8080);
app.js
app.get('/toggle/:ids',function (req,res) {
    let ids=req.params.ids;
    ids=ids.split(',').map(item=>parseInt(item));
    todos = todos.map(item => {
        if (ids.includes(item.id)) {
            item.completed=!item.completed;
        }
        return item;
    });
    res.json({code:0});
});
代理跨域
3000.js
let express=require('express');
let app=express();
app.use(express.static(__dirname));
app.listen(3000);
4000.js
let express=require('express');
let app=express();
let bodyParser=require('body-parser');
app.use(bodyParser.urlencoded({extended:true}));
app.use(express.static(__dirname));
let users=[];
app.post('/register',function(req,res){
    let body=req.body;
    let target=body.target;
    let callback=body.callback;
    let username=body.username;
    let password=body.password;
    let user={username,password};
    let id=users.length==0? 1:users[users.length-1].id+1;
    user.id=id;
    users.push(user);
    res.status(302);
    res.header('Location',`${target}?callback=${callback}&args=${id}`);
    res.end();
});
app.listen(4000);
index.html
<script type="text/javascript">
  function receiveId(data){
      alert('用户ID='+data);
  }
</script>
<iframe name="proxyIframe" id="proxyIframe"  frameborder="0" ></iframe>
<form action="http://localhost:4000/register" method="POST" target="proxyIframe">
   <input type="hidden" name="callback" value="receiveId">
     <input type="hidden" name="target" value="http://localhost:3000/target.html">
     用户名<input type="text" name="username"/>
     密码<input type="text" name="password"/>
     <input type="submit" value="提交">
</form>
target.html
window.onload = function(){
        var query = location.search.substr(1).split('&');
        let fn,args;
        for(let i=0,len=query.length;i<len;i++){
            let item = query[i].split('=');
            if(item[0]=='callback'){
                fn = item[1];
            }else if(item[0] == 'args'){
                args = item[1];
            }
        }
        try{
            eval(`top.${fn}('${args}')`);
        }catch(e){}
    }
代理缓存
缓存代理可以为开销大的计算结果提供暂时的存储
0!=1,n!=(n-1)!×n
let m = function (n) {
    if (n<=1) {
        return 1;
    } else {
        return n*m(n-1);
    }
}
function sum(n) {
    let result=0;
    for (let i=1;i<=n;i++){
        result+=m(i);
    }
    return result;
}
console.log(sum(4));
let m = function (n) {
    if (n<=1) {
        return 1;
    } else {
        return n*m(n-1);
    }
}
let sum=(function () {
    let cache={};
    return function sum(n) {
        let result=0;
        for (let i=1;i<=n;i++){
            let r=cache[i];
            if (r) {
                result+=r;
            } else {
                r=m(i);
                cache[i]=r;
                result+=r;
            }
        }
        return result;
    }
})()

console.log(sum(4));
$.proxy
- 接受一个函数,然后返回一个新函数,并且这个新函数始终保持了特定的上下文语境。
- jQuery.proxy( function, context ) function为执行的函数,content为函数的上下文this值会被设置成这个object对象
<script src="http://libs.baidu.com/jquery/2.0.0/jquery.min.js"></script>
<script>
   let btn = document.getElementById('btn');
   btn.addEventListener('click',function(){
       setTimeout($.proxy((function(){
           $(this).css('color','red');
       }),this),1000);
   });
</script>
Proxy
- Proxy 用于修改某些操作的默认行为
- Proxy 可以理解成,在目标对象之前架设一层“拦截”,外界对该对象的访问,都必须先通过这层拦截,因此提供了一种机制,可以对外界的访问进行过滤和改写。Proxy 这个词的原意是代理,用在这里表示由它来“代理”某些操作,可以译为“代理器”。
let wang={
    name: 'wangy',
    age: 29,
    height:165
}
let wangMama=new Proxy(wang,{
    get(target,key) {
        if (key == 'age') {
            return wang.age-1;
        } else if (key == 'height') {
            return wang.height+5;
        }
        return target[key];
    },
    set(target,key,val) {
        if (key == 'boyfriend') {
            let boyfriend=val;
            if (boyfriend.age>40) {
                throw new Error('太老');
            } else if (boyfriend.salary<20000) {
                throw new Error('太穷');
            } else {
                target[key]=val;
                return true;
            }
        }
    }
});
console.log(wangMama.age);
console.log(wangMama.height);
wangMama.boyfriend={
    age: 41,
    salary:3000
}
- 代理模式 VS 适配器模式 适配器提供不同接口,代理模式提供一模一样的接口
- 代理模式 VS 装饰器模式 装饰器模式原来的功能不变还可以使用,代理模式改变原来的功能
外观模式
该模式就是把一些复杂的流程封装成一个接口供给外部用户更简单的使用
- 门面角色:外观模式的核心。它被客户角色调用,它熟悉子系统的功能。内部根据客户角色的需求预定了几种功能的组合
- 子系统角色:实现了子系统的功能。它对客户角色和Facade时未知的
- 客户角色:通过调用Facede来完成要实现的功能
代码
class Sum{
    sum(a,b) {
        return a+b;
    }
}
class Minus{
    minus(a,b) {
        return a-b;
    }
}
class Multiply{
    multiply(a,b) {
        return a * b;
    }
}
class Calculator{
    constructor() {
        this.sumObj=new Sum();
        this.minusObj=new Minus();
        this.multiplyObj=new Multiply();
    }
    sum(...args) {
        this.sumObj.sum(...args);
    }
    minus(...args) {
        this.minusObj.minus(...args);
    }
    multiply(...args) {
        this.multiplyObj.multiply(...args);
    }
}
let calculator=new Calculator();
calculator.sum(1,2);
calculator.minus(1,2);
calculator.multiply(1,2);
代码
class CPU{
    start() {console.log('打开CPU');}
}
class Memory{
    start() {console.log('打开内存');}
}
class Disk{
    start() {console.log('打开硬盘');}
}
class Computer{
    constructor() {
        this.cpu=new CPU();
        this.memory=new Memory();
        this.disk=new Disk();
    }
    start() {
        this.cpu.start();
        this.memory.start();
        this.disk.start();
    }
}
new Computer().start();
场景
- 为复杂的模块或子系统提供外界访问的模块
- 子系统相互独立
redux
观察者模式
- 被观察者供维护观察者的一系列方法
- 观察者提供更新接口
- 观察者把自己注册到被观察者里
- 在被观察者发生变化时候,调用观察者的更新方法
代码
class Star{
    constructor(name) {
        this.name=name;
        this.state='';
        this.observers=[];
    }
    getState() {
        return this.state;
    }
    setState(state) {
        this.state=state;
        this.notifyAllObservers();
    }
    attach(observer) {
        this.observers.push(observer);
    }
    notifyAllObservers() {
        this.observers.forEach(observer=>observer.update());
    }
}
class Fan{
    constructor(name,subject) {
        this.name=name;
        this.subject=subject;
        this.subject.attach(this);
    }
    update() {
        console.log(`${this.subject.name}有新的状态-${this.subject.getState()},${this.name}正在更新`);
    }
}
let star=new Star('赵丽颖');
let fan1=new Fan('姜老师',star);
star.setState('结婚');
场景
事件绑定
    <button id="btn">click</button>
    <script>
        let btn = document.getElementById('btn');
        btn.addEventListener('click',()=>{alert(1)});
        btn.addEventListener('click',()=>{alert(2)});
        btn.addEventListener('click',()=>{alert(3)});
    </script>
Promise
class Promise{
    constructor(fn) {
        this.callbacks=[];
        let resolve=() => {
            this.callbacks.forEach(callback => callback())
        };
        fn(resolve);
    }
    then(callback) {
        this.callbacks.push(callback);
    }
}
let promise=new Promise(function (resolve,reject) {
    setTimeout(function () {
        resolve(100);
    },1000);
});
promise.then(() => console.log(1));
promise.then(() => console.log(2));
callbacks
- JQuery.Callbacks是jQuery1.7+之后引入的,用来进行函数队列的add、remove、fire、lock等操作
- 并提供once、memory、unique、stopOnFalse四个option进行一些特殊的控制。
- Callbacks对象其实就是一个函数队列,获得Callbacks对象之后 ,就可以向这个集合中增加或者删除函数。add和remove功能相反,函数参数是相同的,empty()删除回调列表中的所有函数
<script src="http://libs.baidu.com/jquery/2.0.0/jquery.min.js"></script>
<script>
 function Callbacks(){
     let observers = [];
     function add(observer){
         observers.push(observer);
     }
     function remove(observer){
         let index = observers.indexOf(observer);
         if(index != -1)
           observers.splice(index,1);
     }
     function fire(){
         observers.forEach(item=>item());
     }
     return {
         add,
         remove,
         fire
     }
 }
 let callbacks = Callbacks();

 let a1= ()=>alert(1);
 let a2= ()=>alert(2);
 let a3= ()=>alert(13);
 callbacks.add(a1);
 callbacks.add(a2);
 callbacks.add(a3);
 callbacks.remove(a3);
 callbacks.fire();
</script>
events
自定义事件
const EventEmitter=require('./events');
let subject=new EventEmitter();
subject.on('click',function (name) {
    console.log(1,name);
});
subject.on('click',function (name) {
    console.log(2,name);
});
subject.emit('click','zfpx');
events.js
class EventEmitter{
    constructor() {
        this._events={};
    }
    on(type,listener) {
        let listeners=this._events[type];
        if (listeners) {
            listeners.push(listener);
        } else {
            this._events[type]=[listener];
        }
    }
    emit(type) {
        let listeners=this._events[type];
        let args=Array.from(arguments).slice(1);
        listeners.forEach(listener => listener(...args));
    }
}
module.exports = EventEmitter;
流
let fs=require('fs');
let rs=fs.createReadStream('./1.txt');
rs.on('data',function (data) {
    console.log(data)
});
rs.on('end',function () {
    console.log('end')
});
http服务器
let http=require('http');
let server = http.createServer();
server.on('request',(req,res)=>{
  req.on('data',function(data){
      console.log(data)
  });
}));
生命周期函数
vue watch
<body>
<div id="root">
      <p>FullName: {{fullName}}</p>
      <p>FirstName: <input type="text" v-model="firstName"/></p>
      <p>LastName: <input type="text" v-model="lastName"/></p>
</div>
<script src="https://cdn.bootcss.com/vue/2.5.17-beta.0/vue.min.js"></script>
<script>
new Vue({
  el:'#root',
  data: {
    firstName:'张',
    lastName: '三',
    fullName:'张三'
  },
  watch: {
    firstName(newName, oldName) {
      this.fullName = newName + ' ' + this.lastName;
    }
  }
})
</script>
redux
-
createStore
- 创建一个Redux仓库来保存整个状态树
- 改变状态树的唯一方法是调用store.dispatch方法
- 在整个应用中只能有一个仓库
- 为了指定状态树的各个部分如何响应action的变化,你可能使用combineReducers方法把多个reducer合并为一个单独的reducer
- @param {Function} reducer 一个通过当前状态对象和要处理的action返回新的状态树的函数
- @param {any} [preloadedState] 初始状态。在同构应用中,你可能需要指定它以合并来自服务器的状态,或者从一个以前序列化的用户会话中恢复.
- 如果你使用了combineReducers,来从根reducer中产生状态,这必须是一个和combineReducer 的keys相同形状的对象
- @param {Function} [enhancer] 仓库的enhancer. 你可能需要指定这个去增强仓库的能力以使用第三方的能力比如中间件
- 时间旅行,持久化等等。redux自带的唯一中间件是applyMiddleware
- @returns {Store} 是一个Redux仓库让你可以读取状态,派发action并订阅状态变化 */
export default function createStore(reducer,preloadedState,enhancer) { if (enhancer) { return enhancer(createStore)(reducer,preloadedState); } let state=preloadedState; let listeners=[]; /**
 * 读取仓库管理的状态树
 * @returns {any} 应用当前的状态树
 */
function getState() {
    return state;
}
/**
 * 增加一个变化监听函数。它将在任何派发动作的时候被调用
 * 状态树的部分数据可能会发生潜在的变化。你可能在那个时候在回调函数中调用getState方法以获取最新的状态。
 * 你可能会在监听函数里调用dispatch方法,它会具备以下注意事项
 * 1. 订阅仅仅在每一次调用每一个dispatch方法时被记录快照
 * 如果你在监听函数被触发的时候订阅或取消订阅的话,这对当前正在处理中的dispatch没有任何效果
 * 尽管如此,在下一次dispatch方法的调用中,不管是不是内嵌,都将使用一个最新的订阅列表
 *
 * 2.监听函数不应该预期所有的状态变化,因为状态可能在dispatch中被更新多次。 尽管如此,在 dispatch之前注册的订阅者将会以最新的状态调用
 *
 * @param {*} listener  每一次dispatch时被调用的监听函数
 * @returns {Function} 返回一个可以移除此监听函数的函数
 */
function subscribe(listener) {
    listeners.push(listener);
    return function () {
        const index=listeners.indexOf(listener);
        listeners.splice(inddx,1);
    }
}

/**
 * 派发一个动作,这是触发状态改变的唯一方式
 * 用来创建仓库的reducer函数将会被调用,参数是当前的状态树和给定的动作。它的返回值将会被当作下一个状态树,所有的监听函数也会被通知
 *
 * 基本实现中只支持简单动作对象。如果你想要派发一个Promise、一个Observerable、一个thunk或者其它的任何懂爱,你需要把你创建仓库的函数包裹到对应的中间件里。
 * 比如,你可以看一下redux-thunk包。甚至中间件最后通过这个方法将会派发简单对象。
 *
 *
 * @param {*} action 一个表示发生了什么的简单对象。保持动作序列化将会是一个好主意,以方便你进行记录和回放用户会话。或者使用时间旅行工具redux-devtools.一个动作必须有一个type属性而且不能是undefine.使用字符串常量表示动作类型将会是个好主意。
 * @returns {object} 为了方便,你派发的相同的动作对象
 * 请注意,如果你使用一个自定义中间件,你可能需要包裹 dispatch去返回别的东西(比如你等待的Promise)
 */
function dispatch(action) {
    state=reducer(state,action);
    listeners.forEach(listener=>listener())
}
dispatch({type:'@@redux/INIT'});
return {
    dispatch,
    subscribe,
    getState
}
}
#### 10.4 观察者模式和发布订阅模式
##### 10.4.1 观察者模式(Observer)
- 订阅者把自己想订阅的事件注册到调度中心
- 当该事件触发时候,发布者发布该事件到调度中心,由调度中心统一调度订阅者注册到调度中心的处理代码。

```js
class Agency{
    constructor() {
        this._topics={};
    }
    subscribe(topic,listener) {
        let listeners=this._topics[topic];
        if (listeners) {
            listeners.push(listener);
        } else {
            this._topics[topic]=[listener];
        }
    }
    publish(topic) {
        let listeners=this._topics[topic];
        let args=Array.from(arguments).slice(1);
        listeners.forEach(listener => listener(...args));
    }
}
let agent=new Agency();
class Landlord{
    constructor(name) {
        this.name=name;
    }
    lend(agent,area,money) {
        agent.publish('house',area,money);
    }
}

class Tenant{
    constructor(name) {
        this.name=name;
    }
    rent(agent) {
        agent.subscribe('house', (area,money)=> {
            console.log(`有新房源了, ${area}平米, ${money}元`);
        });
    }
}
let t1=new Tenant('房客1');
let t2=new Tenant('房客2');
let l1=new Landlord('房东1');
t1.rent(agent);
t2.rent(agent);
l1.lend(agent,30,2000);
- 虽然两种模式都存在订阅者和发布者(观察者可认为是订阅者、被观察者可认为是发布者)
- 但是观察者模式是由被观察者调度的,而发布/订阅模式是统一由调度中心调的
- 所以观察者模式的订阅者与发布者之间是存在依赖的,而发布/订阅模式则不会。
状态模式
- 当一个对象的内部状态发生改变时,会导致其行为的改变,这看起来像是改变了对象
- 对象有自己的状态
- 不同状态下执行的逻辑不一样
- 明确状态和每个状态下执行的动作
- 用来减少
if...else子句
代码
class Battery{
    constructor() {
        this.amount='high';
    }
    show() {
        if (this.amount == 'high') {
            console.log('绿色');
            this.amount='middle';
        }else if (this.amount == 'middle') {
            console.log('黄色');
            this.amount='low';
        }else{
            console.log('红色');
        }
    }
}
let battery=new Battery();
battery.show();
battery.show();
battery.show();
show违反开放-封闭原则show方法逻辑太多太复杂- 颜色状态切换不明显
- 过多的
if/else让代码不可维护
class Battery {
    constructor(state) {
        this.amount = 'high';
        this.state = new SuccessState();
    }
    show() {
        this.state.show();
        if (this.amount == 'high') {
            this.amount='middle';
            this.setState(new WarningState());
        } else if(this.amount=='middle'){
            this.amount='low';
            this.setState(new DangerState());
        }
    }
    setState(state) {
        this.state = state;
    }
}
class SuccessState {
    constructor(battery){
        this.battery = battery;
    }
    show() {
        console.log(`绿色 ${battery.amount}`);

  }
}
class WarningState {
    constructor(battery){
        this.battery = battery;
    }
    show() {
        console.log(`黄色 ${battery.amount}`);
  }
}
class DangerState {
    constructor(battery){
        this.battery = battery;
    }
    show() {
        console.log(`红色 ${battery.amount}`);
  }
}

let battery=new Battery();
battery.show();
battery.show();
battery.show();
应用场景
点赞
let likeState={
    render(element) {
        element.innerHTML='赞👍';
    }
}
let likedState={
    render(element) {
        element.innerHTML='取消';
    }
}

class Button{
    constructor(container) {
        this.liked=false;
        this.state = likeState;
        this.element=document.createElement('button');
        container.appendChild(this.element);
        this.render();
    }
    setState(state) {
        this.state=state;
        this.render();
    }
    render() {
        this.state.render(this.element);
    }
}

let button=new Button(document.body);
button.element.addEventListener('click',() => {
    button.setState(button.liked? likeState:likedState);
    button.liked=!button.liked;
});
promise
class Promise{
    constructor(fn) {
        this.state='initial';
        this.successes=[];
        this.fails=[];
        let resolve=(data) => {
            this.state='fulfilled';
            this.successes.forEach(item=>item(data));
        }
        let reject=(error) => {
            this.state='failed';
            this.fails.forEach(item=>item(error));
        }
        fn(resolve,reject);
    }
    then(success,fail) {
        this.successes.push(success);
        this.fails.push(fail);
    }
}
let p=new Promise(function (resolve,reject) {
    setTimeout(function () {
        resolve(1);
    },1000);
});
p.then((data)=>console.log('成功'),error=>console.error('失败'));
React导航
-
codepen.io
const States = {
'show':function(){
  console.log("banner显示,点击可以关闭");
  this.setState({
    currentState: "hide"
  })
},
'hide':function(){
    console.log("banner隐藏,点击可以打开");
    this.setState({
      currentState: "show"
    })
}
}
class Banner extends React.Component{
state={currentState:'show'}
toggle = ()=>{
  let s = this.state.currentState;
  States[s] && States[s].apply(this);
}
render(){
  return (
    <div>
      {this.state.currentState=='show'&&<nav>导航</nav>}
      <button onClick={this.toggle}>隐藏</button>
    </div>
  )
}
}
ReactDOM.render(<Banner/>,document.getElementById('root'));
有限状态机
- 事物拥有多种状态,任一时间只会处于一种状态不会处于多种状态;
- 动作可以改变事物状态,一个动作可以通过条件判断,改变事物到不同的状态,但是不能同时指向多个状态,一个时间,就一个状态
- 状态总数是有限的;
- javascript-state-machine
- form:当前行为从哪个状态来
- to:当前行为执行完会过渡到哪个状态
- name:当前行为的名字
- fsm.can(t) - return true 如果过渡方法t可以从当前状态触发
- fsm.cannot(t) - return true 如果当前状态下不能发生过渡方法t
- fsm.transitions() - 返回从当前状态可以过渡到的状态的列表
- fsm.allTransitions() - 返回所有过渡方法的列表
- fsm.allStates() - 返回状态机有的所有状态的列表
- onBefore 在特定动作TRANSITION前触发
- onLeaveState 离开任何一个状态的时候触发
- onLeave 在离开特定状态STATE时触发
- onTransition 在任何动作发生期间触发
- onEnterState 当进入任何状态时触发
- onEnter 进入一个特定的状态STATE时触发
- on onEnter的简写
- onAfterTransition 任何动作触发后触发
- onAfter 在特定动作TRANSITION后触发
- on onAfter的简写
//有限状态机 Finite-state machine
var StateMachine = require('javascript-state-machine');
//有限状态机 Finite-state machine
//var StateMachine=require('javascript-state-machine');
class StateMachine {
    constructor(options) {
        let {init,transitions,methods} =options;
        this.state=init;
        transitions.forEach(transition => {
            let {from,to,name}=transition;
            this[name]=function () {
                if (this.state == from) {
                    this.state=to;
                    let onMethod='on'+name.slice(0,1).toUpperCase()+name.slice(1);
                    methods[onMethod]&&methods[onMethod]();
                }
            }
        });
    }
}
var fsm = new StateMachine({
    init: 'solid',
    transitions: [{
            name: 'melt',
            from: 'solid',
            to: 'liquid'
        },
        {
            name: 'freeze',
            from: 'liquid',
            to: 'solid'
        },
        {
            name: 'vaporize',
            from: 'liquid',
            to: 'gas'
        },
        {
            name: 'condense',
            from: 'gas',
            to: 'liquid'
        }
    ],
    methods: {
        onMelt: function () {
            console.log('I melted')
        },
        onFreeze: function () {
            console.log('I froze')
        },
        onVaporize: function () {
            console.log('I vaporized')
        },
        onCondense: function () {
            console.log('I condensed')
        }
    }
});
fsm.melt();
策略模式
- 将定义的一组算法封装起来,使其相互之间可以替换。封装的算法具有一定独立性,不会随客户端变化而变化。
- 避免大量的if else 或 swith case
代码
class Customer{
    constructor(type) {
        this.type=type;
    }
    pay(amount) {
        if (this.type == '会员顾客') {
            return amount*.9;
        }else if (this.type == 'VIP顾客') {
            return amount*.8;
        }
        return amount;
    }
}
let c1=new Customer('普通顾客');
console.log(c1.pay(100));
let c2=new Customer('会员顾客');
console.log(c2.pay(100));
let c3=new Customer('VIP顾客');
console.log(c3.pay(100));
class Customer{
    constructor(kind) {
        this.kind=kind;
    }
    cost(amount) {
        return this.kind.discount(amount);
    }
}
class Kind{

}
class Normal extends Kind{
    discount(amount) {
        return amount;
    }
}
class Member extends Kind{
    discount(amount) {
        return amount*.9;
    }
}
class VIP extends Kind{
    discount(amount) {
        return amount*.8;
    }
}
let c1=new Customer(new Normal());
console.log(c1.cost(100));
c1.kind=new Member();
console.log(c1.cost(100));
c1.kind=new VIP();
console.log(c1.cost(100));
把算法封装在策略对象中,指定算法调用即可
class Customer{
    constructor() {
        this.kinds={
            normal: function (price) {
                return price;
            },
            member: function (price) {
                return price*.9;
            },
            vip: function (price) {
                return price*.8;
            }
        }
    }
    cost(kind,amount) {
        return this.kinds[kind](amount);
    }
}
let c=new Customer();
console.log(c.cost('normal',100));
console.log(c.cost('member',100));
console.log(c.cost('vip',100));
应用场景
animate
-
animate() 方法执行 CSS 属性集的自定义动画。
-
该方法通过CSS样式将元素从一个状态改变为另一个状态。CSS属性值是逐渐改变的,这样就可以创建动画效果。
-
$(selector).animate(styles,speed,easing,callback)- swing 动画的开始变得更加快一些,然后再慢下来
- linear 方法提供了一个稳定的动画,以使得动画的每个步骤都是相同的
<!DOCTYPE html>
<html lang="en">
<head>
    <meta charset="UTF-8">
    <meta name="viewport" content="width=device-width, initial-scale=1.0">
    <meta http-equiv="X-UA-Compatible" content="ie=edge">
    <title>Document</title>
    <style>
      #content{
          width:100px;
          height:100px;
          background-color:green;
      }
    </style>
</head>
<body>
<div id="content"></div>
<button id="bigger">变大</button>
<script src="http://libs.baidu.com/jquery/2.0.0/jquery.min.js"></script>
<script>
$('#bigger').click(function(){
    $('#content').animate({width:'200px',height:'200px'},1000,'linear');
});
</script>
</body>
</html>
表单校验
<!DOCTYPE html>
<html lang="en">
<head>
    <meta charset="UTF-8">
    <meta name="viewport" content="width=device-width, initial-scale=1.0">
    <meta http-equiv="X-UA-Compatible" content="ie=edge">
    <title>Document</title>
</head>
<body>
    <form  id="userform">
      用户名 <input type="text" name="username"/>
      密码 <input type="text" name="password"/>
      手机号 <input type="text" name="mobile"/>
      <input type="submit">
    </form>
<script>
let Validator = (function(){
    let rules = {
        notEmpty(val,msg){
            if(val == ''){
                return msg;
            }
        },
        minLength(val,length,msg){
            if(val==''||val.length <length){
                return msg;
            }
        },
        maxLength(val,length,msg){
            if(val==''||val.length > length){
                return msg;
            }
        },
        isMobile(val,msg){
            if(!/^1\d{10}/.test(val)){
                return msg;
            }
        }
    }
    function addRule(name,rule){
        rules[name] = rule;
    }
    let checks = [];
    function add(element,rule){
        checks.push(function(){
            let name = rule.shift();
            rule.unshift(element.value);
            return rules[name]&&rules[name].apply(element,rule);
        });
    }
    function start(){
        for(let i=0;i<checks.length;i++){
            let check = checks[i];
            let msg = check();
            if(msg){
                return msg;
            }
        }
    }
    return {
        add,
        start,
        addRule
    }
})();

let form = document.getElementById('userform');
form.onsubmit = function(){
    Validator.add(form.username,['notEmpty','用户名不能为空']);
    Validator.add(form.password,['minLength',6,'密码小于6位最少长度']);
    Validator.add(form.password,['maxLength',8,'密码大于8位最大长度']);
    Validator.add(form.mobile,['isMobile','手机号不合法']);
    let msg =   Validator.start();
    if(msg) {
        alert(msg);
        return false;
    }
    alert('校验通过');
    return true;
}
</script>

</body>
</html>
- 策略模式和状态模式都有上下文,有策略或者状态类,上下文把这些请求委托给这些类来执行
- 策略模式中各个类是平等的,没有关系,客户端需要知道算法主动切换,状态模式中,状态的切换和行为被封装好了,客户不需要了解细节。
原型模式
- 原型模式是一个创建型的模式
- 创建基类的时候,简单差异化的属性放在构造函数中,消耗资源相同的功能放在基类原型中
代码
function Person(name) {
    this.name=name;
    this.getName=function () {
        console.log(this.name);
    }
}
let p1 = new Person('张三');
let p2=new Person('李四');
console.log(p1.getName===p2.getName);
function Person(name) {
    this.name=name;
}
Person.prototype.getName = function () {
    console.log(this.name);
}
let p1 = new Person('张三');
let p2=new Person('李四');
console.log(p1.getName===p2.getName);
JavaScript中的原型
函数和对象
- 函数是一种对象
- 对象都是通过函数创建的
//函数是一种对象
function Person() {}
console.log(Person instanceof Object);

//对象都是通过函数创建的
let p1=new Person();
let obj1={name: 'zfpx'}
let obj=new Object();
obj2.name='zfpx';
prototype
-
每个函数都有一个属性叫做
prototype -
prototype的属性值是一个对象,默认的只有一个叫做constructor的属性,指向这个函数本身 -
每个对象都有一个隐藏的属性
__proto__,这个属性引用了创建这个对象的函数的prototype -
自定义函数的prototype是由Object创建,所以它的proto指向的就是Object.prototype
-
Object.prototype的proto指向的是null
-
自定义函数
Foo.__proto__指向Function.prototype -
Object.__proto__指向Function.prototype -
Function.__proto__指向Function.prototype
let sum = new Function('a','b','return a+b'); -
Function.prototype的proto也指向Object.prototype
instanceof
-
Instanceof运算符的第一个变量是一个对象,暂时称为A;第二个变量一般是一个函数,暂时称为B
-
Instanceof的判断规则是:沿着A的
__proto__这条线来找,同时沿着B的
prototype这条线来找,如果两条线能找到同一个引用,即同一个对象,那么就返回
true。如果找到终点还未重合,则返回
false。
console.log(Object instanceof Function);
console.log(Function instanceof Object);
console.log(Function instanceof Function);
原型链
- 访问一个对象的属性时,先在基本属性中查找,如果没有,再沿着proto这条链向上找,这就是原型链
hasOwnProperty可以区分一个属性到底是自己的还是从原型中找到
function Foo(){
    this.a = 10;
}
Foo.prototype.b = 20;

let f1  = new Foo();
console.log(f1.a);
console.log(f1.b);
原型优势
- 可以随意扩展
- 可以重写继承的方法
let obj = {};
console.log(obj.toString());
let arr = [1,2,3];
console.log(arr.toString());
桥接模式
- 将抽象部分与他的实现部分分离,这样抽象化与实现化解耦,使他们可以独立的变化
- 应用场景是实现系统可能有多个角度分类,每一种角度都可能变化.
- 桥方可以通过实现桥接口进行单方面扩展,而另一方可以继承抽象类而单方面扩展,而之间的调用就从桥接口来作为突破口,不会受到双方扩展的任何影响
代码
class A {
    constructor(bridge) {
        this.bridge=bridge;
    }
    go() {
        console.log(`从${this.from()}到${this.bridge.to()}`);
    }
}
class A1 extends A {
    from() {
        return 'A1';
    }
}
class A2 extends A {
    from() {
        return 'A2';
    }
}
class A3 extends A {
    from() {
        return 'A3';
    }
}

class B {
    to() {}
}
class B1 extends B {
    to() {
        return 'B1';
    }
}
class B2 extends B {
    to() {
        return 'B2';
    }
}
class B3 extends B {
    to() {
        return 'B3';
    }
}
let b=new B3();
let a=new A2(b);
a.go();
应用场景
事件监听
et express=require('express');
let path=require('path');
let app=express();
app.get('/',(req,res) => {
    res.sendFile(path.join(__dirname,'4.html'));
});
app.get('/user/:id',function (req,res) {
    let id = req.params.id;
    res.json({id,name:`${id}_name`});
});
app.listen(8888);
<!DOCTYPE html>
<html lang="en">
<head>
    <meta charset="UTF-8">
    <meta name="viewport" content="width=device-width, initial-scale=1.0">
    <meta http-equiv="X-UA-Compatible" content="ie=edge">
    <title>bridage</title>
</head>
<body>
    <ul>
      <li data-id="1" >1</li>
      <li data-id="2" >2</li>
    </ul>
    <p id="content">

    </p>
<script>
  let lis = document.querySelectorAll('li');
  for(let i=0;i<lis.length;i++){
      lis[i].addEventListener('click',getUserById);
  }
  function getUserById(event){
      let id = this.dataset.id;
      let xhr = new XMLHttpRequest;
      xhr.open('GET',`/user/${id}`,true);
      xhr.responseType = 'json';
      xhr.onreadystatechange = function(){
          if(xhr.readyState ===4 && xhr.status == 200){
            let user = xhr.response;
            document.getElementById('content').innerHTML = user.name;
          }
      }
      xhr.send();
  }

  function getUserById(id,callback){
      let id = this.dataset.id;
      let xhr = new XMLHttpRequest;
      xhr.open('GET',`/user/${id}`,true);
      xhr.responseType = 'json';
      xhr.onreadystatechange = function(){
          if(xhr.readyState ===4 && xhr.status == 200){
            let user = xhr.response;
            document.getElementById('content').innerHTML = user.name;
          }
      }
      xhr.send();
  }
</script>
</body>
</html>
<!DOCTYPE html>
<html lang="en">
<head>
    <meta charset="UTF-8">
    <meta name="viewport" content="width=device-width, initial-scale=1.0">
    <meta http-equiv="X-UA-Compatible" content="ie=edge">
    <title>Document</title>
</head>
<body>
    <ul>
      <li data-id="1" >1</li>
      <li data-id="2" >2</li>
    </ul>
    <p id="content">

    </p>
<script>
  let lis = document.querySelectorAll('li');
  for(let i=0;i<lis.length;i++){
      lis[i].addEventListener('click',addBridage);
  }
  function getUserById(event){
      let id = this.dataset.id;
      let xhr = new XMLHttpRequest;
      xhr.open('GET',`/user/${id}`,true);
      xhr.responseType = 'json';
      xhr.onreadystatechange = function(){
          if(xhr.readyState ===4 && xhr.status == 200){
            let user = xhr.response;
             document.getElementById('content').innerHTML = user.name;
          }
      }
      xhr.send();
  }

  function addBridage(){
      let id = this.dataset.id;
      getUserById(id,function(user){
         document.getElementById('content').innerHTML = user.name;
      });
  }

  function getUserById(id,callback){
      let xhr = new XMLHttpRequest;
      xhr.open('GET',`/user/${id}`,true);
      xhr.responseType = 'json';
      xhr.onreadystatechange = function(){
          if(xhr.readyState ===4 && xhr.status == 200){
            let user = xhr.response;
            callback(user);
          }
      }
      xhr.send();
  }
</script>
</body>
</html>
分离变化
- 分离多维变化
<!DOCTYPE html>
<html lang="en">
<head>
    <meta charset="UTF-8">
    <meta name="viewport" content="width=device-width, initial-scale=1.0">
    <meta http-equiv="X-UA-Compatible" content="ie=edge">
    <title>html</title>
    <style>
        * {
            margin:0;
            padding:0;
        }
        canvas{
            border:1px solid #000;
        }
    </style>
</head>
<body>
<canvas id="canvas" width="600" height="600"></canvas>
<script>
//形状 颜色 坐标
function Position(x,y) {
  this.x=x;
  this.y=y;
}

function Color(color) {
    this.color=color;
}


function Ball(x,y,color) {
    this.position=new Position(x,y);
    this.color=new Color(color);
}
Ball.prototype.draw=function () {
  let canvas = document.getElementById('canvas');
  let ctx = canvas.getContext('2d');
  ctx.beginPath();
  ctx.arc(this.position.x,this.position.y,100,0,2*Math.PI);
  ctx.fillStyle = this.color.color;
  ctx.fill();
}
new Ball(300,300,'red').draw();
</script>
</body>
</html>
组合模式
- 又称整体-部分模式
- 将对象组合成树形结构以表示部分-整体的层次结构
- 客户可以使用统一的方式对待组合对象和叶子对象
代码
<!DOCTYPE html>
<html lang="en">
<head>
    <meta charset="UTF-8">
    <meta name="viewport" content="width=device-width, initial-scale=1.0">
    <meta http-equiv="X-UA-Compatible" content="ie=edge">
    <title></title>
    <style>
    .red{
        color:red;
    }
    </style>
</head>
<body>
<div id="root"></div>
<script>
function ReactElement(type,props) {
    this.type = type;
    this.props = props;
}
let React = {
    createElement(type,props={},...childrens){
        childrens.length===1?childrens = childrens[0]:void 0
        return new ReactElement(type,{...props,children:childrens})
    }
};
let render = (eleObj,container)=>{
    // 先取出第一层 进行创建真实dom
    let {type,props} = eleObj;
    let elementNode = document.createElement(type); // 创建第一个元素
    for(let attr in props){ // 循环所有属性
        if(attr === 'children'){ // 如果是children表示有嵌套关系
            if(typeof props[attr] == 'object'){ // 看是否是只有一个文本节点
                props[attr].forEach(item=>{ // 多个的话循环判断 如果是对象再次调用render方法
                    if(typeof item === 'object'){
                        render(item,elementNode)
                    }else{ //是文本节点 直接创建即可
                        elementNode.appendChild(document.createTextNode(item));
                    }
                })
            }else{ // 只有一个文本节点直接创建即可
                elementNode.appendChild(document.createTextNode(props[attr]));
            }
        }else if(attr === 'className'){ // 是不是class属性 class 属性特殊处理
            elementNode.setAttribute('class',props[attr]);
        }else{
            elementNode.setAttribute(attr,props[attr]);
        }
    }
    container.appendChild(elementNode)
};
//ReactDOM.render(<div>hello<span>world</span></div>);
//ReactDOM.render(React.createElement("div",null,"hello,",React.createElement("span",null,"world")));
render(React.createElement("div",null,"hello,",React.createElement("span",{class:"red"},"world")),document.getElementById('root'));

</script>
</body>
</html>
应用场景
文件夹和文件
function Folder(name) {
    this.name=name;
    this.children=[];
    this.parent=null;
    this.level=0;
}
Folder.prototype.add=function (child) {
    child.level=this.level+1;
    child.parent=this;
    this.children.push(child);
}
Folder.prototype.show=function () {
    console.log(' '.repeat(this.level)+'文件夹'+this.name);
    for (let i=0;i<this.children.length;i++){
        this.children[i].show();
    }
}
Folder.prototype.remove=function () {
    if (!this.parent) return;
    for (let i=0;i<this.parent.children.length;i++){
        let current=this.parent.children[i];
        if (current === this) {
            return this.parent.children.splice(i,1);
        }
    }
}

function File(name) {
    this.name=name;
}
File.prototype.add=function () {
    throw new Error(`文件下面不能再添加文件`);
}
File.prototype.show=function () {
    console.log(' '.repeat(this.level)+'文件'+this.name);
}

let folder=new Folder('视频');
let vueFolder=new Folder('Vue视频');
let reactFolder=new Folder('React视频');
let vueFile=new File('Vue从入门到精通');
let reactFile=new File('React从入门到精通');
folder.add(vueFolder);
folder.add(reactFolder);
vueFolder.add(vueFile);
reactFolder.add(reactFile);

folder.show();
vueFolder.remove();
folder.show();
绘制表单
class FormContainer {
    constructor(type) {
        this.element = document.createElement(type);
        this.children = [];
    }
    add(child) {
        this.children.push(child);
        this.element.appendChild(child.element);
        return this;
    }
}
class FieldContainer {
    constructor(type) {
        this.element = document.createElement(type);
        this.children = [];
    }
    add(child) {
        this.children.push(child);
        this.element.appendChild(child.element);
        return this;
    }
}
class LabelItem {
    constructor(title) {
        this.element = document.createElement('label');
        this.element.innerHTML = title;
    }
}
class InputItem {
    constructor(title) {
        this.element = document.createElement('input');
        this.element.name = title;
    }
}
class TipItem {
    constructor(title) {
        this.element = document.createElement('span');
        this.element.innerHTML = title;
    }
}
let userform = new FormContainer('form').add(
    new FieldContainer('p').add(
        new LabelItem('用户名')
    ).add(
        new InputItem('username')
    ).add(
        new TipItem('用户名长度为6-8位')
    )
).add(new FieldContainer('p').add(
    new LabelItem('密码')
).add(
    new InputItem('password')
).add(
    new TipItem('确认密码')
));
document.body.appendChild(userform.element);
命令模式
- 执行命令时,发布者和执行者分开
- 中间加入命令对象,作为中转站
三种角色
Receiver接受者角色:该角色就是干活的角色,命令传递到这里是应该被执行的Command命令角色:需要执行的所有命令都在这里声明Invoker调用者角色:接收到命令,并执行命令
代码
class Cooker{
    cook() {
        console.log(`做饭`);
    }
}
class Cleaner{
    clean() {
        console.log(`清洁`);
    }
}


class CookCommand{
    constructor(cooker) {
        this.cooker=cooker;
    }
    execute() {
        this.cooker.cook();
    }
}
class CleanCommand{
    constructor(cleaner) {
        this.cleaner=cleaner;
    }
    execute() {
        this.cleaner.clean();
    }
}

class Customer{
    constructor(command) {
        this.command=command;
    }
    cook() {
        this.command.execute();
    }
    clean() {
        this.command.execute();
    }
}
let cooker=new Cooker();
let command=new CookCommand(cooker);
let c=new Customer(command);
c.cook();
let cleaner=new Cleaner();
c.command = new CleanCommand(cleaner);
c.clean();
应用场景
计数器
<!DOCTYPE html>
<html lang="en">
<head>
    <meta charset="UTF-8">
    <meta name="viewport" content="width=device-width, initial-scale=1.0">
    <meta http-equiv="X-UA-Compatible" content="ie=edge">
    <title>计数器</title>
</head>
<body>
    <p id="number">0</p>
    <button id="addBtn">点击按钮</button>
<script>
 let addBtn = document.getElementById('addBtn');
 let number = document.getElementById('number');

 let worker = {
  add(){
   number.innerHTML = parseInt(number.innerHTML)+1;
  }
 }

 class AddCommand{
     constructor(receiver){
         this.receiver = receiver;
     }
     execute(){
         this.receiver.add();
     }
 }

let addCommand = new AddCommand(worker);
addBtn.onclick = ()=>addCommand.execute();
</script>
</body>
</html>
撤销和重做
<!DOCTYPE html>
<html lang="en">
<head>
    <meta charset="UTF-8">
    <meta name="viewport" content="width=device-width, initial-scale=1.0">
    <meta http-equiv="X-UA-Compatible" content="ie=edge">
    <title>弹出菜单</title>
</head>
<body>
    <p id="number">0</p>
    <button id="addBtn">+</button>
    <button id="undoBtn">undo</button>
<script>
 let addBtn = document.getElementById('addBtn');
 let undoBtn = document.getElementById('undoBtn');
 let number = document.getElementById('number');

 let worker = {
  lastVal:-1,
  add(){
   let oldVal = parseInt(number.innerHTML);
   worker.lastVal = oldVal;
   number.innerHTML = oldVal+1;
  },
  undo(){
      number.innerHTML = worker.lastVal;
  }
 }

 class AddCommand{
     constructor(receiver){
         this.receiver = receiver;
     }
     execute(){
         this.receiver.add();
     }
 }

 let addCommand = new AddCommand(worker);
 class UndoCommand{
     constructor(receiver){
         this.receiver = receiver;
     }
     execute(){
         this.receiver.undo();
     }
 }

 let undoCommand = new UndoCommand(worker);
 addBtn.onclick = ()=>addCommand.execute();
 undoBtn.onclick = ()=>undoCommand.execute();
</script>
</body>
</html>
多步撤销和重做
<!DOCTYPE html>
<html lang="en">
<head>
    <meta charset="UTF-8">
    <meta name="viewport" content="width=device-width, initial-scale=1.0">
    <meta http-equiv="X-UA-Compatible" content="ie=edge">
    <title>弹出菜单</title>
</head>
<body>
    <p id="number">0</p>
    <button id="addBtn">+</button>
    <button id="undoBtn">undo</button>
    <button id="redoBtn">undo</button>
<script>
 let addBtn = document.getElementById('addBtn');
 let undoBtn = document.getElementById('undoBtn');
 let redoBtn = document.getElementById('redoBtn');
 let number = document.getElementById('number');

 let worker = {
  history:[],
  index:-1,
  add(){
   let oldVal = parseInt(number.innerHTML);
   let newVal = oldVal + 1;
   worker.history.push(newVal);
   worker.index = worker.history.length-1;
   number.innerHTML = newVal;
   console.log(worker);
  },
  undo(){
      if(worker.index-1>=0){
          worker.index--;
        number.innerHTML = worker.history[worker.index];
        console.log(worker);
      }
  },
  redo(){
      if(worker.index+1<worker.history.length){
        worker.index++;
        number.innerHTML = worker.history[worker.index];
        console.log(worker);
      }
  }
 }

 class AddCommand{
     constructor(receiver){
         this.receiver = receiver;
     }
     execute(){
         this.receiver.add();
     }
 }

 let addCommand = new AddCommand(worker);
 class UndoCommand{
     constructor(receiver){
         this.receiver = receiver;
     }
     execute(){
         this.receiver.undo();
     }
 }

 let undoCommand = new UndoCommand(worker);
 class RedoCommand{
     constructor(receiver){
         this.receiver = receiver;
     }
     execute(){
         this.receiver.redo();
     }
 }

let redoCommand = new RedoCommand(worker);
addBtn.onclick = ()=>addCommand.execute();
undoBtn.onclick = ()=>undoCommand.execute();
redoBtn.onclick = ()=>redoCommand.execute();
</script>
</body>
</html>
享元模式
- 共享内存,节约内存空间
- 相同的数据共享使用
- 主要还是对数据、方法共享分离,将数据的方法分为内部数据、内部方法和外部数据、外部方法。
- 内部状态保存在对象内部,通常不会改变,可以共享
- 外部状态保存在对象外部,可以随场景改变,不可以共享。
代码
function Person(name,age) {
    this.name=name;
    this.age=age;
}
Person.prototype.getAge=function () {
    console.log(this.age)
}
Person.prototype.getName=function () {
    console.log(this.name)
}
场景
对象
<!DOCTYPE html>
<html lang="en">
<head>
    <meta charset="UTF-8">
    <meta name="viewport" content="width=device-width, initial-scale=1.0">
    <meta http-equiv="X-UA-Compatible" content="ie=edge">
    <title>Document</title>
</head>
<body>

<input type="radio" value="red" name="color" checked/>红
<input type="radio" value="yellow" name="color"/>黄
<input type="radio" value="blue" name="color"/>蓝

<button onclick="draw()">绘制</button>

<div id="container">

</div>

<script>
let container = document.getElementById('container');
class MyDiv{
    constructor(){
      this.element = document.createElement('div');
    }
    setColor(color){
        this.element.style = `width:100px;height:100px;background-color:${color}`;
    }
}
let div = new MyDiv();
function draw(){
  let color = Array.from(document.getElementsByName('color')).find(item=>item.checked).value||'red';
  div.setColor(color);
  container.appendChild(div.element);
}
</script>
</body>
</html>
分页
<!DOCTYPE html>
<html lang="en">
<head>
    <meta charset="UTF-8">
    <meta name="viewport" content="width=device-width, initial-scale=1.0">
    <meta http-equiv="X-UA-Compatible" content="ie=edge">
    <title>Document</title>
</head>
<body>
<ul id="news">

</ul>
<button id="nextPage" onclick="goNext()">下一页</button>
<script>
let list = [];
for(let i=0;i<20;i++){
    list[i]=`新闻${i+1}`
}
let pageNum = 0;
let pageSize = 5;
let news = document.getElementById('news');
for(let i=0;i<list.length;i++){
    let li = document.createElement('li');
    li.innerHTML = `新闻${i+1}`;
    li.style.display = 'none';
    news.appendChild(li);
}
function goNext(){
  pageNum++;
  let start = (pageNum -1)*pageSize;
  let lis = document.getElementsByTagName('li');
  for(let i=0;i<=lis.length;i++){
     let li = lis[i];
     if(i>=start && i<start+pageSize){
         li.style.display = 'block';
     }else{
         li.style.display = 'none';
     }
  }
}
goNext();
</script>
</body>
</html>
<!DOCTYPE html>
<html lang="en">
<head>
    <meta charset="UTF-8">
    <meta name="viewport" content="width=device-width, initial-scale=1.0">
    <meta http-equiv="X-UA-Compatible" content="ie=edge">
    <title>Document</title>
</head>
<body>
<ul id="news">

</ul>
<button id="nextPage" onclick="goNext()">下一页</button>

<script>
let list = [];
for(let i=0;i<20;i++){
    list[i]=`新闻${i+1}`
}
let getLi = (function(){
    let lis = [];
    return function(){
        let element;
        if(lis.length<5){
            element = document.createElement('li');
            lis.push(element);
        }else{
            element = lis.shift();
            lis.push(element);
        }
            return element;
    }
})();

let pageNum = 0;
let pageSize = 5;
let news = document.getElementById('news');
function goNext(){
  pageNum++;
  let start = (pageNum -1)*pageSize;
  for(let i=1;i<=5;i++){
      let element = getLi();
      element.innerHTML = `新闻${start+i}`;
      news.appendChild(element);
  }
}
goNext();

</script>
</body>
</html>
模版方法模式
- 模板方法模式在一个方法中定义一个算法的骨架,而将一些步骤的实现延迟到子类中
- 模板方法使得子类可以在不改变算法结构的情况下,重新定义算法中某些步骤的具体实现
- 一般有两部分组成,第一部分是抽象父类,第二部分是具体的实现子类
- 好莱坞原则,子类放弃了控制权,改由父类来调用
- 发布订阅
- 回调函数
代码
class Person{
    dinner() {
        this.buy();
        this.cook();
        this.eat();
    }
    buy() {}
    cook() {}
    eat() {}
}
class Jiangwen extends Person{
    buy() {console.log('买黄瓜');}
    cook() {console.log('拍黄瓜');}
    eat() {console.log('吃黄瓜');}
}
let j=new Jiangwen();
j.dinner();
场景
提示框
<!DOCTYPE html>
<html lang="en">
<head>
    <meta charset="UTF-8">
    <meta name="viewport" content="width=device-width, initial-scale=1.0">
    <meta http-equiv="X-UA-Compatible" content="ie=edge">
    <title>Document</title>
    <link rel="stylesheet" href="3.css">
</head>
<body>

<script src="3.js"></script>
<script>
let dialog = new ConfirmDialog({
    title:'标题',
    content:'内容'
});
</script>
</body>
</html>
class Dialog{
    constructor(options) {
        this.title = options.title||'标题';
        this.content = options.content||'内容';
        this.onConfirm = options.onConfirm||this.hide;
        this.onCancel = options.onCancel||this.hide;
        this.init();
        this.initEventHandler();
    }
    init() {
        this.panel=document.createElement('div');
        this.panel.className='dialog';

        this.titleP=document.createElement('p');
        this.titleP.innerHTML=this.title;
        this.panel.appendChild(this.titleP);

        this.contentP=document.createElement('p');
        this.contentP.innerHTML=this.content;
        this.panel.appendChild(this.contentP);

        this.confirmBtn=document.createElement('button');
        this.confirmBtn.className='button confirm-button';
        this.confirmBtn.innerHTML='确定';
        this.panel.appendChild(this.confirmBtn);

        this.cancelBtn=document.createElement('button');
        this.cancelBtn.className='button cancel-button';
        this.cancelBtn.innerHTML='取消';
        this.panel.appendChild(this.cancelBtn);

        document.body.appendChild(this.panel);
    }
    inithttp://image.bubuko.com/info/201807/20180712173511381297.pngntListener('click',() => {
            this.onConfirm();
            this.hide();
        });
        this.cancelBtn.addEventListener('click',() => {
            this.onCancel();
            this.hide();
        });
    }
    show() {
        this.panel.style.display='block';
    }
    hide() {
        this.panel.style.display='none';
    }
}

class ContentDialog extends Dialog{
    init() {
        super.init();
        this.titleP.parentNode.removeChild(this.titleP);
    }
}

class ConfirmDialog extends Dialog{
    init() {
        super.init();
        this.cancelBtn.parentNode.removeChild(this.cancelBtn);
    }
}
.dialog{
    width:400px;
    height:300px;
    position: absolute;
    padding:20px;
    top:50%;
    left:50%;
    margin-left:-200px;
    margin-top:-150px;
    border:1px solid#000;
    background-color: #EEE;
    border-radius: 5px;
    display: flex;
    flex-direction: column;
    align-items: center;
    justify-content: center;
}

.dialog button{
    width:100px;
    height:30px;
    position: absolute;
    border: none;
    outline: none;

}
.dialog .confirm-button {
    right:140px;
    bottom:20px;
}
.dialog .cancel-button {
    right:20px;
    bottom:20px;
}
类图模式
- 类图(Class Diagram)描述类的静态结构,定义类及描述类之间的联系,如关联、依赖、聚合等,还包括类的内部结构(类的属性和操作)
- 类图是一种静态模型类型,一个类图根据系统中的类以及各个类之间的关系描述系统的静态结构
- 类图包含7个元素:
- 类(Class)
- 接口(Interface)
- 协作(Collaboration)
- 依赖关系(Dependency)
- 泛化关系(Generalization)
- 关联关系(Association)
- 实现关系(Realization)
- 在UML中,类用矩形来表示,分为3个部分: 名称部分(Name)、属性部分(Attribute)和操作部分(Operation)
时序图模式
- 时序图强调消息时间顺序的交互图
- 时序图描述类系统中类与类之间的交互,它讲这些交互建模换成消息交换
- 时序图用于描述对象之间如何随着时间进行协作
- 时序图由活动者(Actor)、对象(Object)、消息(Message)、生命线(Lifeline)和控制焦点(Focus Of Control)组成
- 不同元素有不同表示
- 对象是一个矩形,对象名称下有下划线
- 消息用由方向的箭头表示,调用是实线,返回消息是虚线
- 生命线由纵向的虚线表示
- 控制焦点是纵向的矩形,也就是活动条(Activiation Bar)
迭代器模式
- 迭代器模式(Iterator Pattern)用于顺序地访问聚合对象内部的元素,又无需知道对象内部结构。使用了迭代器之后,使用者不需要关心对象的内部构造,就可以按序访问其中的每个元素。
类图
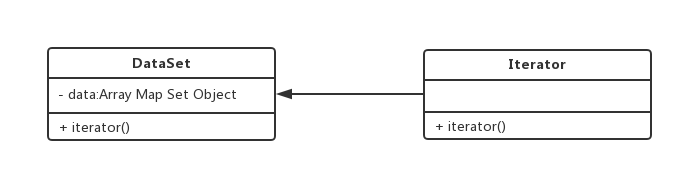
场景
forEach
-
可以使用 for 循环自己实现一个
forEachArray.prototype.forEach = function (cb) { for (var i = 0; i < this.length; i++) { cb.call(this, this[i], i, arr); } } let arr = [1, 2, 3]; arr.forEach((item) => { console.log(item); });
each
<body>
    <script src="http://libs.baidu.com/jquery/2.0.0/jquery.min.js"></script>
    <script>

    $.each(['1', '2', '3'], function (index, item) {
        console.log(index, item);
    })
    $.each({ name: 'hs', age: 10 }, function (index, item) {
        console.log(index, item);
    })
    function each(obj, callback) {
        if (Array.isArray(obj)) {
            let length = obj.length;
            for (let i = 0; i < length; i++) {
                if (callback.call(obj[i], i, obj[i]) === false) {
                    break;
                }
            }
        } else {
            for (let i in obj) {
                if (callback.call(obj[i], i, obj[i]) === false) {
                    break;
                }
            }
        }

        return obj;
    }

    </script>

</body>
Iterator
- 在ES6中有序集合数据类型有Array、Map、Set、String、TypedArray、arguments、NodeList
- 我们需要有一个统一的遍历接口来遍历所有的数据类型
- 他们都有 [Symbol.Iterator]属性,属性是一个函数,执行函数会返回迭代器
- 迭代器就有
next方法顺序返回子元素
Array[Symbol.iterator] = function () {
    let index = 0;
    return {
        next: () => {
            return index < this.length ?
                { value: this[index++], done: false } :
                { done: true }
        }
    }
}
let arr = [1, 2];
let it = arr[Symbol.iterator]();
console.log(it.next());
console.log(it.next());
console.log(it.next());
yield*
- yield*后面跟的是一个可遍历的结构,它会调用该结构的遍历器接口
let generator = function* () {
    yield 1;
    yield* [2, 3];
    yield 4;
};

var iterator = generator();

console.log(iterator.next()); // { value: 1, done: false }
console.log(iterator.next()); // { value: 2, done: false }
console.log(iterator.next()); // { value: 3, done: false }
console.log(iterator.next()); // { value: 4, done: false }
console.log(iterator.next()); // { value: undefined, done: true }
二叉树遍历
- 二叉树是每个结点最多有两个子树的树结构。通常子树被称作左子树和右子树
- 根据根据根节点的顺序可以把遍历分为三种前序、中序、后序
- 先序遍历:根节点->左子树->右子树
- 中序遍历:左子树->根节点->右子树
- 后序遍历:左子树->右子树->根节点

class Tree {
    constructor(public left, public value, public right) {
    }
}
//['A', 'B', 'D','E', 'C', 'F','G']
function* leftOrder(tree) {
    if (tree) {
        yield tree.value;
        yield* leftOrder(tree.left);
        yield* leftOrder(tree.right);
    }
}

//['D', 'B', 'E','A', 'F', 'C','G']
function* inOrder(tree) {
    if (tree) {
        yield* inOrder(tree.left);
        yield tree.value;
        yield* inOrder(tree.right);
    }
}
//['D', 'E', 'B','F', 'G', 'C','A']
function* rightOrder(tree) {
    if (tree) {
        yield* rightOrder(tree.left);
        yield* rightOrder(tree.right);
        yield tree.value;
    }
}
function make(array) {
    if (array.length === 1) return new Tree(null, array[0], null);
    return new Tree(make(array[0]), array[1], make(array[2]));
}
let tree = make([[['D'], 'B', ['E']], 'A', [['F'], 'C', ['G']]]);
var result: any[] = [];
for (let node of rightOrder(tree)) {
    result.push(node);
}
console.log(result);


 2045
2045

 被折叠的 条评论
为什么被折叠?
被折叠的 条评论
为什么被折叠?
 到【灌水乐园】发言


