


一 SpringMVC入门
1 SpringMVC简介

MVC模型
MVC全称Model View Controller,是一种设计创建Web应用程序的 模式。这三个单词分别代表Web应用程序的三个部分:
- Model(模型):指数据模型。用于存储数据以及处理用户请求 的业务逻辑。在Web应用中,JavaBean对象,业务模型等都属 于Model。
- View(视图):用于展示模型中的数据的,一般为jsp或html文 件。
- Controller(控制器):是应用程序中处理用户交互的部分。接受视图提出的请求,将数据交给模型处理,并将处理后的结果交 给视图显示。

SpringMVC
SpringMVC是一个基于MVC模式的轻量级Web框架,是Spring框架的一个模块,和Spring可以直接整合使用。SpringMVC代替了 Servlet技术,它通过一套注解,让一个简单的Java类成为处理请求的控制器,而无须实现任何接口。
2 SpringMVC入门案例
接下来我们编写一个SpringMVC的入门案例
- 使用maven创建web项目,补齐包结构。
- 引入相关依赖和tomcat插件 ( 并指定使用的java版本 )
	<properties>
        <!-- 编码格式 -->
        <project.build.sourceEncoding>UTF-8</project.build.sourceEncoding>
        <!-- 编译时使用的java版本 -->
        <maven.compiler.source>12</maven.compiler.source>
        <maven.compiler.target>12</maven.compiler.target>
    </properties>


	<dependencies>
        <!-- Spring核心模块 -->
        <dependency>
            <groupId>org.springframework</groupId>
            <artifactId>spring-context</artifactId>
            <version>5.2.12.RELEASE</version>
        </dependency>
        <!-- SpringWeb模块 -->
        <dependency>
            <groupId>org.springframework</groupId>
            <artifactId>spring-web</artifactId>
            <version>5.2.12.RELEASE</version>
        </dependency>
        <!-- SpringMVC模块 -->
        <dependency>
            <groupId>org.springframework</groupId>
            <artifactId>spring-webmvc</artifactId>
            <version>5.2.12.RELEASE</version>
        </dependency>
        <!-- Servlet -->
        <dependency>
            <groupId>javax.servlet</groupId>
            <artifactId>servlet-api</artifactId>
            <version>2.5</version>
            <scope>provided</scope>
        </dependency>
        <!-- JSP -->
        <dependency>
            <groupId>javax.servlet.jsp</groupId>
            <artifactId>jsp-api</artifactId>
            <version>2.0</version>
            <scope>provided</scope>
        </dependency>
    </dependencies>

    <build>
        <finalName>springmvcdemo</finalName>
        <plugins>
            <!-- tomcat插件 -->
            <plugin>

                <groupId>org.apache.tomcat.maven</groupId>
                <artifactId>tomcat7-maven-plugin</artifactId>
                <version>2.1</version>
                <configuration>
                    <port>8080</port>
                    <path>/</path>
                    <uriEncoding>UTF8</uriEncoding>
                    <server>tomcat7</server>
                    <systemProperties>
                        <java.util.logging.SimpleFormatter.format>%1$tH:%1$tM:%1$tS %2$s%n%4$s: %5$s%6$s%n
                        </java.util.logging.SimpleFormatter.format>
                    </systemProperties>
                </configuration>
            </plugin>
        </plugins>
    </build>
- 在web.xml中配置前端控制器DispatcherServlet。
    <!--SpringMVC前端控制器,本质是一个Servlet,接收所有请求,在容器启动时就会加载-->
    <servlet>
        <servlet-name>dispatcherServlet</servlet-name>
        <servlet-class>org.springframework.web.servlet.DispatcherServlet</servlet-class>
        <init-param>
            <param-name>contextConfigLocation</param-name>
            <param-value>classpath:springmvc.xml</param-value>
        </init-param>
        <load-on-startup>1</load-on-startup>
    </servlet>
    <servlet-mapping>
        <servlet-name>dispatcherServlet</servlet-name>
        <url-pattern>/</url-pattern>
    </servlet-mapping>
- 编写SpringMVC核心配置文件springmvc.xml,该文件和Spring 配置文件写法一样。
<?xml version="1.0" encoding="UTF-8"?>
<beans
        xmlns="http://www.springframework.org/schema/beans"
        xmlns:mvc="http://www.springframework.org/schema/mvc"
        xmlns:context="http://www.springframework.org/schema/context"
        xmlns:xsi="http://www.w3.org/2001/XMLSchema-instance"
        xsi:schemaLocation="
      http://www.springframework.org/schema/beans
      http://www.springframework.org/schema/beans/spring-beans.xsd
      http://www.springframework.org/schema/mvc
      http://www.springframework.org/schema/mvc/spring-mvc.xsd
      http://www.springframework.org/schema/context
      http://www.springframework.org/schema/context/spring-context.xsd">

    <!-- 扫描包 -->
    <context:component-scan base-package="com.lxx"></context:component-scan>

    <!-- 开启SpringMVC注解的支持 -->
    <mvc:annotation-driven></mvc:annotation-driven>

</beans>
- 编写控制器
@Controller
public class MyController1 {

    // 该方法的访问路径是/c1/hello1
    @RequestMapping("/c1/hello1")
    public void helloMVC() {
        System.out.println("hello springmvc");
    }
}
- 使用tomcat插件启动项目,访问 http://localhost:8080/c1/hello1
3 SpringMVC执行流程

SpringMVC的组件
- DispatcherServlet:前端控制器,接受所有请求,调用其他组件。
- HandlerMapping:处理器映射器,根据配置找到方法的执行链。
- HandlerAdapter:处理器适配器,根据方法类型找到对应的处理器。
- ViewResolver:视图解析器,找到指定视图。
组件的工作流程
客户端将请求发送给前端控制器。前端控制器将请求发送给处理器映射器,处理器映射器根据路径找到方法的执行链,返回给前端控制器。前端控制器将方法的执行链发送给处理器适配器,处理器适配器根据方法类型找到对应的处理器。处理器执行方法,将结果返回给前端控制器。前端控制器将结果发送给视图解析器,视图解析器找到视图文件位置。视图渲染数据并将结果显示到客户端。
二 SpringMVC参数获取
1 封装为简单数据类型

在Servlet中我们通过request.getParameter(name) 获取请求参数。该方式存在两个问题:
- 请求参数较多时会出现代码冗余。
- 与容器紧耦合。
而SpringMVC支持参数注入的方式用于获取请求数据,即将请求参数直接封装到方法的参数当中。
用法如下:
- 编写控制器方法
    // 获取简单类型参数
    @RequestMapping("/c1/param1")
    public void simpleParam(String username, int age) {
        System.out.println(username);
        System.out.println(age);
    }
- 访问该方法时,请求参数名和方法参数名相同,即可完成自动封装。
http://localhost:8080/c1/param1?username=lxx&age=11
2 封装为对象类型

SpringMVC支持将参数直接封装为对象,写法如下:
封装单个对象
- 编写实体类
public class Student {
    private int id;
    private String name;
    private String sex;
}
//getter/settter/toString等略
- 编写控制器方法
    // 获取对象类型参数
    @RequestMapping("/c1/param2")
    public void objParam(Student student){
        System.out.println(student);
    }
- 访问该方法时,请求参数名和方法参数的属性名相同,即可完 自动封装。
http://localhost:8080/c1/param2?id=1&name=lxx&sex=nan
封装关联对象
- 编写实体类
public class Address {
    private String info; //地址信息
    private String postcode; //邮编
}

public class Student {
    private int id;
    private String name;
    private String sex;
    private Address address;
}
//getter/settter/toString等略
- 编写控制器方法
    // 获取关联对象类型参数
    @RequestMapping("/c1/param3")
    public void objParam2(Student student){
        System.out.println(student);
    }
- 访问该方法时,请求参数名和方法参数的属性名相同,即可完成 自动封装。
http://localhost:8080/c1/param3?id=1&name=lxx&sex=nan&address.info=xxxx&address.postcode=00001
我们也可以使用表单发送带有参数的请求:
<%@ page
        contentType="text/html;charset=UTF-8"
        language="java" %>
<html>
<head>
    <title>表单提交</title>
</head>
<body>
<form action="/c1/param3" method="post">
    id:<input name="id">
    姓名:<input name="name">
    性别:<input name="sex">
    住址:<input name="address.info">
    邮编:<input name="address.postcode">
    <input type="submit">
</form>
</body>
</html>
3 封装为集合类型

SpringMVC支持将参数封装为List或Map集合,写法如下:
(1) 封装为List集合
a.封装为简单数据类型集合
- 编写控制器方法
    // 绑定简单数据类型List参数,参数前必须添加@RequestParam注解
    @RequestMapping("/c1/param4")
    public void listParam(@RequestParam List<String> users) {
        System.out.println(users);
    }
该方式也可以绑定数组类型:
    @RequestMapping("/c1/param5")
    public void listParam2(@RequestParam String[] users) {
        System.out.println(Arrays.asList(users));
    }
- 请求的参数写法
http://localhost:8080/c1/param4?users=lxx&users=sanhao
b.封装为对象类型集合
SpringMVC不支持将参数封装为对象类型的List集合,但可以封装到有List属性的对象中。
- 编写实体类
public class Address {
    private String info; //地址信息
    private String postcode; //邮编
}

public class Student {
    private int id;
    private String name;
    private String sex;

    private List<Address> address; // 地址集合
}
- 编写控制器方法
    // 对象中包含集合属性
    @RequestMapping("/c1/param6")
    public void listParam3(Student student){
        System.out.println(student);
    }
- 请求的参数写法
http://localhost:8080/c1/param6?id=1&name=lxx&sex=name&address[0].info=xxx&address[0].postcode=0001&address[1].info=yyy&address[1].postcode=0002
(2)封装为Map集合
同样,SpringMVC要封装Map集合,需要封装到有Map属性的对象中。
- 封装实体类
public class Address {
    private String info; //地址信息
    private String postcode; //邮编
}

public class Student {
    private int id;
    private String name;
    private String sex;
    private Map<String, Address> address;// 地址集合
}
- 编写控制器方法
    // 对象中包含Map属性
    @RequestMapping("/c1/param7")
    public void mapParam(Student student) {
        System.out.println(student);
    }
- 请求的参数写法
http://localhost:8080/c1/param7?id=1&name=lxx&sex=nan&address[one].info=xxxx&address[one].postcode=0001&address[two].info=yyyy&address[two].postcode=0002
4 使用Servlet原生对象获取参数

SpringMVC也支持使用Servlet原生对象,在方法参数中定义 HttpServletRequest 、HttpServletResponse、 HttpSession 等类型的参数即可直接在方法中使用。
    // 使用Servlet原生对象
    @RequestMapping("/c1/param8")
    public void servletParam(HttpServletRequest request, HttpServletResponse response, HttpSession session) {
        // 原生对象获取参数
        System.out.println(request.getParameter("name"));
        System.out.println(response.getCharacterEncoding());
        System.out.println(session.getId());
    }
访问该方法即可:http://localhost:8080/c1/param8?name=lxx
一般情况下,在SpringMVC中都有对Servlet原生对象的方法的替代,推荐使用SpringMVC的方式代替Servlet原生对象。
5 自定义参数类型转换器

前端传来的参数全部为字符串类型,SpringMVC使用自带的转换器将字符串参数转为需要的类型。如:
    // 获取简单类型参数
    @RequestMapping("/c1/param1")
    public void simpleParam(String username, int age) {
        System.out.println(username);
        System.out.println(age);
    }
请求路径:http://localhost:8080/c1/param1?username=lxx&age=11
但在某些情况下,无法将字符串转为需要的类型,如:
由于日期数据有很多种格式,SpringMVC没办法把所有格式的字符 串转换成日期类型。比如参数格式为 birthday=2022-10-13 时,SpringMVC 就无法解析参数。此时需要自定义参数类型转换器。
- 定义类型转换器类,实现Converter接口
public class DateConverter implements Converter<String, Date> {
    /**
     * 转换方法
     *
     * @param source 转换前的数据
     * @return 转换后的数据
     */

    public Date convert(String source) {
        SimpleDateFormat sdf = new SimpleDateFormat("yyyy-MM-dd");
        Date date = null;
        try {
            date = sdf.parse(source);
        } catch (ParseException e) {
            e.printStackTrace();
        }
        return date;

    }
}
- 注册类型转换器对象
   <!-- 配置转换器工厂 -->
    <bean id="converterFactory" class="org.springframework.context.support.ConversionServiceFactoryBean">
        <!-- 转换器集合 -->
        <property name="converters">
            <set>
                <!-- 自定义转换器 -->
                <bean class="com.lxx.converter.DateConverter"></bean>
            </set>
        </property>
    </bean>

    <!-- 开启SpringMVC注解的支持 -->
    <!-- 使用转换器工厂 -->
    <mvc:annotation-driven conversion-service="converterFactory"></mvc:annotation-driven>
此时再访问http://localhost:8080/c1/param9?birthday=2022-10-13时,SpringMVC即可将请求参数封装为Date类型的参数。
6 编码过滤器

在传递参数时,tomcat8以上能处理get请求的中文乱码,但不能处理post请求的中文乱码
- 编写jsp表单
<%@ page
        contentType="text/html;charset=UTF-8"
        language="java" %>
<html>
<head>
    <title>编码过滤器</title>
</head>
<body>
<form action="/cn/code" method="post">
    姓名:<input name="username">
    <input type="submit">
</form>
</body>
</html>
- 编写控制器方法
    @RequestMapping("/cn/code")
    public void code(String username) {
        System.out.println(username);
    }
SpringMVC提供了处理中文乱码的过滤器,在web.xml中配置该过 滤器即可解决中文乱码问题:
    <!--SpringMVC中提供的字符编码过滤器,放在所有过滤器的最上方-->
    <filter>
        <filter-name>characterEncodingFilter</filter-name>
        <filter-class>org.springframework.web.filter.CharacterEncodingFilter</filter-class>
        <init-param>
            <param-name>encoding</param-name>
            <param-value>utf-8</param-value>
        </init-param>
    </filter>
    <filter-mapping>
        <filter-name>characterEncodingFilter</filter-name>
        <url-pattern>/*</url-pattern>
    </filter-mapping>
三 SpringMVC处理响应
1 配置视图解析器

SpringMVC默认情况下会在控制器执行完成后跳转到视图页面,视图解析器能找到相应的视图,之前的404异常就是由于没有配置视图解析器导致找不到视图。
在SpringMVC中提供了13个视图解析器,用于支持不同的视图技术。InternalResourceViewResolver是SpringMVC的默认视图解析器,用来解析JSP视图。
    <!-- 视图解析器 -->
    <bean id="viewResolver" class="org.springframework.web.servlet.view.InternalResourceViewResolver">
        <!-- 视图前缀 -->
        <property name="prefix" value="/"></property>
        <!-- 视图后缀 -->
        <property name="suffix" value=".jsp"></property>
    </bean>
2 控制器方法的返回值

我们可以通过控制器方法的返回值设置跳转的视图,控制器方法支持以下返回值类型:
(1) 返回值为void
此时会跳转到名字是 前缀+访问路径名+后缀 的jsp页面
- 编写控制器方法
    // 路径是helloMVC,方法执行完后会跳转到/helloMVC.jsp
    @RequestMapping("/helloMVC")
    public void helloMVC() {
        System.out.println("hello SpringMVC!");
    }
- 编写helloMVC.jsp
<%@ page contentType="text/html;charset=UTF-8" language="java" %>
<html>
<head>
    <title>MVC</title>
</head>
<body>
<h1>欢迎来到SpringMVC</h1>
</body>
</html>
(2) 返回值为String
此时会跳转到名字是 前缀+返回值+后缀 的jsp页面
- 编写控制器方法
    // 返回值为String
    @RequestMapping("/c2/hello1")
    public String helloMVC1() {
        System.out.println("hello SpringMVC!");
        // 方法执行完后会跳转到/helloMVC.jsp
        return "helloMVC";
    }
(3) 返回值为ModelAndView
这是SpringMVC提供的对象,该对象可以向request域设置数据并 指定跳转的页面。该对象中包含Model对象和View对象。
Model:向request域中设置数据。
View:指定跳转的页面。
- 编写控制器方法
    // 返回值为ModelAndView
    @RequestMapping("/c2/hello2")
    public ModelAndView useMAV() {
        System.out.println("返回值类型为ModelAndView");
        // 1.创建ModelAndView对象
        ModelAndView modelAndView = new ModelAndView();
        // 2.获取Model对象,本质是一个Map
        Map<String, Object> model = modelAndView.getModel();
        // 3.使用Model对象向request域设置数据
        model.put("name", "李三好");
        // 4.使用View对象设置跳转的路径为/lxx.jsp
        modelAndView.setViewName("lxx");
        return modelAndView;
    }
- 编写jsp页面
<%--
  Created by IntelliJ IDEA.
  User: Administrator
  Date: 2022/10/14
  Time: 10:56
  To change this template use File | Settings | File Templates.
--%>
<%@ page contentType="text/html;charset=UTF-8" language="java" %>
<html>
<head>
    <title>lxx</title>
</head>
<body>
    <h1>你好${requestScope.name}</h1>
</body>
</html>
- 修改web.xml命名空间,让jsp页面默认支持el表达式
<web-app xmlns:xsi="http://www.w3.org/2001/XMLSchema-instance"
         xmlns="http://xmlns.jcp.org/xml/ns/javaee"
         xsi:schemaLocation="http://xmlns.jcp.org/xml/ns/javaee http://xmlns.jcp.org/xml/ns/javaee/web-app_3_1.xsd"
         id="WebApp_ID" version="3.1">
3 request域设置数据

当控制器返回值为ModelAndView时我们可以向request域设置数 据,我们还有以下方法可以向request域设置数据:
使用原生的HttpServletRequest
    @RequestMapping("/c2/hello3")
    public String setRequestModel(HttpServletRequest request){
        request.setAttribute("name","李三好");
        return "lxx";
    }
使用Model、ModelMap
SpringMVC提供了Model接口和ModelMap类,控制器方法添加这 两个类型的参数,使用该参数设置数据,该数据就会存到request域中。
    @RequestMapping("/c2/hello4")
    public String setRequestModel2(Model model, ModelMap modelMap) {
        // 使用Model将数据存入request域
        // model.addAttribute("name","李三好");
        // 使用ModelMap将数据存入request域
        modelMap.addAttribute("name", "李三好");
        return "lxx";
    }
使用Map集合
Model接口底层就是一个Map集合,我们可以给控制器方法设置 Map类型的参数,向Map中添加键值对,数据也会存到request域 中。
    @RequestMapping("/c2/hello5")
    public String setRequestModel3(Map map){
        map.put("name", "李三好");
        return "lxx";
    }
4 session域设置数据

Session作用域表示在当前会话中有效。在SpringMVC中对于 Session作用域传值,只能使用HttpSession对象来实现。
- 编写控制器方法
    @RequestMapping("/c2/hello6")
    public String setSeesionModel(HttpSession session){
        session.setAttribute("address","昆明");
        return "lxx";
    }
- 编写jsp页面
<%--
  Created by IntelliJ IDEA.
  User: Administrator
  Date: 2022/10/14
  Time: 10:56
  To change this template use File | Settings | File Templates.
--%>
<%@ page contentType="text/html;charset=UTF-8" language="java" %>
<html>
<head>
    <title>lxx</title>
</head>
<body>
    <h1>你好${requestScope.name}</h1>
    <h1>地址是${sessionScope.address}</h1>
</body>
</html>
5 context域设置数据

context作用域表示在整个应用范围都有效。在SpringMVC中对 context作用域传值,只能使用ServletContext对象来实现。但是该对象不能直接注入到方法参数中,需要通过HttpSession对象获取。
- 编写控制器方法
    @RequestMapping("/c2/hello7")
    public String setContextModel(HttpSession session) {
        ServletContext servletContext = session.getServletContext();
        servletContext.setAttribute("age", 10);
        return "lxx";
    }
- 编写jsp页面
<%--
  Created by IntelliJ IDEA.
  User: Administrator
  Date: 2022/10/14
  Time: 10:56
  To change this template use File | Settings | File Templates.
--%>
<%@ page contentType="text/html;charset=UTF-8" language="java" %>
<html>
<head>
    <title>lxx</title>
</head>
<body>
    <h1>你好${requestScope.name}</h1>
    <h1>地址是${sessionScope.address}</h1>
    <h1>年龄是${applicationScope.age}</h1>
</body>
</html>
6 请求转发&重定向

之前的案例,我们发现request域中的值可以传到jsp页面中,也就是通过视图解析器跳转到视图的底层是请求转发。 如果我们跳转时不想使用视图解析器,可以使用原生 HttpServletRequest进行请求转发或HttpServletResponse进行重定向:
    @RequestMapping("/c2/hello8")
    public void myForward1(HttpServletRequest request, HttpServletResponse response) throws Exception {
        request.setAttribute("name", "李三好");
        // 请求转发
        //request.getRequestDispatcher("/c2/hello9").forward(request, response);

        // 原生重定向
        response.sendRedirect("/c2/hello9");
    }

    @RequestMapping("/c2/hello9")
    public void myForward2(HttpServletRequest request) {
        System.out.println("hello");
        System.out.println(request.getAttribute("name"));
    }
SpringMVC还提供了一种更简单的请求转发和重定向的写法:
    @RequestMapping("/c2/hello10")
    public String myForward3(HttpServletRequest request) {
        request.setAttribute("name", "尚学堂");
        // 请求转发
        //return "forward:/c2/hello9";

        // 重定向
        return "redirect:/c2/hello9";
    }
四 SpringMVC注解
SpringMVC通过注解来实现控制器的功能,接下来我们详细学习 SpringMVC的常用注解:
1 @Controller
作用:标记控制器,将控制器交给Spring容器管理。
位置:类上方
2 @RequestMapping
作用:给控制器方法设置请求路径
位置:方法或类上方。用于类上,表示类中的所有控制器方法都是 以该地址作为父路径。
属性:
- value/path:请求路径
- method:指定请求方式
- params:规定必须发送的请求参数
- headers:规定请求必须包含的请求头
@Controller
@RequestMapping("/c3")
public class MyController3 {

    /*
       访问路径为 /c3/annotation1
       支持post和get请求
       请求时必须带有age参数
       请求时必须带有User-agent请求头
    */
    @RequestMapping(path = "/annotation1",method = {RequestMethod.GET,RequestMethod.POST},
    params = {"age"},headers = {"User-Agent"})
    public String annotation1(String username) {
        System.out.println(username);
        return "lxx";
    }

}
请求URL的写法:http://localhost:8080/c3/annotation1?age=1&username=xxx
3 @RequestParam

作用:在控制器方法中获取请求参数
位置:方法参数前
属性:
- name:指定请求参数名称
- defaultValue: 为参数设置默认值
- required:设置是否是必须要传入的参数
    /*
    定义请求的参数名为username,默认值为sxt,不是必须的参数
*/
    @RequestMapping("/annotation2")
    public String annotation2(@RequestParam(name = "username", defaultValue = "sxt", required = false) String name) {
        System.out.println(name);
        return "lxx";
    }
请求URL的写法:http://localhost:8080/c3/annotation2?username=xxx
4 @RequestHeader、@CookieValue

@RequestHeader
作用:在控制器方法中获取请求头数据
位置:方法参数前
**@CookieValue **
作用:在控制器方法中获取Cookie数据
位置:方法参数前
   /*
        获取User-Agent请求头
        获取JSESSIONID的Cookie值
     */
    @RequestMapping("/annotation3")
    public String
    annotation3(@RequestHeader("User-Agent") String userAgent, @CookieValue("JSESSIONID") String jSessionId) {
        System.out.println(userAgent);
        System.out.println(jSessionId);
        return "lxx";
    }
5 @SessionAttributes
作用:将Model模型中的数据存到session域中
位置:类上方
@Controller
@RequestMapping("/c4")
// 将模型中的name数据保存到session中
@SessionAttributes("name")
public class MyController4 {

    @RequestMapping("/t1")
    public String t1(Model model) {
        // model中保存name数据
        model.addAttribute("name", "kobe");
        return "lxx";
    }

    @RequestMapping("/t2")
    public String t2(HttpSession session) {
        // 从session中获取name数据
        System.out.println(session.getAttribute("name"));
        return "lxx";
    }
}
6 @ModelAttribute

作用1:设置指定方法在控制器其他方法前执行
位置:方法上方
@Controller
@RequestMapping("/c5")
public class MyController5 {
    @ModelAttribute
    public void before() {
        System.out.println("前置方法");
    }

    @RequestMapping("/t1")
    public String t1() {
        System.out.println("t1");
        return "lxx";
    }
}
作用2:从Model模型中获取数据给参数赋值
位置:方法参数前
@Controller
@RequestMapping("/c6")
public class MyController6 {
    // 前置方法向Model中设置数据
    @ModelAttribute
    public void before(Model model) {
        model.addAttribute("name", "kobe");
    }

    // 该参数不是从请求中获取,而是从Model中获取
    @RequestMapping("/t1")
    public String t1(@ModelAttribute("name") String name) {
        System.out.println(name);
        return "lxx";
    }
}
7 Restful风格支持

(1) RESTful风格介绍
RESTful风格是一种URL路径的设计风格。在RESTful风格的URL路径中,网络上的任意数据都可以看成一个资源,它可以是一段文本、一张图片,也可以是一个Java对象。而每个资源都会占据一个网络路径,无论对该资源进行增删改查,访问的路径是一致的。
传统URL:
- 查找id为1的学生: http://localhost:8080/student/findById?id=30
- 删除id为1的学生: http://localhost:8080/student/deleteById?id=30
RESTful风格URL:
- 查找id为30的学生: http://localhost:8080/student/30
- 删除id为30的学生: http://localhost:8080/student/30
那么如何区分对该资源是哪一种操作?通过请求方式不同,判断进 行的是什么操作。
之前我们学过两种请求方式,GET请求和POST请求,而访问 RESTful风格的URL一共有四种请求方式:
- GET请求:查询操作
- POST请求:新增操作
- PUT请求:修改操作
- DELETE请求:删除操作
RESTful风格URL:
- 查找id为30的学生: http://localhost:8080/student/30 GET方式请求
- 删除id为30的学生: http://localhost:8080/student/30 DELETE方式请求
RESTful风格的优点: 结构清晰、符合标准、易于理解、扩展方便。
(2) Postman使用
默认情况下浏览器是无法发送DELETE请求和PUT请求的,我们可以使用Postman工具发送这些请求。
- 双击安装包安装Postman
- 点击new-collection创建请求集合

- 添加请求

- 保存请求到集合,以后可以随时发送该请求

8 @PathVariable

作用:在RESTful风格的URL中获取占位符的值
位置:方法参数前
属性:
- value:获取哪个占位符的值作为参数值,如果占位符和参数名相同,可以省略该属性。
@Controller
@RequestMapping("/student")
public class StudentController {

    @RequestMapping(value = "/{id}", method = RequestMethod.GET)
    public String findStudentById(@PathVariable("id") int id) {
        System.out.println("查找id为" + id + "的学生");
        return "lxx";
    }

    @RequestMapping(value = "/{id}", method = RequestMethod.DELETE)
    public String deleteStudentById(@PathVariable int id) {
        System.out.println("删除id为" + id + "的学生");
        return "lxx";
    }

    @RequestMapping(value = "/{id}", method = RequestMethod.POST)
    public String addStudent(@PathVariable int id, Student student) {
        System.out.println(id);
        System.out.println(student);
        System.out.println("添加学生");
        return "lxx";
    }

    @RequestMapping(value = "/{id}", method = RequestMethod.PUT)
    public String updateStudent(@PathVariable int id, Student student) {
        System.out.println(id);
        System.out.println(student);
        System.out.println("修改学生");
        return "lxx";
    }

}
访问方式:
- 新增学生:POST
http://localhost:8080/student/30?name=李三好&sex=男 - 修改学生:PUT
http://localhost:8080/student/30?name=阿萨&sex=女 - 删除学生:DELETE
http://localhost:8080/student/30 - 查询学生:GET
http://localhost:8080/student/30
@PostMapping、@GetMapping、@PutMapping、@DeleteMapping
作用:简化设置请求方式的@RequestMapping写法
位置:方法上方。
9 HiddentHttpMethodFilter

由于浏览器form表单只支持GET与POST请求,而DELETE、PUT请求并不支持,SpringMVC有一个过滤器,可以将浏览器的POST请求改为指定的请求方式,发送给的控制器方法。
用法如下:
- 在web.xml中配置过滤器
<!-- 请求方式过滤器 -->
<filter>
	<filter-name>httpMethodFilter</filter-name>
	<filter-class>org.springframework.web.filter.HiddenHttpMethodFilter</filter-class>
</filter>
<filter-mapping>
	<filter-name>httpMethodFilter</filter-name>
	<url-pattern>/*</url-pattern>
</filter-mapping>
- 编写控制器方法
@Controller
@RequestMapping("/c7")
public class MyController7 {

	@DeleteMapping("/delete")
	public String testDelete(){
		System.out.println("删除方法");
		return "lxx";
	}

	@PutMapping("/put")
	public String testPut(){
		System.out.println("修改方法");
		return "lxx";
	}
}
- 在jsp中编写表单
<%@ page	contentType="text/html;charset=UTF-8"	language="java" %>
<html>
<head>
	<title>DELETE、PUT提交</title>
</head>
<body>
    <!-- 删除 -->
    <%-- 提交DELETE、PUT请求,表单必须提交方式为post --%>
    <%-- 表单中有一个隐藏域,name值为_method,value值为提交方式 --%>
    <form action="/c7/delete"	method="post">
		<input type="hidden"	name="_method" value="DELETE">
		<input type="submit" value="删除">
	</form>
	<hr/>
	<!-- 修改 -->
	<form action="/c7/put"	method="post">
		<input type="hidden"	name="_method" value="PUT">
		<input type="submit" value="修改">
	</form>
</body>
</html>
10 @ResponseBody

作用:方法返回的对象转换为JSON格式,并将JSON数据直接写入到输出流中,使用此注解后不会再经过视图解析器。使用该注解可以处理Ajax请求。
位置:方法上方或方法返回值前
- 编写jsp页面,发送ajax请求
<%--
  Created by IntelliJ IDEA.
  User: Administrator
  Date: 2022/10/15
  Time: 17:23
  To change this template use File | Settings | File Templates.
--%>
<%@ page contentType="text/html;charset=UTF-8" language="java" %>
<html>
<head>
    <title></title>
</head>
<body>
</body>
<script src="/js/axios.js"></script>
<script>
    axios.get("/c8/getStudent", {
        params: {
            name: "李三好",
            sex: "男"
        }
    }).then(value => console.log(value), reason => console.log(reason))
</script>
</html>
- 由于jsp页面中引入axios的js文件,而SpringMVC会拦截所有资源,造成axios.js失效,需要在SpringMVC核心配置文件中放行静态资源。
    <!-- 放行静态资源 -->
    <mvc:default-servlet-handler />
- 编写结果实体类,该实体类会封装一个请求的结果
// 请求的结果对象
public class Result {
    private boolean flag; // 请求是否成功
    private String message; // 请求提示信息
}
- 编写控制器
@Controller
@RequestMapping("/c8")
public class MyController8 {
    @GetMapping("/getStudent")
    @ResponseBody
    public Result getStudent(String name, String sex) {
        // 输出接受到的参数
        System.out.println(name + ":" + sex);
        // 返回添加结果
        Result result = new Result(true, "success!");
        return result;
    }
}
- SpringMVC会将Result对象转为JSON格式写入输出流,而SpringMVC默认使用的JSON转换器是jackson,需要在pom中添加jackson依赖。
        <!--Jackson包-->
        <dependency>
            <groupId>com.fasterxml.jackson.core</groupId>
            <artifactId>jackson-core</artifactId>
            <version>2.10.0</version>
        </dependency>
        <dependency>
            <groupId>com.fasterxml.jackson.core</groupId>
            <artifactId>jackson-databind</artifactId>
            <version>2.10.0</version>
        </dependency>
        <dependency>
            <groupId>com.fasterxml.jackson.core</groupId>
            <artifactId>jackson-annotations</artifactId>
            <version>2.10.0</version>
        </dependency>
11 @RestController
如果一个控制器类下的所有控制器方法都返回JSON格式数据且不进行跳转,可以使用@RestController代替@Controller,此时每个方法上的@ResponseBody都可以省略。
12 静态资源映射

当在DispatcherServlet的 <url-pattern> 中配置拦截 “/” 时,除了jsp文件不会拦截以外,其他所有的请求都会经过前端控制器进行匹配。此时静态资源例如css、js、jpg等就会被前端控制器拦截,导致不能访问,出现404问题。想要正常映射静态资源共有三种方案:
配置静态资源筛查器
在SpringMVC的配置文件中配置<mvc:default-servlet-handler />后,会在Spring容器中创建一个资源检查器,它对进入DispatcherServlet的URL进行筛查,如果不是静态资源,才由DispatcherServlet处理。
修改SpringMVC核心配置文件:
    <!-- 放行静态资源 -->
    <mvc:default-servlet-handler />
配置静态资源映射器
SpringMVC模块提供了静态资源映射器组件,通过 <mvc:resources> 标签配置静态资源映射器,配置后的路径不会由DispatcherServlet处理。
修改SpringMVC核心配置文件:
<!--配置静态资源映射器-->
<!-- mapping:配置请求的URL location:资源路径-->
<mvc:resources mapping="/img/"	location="/img/"/>
<mvc:resources mapping="/js/" location="/js/"/>
配置默认Servlet处理静态资源
在web.xml可以配置默认Servlet处理静态资源,该Servlet由tomcat提供,它会直接访问静态资源不进行其他操作。这样就避免了使用DispatcherServlet对静态资源的拦截:
修改web.xml:
<servlet-mapping>
	<servlet-name>default</servlet-name>
	<url-pattern>*.jpg</url-pattern>
</servlet-mapping>

<servlet-mapping>
	<servlet-name>default</servlet-name>
	<url-pattern>*.css</url-pattern>
</servlet-mapping>

<servlet-mapping>
	<servlet-name>default</servlet-name>
    <url-pattern>*.js</url-pattern>
</servlet-mapping>

<servlet-mapping>
	<servlet-name>default</servlet-name>
	<url-pattern>*.png</url-pattern>
</servlet-mapping>
13 @RequestBody

作用:将请求中JSON格式的参数转为JAVA对象
位置:写在方法参数前
- AJAX请求发送JSON格式的参数
<%--
  Created by IntelliJ IDEA.
  User: Administrator
  Date: 2022/10/15
  Time: 17:23
  To change this template use File | Settings | File Templates.
--%>
<%@ page contentType="text/html;charset=UTF-8" language="java" %>
<html>
<head>
    <title></title>
</head>
<body>
</body>
<script src="/js/axios.js"></script>
<script>
    axios.post("/c8/addStudent", {
        id: 1,
        name: "kobe",
        sex: "man"
    }).then(value => console.log(value), reason => console.log(reason))
</script>
</html>
- 编写控制器
    @PostMapping("/addStudent")
    @ResponseBody
    public Result addStudent(@RequestBody Student student) {
        // 输出接受到的参数
        System.out.println(student);
        // 返回添加结果
        Result result = new Result(true, "success!");
        return result;
    }
Postman发送JSON格式的post请求
- 在Headers中添加Content-Type
key为Content-Type,值为application/json - 设置Body
点击"body",’‘raw’'并设定为JSON

五 SpringMVC文件上传
1 原生方式上传

上传是Web工程中很常见的功能,SpringMVC框架简化了文件上传 的代码,我们首先使用JAVAEE原生方式上传文件:
- 创建新的SpringMVC项目,在web.xml中将项目从2.3改为3.1, 即可默认开启el表达式
<web-app xmlns:xsi="http://www.w3.org/2001/XMLSchema-instance"
         xmlns="http://xmlns.jcp.org/xml/ns/javaee"
         xsi:schemaLocation="http://xmlns.jcp.org/xml/ns/javaee http://xmlns.jcp.org/xml/ns/javaee/web-app_3_1.xsd"
         id="WebApp_ID" version="3.1">
- 编写上传表单
<%--
  Created by IntelliJ IDEA.
  User: Administrator
  Date: 2022/10/16
  Time: 17:14
  To change this template use File | Settings | File Templates.
--%>
<%@ page contentType="text/html;charset=UTF-8" language="java" %>
<html>
<head>
    <title>Title</title>
</head>
<body>
<h3>文件上传</h3>
<%-- 上传表单的提交方式必须是post --%>
<%-- enctype属性为multipart/formdata,意思是不对表单数据进行编码 --%>
<form action="/fileUpload" method="post" enctype="multipart/form-data">
    <%-- 文件选择控件,类型是file,必须要有name属性--%>
    选择文件:<input type="file" name="upload"/>
    <input type="submit" value="上传"/>
</form>
</body>
</html>
- 接收请求体数据:
@RequestMapping("/fileUpload")
public String upload(HttpServletRequest request) throws Exception {
    // 获取输入流
    ServletInputStream is = request.getInputStream();
    // 从输入流获取请求体数据
    int i = 0;
    while ((i=is.read())!=-1){
        System.out.println((char)i);
   }
    return "index";
}
接下来需要分析请求体中的文件项,并将数据写入磁盘,此时需要 借助文件上传工具
- 引入文件上传依赖:
        <!-- 文件上传 -->
        <dependency>
            <groupId>commons-fileupload</groupId>
            <artifactId>commons-fileupload</artifactId>
            <version>1.3.1</version>
        </dependency>
        <dependency>
            <groupId>commons-io</groupId>
            <artifactId>commons-io</artifactId>
            <version>2.4</version>
        </dependency>
- 编写控制器接收上传请求,控制器进行三步操作:
- 创建文件夹,存放上传文件。
- 分析请求体,找到上传文件数据。
- 将文件数据写入文件夹。
   @PostMapping("/fileUpload")
    public String upload(HttpServletRequest request) throws Exception {
        // 创建文件夹,存放上传文件
        // 1.设置上传文件夹的真实路径
        String realPath = request.getSession().getServletContext().getRealPath("/upload");
        // 2.判断该目录是否存在,如果不存在,创建该目录
        File file = new File(realPath);
        if(!file.exists()){
            file.mkdirs();
        }

        // 分析请求体,找到上传文件数据
        // 1.创建磁盘文件工厂
        DiskFileItemFactory factory = new DiskFileItemFactory();
        // 2.创建上传数据分析器对象
        ServletFileUpload servletFileUpload = new ServletFileUpload(factory);
        // 3.利用分析器对象解析请求体,返回所有数据项
        List<FileItem> fileItems = servletFileUpload.parseRequest(request);
        // 4.遍历所有数据,找到文件项(非表单项)
        for (FileItem fileItem:fileItems){
            if(!fileItem.isFormField()){

                // 将文件数据写入文件夹
                // 1.获取文件名
                String name = fileItem.getName();
                // 2.将文件写入磁盘
                fileItem.write(new File(file,name));
                // 3.删除内存中的临时文件
                fileItem.delete();
            }
        }

        return "index";
    }
2 SpringMVC方式上传

SpringMVC使用框架提供的文件解析器对象,可以直接将请求体中的文件数据转为MultipartFile对象,从而省略原生上传中分析请求体的步骤。
- 在SpringMVC核心配置文件配置文件解析器
    <!-- 文件解析器对象,id名称必须是multipartResolver -->
    <bean id="multipartResolver" class="org.springframework.web.multipart.commons.CommonsMultipartResolver">
        <!-- 支持一次上传文件的总容量。单位:字节
        100M = 100*1024*1024-->
        <property name="maxUploadSize" value="104857600"/>
        <!-- 文件名的编码方式-->
        <property name="defaultEncoding" value="utf-8"/>
    </bean>
- 创建JSP表单
<%@ page contentType="text/html;charset=UTF-8" language="java" %>
<html>
<head>
    <title>Title</title>
</head>
<body>
<h3>文件上传</h3>

<form action="/fileUpload2" method="post" enctype="multipart/form-data">
    选择文件:<input type="file" name="file"/>
    <input type="submit" value="上传"/>
</form>
</body>
</html>
- 编写控制器接收上传请求
    // MultipartFile参数名必须和JSP文件空间的name属性一致
    @PostMapping("/fileUpload2")
    public String upload2(MultipartFile file,HttpServletRequest request) throws IOException {
        // 创建文件夹,存放上传文件
        String realPath = request.getSession().getServletContext().getRealPath("/upload");
        File dir = new File(realPath);
        if(!dir.exists()){
            dir.mkdirs();
        }

        // 将上传的数据写到文件夹的文件中
        // 1.拿到上传的文件名
        String filename = file.getOriginalFilename();
        // 2.创建空文件
        File newFile = new File(dir, filename);
        // 3.将数据写入空文件中
        file.transferTo(newFile);

        return "index";
    }
3 上传多文件
SpringMVC支持一次性上传多个文件,写法如下:
- 创建JSP表单
<%--
  Created by IntelliJ IDEA.
  User: Administrator
  Date: 2022/10/16
  Time: 17:14
  To change this template use File | Settings | File Templates.
--%>
<%@ page contentType="text/html;charset=UTF-8" language="java" %>
<html>
<head>
    <title>Title</title>
</head>
<body>
<h3>文件上传</h3>

<form action="/fileUpload3" method="post" enctype="multipart/form-data">
    用户名:<input name="username"/><br>
    文件1:<input type="file" name="files"/><br>
    文件2:<input type="file" name="files"/><br>
    <input type="submit" value="上传"/>
</form>
</body>
</html>
- 编写控制器接收上传请求
    // 处理多文件上传,参数类型为MultipartFile数组,参数名和JSP文件控件的name属性一致
    @PostMapping("fileUpload3")
    public String upload3(MultipartFile[] files, String username, HttpServletRequest request) throws IOException {
        System.out.println("username: " + username);

        //1.设置上传文件保存的文件夹
        String realPath = request.getSession().getServletContext().getRealPath("/upload");
        File dir = new File(realPath);
        if (!dir.exists()) {
            dir.mkdirs();
        }

        //2.遍历数组,将上传文件保存到文件夹
        for (MultipartFile file : files) {
            String filename = file.getOriginalFilename();
            filename = UUID.randomUUID() + "_" + filename;
            File newFile = new File(dir, filename);
            file.transferTo(newFile);
        }

        return "index";
    }
4 异步上传

之前的上传方案,在上传成功后都会跳转页面。而在实际开发中, 很多情况下上传后不进行跳转,而是进行页面的局部刷新,比如: 上传头像成功后将头像显示在网页中。这时候就需要使用异步文件 上传。
- 编写JSP页面,引入jQuery和jQuery表单上传工具 jquery.form.js
<%--
  Created by IntelliJ IDEA.
  User: Administrator
  Date: 2022/10/16
  Time: 17:51
  To change this template use File | Settings | File Templates.
--%>
<%@ page contentType="text/html;charset=UTF-8" language="java" %>
<html>
<head>
    <title>上传</title>
    <script src="/js/jquery-2.1.1.min.js">
    </script>
    <script src="/js/jquery.form.js">
    </script>
</head>

<body>
<h3>文件上传</h3>
<form id="ajaxForm" enctype="multipart/form-data">
    <input type="file" name="file"/>
    <%-- 按钮类型不能是submit,否则会刷新页面--%>
    <input type="button" value="上传头像" id="btn"/>
</form>
<%-- 上传头像后展示的位置 --%>
<img src="/" width="100" id="img">

<script>
    $(function () {
        $("#btn").click(function () {
            // 异步提交表单
            $("#ajaxForm").ajaxSubmit({
                url: "/fileUpload4",
                type: "post",
                success: function (data) {
                    console.log(data);
                    $("#img").attr("src", data);
                }
            })
        })
    })
</script>

</body>
</html>
- 编写控制器接收异步上传请求
   @PostMapping("/fileUpload4")
    //不进行页面跳转
    @ResponseBody
    public String upload4(HttpServletRequest request, MultipartFile file) throws Exception {
        // 创建文件夹,存放上传文件。
        String realPath = request.getSession().getServletContext().getRealPath("/upload");
        File dir = new File(realPath);
        if (!dir.exists()){
            dir.mkdirs();
        }

        // 将上传的数据写到文件夹的文件中
        // 1.拿到上传文件名
        String filename = file.getOriginalFilename();
        filename = UUID.randomUUID()+"_"+filename;
        // 2.创建空文件
        File newFile = new File(dir, filename);
        // 3.将上传的文件写到空文件中
        file.transferTo(newFile);

        // 返回文件的路径
        return "/upload/"+filename;
    }
- 解决解决SpringMVC的@ResponseBody返回中文乱码问题
    <!-- 开启SpringMVC注解的支持 -->
    <mvc:annotation-driven >
        <!-- 消息转换器 解决SpringMVC的@ResponseBody返回中文乱码-->
        <mvc:message-converters register-defaults="true">
            <bean class="org.springframework.http.converter.StringHttpMessageConverter">
                <property name="supportedMediaTypes" value="text/html;charset=UTF-8"/>
            </bean>
        </mvc:message-converters>
    </mvc:annotation-driven>
5 跨服务器上传
待续。。。
6 文件下载

将文件上传到服务器后,有时我们需要让用户下载上传的文件,接下来我们编写文件下载功能:
查询所有可下载的文件
- 编写控制器方法,查询所有可下载的文件,并跳转到下载页面
    // 查询可下载的文件
    @GetMapping("/showFiles")
    public String showFileDown(HttpServletRequest request, Model model) {
        //1.获取下载文件路径集合。注:跨服务器上传中,网络路径无法获取文件列表。
        String path = request.getSession().getServletContext().getRealPath("/upload");
        File file = new File(path);
        String[] files = file.list();
        //2.将路径放入模型中,跳转到JSP页面
        model.addAttribute("files", files);
        return "download";
    }
- 添加JSTL依赖
        <!-- JSTL -->
        <dependency>
            <groupId>org.apache.taglibs</groupId>
            <artifactId>taglibs-standard-spec</artifactId>
            <version>1.2.5</version>
        </dependency>
        <dependency>
            <groupId>org.apache.taglibs</groupId>
            <artifactId>taglibs-standard-impl</artifactId>
            <version>1.2.5</version>
        </dependency>
- 编写下载页面download.jsp
<%@ page
        contentType="text/html;charset=UTF-8"
        language="java" %>
<%@ taglib prefix="c"
           uri="http://java.sun.com/jsp/jstl/core" %>
<html>
<head>
    <title>下载</title>
</head>
<body>
<h3>文件下载</h3>
<%-- 遍历文件集合 --%>
<c:forEach items="${files}" var="file">
    <a href="/download?fileName=${file}">${file}</a><br/>
</c:forEach>
</body>
</html>
编写下载控制器
   // 文件下载
    @RequestMapping("/download")
    public void fileDown(HttpServletRequest request, HttpServletResponse response, String fileName) throws IOException {
        //设置响应头
        response.addHeader("Content-Disposition", "attachment;filename=" + new String(fileName.getBytes("gbk"), "iso-8859-1"));

        //读取下载文件
        String path = request.getSession().getServletContext().getRealPath("/upload");
        File file = new File(path, fileName);
        FileInputStream inputStream = new FileInputStream(file);

        //产生响应
        ServletOutputStream outputStream = response.getOutputStream();
        byte[] data = new byte[1024];
        int len;
        while ((len = inputStream.read(data)) != -1) {
            outputStream.write(data, 0, len);
        }

        inputStream.close();
        outputStream.close();
    }
六 SpringMVC异常处理
1 单个控制器异常处理

在系统当中, Dao、Service、Controller层代码出现都可能抛出异常。如果哪里产生异常就在哪里处理,则会降低开发效率。所以一 般情况下我们会让异常向上抛出,最终到达DispatcherServlet中, 此时SpringMVC提供了异常处理器进行异常处理,这样可以提高开发效率。

处理单个Controller的异常:
@Controller
public class MyController {
    @RequestMapping("/t1")
    public String t1(){
        String str = null;
        //       str.length();
        //       int flag = 1/0;
        int[] arr = new int[1];
        arr[2] = 10;
        return "index";
   }

    /**
     * 异常处理方法
     * @param ex 异常对象
     * @param model 模型对象
     * @return
     */
    // 添加@ExceptionHandler,表示该方法是处理异常的方法,属性为处理的异常类
	@ExceptionHandler({NullPointerException.class,
                       ArithmeticException.class})
    public String exceptionHandle1(Exception ex, Model model){
        // 向模型中添加异常对象
        model.addAttribute("msg",ex);
        // 跳转到异常页面
        return "error";
   }

    // 方法一不能处理的异常交给方法二处理
	@ExceptionHandler(Exception.class)
    public String exceptionHandle2(Exception ex, Model model){
        model.addAttribute("msg",ex);
        return "error2";
   }
}
异常页面error.jsp
<%@ page contentType="text/html;charset=UTF8" language="java" %>
<html>
    <head>
        <title>出错了!</title>
    </head>
    <body>
        <h3>ERROR 发生异常!${msg}</h3>
    </body>
</html>
异常页面error2.jsp
<%@ page contentType="text/html;charset=UTF8" language="java" %>
<html>
    <head>
        <title>出错了!</title>
    </head>
    <body>
        <h3>ERROR2 发生严重异常!${msg}</h3>
    </body>
</html>
2 全局异常处理

在控制器中定义异常处理方法只能处理该控制器类的异常,要想处理所有控制器的异常,需要定义全局异常处理类。
- 编写另一个有异常的控制器类
@Controller
public class MyController2 {
    @RequestMapping("/t2")
    public String t2(){
        int[] arr = new int[1];
        arr[2] = 10; //数组越界
        return "index";
   }
}
- 编写全局异常处理器类
// 全局异常处理器类,需要添加@ControllerAdvice
@ControllerAdvice
public class GlobalExceptionHandler {
    /**
    * 异常处理方法
     *
     * @param ex   异常对象
     * @param model 模型对象
     * @return
     */
    // 添加@ExceptionHandler,表示该方法是处理异常的方法,属性为处理的异常类
  	@ExceptionHandler({NullPointerException.class,ArithmeticException.class})
    public String exceptionHandle1(Exception ex, Modelmodel) {
        // 向模型中添加异常对象
        model.addAttribute("msg", ex);
        // 跳转到异常页面
        return "error";
   }

    // 方法一不能处理的异常交给方法二处理
	@ExceptionHandler(Exception.class)
    public String exceptionHandle2(Exception ex, Modelmodel) {
        model.addAttribute("msg", ex);
        return "error2";
   }
}
3 自定义异常处理器

以上方式都是使用的SpringMVC自带的异常处理器进行异常处理, 我们还可以自定义异常处理器处理异常:
// 自定义异常处理器实现HandlerExceptionResolver接口,并放入Spring容器中
@Component
public class MyExceptionHandler implements HandlerExceptionResolver {
    @Override
    public ModelAndView resolveException(HttpServletRequest httpServletRequest, HttpServletResponse httpServletResponse, Object o, Exception e){
        ModelAndView modelAndView = new ModelAndView();
        if (e instanceof NullPointerException) {
          	modelAndView.setViewName("error");
       	} else {
          	modelAndView.setViewName("error2");
       	}
        modelAndView.addObject("msg", e);
        return modelAndView;
   }
}
七 SpringMVC拦截器
1 拦截器简介

SpringMVC的拦截器(Interceptor)也是AOP思想的一种实现方 式。它与Servlet的过滤器(Filter)功能类似,主要用于拦截用户的 请求并做相应的处理,通常应用在权限验证、记录请求信息的日志、判断用户是否登录等功能上。
拦截器和过滤器的区别
- 拦截器是SpringMVC组件,而过滤器是Servlet组件。
- 拦截器不依赖Web容器,过滤器依赖Web容器。
- 拦截器只能对控制器请求起作用,而过滤器则可以对所有的请求起作用。
- 拦截器可以直接获取IOC容器中的对象,而过滤器就不太方便获取。
2 拦截器使用
接下来我们使用SpringMVC拦截器
- 使用maven创建SprinMVC的web项目
- 创建控制器方法
@RequestMapping("/m1")
public String m1(){
	System.out.println("控制器方法");
	return "result";
}
- 创建拦截器类,该类实现HandlerInterceptor接口,需要重写三个方法:
- preHandle:请求到达Controller前执行的方法,返回值为true通过拦截器,返回值为false被 拦截器拦截。
- postHandle:跳转到JSP前执行的方法
- afterCompletion:跳转到JSP后执行的方法
// 拦截器类
public class MyInterceptor implements HandlerInterceptor {
    // 请求到达Controller前执行
    @Override
       public boolean preHandle(HttpServletRequest request,HttpServletResponse response, Object handler) {
        System.out.println("请求到达Controller前");
        // 如果return false则无法到达Controller
        return true;
   }

    // 跳转到JSP前执行,此时可以向Request域添加数据
    @Override
    public void postHandle(HttpServletRequest request,HttpServletResponse response, Object handler, ModelAndView modelAndView) {
        System.out.println("跳转到JSP前");
        request.setAttribute("name","lxx");
   }

    // 跳转到JSP后执行,此时已经不能向Request域添加数据
    @Override
    public void afterCompletion(HttpServletRequest request, HttpServletResponse response,
Object handler, Exception ex) {
        System.out.println("跳转到JSP后");
        request.setAttribute("age",10);
  }
}
- 编写JSP页面
<%@ page
contentType="text/html;charset=UTF-8"
language="java" %>
<html>
    <head>
        <title>结果</title>
    </head>
    <body>
        <h3>name:${requestScope.name}</h3>
        <h3>age:${requestScope.age}</h3>
    </body>
</html>
- 在SpringMVC核心配置文件中配置拦截器
<!-- 配置拦截器-->
<mvc:interceptors>
    <mvc:interceptor>
        <!-- 配置拦截器的作用路径-->
        <mvc:mapping path="/**"/>
        <!-- 拦截器对象 -->
        <bean
class="com.itbaizhan.interceptor.MyInterceptor"/>
    </mvc:interceptor>
</mvc:interceptors>
3 全局拦截器
全局拦截器可以拦截所有控制器处理的URL,作用等于/**,配置方 式如下:
<!-- 配置拦截器 -->
<mvc:interceptors>
    <!-- 全局拦截器 -->
    <bean class="com.itbaizhan.interceptor.MyInterceptor"></bean>
</mvc:interceptors>
4 拦截器链与执行顺序

如果一个URL能够被多个拦截器所拦截,全局拦截器最先执行,其 他拦截器根据配置文件中配置的从上到下执行,接下来我们再配置 一个拦截器:
- 编写拦截器类
// 拦截器类
public class MyInterceptor2 implements HandlerInterceptor {

    @Override
       public boolean preHandle(HttpServletRequest request,HttpServletResponse response, Object handler) {
        System.out.println("拦截器2:请求到达Controller前");
        return true;
   }

    @Override
    public void postHandle(HttpServletRequest request,HttpServletResponse response, Object handler, ModelAndView modelAndView) {
        System.out.println("拦截器2:跳转到JSP前");
   }

    @Override
    public void afterCompletion(HttpServletRequest request, HttpServletResponse response,
Object handler, Exception ex) {
        System.out.println("拦截器2:跳转到JSP后");
  }
}
- 配置拦截器链
<!-- 配置拦截器 -->
<mvc:interceptors>
    <!-- 拦截器1 -->
    <mvc:interceptor>
        <mvc:mapping path="/**"/>
        <bean class="com.itbaizhan.interceptor.MyInterceptor"/>
    </mvc:interceptor>
    <!-- 拦截器2 -->
    <mvc:interceptor>
        <mvc:mapping path="/**"/>
        <bean class="com.itbaizhan.interceptor.MyInterceptor2"/>
    </mvc:interceptor>
</mvc:interceptors>
访问控制器方法后输出如下:
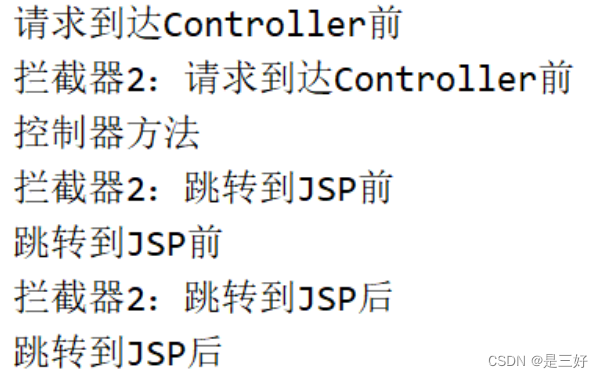
结论:
- preHandle()顺序执行,postHandle()、afterComletion()逆序执行。
- 只要有一个preHandle()拦截,后面的preHandle(),postHandle()都不会执行。
- 只要相应的preHandle()放行,afterComletion()就会执行。
5 拦截器过滤敏感词案例

接下来我们编写一个拦截器案例,需求如下:
在系统中,我们需要将所有响应中的一些敏感词替换为 *** ,此时可以使用拦截器达到要求:
- 编写控制器方法
@RequestMapping("/m2")
public String m2(Model model){
    model.addAttribute("name","大笨蛋");
    return "result";
}
- 编写敏感词拦截器
// 敏感词拦截器
public class SensitiveWordInterceptor implements HandlerInterceptor {
    @Override
    public boolean preHandle(HttpServletRequest request,HttpServletResponse response, Object handler) {
        return true;
   }

    @Override
        public void postHandle(HttpServletRequest request,HttpServletResponse response, Object handler, ModelAndView modelAndView) {
        // 敏感词列表
        String[] sensitiveWords = {"坏人","暴力","笨蛋"};
        // 获取model中所有数据
        Map<String, Object> model = modelAndView.getModel();
        Set<Map.Entry<String, Object>> entries = model.entrySet();
        // 遍历model
        for (Map.Entry<String, Object> entry : entries) {
            String key = entry.getKey();
            String value = entry.getValue().toString();
            // 将model值和敏感词列表遍历比对
            for (String sensitiveWord :sensitiveWords) {
                // 如果model值包含敏感词,则替换
              if(value.contains(sensitiveWord)){
                    String newStr = value.replaceAll(sensitiveWord,"***");
                    model.put(key,newStr);
               }
           }
       }
   }

}
- 配置拦截器
<!-- 配置拦截器-->
<mvc:interceptors>
    <!-- 敏感词拦截器 -->
    <mvc:interceptor>
        <mvc:mapping path="/**"/>
        <bean class="com.itbaizhan.interceptor.SensitiveWordInterceptor"></bean>
    </mvc:interceptor>
</mvc:interceptors>
八 SpringMVC跨域请求
1 同源策略
同源策略是浏览器的一个安全功能。同源,指的是两个URL的协议,域名,端口相同。浏览器出于安全方面的考虑,不同源的客户端脚本在没有明确授权的情况下,不能读写对方资源。
哪些不受同源策略限制:
- 页面中的
<a>跳转、表单提交不会受到同源策略限制的。 - 静态资源引入也不会受到同源策略限制。如嵌入到页面中的
<script src="">, <img src=""> ,<link href="">等。
最容易受到同源策略影响的就是Ajax请求。
2 跨域请求

当请求URL的协议、域名、端口三者中任意一个与当前页面URL不 同时即为跨域。浏览器执行JavaScript脚本时,会检查当前请求是否同源,如果不是同源资源,就不会被执行。
| 当前页面URL | 被请求页面URL | 是否跨域 | 原因 |
|---|---|---|---|
| http://www.lxx.com/ | http://www.lxx.com/index.html | 否 | |
| http://www.lxx.com/ | https://www.lxx.com/index.html | 是 | 协议不同 |
| http://www.lxx.com/ | http://www.baidu.com/ | 是 | 主域名不同 |
| http://www.lxx.com/ | http://kobe.lxx.com/ | 是 | 子域名不同 |
| http://www.lxx.com:8080 | http://www.lxx.com:7070 | 是 | 端口号不同 |
比如:
- 编写控制器方法
@RequestMapping("/m3")
@ResponseBody
public String m3(){
    System.out.println("测试跨域请求");
    return "success";
}
- 编写JSP页面,发送异步请求
<%@ page
contentType="text/html;charset=UTF-8"
language="java" %>
<html>
    <head>
        <title>跨域请求</title>
        <script src="/js/jquery2.1.1.min.js"></script>
        <script>
            $(function (){
                $("#btn").click(function() {
                  $.get("http://127.0.0.1:8080/m3",function(data) {
                        console.log(data);
                   })
               })
           })
        </script>
    </head>
    <body>
        <button id="btn">异步请求</button>
    </body>
</html>

3 控制器接收跨域请求

SpringMVC提供了注解@CrossOrigin解决跨域问题。用法如下:
@RequestMapping("/m3")
@ResponseBody
// 如果请求从http://localhost:8080发出,则允许跨域访问
@CrossOrigin("http://localhost:8080")
public String m3(){
    System.out.println("测试跨域请求");
    return "success";
}
九 SSM整合
1 需求分析
接下来我们使用Maven+Spring+MyBatis+SpringMVC完成一个案 例,案例需求为在页面可以进行添加学生+查询所有学生!
案例需要使用以下技术:
- 使用Maven创建聚合工程,并使用Maven的tomcat插件运行工程
- 使用Spring的IOC容器管理对象
- 使用MyBatis操作数据库
- 使用Spring的声明式事务进行事务管理
- 使用SpringMVC作为控制器封装Model并跳转到JSP页面展示数据
- 使用Junit测试方法 使用Log4j在控制台打印日志
案例的编写流程如下:
- 创建maven父工程,添加需要的依赖和插件
- 创建dao子工程,配置MyBatis操作数据库,配置Log4j在控制台 打印日志。
- 创建service子工程,配置Spring声明式事务
- 创建controller子工程,配置SpringMVC作为控制器,编写JSP页 面展示数据。
- 每个子工程都使用Spring进行IOC管理
/*
Navicat MySQL Data Transfer

Source Server         : mysql57
Source Server Version : 50735
Source Host           : localhost:3306
Source Database       : student

Target Server Type    : MYSQL
Target Server Version : 50735
File Encoding         : 65001

Date: 2022-10-10 10:32:59
*/

SET FOREIGN_KEY_CHECKS=0;

-- ----------------------------
-- Table structure for `student`
-- ----------------------------
DROP TABLE IF EXISTS `student`;
CREATE TABLE `student` (
  `id` int(11) NOT NULL AUTO_INCREMENT,
  `name` varchar(255) DEFAULT NULL,
  `sex` varchar(10) DEFAULT NULL,
  `address` varchar(255) DEFAULT NULL,
  PRIMARY KEY (`id`)
) ENGINE=InnoDB AUTO_INCREMENT=3 DEFAULT CHARSET=utf8;

-- ----------------------------
-- Records of student
-- ----------------------------
INSERT INTO `student` VALUES ('1', '三好', '男', '昆明');
INSERT INTO `student` VALUES ('2', '科比', '男', '洛杉矶');
2 创建父工程
创建maven父工程,添加需要的依赖和插件
    <properties>
        <maven.compiler.source>12</maven.compiler.source>
        <maven.compiler.target>12</maven.compiler.target>
        <project.build.sourceEncoding>UTF-8</project.build.sourceEncoding>

        <!--Spring版本-->
        <spring.version>5.2.12.RELEASE</spring.version>
    </properties>

    <dependencies>
        <!-- mybatis -->
        <dependency>
            <groupId>org.mybatis</groupId>
            <artifactId>mybatis</artifactId>
            <version>3.5.7</version>
        </dependency>
        <!-- mysql驱动 -->
        <dependency>
            <groupId>mysql</groupId>
            <artifactId>mysql-connector-java</artifactId>
            <version>5.1.48</version>
        </dependency>
        <!-- druid连接池 -->
        <dependency>
            <groupId>com.alibaba</groupId>
            <artifactId>druid</artifactId>
            <version>1.2.8</version>
        </dependency>
        <!-- MyBatis与Spring的整合包 -->
        <dependency>
            <groupId>org.mybatis</groupId>
            <artifactId>mybatis-spring</artifactId>
            <version>2.0.6</version>
        </dependency>
        <dependency>
            <groupId>org.springframework</groupId>
            <artifactId>spring-jdbc</artifactId>
            <version>${spring.version}</version>
        </dependency>
        <!-- springmvc -->
        <dependency>
            <groupId>org.springframework</groupId>
            <artifactId>spring-context</artifactId>
            <version>${spring.version}</version>
        </dependency>
        <dependency>
            <groupId>org.springframework</groupId>
            <artifactId>spring-web</artifactId>
            <version>${spring.version}</version>
        </dependency>
        <dependency>
            <groupId>org.springframework</groupId>
            <artifactId>spring-webmvc</artifactId>
            <version>${spring.version}</version>
        </dependency>
        <!-- 事务 -->
        <dependency>
            <groupId>org.springframework</groupId>
            <artifactId>spring-tx</artifactId>
            <version>${spring.version}</version>
        </dependency>
        <dependency>
            <groupId>org.aspectj</groupId>
            <artifactId>aspectjweaver</artifactId>
            <version>1.8.7</version>
        </dependency>
        <!-- jstl -->
        <dependency>
            <groupId>org.apache.taglibs</groupId>
            <artifactId>taglibs-standard-spec</artifactId>
            <version>1.2.5</version>
        </dependency>
        <dependency>
            <groupId>org.apache.taglibs</groupId>
            <artifactId>taglibs-standard-impl</artifactId>
            <version>1.2.5</version>
        </dependency>
        <!-- servlet -->
        <dependency>
            <groupId>javax.servlet</groupId>
            <artifactId>servlet-api</artifactId>
            <version>2.5</version>
            <scope>provided</scope>
        </dependency>
        <!-- jsp -->
        <dependency>
            <groupId>javax.servlet.jsp</groupId>
            <artifactId>jsp-api</artifactId>
            <version>2.0</version>
            <scope>provided</scope>
        </dependency>
        <!-- junit -->
        <dependency>
            <groupId>junit</groupId>
            <artifactId>junit</artifactId>
            <version>4.12</version>
            <scope>test</scope>
        </dependency>
        <dependency>
            <groupId>org.springframework</groupId>
            <artifactId>spring-test</artifactId>
            <version>${spring.version}</version>
        </dependency>
        <!-- log4j -->
        <dependency>
            <groupId>log4j</groupId>
            <artifactId>log4j</artifactId>
            <version>1.2.12</version>
        </dependency>

    </dependencies>

    <build>
        <finalName>springmvcdemo</finalName>
        <plugins>
            <!-- tomcat插件 -->
            <plugin>
                <groupId>org.apache.tomcat.maven
                </groupId>
                <artifactId>tomcat7-maven-plugin</artifactId>
                <version>2.1</version>
                <configuration>
                    <port>8080</port>
                    <path>/</path>
                    <uriEncoding>UTF8</uriEncoding>
                    <server>tomcat7</server>
                    <systemProperties>
                        <java.util.logging.SimpleFormatter.format>%1$tH:%1$tM:%1$tS %2$s%n%4$s: %5$s%6$s%n
                        </java.util.logging.SimpleFormatter.format>
                    </systemProperties>
                </configuration>
            </plugin>
        </plugins>
    </build>
3 创建dao子工程
- 在父工程下创建maven普通java子工程
- 编写实体类
public class Student {
    private int id;
    private String name;
    private String sex;
    private String address;
}
- 编写持久层接口
@Repository
public interface StudentDao {
    //查询所有学生
    List<Student> findAll();

    //添加学生
    void add(Student student);
}
- 编写mybatis映射文件StudentDao.xml
<?xml version="1.0" encoding="UTF-8"?>
<!DOCTYPE mapper
        PUBLIC "-//mybatis.org//DTD Mapper 3.0//EN"
        "http://mybatis.org/dtd/mybatis-3-mapper.dtd">
<mapper namespace="com.lxx.dao.StudentDao">
    <select id="findAll" resultType="student">
        select id, name, sex, address
        from student;
    </select>

    <insert id="add" parameterType="student">
        insert into student(id,name, sex, address)
        values (null,#{name}, #{sex}, #{address});
    </insert>

</mapper>
- 编写log4j.properties配置文件
log4j.rootCategory=debug, CONSOLE, LOGFILE
log4j.logger.org.apache.axis.enterprise=FATAL, CONSOLE
log4j.appender.CONSOLE=org.apache.log4j.ConsoleAppender
log4j.appender.CONSOLE.layout=org.apache.log4j.PatternLayout
log4j.appender.CONSOLE.layout.ConversionPattern=[%d{MM/dd HH:mm:ss}] %-6r [%15.15t]%-5p %30.30c %x - %m\n
- 编写数据库配置文件db.properties
jdbc.driver=com.mysql.jdbc.Driver
jdbc.url=jdbc:mysql://localhost:3306/student?characterEncoding=utf-8
jdbc.username=root
jdbc.password=123456
- 编写Spring配置文件applicationContext-dao.xml
<?xml version="1.0" encoding="UTF-8"?>
<beans xmlns="http://www.springframework.org/schema/beans"
       xmlns:context="http://www.springframework.org/schema/context"
       xmlns:xsi="http://www.w3.org/2001/XMLSchema-instance"
       xsi:schemaLocation="
       http://www.springframework.org/schema/beans
       http://www.springframework.org/schema/beans/spring-beans.xsd
       http://www.springframework.org/schema/context
       http://www.springframework.org/schema/context/spring-context.xsd">


    <!-- 读取数据库配置文件 -->
    <context:property-placeholder location="classpath:db.properties"/>

    <!-- 创建druid数据源对象 -->
    <bean id="dataSource" class="com.alibaba.druid.pool.DruidDataSource">
        <property name="driverClassName" value="${jdbc.driver}"/>
        <property name="url" value="${jdbc.url}"/>
        <property name="username" value="${jdbc.username}"/>
        <property name="password" value="${jdbc.password}"/>
    </bean>

    <!-- Spring创建封装过的SqlSessionFactory-->
    <bean id="sessionFactoryBean" class="org.mybatis.spring.SqlSessionFactoryBean">
        <property name="dataSource" ref="dataSource"/>
        <property name="typeAliasesPackage" value="com.lxx.domain"/>
    </bean>

    <!-- 配置扫描包对象,为包下的接口创建代理对象 -->
    <bean id="mapperScannerConfigurer" class="org.mybatis.spring.mapper.MapperScannerConfigurer">
        <property name="basePackage" value="com.lxx.dao"/>
    </bean>

</beans>
- 测试持久层接口的方法
@RunWith(SpringJUnit4ClassRunner.class)
@ContextConfiguration(locations = "classpath:applicationContext-dao.xml")
public class StudentDaoTest {

    @Autowired
    private StudentDao studentDao;

    @Test
    public void testFindALl() {
        List<Student> students = studentDao.findAll();
        students.stream().forEach(System.out::println);
    }

    @Test
    public void testAdd() {
        studentDao.add(new Student(0, "lxx", "男", "xxxx"));
    }
}
4 创建service子工程
- 在父工程下创建maven普通java子工程
- service子工程引入dao子工程的依赖
    <dependencies>
        <dependency>
            <groupId>com.lxx</groupId>
            <artifactId>springmvc_dao</artifactId>
            <version>1.0-SNAPSHOT</version>
        </dependency>
    </dependencies>
- 创建服务层方法
@Service
public class StudentService {

    @Autowired
    private StudentDao studentDao;

    public List<Student> findAllStudent() {
        return studentDao.findAll();
    }

    public void addStudent(Student student) {
        studentDao.add(student);
    }
}
- 创建服务层的Spring配置文件applicationContextservice.xml,配置声明式事务
<?xml version="1.0" encoding="UTF-8"?>
<beans xmlns="http://www.springframework.org/schema/beans"
       xmlns:context="http://www.springframework.org/schema/context"
       xmlns:aop="http://www.springframework.org/schema/aop"
       xmlns:tx="http://www.springframework.org/schema/tx"
       xmlns:xsi="http://www.w3.org/2001/XMLSchema-instance"
       xsi:schemaLocation="
       http://www.springframework.org/schema/beans
       http://www.springframework.org/schema/beans/spring-beans.xsd
       http://www.springframework.org/schema/context
       http://www.springframework.org/schema/context/spring-context.xsd
       http://www.springframework.org/schema/aop
       http://www.springframework.org/schema/aop/spring-aop.xsd
       http://www.springframework.org/schema/tx
       http://www.springframework.org/schema/tx/spring-tx.xsd">

    <!-- 包扫描 -->
    <context:component-scan base-package="com.lxx.service"/>

    <!-- 事务管理器 -->
    <bean id="transactionManager" class="org.springframework.jdbc.datasource.DataSourceTransactionManager">
        <property name="dataSource" ref="dataSource"/>
    </bean>

    <!-- 进行事务相关配置 -->
    <tx:advice id="txAdvice">
        <tx:attributes>
            <tx:method name="*"/>
        </tx:attributes>
    </tx:advice>

    <!-- 配置AOP -->
    <aop:config>
        <!-- 配置切点 -->
        <aop:pointcut id="pointcut"
                      expression="execution(* com.lxx.service.*.*(..))"/>
        <!-- 配置通知 -->
        <aop:advisor advice-ref="txAdvice" pointcut-ref="pointcut"/>
    </aop:config>

</beans>
5 创建controller子工程
- 在父工程下使用maven创建web类型子工程
- controller工程引入service子工程的依赖
    <dependencies>
        <dependency>
            <groupId>com.lxx</groupId>
            <artifactId>springmvc_service</artifactId>
            <version>1.0-SNAPSHOT</version>
        </dependency>
    </dependencies>
- 编写控制器类
@Controller
@RequestMapping("/student")
public class StudentController {

    @Autowired
    private StudentService studentService;

    @RequestMapping("/all")
    public String all(Model model) {
        List<Student> students = studentService.findAllStudent();
        model.addAttribute("students", students);
        return "allStudent";
    }

    @RequestMapping("/add")
    public String add(Student student) {
        studentService.addStudent(student);
        // 重定向到查询所有学生
        return "redirect:/student/all";
    }
}
- 编写SpringMVC配置文件springmvc.xml
<?xml version="1.0" encoding="UTF-8"?>
<beans xmlns="http://www.springframework.org/schema/beans"
       xmlns:context="http://www.springframework.org/schema/context"
       xmlns:mvc="http://www.springframework.org/schema/mvc"
       xmlns:xsi="http://www.w3.org/2001/XMLSchema-instance"
       xsi:schemaLocation="
       http://www.springframework.org/schema/beans
       http://www.springframework.org/schema/beans/spring-beans.xsd
       http://www.springframework.org/schema/context
       http://www.springframework.org/schema/context/spring-context.xsd
       http://www.springframework.org/schema/mvc
       http://www.springframework.org/schema/mvc/spring-mvc.xsd">

    <!-- 扫描Controller包 -->
    <context:component-scan base-package="com.lxx.controller"/>

    <!-- 配置视图解析器 -->
    <bean id="viewResolver" class="org.springframework.web.servlet.view.InternalResourceViewResolver">
        <property name="prefix" value="/"></property>
        <property name="suffix" value=".jsp"></property>
    </bean>

    <!-- 开启SpringMVC注解的支持 -->
    <mvc:annotation-driven/>

    <!-- 放行静态资源 -->
    <mvc:default-servlet-handler />

</beans>
- 编写Spring的总配置文件applicationContext.xml,该文件引入 dao和service层的Spring配置文件
<?xml version="1.0" encoding="UTF-8"?>
<beans xmlns="http://www.springframework.org/schema/beans"
       xmlns:xsi="http://www.w3.org/2001/XMLSchema-instance"
       xsi:schemaLocation="http://www.springframework.org/schema/beans http://www.springframework.org/schema/beans/spring-beans.xsd">
    <import resource="applicationContext-dao.xml"/>
    <import resource="applicationContext-service.xml"/>
</beans>
-
在web.xml中配置Spring监听器,该监听器会监听服务器启动, 并自动创建Spring的IOC容器
-
在web.xml中配置SpringMVC的前端控制器和编码过滤器
<!DOCTYPE web-app PUBLIC
        "-//Sun Microsystems, Inc.//DTD Web Application 2.3//EN"
        "http://java.sun.com/dtd/web-app_2_3.dtd" >

<web-app xmlns:xsi="http://www.w3.org/2001/XMLSchema-instance"
         xmlns="http://xmlns.jcp.org/xml/ns/javaee"
         xsi:schemaLocation="http://xmlns.jcp.org/xml/ns/javaee http://xmlns.jcp.org/xml/ns/javaee/web-app_3_1.xsd"
         id="WebApp_ID" version="3.1">
    <display-name>Archetype Created Web Application</display-name>

    <!-- 创建spring容器的监听器 -->
    <listener>
        <listener-class>org.springframework.web.context.ContextLoaderListener</listener-class>
    </listener>
    <context-param>
        <param-name>contextConfigLocation</param-name>
        <param-value>classpath:applicationContext.xml</param-value>
    </context-param>

    <!--前端控制器-->
    <servlet>
        <servlet-name>dispatcherServlet</servlet-name>
        <servlet-class>org.springframework.web.servlet.DispatcherServlet</servlet-class>
        <init-param>
            <param-name>contextConfigLocation</param-name>
            <param-value>classpath:springmvc.xml</param-value>
        </init-param>
        <load-on-startup>1</load-on-startup>
    </servlet>
    <servlet-mapping>
        <servlet-name>dispatcherServlet</servlet-name>
        <url-pattern>/</url-pattern>
    </servlet-mapping>

    <!--SpringMVC中提供的字符编码过滤器,放在所有过滤器的最上方-->
    <filter>
        <filter-name>characterEncodingFilter</filter-name>
        <filter-class>org.springframework.web.filter.CharacterEncodingFilter</filter-class>
        <init-param>
            <param-name>encoding</param-name>
            <param-value>utf-8</param-value>
        </init-param>
    </filter>
    <filter-mapping>
        <filter-name>characterEncodingFilter</filter-name>
        <url-pattern>/*</url-pattern>
    </filter-mapping>

</web-app>
- 编写JSP页面allStudent.jsp
<%@ page
        contentType="text/html;charset=UTF-8"
        language="java" %>
<%@ taglib prefix="c"
           uri="http://java.sun.com/jsp/jstl/core" %>
<html>
<head>
    <title>所有学生</title>
</head>
<body>
<%-- 添加学生表单 --%>
<form action="/student/add"
      method="post">
    姓名:<input name="name">
    性别:<input name="sex">
    地址:<input name="address">
    <input type="submit" value="提交">
</form>
<%-- 展示学生表格 --%>
<table width="500" cellpadding="0" cellspacing="0" border="1" align="center">
    <tr>
        <th>id</th>
        <th>姓名</th>
        <th>性别</th>
        <th>地址</th>
    </tr>
    <c:forEach items="${students}" var="student">
        <tr>
            <td>${student.id}</td>
            <td>${student.name}
            </td>
            <td>${student.sex}
            </td>
            <td>${student.address}
            </td>
        </tr>
    </c:forEach>
</table>
</body>
</html>
6 运行项目
- 在idea中配置使用tomcat插件启动maven父项目

-
启动项目,访问
http://localhost:8080/student/all
ng的IOC容器 -
在web.xml中配置SpringMVC的前端控制器和编码过滤器
<!DOCTYPE web-app PUBLIC
        "-//Sun Microsystems, Inc.//DTD Web Application 2.3//EN"
        "http://java.sun.com/dtd/web-app_2_3.dtd" >

<web-app xmlns:xsi="http://www.w3.org/2001/XMLSchema-instance"
         xmlns="http://xmlns.jcp.org/xml/ns/javaee"
         xsi:schemaLocation="http://xmlns.jcp.org/xml/ns/javaee http://xmlns.jcp.org/xml/ns/javaee/web-app_3_1.xsd"
         id="WebApp_ID" version="3.1">
    <display-name>Archetype Created Web Application</display-name>

    <!-- 创建spring容器的监听器 -->
    <listener>
        <listener-class>org.springframework.web.context.ContextLoaderListener</listener-class>
    </listener>
    <context-param>
        <param-name>contextConfigLocation</param-name>
        <param-value>classpath:applicationContext.xml</param-value>
    </context-param>

    <!--前端控制器-->
    <servlet>
        <servlet-name>dispatcherServlet</servlet-name>
        <servlet-class>org.springframework.web.servlet.DispatcherServlet</servlet-class>
        <init-param>
            <param-name>contextConfigLocation</param-name>
            <param-value>classpath:springmvc.xml</param-value>
        </init-param>
        <load-on-startup>1</load-on-startup>
    </servlet>
    <servlet-mapping>
        <servlet-name>dispatcherServlet</servlet-name>
        <url-pattern>/</url-pattern>
    </servlet-mapping>

    <!--SpringMVC中提供的字符编码过滤器,放在所有过滤器的最上方-->
    <filter>
        <filter-name>characterEncodingFilter</filter-name>
        <filter-class>org.springframework.web.filter.CharacterEncodingFilter</filter-class>
        <init-param>
            <param-name>encoding</param-name>
            <param-value>utf-8</param-value>
        </init-param>
    </filter>
    <filter-mapping>
        <filter-name>characterEncodingFilter</filter-name>
        <url-pattern>/*</url-pattern>
    </filter-mapping>

</web-app>
- 编写JSP页面allStudent.jsp
<%@ page
        contentType="text/html;charset=UTF-8"
        language="java" %>
<%@ taglib prefix="c"
           uri="http://java.sun.com/jsp/jstl/core" %>
<html>
<head>
    <title>所有学生</title>
</head>
<body>
<%-- 添加学生表单 --%>
<form action="/student/add"
      method="post">
    姓名:<input name="name">
    性别:<input name="sex">
    地址:<input name="address">
    <input type="submit" value="提交">
</form>
<%-- 展示学生表格 --%>
<table width="500" cellpadding="0" cellspacing="0" border="1" align="center">
    <tr>
        <th>id</th>
        <th>姓名</th>
        <th>性别</th>
        <th>地址</th>
    </tr>
    <c:forEach items="${students}" var="student">
        <tr>
            <td>${student.id}</td>
            <td>${student.name}
            </td>
            <td>${student.sex}
            </td>
            <td>${student.address}
            </td>
        </tr>
    </c:forEach>
</table>
</body>
</html>
6 运行项目
- 在idea中配置使用tomcat插件启动maven父项目
[外链图片转存中…(img-JOPf1hjr-1676640696289)]
- 启动项目,访问
http://localhost:8080/student/all


 844
844


 被折叠的 条评论
为什么被折叠?
被折叠的 条评论
为什么被折叠?
 到【灌水乐园】发言


