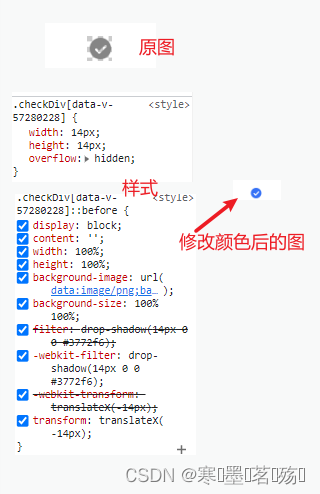
修改图片颜色(需要是png图片)
1. 封装方法:
@mixin colorImg(
  $config: (
    width: null,
    height: null,
    url: '',
    color: null,
	size:null,
	position:null
  )
) {
  $size: if(map-get($config, size), if(map-get($config, size) == none,revert,map-get($config, size)),100% 100%) ;
  @if map-get($config, width){
	  width: map-get($config, width) !important;
  }
  @if map-get($config, height){
  	  height: map-get($config, height) !important;
  }
  overflow: hidden !important;
  &::before {
     // ios上需要开启cup加速,不然显示不了不在页面内元素的滤镜
    transform: translate3d(0, 0, 0);
    display: block;
	border-left: 100vw solid transparent;
    content: '';
    width: 100%;
    height: 100%;
    background-image: url('#{map-get($config, url)}');
    background-size: $size;
	@if map-get($config, position){
		background-position: map-get($config, position);
	}
	@if map-get($config, color){
		filter: drop-shadow(100vw 0 0 map-get($config, color));
		-webkit-filter: drop-shadow(100vw 0 0 map-get($config, color));
		position: relative;
		left: -200vw;
	}
  }
}
2. 使用:
.checkDiv{
    // 修改普通png图片的颜色,如果不修改图片颜色可以不传color
	@include colorImg(( width: 14px,height: 14px,url: '~@/images/checked_h.png',color: #3772f6,));
}

.xuetu{
    // 修改雪碧图的颜色,需要设置size为none(默认是100% 100%),并通过传值position设置background-position
	@include colorImg(( width: 14px,height: 14px,url: '~@/images/thisImg.png',size:none,position:0px -24px,color:#3772f6));
}
3. 展示:


设置一些class 快捷使用(@while)
$counter: 5;
@while $counter > 0 {
	.more-line-#{$counter}{
		overflow: hidden;
		text-overflow: ellipsis;
		display: -webkit-box; /* 将对象作为弹性伸缩盒子模型显示 */
		-webkit-line-clamp: 1*$counter; /* 控制最多显示几行 */
		-webkit-box-orient: vertical; /* 设置或检索伸缩盒对象的子元素的排列方式 */
	}

    $counter: ($counter - 1);
}


// 设置动态生成的class ($mapClass是一个对象)
// 'display-flex':class名
// (display,flex),第一个是属性名,第二个是属性值(是一个数组)
$mapClass:(
'display-flex':(display,flex),
'align-items-center':(align-items,center),
'align-items-start':(align-items,flex-start),
'align-items-end':(align-items,flex-end),
'justify-content-center':(justify-content,center),
'justify-content-s-a':(justify-content,space-around),
'justify-content-s-b':(justify-content,space-between),
'flex-direction-row':(flex-direction,row),
'flex-direction-column':(flex-direction,column),
'flex-':(flex),
'flex-shrink-':(flex-shrink)
);
$keyArray:map-keys($mapClass);
@each $key in $keyArray {
	@if $key=='flex-'{
		$value: 5;
		$list:map-get($mapClass,$key);
		@while $value > 0 {
			.#{$key}#{$value}{
				#{nth($list,1)}:$value;
			}
		    $value: ($value - 1);
		}
	}
	@else if $key=='flex-shrink-'{
		$value1: 5;
		$list:map-get($mapClass,$key);
		@while $value1 >= 0 {
			.#{$key}#{$value1}{
				#{nth($list,1)}:$value1;
			}
		    $value1: ($value1 - 1);
		}
	}@else{
		.#{$key}{
			$list:map-get($mapClass,$key);
			#{nth($list,1)}:nth($list,2);
		}
	}


}

@mixin 和 @include
$IMG_BASE_URL:'www.xxx.com/public/img/';//css图片域名变量
// width:宽
// height:高
// versions:版本号:
// localUrl:本地路径
@mixin getImgUrl($url,$config:(width:0,height:0,versions:0,localUrl:null)) {
	$w:map-get($config,width);
	$h:map-get($config,height);
	$v:map-get($config,versions);
	$localUrl:map-get($config,localUrl);
	$imgUrl:'';
	$process:#{'x-oss-process=image/resize,m_lfit'};
	$numZhi:0;
	@if $localUrl{
		$imgUrl:'~@/static/#{$localUrl}#{$url}';
	}@else{
		$imgUrl:#{$IMG_BASE_URL}#{$url};
		@if $w {
			@if $w !=0{
				$process:$process#{',w_'}$w;
				$numZhi:$numZhi+1
			}

		}
		@if $h  {
			@if $h!=0{
				$process:$process#{',h_'}$h;
				$numZhi:$numZhi+1
			}
		}
		@if $numZhi>0 {
			@if str-index($imgUrl,'?'){
				$imgUrl:$imgUrl#{'&'}$process;
			}@else {

				$imgUrl:$imgUrl#{'?'}$process;
			}
		}
		@if $v {
			@if $v !=0{
				@if str-index($imgUrl,'?') {
					$imgUrl:$imgUrl#{'&v='}$v
				}@else {
					$imgUrl:$imgUrl#{'?v='}$v
				}
			}
		}
	}
	background-image: url('#{$imgUrl}');
}

.video-demo {
	@include getImgUrl("/index/home_video.png",(versions:2));
}![]()
@function 和 @if、@else
//sacss:
@function  getImgUrl($url,$config:(width:0,height:0,versions:0,localUrl:null)){
	$w:map-get($config,width);
	$h:map-get($config,height);
	$v:map-get($config,versions);
	$localUrl:map-get($config,localUrl);
	$imgUrl:'';
	$process:#{'x-oss-process=image/resize,m_lfit'};
	$numZhi:0;
	@if $localUrl{
		$imgUrl:'~@/static/#{$localUrl}#{$url}';
	}@else{
		$imgUrl:#{$IMG_BASE_URL}#{$url};
		@if $w {
			@if $w !=0{
				$process:$process#{',w_'}$w;
				$numZhi:$numZhi+1
			}

		}
		@if $h  {
			@if $h!=0{
				$process:$process#{',h_'}$h;
				$numZhi:$numZhi+1
			}
		}
		@if $numZhi>0 {
			@if str-index($imgUrl,'?'){
				$imgUrl:$imgUrl#{'&'}$process;
			}@else {

				$imgUrl:$imgUrl#{'?'}$process;
			}
		}
		@if $v {
			@if $v !=0{
				@if str-index($imgUrl,'?') {
					$imgUrl:$imgUrl#{'&v='}$v
				}@else {
					$imgUrl:$imgUrl#{'?v='}$v
				}
			}
		}
	}
	@return $imgUrl;
}


@mixin getBgUrl($url,$config:(width:0,height:0,versions:0,localUrl:null)) {
	$w:map-get($config,width);
	$h:map-get($config,height);
	$v:map-get($config,versions);
	$localUrl:map-get($config,localUrl);
	background-image: url('#{getImgUrl($url,(width:$w,height:$h,versions:$v,localUrl:$localUrl))}');//此处使用
}


//页面使用
.video-demo {
		@include getBgUrl("/index/home_video.png",(versions:2));
}

@for 使用
//定义一个变量,从1遍历到5
@for $i from 1 through 5 {
    .item-#{$i} {
      z-index: $i;
    }
  }
@each 使用
//scss
@each $img in img1, img2, img3, img4{
  .#{$img}-long {
    background-image: url('/images/#{$img}.png');
  }
}
//css结果:
.img1-long {
background-image: url("/images/img1.png");
}
.img2-long {
background-image: url("/images/img2.png");
}
.img3-long {
background-image: url("/images/img3.png");
}
.img4-long {
background-image: url("/images/img4.png");
}数据类型:
数字:1,2,3,11,10px (可以带单位)
字符串:"asd",'asd',asd (有引号和无引号都是字符串类型) 如 name:zhangsan;name:zhangsan;name是一个字符串
颜色:blue,#fff,rgba(0,0,0,1);
布尔值:true,false
空值:null
数组:10px 10px 10px 10px 或者 10px,10px,10px,10px 最好用括号"()"包起来区分数据类型 如(10px,10px,10px,10px)
maps:(key1:value1 , key2:value2) 类似js的Map数据结构,可以用Object来理解
Sass一些原生数据类型的方法:
数字类型的方法:
percentage($number) : 将一数字类型转为带百分数 如 percentage(0.1) => 10% percentage(10) => 1000%
round($number) : Math.round
ceil($number) : Math.ceil
floor($number) : Math.floor
abs($number) :Math.abs
min($number): Math.min
max($number):Math.max
random(): Math.random
字符串类型的方法:
unquote($str) : 去掉引号 unquote("asd") => asd
quote($str) : 添加引号 quote(asd) => "asd"
str-length($str) : "asd".length
str-insert(str,insert,index):根据index):根据index,把insert插入到insert插入到str中$index的后面
str-index(str,subString) : 根据subString查找subString查找subString在$str那个位置 返回index 参考js 的 String.prototype.indexOf
str-slice(str,start,$end) : 参考js 的 slice
to-upper-case($str) : 转为大写字符
to-lower-case($str) :转为小写字符
list类型的方法:
length($list) :返回数组的长度
nth(list,index) : 根据index来获取数组index来获取数组list的元素
set-nth(list,index,value):根据value):根据index来替换数组list中原来的值为list中原来的值为value
join(list1,list2,) : 将2个数组合并成一个数组 join((1px,1px),(2px,2px)) => (1px,1px,2px,2px)
append(list,vlaue) : 给数组添加值类似js数组的push
zip($lists...) : 主要作用如 zip( (a,b,c) , (1,2,3) , ("a","b","c") , (1px,2px,3px)) => ( (a,1,"a",1px) , (b,2,"b",2px) , (c,3,"c",3px))
index(list,list,value) : 根据值来查找index
Maps(可以用Object来理解)类型的方法:
map-get(map,key) : 根据键名获取值
map-merge(map1,map2) : map合并,如果map2的属性和map2的属性和map1的相同,会用map2的替换掉map2的替换掉map1的,不相同的属性只是添加,然后返回一个新的map类型的数据
map-remove(map,keys...) : 根据键名 来删除map结构的值 ,支持传入多个键名,一次删除多个
map-keys($map) : 相当于js 中的Object.keys
map-values($map) : 相当于js中的Object.values
map-has-key(map,key) :判断map是否有map是否有key这一属性
还有一些封装的有用的函数:
comparable(num1,num2) :判断两个数字类型能否进行四则运算和比较
unit($number) :返回一个数字类型的单位 如unit(10px) => "px" unit(10) => "" 就是获取单位
unitless($number) : 判断是不是数字类型,不管有没有单位返回true或者false
type-of($value) : 返回传入的数据的类型 相当于js中的 typeof
if(condition,if-true,$if-false) : 相当于三元运算符 condition ? true : false 如 if(true,1px,2px) => 1px


 1448
1448


 被折叠的 条评论
为什么被折叠?


