


使用Don't Care去擦除或是保留我们想要学习的模板,现在我们看看具体如何实现?
我们先看看使用Don't Care,如何设置画笔,设置绘制的画刷,后将绘制区域转换为我们实际的要用的Don't Care 区域。
//实例化画笔
ERegionFreeHandPainter painter_ = new ERegionFreeHandPainter();
//设置画笔样式
//使用画笔为圆形并将其设置画刷中
ECircleRegion region = new ECircleRegion(0, 0, 8);
 painter_.Brush = region;
//使用画笔为矩形并将其设置画刷中
ERectangleRegion region = new ERectangleRegion(0, 0, 16, 16);
 painter_.Brush = region;
//使用画笔为菱形并将其设置画刷中
 ERectangleRegion region = new ERectangleRegion(0, 0, 16, 16, 45);
 painter_.Brush = region;
//获取绘制的区域
ERegion region=painter_.RetrieveRegion();
下面我们具体使用代码实现试一下:
//与鼠标点击和移动事件进行联合绘制出区域
//鼠标事件获取在鼠标坐标处绘制区域
 private void MainForm_MouseClick(object sender, MouseEventArgs e)
   {
     if (srcImage.IsVoid)
        return;
   painter_.Paint(e.X, e.Y);
      // 显示绘画事件
      Redraw();
    }
//移动鼠标与绘制画笔关联,获取绘制的Region
 private void MainForm_MouseMove(object sender, System.Windows.Forms.MouseEventArgs e)
    {
      try
      {
        if (srcImage.IsVoid)
           return;

        if (e.Button == MouseButtons.Left)
        {
   painter_.Paint(e.X, e.Y);

          // 显示
          Redraw();
        }
      }
      catch (EException exc)
      {
        if (exc.Error != EError.LicenseMissing)
        {
          MessageBox.Show(exc.Message, "Error", MessageBoxButtons.OK, MessageBoxIcon.Error);
        }
      }
    }
使用ERegionFreeHandPainter.RetrieveRegion()方法将绘制的区域转换成实际的区域。
获取绘制的Region来带入到我们的EasyFind当中,在EasyFind当中学习的函数为EPatternFinder.Learn,可以从Euresys官网上查找对应的函数含义,从下面的含义不难看出,region为我们学习的区域即保留下来的区域。
EPatternFinder.Learn
void Learn(
   EROIBW8 pattern,
   ERegion region
)
// pattern:要学习的模型 (ROI)
//region:区域添加到执行学习的 ROI 中
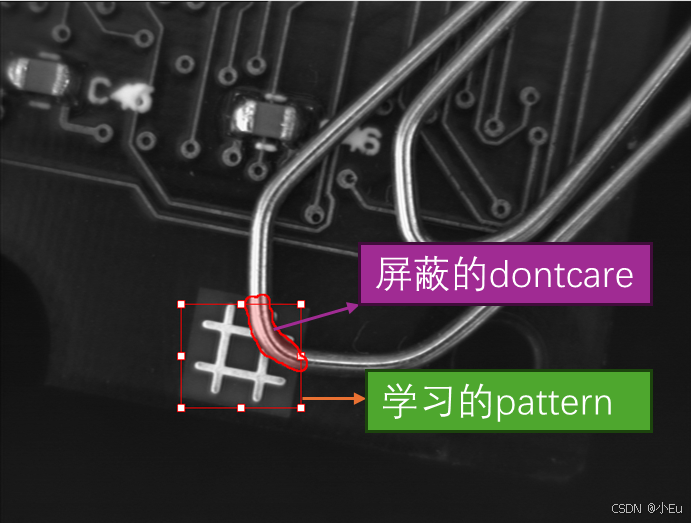
但是如将我想将我绘制的区域作为屏蔽即不想学习到的部分的话。方法也是很简单,我们只需将学习的pattern的“ROI”减去我们绘制的Region,这样的话就可以完成屏蔽了。
由于Open eVision 无法直接EROIBW8和ERegion进行直接的“加”或“减”,因此我们选择相同将与EROIBW8大小相同的Region进行计算。
//获取绘制Don't Care(掩膜) 区域的Region
 ERegion d_Region =new ERegion( painter_.RetrieveRegion());
//这里不详细介绍可以看使用Open eVision的EasyFind解决复杂多变应用场景的匹
//配查找(一)
//Don't Care(掩膜) 区域与我们的pattern统一坐标系
coor_Region = d_Region .TranslateRuns(-pattern.OrgX,-pattern.OrgY);

// 获取与pattern等高等宽的矩形Region ERectangleRegion
 ERectangleRegion rect_WH = new ERectangleRegion(0,0,pattern.Width,pattern.Height);
 rect_WH.Prepare(srcImage);
 newRegion.Prepare(srcImage);

//创建新的Region为了接收去掉Don't care之后的Region
  ERegion learn_Region = new ERegion();
//获取想要学习的Region 使用"ROI"region去减去绘制的Region
learn_Region = ERegion.Subtraction(rect_WH, coor_Region);
region.Prepare(srcImage);

 finder.Learn(m_ROI, learn_Region );//学习模版
//设置所需查找条件
//设置最大查
foundPattern = finder.Find(srcImage);//查找图像上的模版对象与获取结果foundPattern
我们看一下下面是我们学习的模版图片,将不常规出现的特征进行屏蔽,以保证我们后续图像的匹配更为精确。
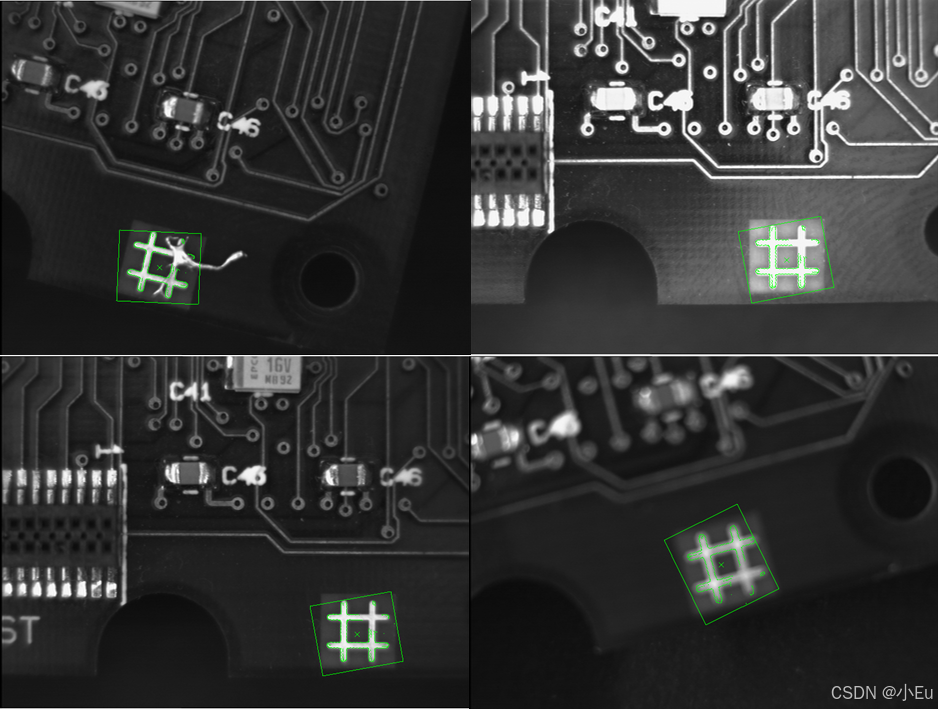
下面展示我们匹配的结果:
我们再介绍一下显示,Open eVision封装好有较为丰富的显示算子,只需进行调用即可:
 private void Redraw()
    {
Graphics g=this.CreateGraphics();
      try
      {
        if (srcImage.IsVoid)
          return;

        // 图像显示
        srcImage.Draw(g);

        //显示绘制的区域
        painter_.Draw(g, new ERGBColor(255, 0, 0));
        painter_.DrawContour(g, new ERGBColor(255, 0, 0));
//显示查找的对象
if (finder.LearningDone)//Display all the find instances  on image
                {

                    m_FoundPattern.DrawBoundingBox = true;//显示矩形边界框
                    m_FoundPattern.DrawFeaturePoints = true;//显示特征点
                    m_FoundPattern.Draw(g, new ERGBColor(0, 255, 0));//显示与相应的颜色射中


                }

      }
      catch (EException exc)
      {
        if (exc.Error != EError.LicenseMissing)
        {
          MessageBox.Show(exc.Message,"Error", MessageBoxButtons.OK,MessageBoxIcon.Error);
        }
      }
    }
EasyFind还可以使用CAD绘制的dxf文件进行学习,C#代码展示:
// 图像实例化
EImageBW8 srcImage = new EImageBW8();
// EPatternFinder实例化
EPatternFinder finder = new EPatternFinder();
// EVectorModel 实例化
EVectorModel myModel = new EVectorModel();
//加载dxf模型文件
myModel.LoadDXF("myModel.dxf");
// 学习模型
finder.Learn(myModel);
// EFoundPattern实例化
EFoundPattern[] foundPattern = null;
// 设置模型查找条件
//...

//执行模型查找
foundPattern = finder.Find(srcImage);
C++代码展示:
// Image实例化
EImageBW8 srcImage;
// EPatternFinder声明
EPatternFinder finder;
// EVectorModel声明
EVectorModel myModel;
// 加载dxf模型文件
myModel.LoadDXF("myModel.dxf");
//学习模型
finder.Learn(myModel);
// EFoundPattern声明
std::vector<EFoundPattern> foundPattern;
//设置查找条件
// ...
//执行模型查找
foundPattern = finder.Find(&srcImage);
使用EasyFind还可以使用任意图形进行图像的查找与匹配,C#代码示例:
// Image实例化
EImageBW8 srcImage = new EImageBW8();
// EPatternFinder实例化
EPatternFinder finder = new EPatternFinder();
// EVectorModel实例化
EVectorModel myModel = new EVectorModel();
// 获取模型的根 EFrameShape
EFrameShape root = myModel.Root;
// EPolygonShape 实例化
EPolygonShape polygon = new EPolygonShape();
// 定义多边形的顶点
EPoint[] vertices = new EPoint[] { new EPoint(0, 0), new EPoint(1, 0), new EPoint(1, 1), new EPoint(0, 1) };
//定义多边形
EPolygon basePolygon = new EPolygon(vertices, true);
//定义多边形EPolygonShape
polygon.Polygon = basePolygon;
// 将 EPolygonShape 附加到根 EFrameShape
polygon.Attach(root);
//设置 EPolygonShape 的极性
polygon.SetProperty("polarity", "direct");
// 学习模型
finder.Learn(myModel);
// EFoundPattern 实例化
EFoundPattern[] foundPattern = null;
//设置查找条件
// ...
//执行模型查找
foundPattern = finder.Find(srcImage);
C++代码示例:
// Image声明
EImageBW8 srcImage;
// EPatternFinder声明
EPatternFinder finder ;
// EVectorModel声明
EVectorModel myModel ;
// 获取模型的根 EFrameShape
EFrameShape& shapeMother = myModel.GetRoot();
// EPolygonShape声明
EPolygonShape polygon;
// 定义多边形的顶点
std::vector<EPoint> vertices = { {0.f, 0.f}, {1.f, 0.f}, {1.f, 1.f}, {0.f, 1.f} };
//定义EPolygonShape
polygon.SetPolygon(EPolygon(vertices, true));
// 将 EPolygonShape 附加到根 EFrameShape
polygon.Attach(&shapeMother);
//设置 EPolygonShape 的极性
polygon.SetProperty("polarity", "direct");
// 学习模型
finder.Learn(myModel);
// EFoundPattern声明
std::vector<EFoundPattern> foundPattern;
//设置查找条件
// ...
//执行模型查找
foundPattern = finder.Find(srcImage);
Open eVision在安装成功后,有丰富的历程可以供参考与学习。感兴趣的话可以直接访问www.euresys.com。


 846
846

 被折叠的 条评论
为什么被折叠?
被折叠的 条评论
为什么被折叠?
 到【灌水乐园】发言


