


Redux的设计思想:
- Web 应用是一个状态机,视图与状态是一一对应的。
- 所有的状态,保存在一个对象里面(唯一数据源)。
注意:flux、redux都不是必须和react搭配使用的,因为flux和redux是完整的架构,只是将react的组件作为redux中的视图层去使用了。
Redux的使用的三大原则:
- Single Source of Truth(唯一的数据源)
- State is read-only(状态是只读的)
- Changes are made with pure function(数据的改变必须通过纯函数完成)
Redux实现基本逻辑思路
1.store通过reducer创建了初始状态
2.view通过store.getState()获取到了store中保存的state挂载在了自己的状态上
3.用户产生了操作,调用了actions 的方法
4.actions的方法被调用,创建了带有标示性信息的action
5.actions将action通过调用store.dispatch方法发送到了reducer中
6.reducer接收到action并根据标识信息判断之后返回了新的state
7.store的state被reducer更改为新state的时候,store.subscribe方法里的回调函数会执行,此时就可以通知view去重新获取state
基础使用流程
实例(通过input添加一条列表数据)
安装redux
$ yarn add redux
store通过reducer创建初始状态,并通过视图展示
1、在src下新建一个store,store中新建index.js用来打造store
import { createStore } from 'redux';

import reducer from './reducers';

const store = createStore( reducer);//参数是一个function

export default store;
2、在store下新建一个state,用来保存数据
const state ={
   todos:[
      {
         id:1,
         interest:'打球'
      },
      {
         id:2,
         interest:'弹吉他'
      },
      {
         id:3,
         interest:'遛狗'
      }
   ]
}

export default state;
3、在 store下新建一个 reducer
/*
reducer:是一个纯函数
作用:完成数据修改
可以接收两个参数:
   * 参数一:previousState初始化赋值数据
   * 参数二:action是从actionsCreatos中发来的数据
*/

import state from './state';
//将初始数据赋值
const reducer = ( previousState=state ,action) => {
   const newState = {
      ...previousState
   }
   return newState; //返回一个新的数据对象
}

export default  reducer ;
4、在组件中展示初始数据,在想要使用的组件中直接引用 store
import React ,{ Component} from 'react';
import store from '../store/index'

//定义无状态组件进行列表渲染
const Item = (props) => {
   return <li> interest:{props.interest} </li>
}

class Content extends Component{

   constructor(){
      super()
      this.state = {
         todos: store.getState().todos,//获取state.js中定义数据
      }
   }
   getItem = () => {
      return this.state.todos.map( item => <Item {...item} key={item.id} ></Item> )
   }

   render(){
      return(
         <div>
            <ul>
               {this.getItem() }
            </ul>
         </div>
      )
   }
}

export default  Content;
进行用户交互 React component — > actionCreators
5、在store下新建 actionCreators.js,进行用户交互动作创建
/*
 actionCreators.js中主要用来:
 创建动作,发送动作给reducers
*/

import * as type from './type';
import store from './index'

const actionCreators = {
   add_todos_item ( val ) {
      //创建动作
      const action = {
         type:type.ADD_TODOS_ITEM,
         payload:val,//负载数据
      }
      //通过store中dispatch方法,发送动作到reducers
      store.dispatch( action )
      console.log( val)

   }

}

export default actionCreators

export default actionCreators
6、组件(视图)通过事件触发actionCreators.js中动作事件,发送数据到reducers
//addInput.js组件内触发
import React,{Component} from 'react';

//引入actionCreators,并通过input输入事件触发其中的方法
import actionCreators from '../store/actionCreators'

class Add extends Component{

   changeInput= ( e ) => {
      if(e.keyCode===13){
         actionCreators.add_todos_item( this.input.value )
         this.input.value=""
      }
   }

   render(){
      return (
         <input type="text"
          onKeyUp ={ this.changeInput }
          ref={ el => this.input = el}
          />
      )
   }
}

export default Add;
7、reducers接收actionCreators.js中发来数据,对原有数据进行修改
import state from './state';
import * as type from './type'

//将初始数据赋值
const reducer = ( previousState=state ,action) => {
   const newState = {
      ...previousState
   }

   //接收数据判断,并修改数据
   switch( action.type ){
      case type.ADD_TODOS_ITEM:
         //修改数据
         newState.todos.push({
            id:newState.todos.length+1,
            interest:action.payload,,
         })
         break;
      default:
         break;
   }
   return newState; //返回一个新的数据对象
}

export default  reducer ;
8、数据修改完成,进行数据个更新,通过store的订阅功能进行更新,也就是组件需要重新赋值一次数据,利用store中subscribe()函数进行发布订阅
import React ,{ Component} from 'react';
import store from '../store/index'

//定义无状态组件进行列表渲染
const Item = (props) => {
   return <li> interest:{props.interest} </li>
}

class Content extends Component{

   constructor(){
      super()
      this.state = {
         todos: store.getState().todos,//获取state.js中定义数据
      }
   }
   getItem = () => {
      return this.state.todos.map( item => <Item {...item} key={item.id} ></Item> )
   }

   componentDidMount(){//组件内状态更新
      //在钩子内对组件内状态进行更新
      store.subscribe( () => {
         this.setState({
            todos:store.getState().todos,
         })
      })
   }

   render(){
      return(
         <div>
            <ul>
               {this.getItem() }
            </ul>
         </div>
      )
   }
}

export default  Content;
redux使用流程进阶(根据数据类型划分模块)
在项目中根据不同类型数据进行模块划分,可以使代码清晰明了,方便维护
1、在store文件夹建一个index.js打造store
// redux分片管理
//根据项目数据类型将不同数据模块化管理
//首先打造一个store

import { createStore } from 'redux';
import reducers from './reducers';

const store = createStore(reducers )

export default store;
2、在store文件夹建一个reducers.js来管理分片的reducers
//建立一个总的reducers来管理分片的reducers
//管理分片的reducers我们需要借助redux中的一个工具combineReducers

import { combineReducers }  from 'redux';


const reducers = combineReducers( {
   // 其中为分片式的reducers
})

export default reducers;
3、接下来根据所需模块建立文件夹,里面建立所属文件

4、在count文件夹打造分片的reducers
//打造分片的reducers

import state from './state';
import * as type from './type';

const reducer = ( previousProps = state,action) => {
   const newState={
      ...previousProps
   }
   //修改数据
   switch (action.type) {
      case type.INCREMENT:
         newState.count++
         break;

      default:
         break;
   }

   return newState;
}

export default reducer;
5、将打造好的分片reducers导入到总的reducers
import { combineReducers }  from 'redux';

import count from './count/reducers'


const reducers = combineReducers( {
   // 其中为分片式的reducers
   count,//导入打造好的模块
})

export default reducers;
6、接下来的操作就是conut文件夹内各个模块功能的打造,与基础使用相同
redux使用过程代码优化
-
1.我们需要使用一个工具(react-redux)对redux进行代码优化
-
2.需要在组件的最外层套上Provider组件,并为其传入store
-
3.利用connect将需要使用store相关api的组件变成容器组件嵌套UI组件的模式
-
4.connect方法的返回值是一个函数,这个函数接收到UI组件之后会返回一个容器组件,容器内部已经嵌套了UI组件
-
5.Provider组件会利用context上下文将自己属性中store传递给自己的子级组件,而容器组件会取得context上面的store相关的api
-
6.我们可以在connect函数中传入mapStateToProps/mapDispatchToProps参数来掌控容器组件给UI组件传递属性的过程
-
7.mapStateToProps的作用:
* 将store中的state传递到UI组件的属性上 * 值为一个函数,接收到的就是store中的state * 返回值是什么,UI组件的属性上就有什么 * 并且,因为容器组件中已经做好了store.subscribe的处理,所以一旦store中的状态变化, 容器组件就马上能得知,就会重新给UI组件传入新的数据 -
8.mapDispatchToProps的作用:
  * 可以将能使用到dispatch的一些方法传递到UI组件上
  * 值为一个函数,接收到的就是store中的dispatch
  * 返回什么,UI组件的属性上就有什么
优化流程
1、安装react-redux
yarn add react-redux
2、首先我们在最大的组件外添加一个标签,并将store模块作为属性值引入
import store from './store/index'
import { Provider } from 'react-redux';

ReactDOM.render(
   <Provider store= {store} >
      <App />
   </Provider>
, document.getElementById('root'));
3、组件内使用代码优化(内容更新)
//优化前组件
import React ,{Component} from 'react';
import store from '../store/index';

class Content extends Component{
   constructor(){
         super()
        // console.log(store.getState())
         this.state={
            count:store.getState().count.count
      }
   }

   componentDidMount(){
      store.subscribe( ()=>{
         this.setState({
            count:store.getState().count.count
         })
      })
   }
   render () {
      return (
         <div> { this.props.count.count } </div>
      )
   }
}

=======================================================================================
//react组件优化使用以后结果

import React ,{Component} from 'react';

//引入connect 来根据UI组件生成容器组件,容器组件负责连接store
import { connect } from 'react-redux';

class Content extends Component{

   render () {
      return (
         <div> { this.props.count.count } </div>
      )
   }
}

/*
   connect( arg1,arg2 )(Content)
   connect是一个函数,可以接收两个参数
    arg1: mapStateToProps 它是一个函数 , 作用: 将容器组件拿取store中的state,以属性的形式传递给UI组件
    arg2: mapDispatchToProps 它也是一个函数
          作用: 将store中actionCreators中的方法以属性的形式传递给UI组件
*/


//  const mapStateToProps = state => {
//   //state 就是store中的数据
//   return state
// }
// export default connect(mapStateToProps)(Content);

//上述可以优化为以下一句

export default connect( state => state )( Content )
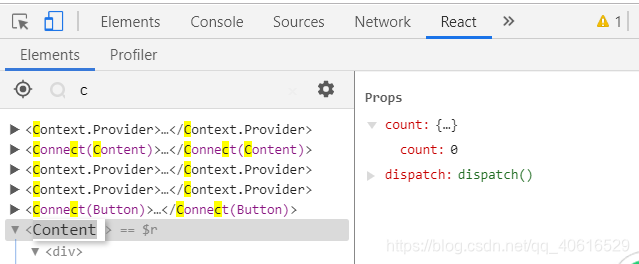
我们可以看到数据通过组件props可以获得
4、组件内使用代码优化(事件触发)
//优化前代码
import React ,{Component} from 'react';
import actionCreators from '../store/count/actionCreators';

class Button extends Component{
   add=()=>{
      actionCreators.increment()
   }
   render (){
      return (
      <button onClick= {this.add} >+</button>
      )
   }
}

export default Button;

======================================================================================
//优化后代码
import React ,{Component} from 'react';
import actionCreators from '../store/count/actionCreators';

//从redux中引入一个方法用于将actionCreators中的方法进行绑定
import { bindActionCreators } from 'redux'

import { connect } from 'react-redux'


class Button extends Component{

   render (){
      return (
         <button onClick = { this.props.increment }> + </button>//通过属性获得
      )
   }
}

/* const mapDispatchToProps = dispatch => {
  // return bindActionCreators( 分片的actionCreators, dispatch )
  return bindActionCreators( actionCreators, dispatch )
}


export default connect( state => state.count, mapDispatchToProps )(Button) */

export default connect(
   state => state.count,
   dispatch => bindActionCreators( actionCreators,dispatch )
 )( Button )


=========================================================================================
//我们对代码优化后,actionCreators.js文件也可以做一些相应修改
//actionCreators.js代码
import * as type from './type';
const actionCreators={

   increment(){
      //创建动作
      const action = {
         type:type.INCREMENT
      }
      return action
   }
}

export default actionCreators;
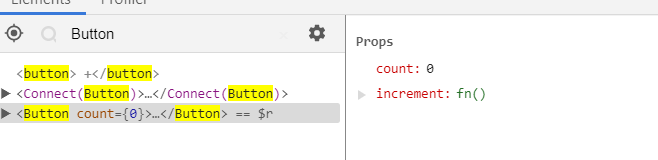
我们可以看到通过组件props可以获得方法
5、redux中数据交互如何解决
-
我们使用上述方法管理数据很简单
-
但是有一点小问题,如果我们有了异步操作,比如我们会先执行一个ajax调用之后再去更改状态的话,这个异步动作,没有地方放了
-
我们不能把异步动作放到组件中,因为UI组件只负责使用数据,如果有其他的异步代码,让UI组件组件不纯粹
-
理论上来说放到actionCreator的方法中最合适,但是,因为actionCreator目前只是专注于创建action和返回action,无法放入异步操作;
针对这个问题我们可以用redux的中间件redux-thunk来解决; -
它的使用方法及其简单:
- 1.安装redux-thunk
yarn add redux-thunk
- 2.在创建store的时候使用中间件
import { createStore, applyMiddleware } from 'redux' import thunk from 'redux-thunk' import reducer from './reducer' const store = createStore(reducer, applyMiddleware(thunk) )- 3这个时候,actionCreator的方法就可以返回一个能接收到dispatch的一个函数,我们可以在这个函数中进行异步操作之后,将actionCreator创建好的action给发送
通过代码来看一下:
//store模块  index.js文件
import { createStore,applyMiddleware } from 'redux';
import thunk from "redux-thunk";
import reducers from './reducers';

const store = createStore(reducers,applyMiddleware(thunk) )

export default store;

=======================================================================================
//actionCreators.js中数据请求

import * as type from './type';
const actionCreators={

   increment(){
      //创建动作
      const action = {
         type:type.INCREMENT
      }

      return action
   },

   getInfo () {//异步数据的请求方式
    //进行数据交互
    /*
      actionCreators中用于数据交互的方法必须要有返回值,返回值是一个函数,函数接收一个参数,这个参数就是dispatch
    */
      return dispatch  => {
         fetch('/data.json')
         .then(res => res.json())
         .then(data => {
         	// 动作的创建
            const action = {
               type:type.GET_INFO,
               payload:data,
            }
			// 动作的发送
            dispatch (action)
         })

      }
   }
}

export default actionCreators;


 1503
1503


 被折叠的 条评论
为什么被折叠?
被折叠的 条评论
为什么被折叠?
 到【灌水乐园】发言


