


● 难度:夯实基础⭐⭐
● 语言:Python3、Pytorch3
🍺要求:
1、自己搭建VGG-16网络框架
2、调用官方的VGG-16网络框架
3、如何查看模型的参数量以及相关指标
🍻拔高(可选):
1、验证集准确率达到100%
2、使用PPT画出VGG-16算法框架图
🔎探索:
1、在不影响准确率的前提下轻量化模型
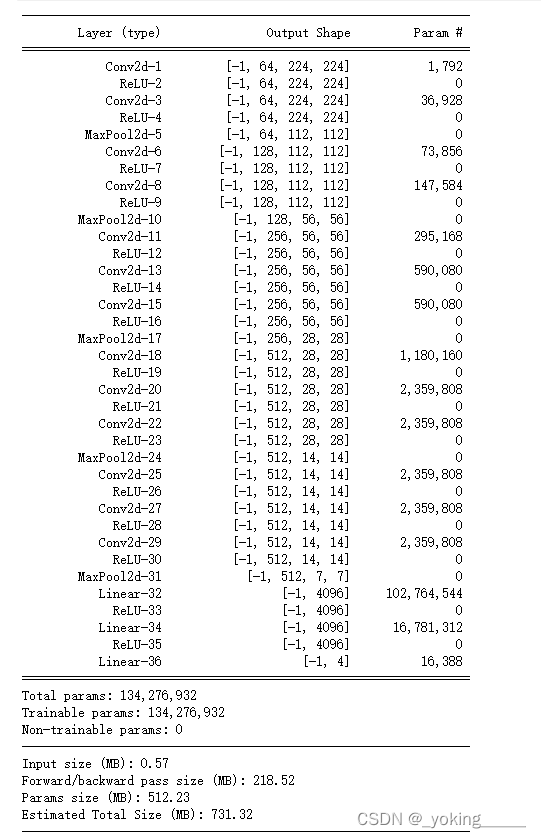
-- 目前VGG16的Total params是134,276,932
🍨 本文为🔗365天深度学习训练营 中的学习记录博客
🍖 原作者:K同学啊|接辅导、项目定制
365天深度学习训练营打卡
第7周-咖啡豆识别
一、前期准备
1.设置GPU
device = "cuda" if torch.cuda.is_available() else "cpu"
2.导入数据
在这里插入代码片
3.划分数据集
train_size = int(0.8 * len(total_data))
test_size = len(total_data) - train_size
train_dataset, test_dataset = torch.utils.data.random_split(total_data, [train_size, test_size])
train_dataset, test_dataset
batch_size = 32

train_dl = torch.utils.data.DataLoader(train_dataset,
                                       batch_size=batch_size,
                                       shuffle=True,
                                       num_workers=1)

test_dl = torch.utils.data.DataLoader(test_dataset,
                                      batch_size=batch_size,
                                      shuffle=False,
                                      num_workers=1)
for X, y in test_dl:
    print("Shape of X [N, C, H, W]:", X.shape)
    print("Shape of y:", y.shape, y.dtype)
    break

二、手动构建VGG16
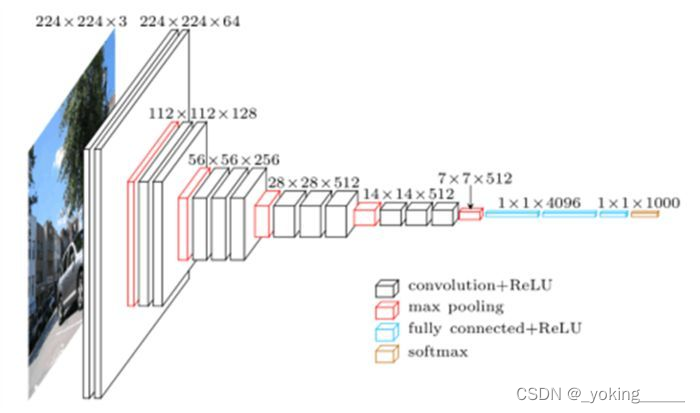
## 手动搭建VGG16
class vgg16(nn.Module):
    def __init__(self):
        super(vgg16, self).__init__()

        # block1
        self.block1 = nn.Sequential(nn.Conv2d(3, 64, 3, padding=1), nn.ReLU(),
                                    nn.Conv2d(64, 64, 3, padding=1), nn.ReLU(),
                                    nn.MaxPool2d(2, stride=2))

        # block2
        self.block2 = nn.Sequential(nn.Conv2d(64, 128, 3, padding=1), nn.ReLU(),
                                    nn.Conv2d(128, 128, 3, padding=1), nn.ReLU(),
                                    nn.MaxPool2d(2, stride=2))

        # block3
        self.block3 = nn.Sequential(nn.Conv2d(128, 256, 3, padding=1), nn.ReLU(),
                                    nn.Conv2d(256, 256, 3, padding=1), nn.ReLU(),
                                    nn.Conv2d(256, 256, 3, padding=1), nn.ReLU(),
                                    nn.MaxPool2d(2, stride=2))

        # block4
        self.block4 = nn.Sequential(nn.Conv2d(256, 512, 3, padding=1), nn.ReLU(),
                                    nn.Conv2d(512, 512, 3, padding=1), nn.ReLU(),
                                    nn.Conv2d(512, 512, 3, padding=1), nn.ReLU(),
                                    nn.MaxPool2d(2, stride=2))

        # block5
        self.block5 = nn.Sequential(nn.Conv2d(512, 512, 3, padding=1), nn.ReLU(),
                                    nn.Conv2d(512, 512, 3, padding=1), nn.ReLU(),
                                    nn.Conv2d(512, 512, 3, padding=1), nn.ReLU(),
                                    nn.MaxPool2d(2, stride=2))

        # classifier
        self.fc_net = nn.Sequential(nn.Linear(512*7*7, 4096), nn.ReLU(),
                                    nn.Linear(4096, 4096), nn.ReLU(),
                                    nn.Linear(4096, len(class_names)))

    def forward(self, x):

        x = self.block5(self.block4(self.block3(self.block2(self.block1(x)))))
        x = torch.flatten(x, start_dim=1)

        return self.fc_net(x)
model = vgg16().to(device)
model
import torchsummary as summary
summary.summary(model, (3, 224, 224))
三、训练模型
1.设置超参数
lr = 1e-4
optimizer = torch.optim.Adam(model.parameters(), lr=lr)
2.编写训练函数
def train(dataloader, model, loss_fn, optimizer):
    size = len(dataloader.dataset)
    num_batches = len(dataloader)

    train_loss, train_acc = 0, 0

    for X, y in dataloader:
        X, y = X.to(device), y.to(device)

        # loss
        pred = model(X)
        loss = loss_fn(pred, y)

        # back
        optimizer.zero_grad()
        loss.backward()
        optimizer.step()

        # log
        train_loss += loss.item()
        train_acc += (pred.argmax(1) == y).type(torch.float).sum().item()

    train_acc /= size
    train_loss /= num_batches

    return train_acc, train_loss
3.编写测试函数
def test(dataloader, model, loss_fn):
    size = len(dataloader.dataset)
    num_batches = len(dataloader)

    test_loss, test_acc = 0, 0

    with torch.no_grad():
        for imgs, target in dataloader:
            imgs, target = imgs.to(device), target.to(device)

            # loss
            target_pred = model(imgs)
            loss = loss_fn(target_pred, target)

            test_loss += loss.item()
            test_acc += (target_pred.argmax(1) == target).type(torch.float).sum().item()

    test_acc /= size
    test_loss /= num_batches

    return test_acc, test_loss
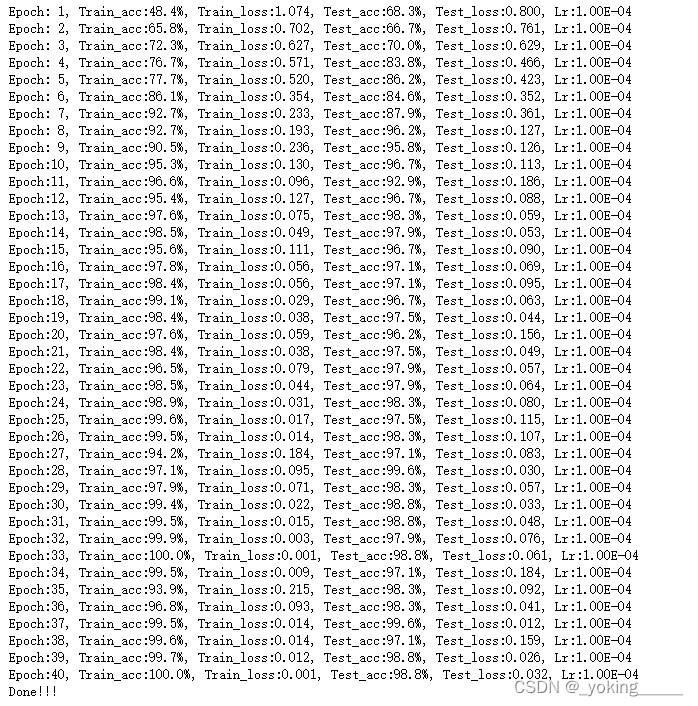
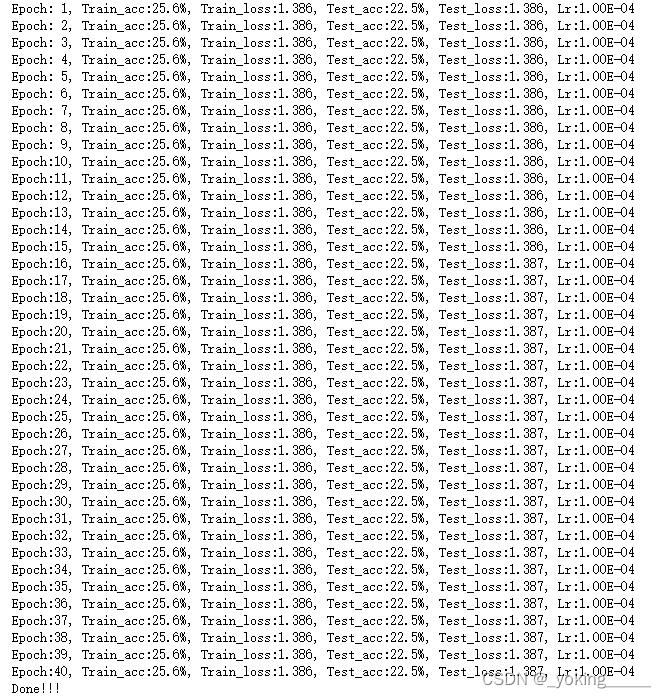
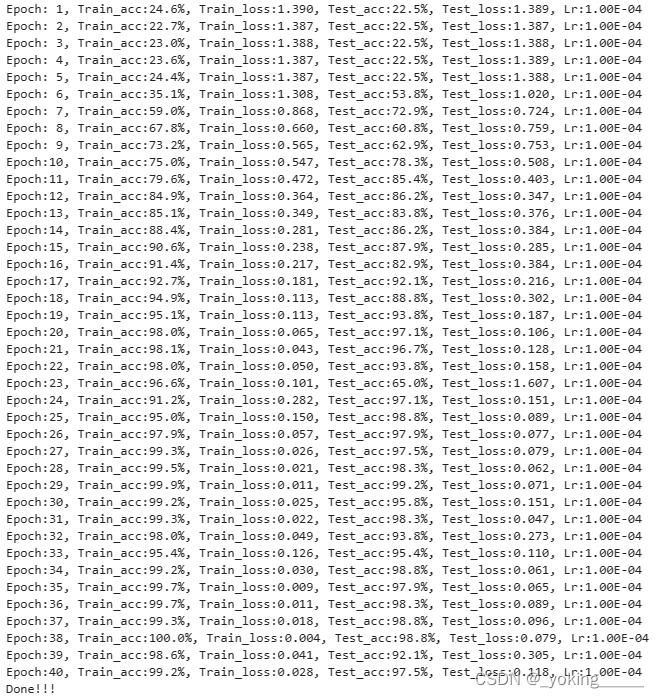
4.正式训练
import copy

loss_fn = nn.CrossEntropyLoss()
epochs = 40

train_loss, train_acc = [], []
test_loss, test_acc = [], []

best_acc = 0

for epoch in range(epochs):

    model.train()
    epoch_train_acc, epoch_train_loss = train(train_dl, model, loss_fn, optimizer)

    model.eval()
    epoch_test_acc, epoch_test_loss = test(test_dl, model, loss_fn)

    if epoch_test_acc > best_acc:
        best_acc = epoch_test_acc
        best_model = copy.deepcopy(model)

    train_acc.append(epoch_train_acc)
    train_loss.append(epoch_train_loss)
    test_acc.append(epoch_test_acc)
    test_loss.append(epoch_test_loss)

    lr = optimizer.state_dict()['param_groups'][0]['lr']

    template = "Epoch:{:2d}, Train_acc:{:.1f}%, Train_loss:{:.3f}, Test_acc:{:.1f}%, Test_loss:{:.3f}, Lr:{:.2E}"
    print(template.format(epoch+1,
                          epoch_train_acc*100, epoch_train_loss,
                          epoch_test_acc*100, epoch_test_loss,
                          lr))

PATH = './best_model.pth'
torch.save(model.state_dict(), PATH)

print('Done!!!')
四、结果可视化
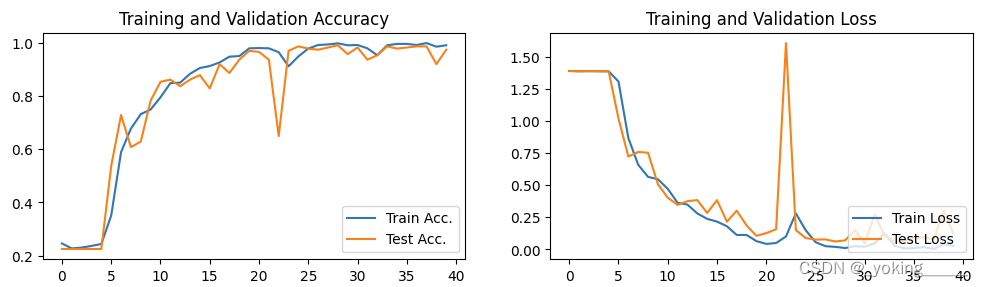
1.Loss和Accuracy图
import matplotlib.pyplot as plt
import warnings
warnings.filterwarnings("ignore")
plt.rcParams['font.sans-serif'] = ['SimHei']
plt.rcParams['axes.unicode_minus'] = False
plt.rcParams['figure.dpi'] = 100

epochs_range = range(epochs)

plt.figure(figsize=(12, 3))

plt.subplot(1, 2, 1)
plt.plot(epochs_range, train_acc, label='Train Acc.')
plt.plot(epochs_range, test_acc, label='Test Acc.')
plt.legend(loc='lower right')
plt.title('Training and Validation Accuracy')

plt.subplot(1, 2, 2)
plt.plot(epochs_range, train_loss, label='Train Loss')
plt.plot(epochs_range, test_loss, label='Test Loss')
plt.legend(loc='lower right')
plt.title('Training and Validation Loss')
plt.show()
第一次训练:
- 优化器:Adam
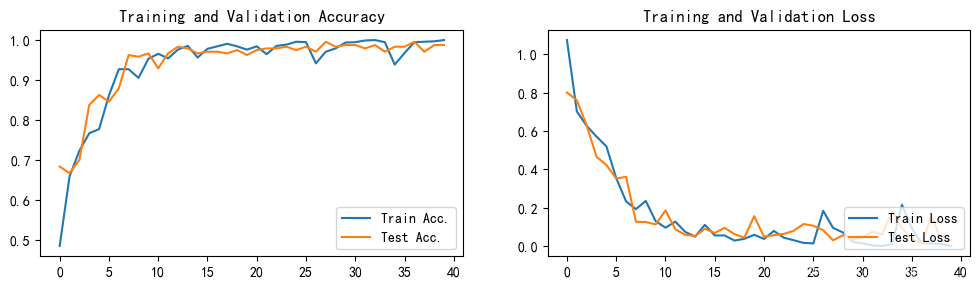
第二次训练:
- 采用SGD来训练
确实很奇怪,完全没有要优化的痕迹。我尝试增加学习率来看看是否有变化,发现依旧一模一样,所以到底为什么会出现这种现象呢?
因为这里的现象是训练误差和测试误差同时出现不下降的趋势,基本不太可能是过拟合,所以我推测是由于网络层数太深而出现了梯度消失的情况。
但是奇怪的是,换成其他优化器基本上都没有此类现象,唯独SGD!!!
调用官方vgg16框架,同样会出现无法正常训练的情况

我做了以下尝试企图解决SGD优化器优化出现的奇怪现象:
- 将ReLU激活函数换成LeakyReLU:这里参考有博客提到ReLU激活函数同样会出现梯度消失现象,所以才出现LeakyReLU激活函数,但是结果还是一样,并没有出现误差下降的趋势。
- 我直接将VGG替换成resnet50竟出现同样的现象!!!
留下疑问的记号??
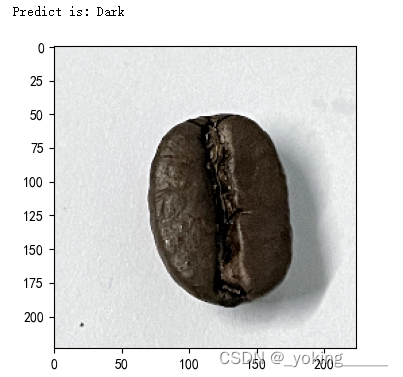
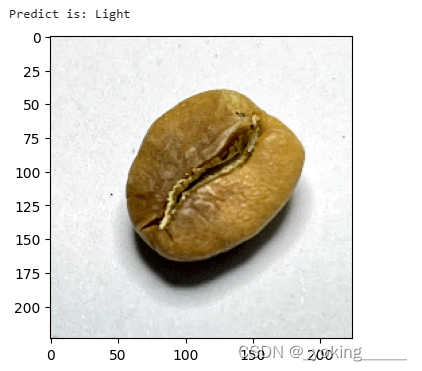
2.指定图片进行预测
from PIL import Image

classes = list(total_data.class_to_idx)

def predict_one_image(image_path, model, transform, classes):

    test_img = Image.open(image_path).convert('RGB')
    plt.imshow(test_img)

    test_img = transform(test_img)
    img = test_img.to(device).unsqueeze(0)

    model.eval()
    output = model(img)

    _, pred = torch.max(output, 1)
    pred_class = classes[pred]
    print(f'Predict is: {pred_class}')
predict_one_image(image_path='./data/Dark/dark (103).png',
                  model=model,
                  transform=train_transforms,
                  classes=class_names)
第一次预测:
轻量化VGG16(保证同样的精确度的情况下)
参考:轻量化模型
- 参考轻量化网络SqueezeNet(2017)的思路:
- 使用1x1的卷积替换3x3的卷积层
- 使用1x1以及3x3的卷积,最后做一次concat
轻量化后的网络(还能进一步轻量化):
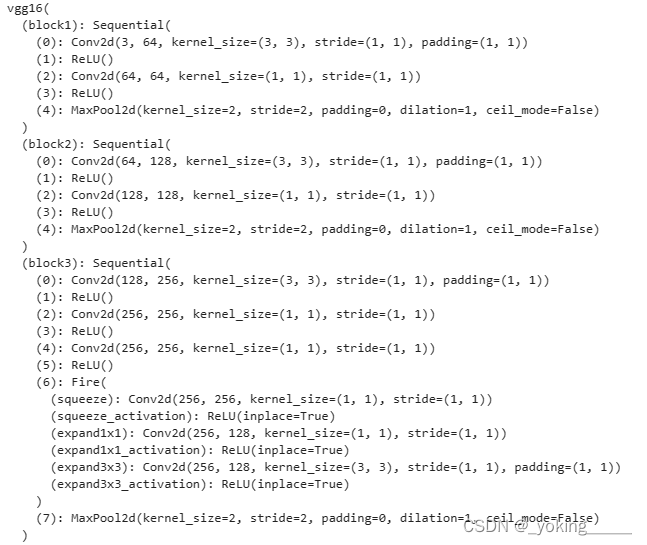
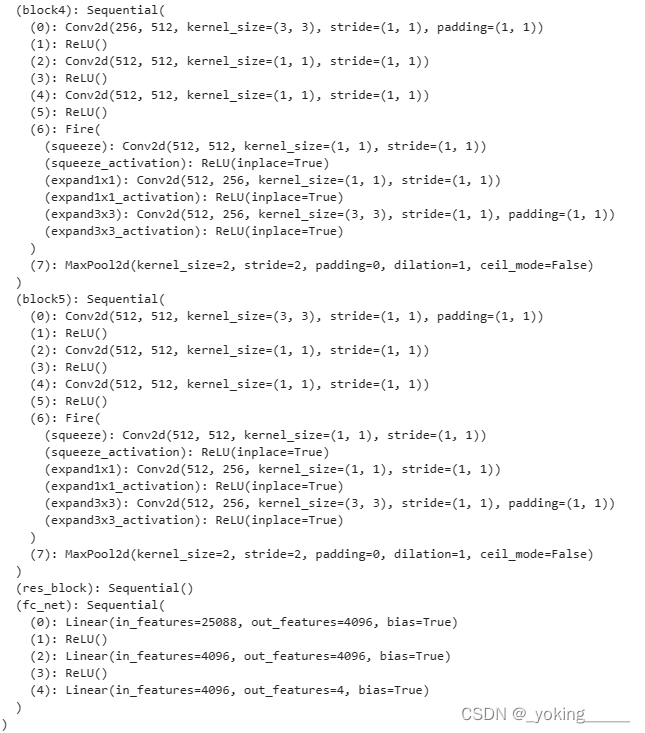
参数情况:
- 目前VGG16的Total params是134,276,932
- 轻量化之后的参数为128,217,412
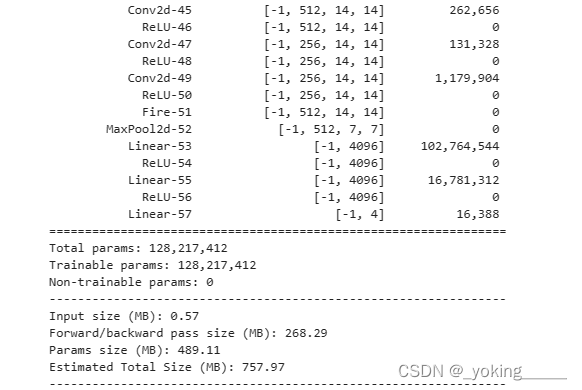
训练情况: - 训练准确度略有降低,但是应该不影响预测
预测情况:


 1556
1556


 被折叠的 条评论
为什么被折叠?
被折叠的 条评论
为什么被折叠?
 到【灌水乐园】发言


