


绪论
三个问题
- netty是如何判断ChannelHandler类型的?
- 对于ChannelHandler的添加应该遵循什么样的顺序?
- 用户手动触发事件传播,不同的触发方式有什么样的的区别?
主要内容
- pipeline的初始化
- 添加和删除ChannelHandler
- 事件和异常的传播
pipeline的初始化
- pipeline在创建Channel的时候被创建;
- pipeline节点数据结构:ChannelHandlerContext;
- pipeline中两大哨兵:head和tail;
pipeline的创建
不管是服务端还是客户端都会实现AbstractChannel()方法。从该方法中可以看到是每一个channel都会创建一个pipeline。
protected AbstractChannel(Channel parent, ChannelId id) {
        this.parent = parent;
        this.id = id;
        unsafe = newUnsafe();
        pipeline = newChannelPipeline();
}
protected DefaultChannelPipeline newChannelPipeline() {
return new DefaultChannelPipeline(this);
}
protected DefaultChannelPipeline(Channel channel) {
this.channel = ObjectUtil.checkNotNull(channel, "channel");
succeededFuture = new SucceededChannelFuture(channel, null);
voidPromise = new VoidChannelPromise(channel, true);
//创建两节点。并将其连接起来
tail = new TailContext(this);
head = new HeadContext(this);
head.next = tail;
tail.prev = head;
}pipeline节点数据结构:ChannelHandlerContext
该接口主要由AbstractChannelHandlerContext类实现
public interface ChannelHandlerContext extends AttributeMap, ChannelInboundInvoker, ChannelOutboundInvoker {

    /**
     * Return the {@link Channel} which is bound to the {@link ChannelHandlerContext}.
     */
    Channel channel();

    /**
     * Returns the {@link EventExecutor} which is used to execute an arbitrary task.
     */
    EventExecutor executor();

    /**
     * The unique name of the {@link ChannelHandlerContext}.The name was used when then {@link ChannelHandler}
     * was added to the {@link ChannelPipeline}. This name can also be used to access the registered
     * {@link ChannelHandler} from the {@link ChannelPipeline}.
     */
    String name();

    /**
     * The {@link ChannelHandler} that is bound this {@link ChannelHandlerContext}.
     */
    ChannelHandler handler();

    /**
     * Return {@code true} if the {@link ChannelHandler} which belongs to this context was removed
     * from the {@link ChannelPipeline}. Note that this method is only meant to be called from with in the
     * {@link EventLoop}.
     */
    boolean isRemoved();

    @Override
    ChannelHandlerContext fireChannelRegistered();

    @Override
    ChannelHandlerContext fireChannelUnregistered();

    @Override
    ChannelHandlerContext fireChannelActive();

    @Override
    ChannelHandlerContext fireChannelInactive();

    @Override
    ChannelHandlerContext fireExceptionCaught(Throwable cause);

    @Override
    ChannelHandlerContext fireUserEventTriggered(Object evt);

    @Override
    ChannelHandlerContext fireChannelRead(Object msg);

    @Override
    ChannelHandlerContext fireChannelReadComplete();

    @Override
    ChannelHandlerContext fireChannelWritabilityChanged();

    @Override
    ChannelHandlerContext read();

    @Override
    ChannelHandlerContext flush();

    /**
     * Return the assigned {@link ChannelPipeline}
     */
    ChannelPipeline pipeline();

    /**
     * Return the assigned {@link ByteBufAllocator} which will be used to allocate {@link ByteBuf}s.
     */
    ByteBufAllocator alloc();

    /**
     * @deprecated Use {@link Channel#attr(AttributeKey)}
     */
    @Deprecated
    @Override
    <T> Attribute<T> attr(AttributeKey<T> key);

    /**
     * @deprecated Use {@link Channel#hasAttr(AttributeKey)}
     */
    @Deprecated
    @Override
    <T> boolean hasAttr(AttributeKey<T> key);
}
pipeline中两大哨兵:head和tail
tail = new TailContext(this);
head = new HeadContext(this);
tail
主要做到是一些收尾的工作,若是有异常没捕获会打印异常信息;若是有信息没处理,会建议你去处理。
final class TailContext extends AbstractChannelHandlerContext implements ChannelInboundHandler {

        TailContext(DefaultChannelPipeline pipeline) {
            super(pipeline, null, TAIL_NAME, true, false);  //设置一些节点属性
            setAddComplete();                              //标识节点已经设置完成
        }
        ......

进入super()方法:
 AbstractChannelHandlerContext(DefaultChannelPipeline pipeline, EventExecutor executor, String name,
                                  boolean inbound, boolean outbound) {
        this.name = ObjectUtil.checkNotNull(name, "name");
        this.pipeline = pipeline;
        this.executor = executor;
        this.inbound = inbound;   //设置该pipeline是入站
        this.outbound = outbound; //设置该pipeline是出站
        // Its ordered if its driven by the EventLoop or the given Executor is an instanceof OrderedEventExecutor.
        ordered = executor == null || executor instanceof OrderedEventExecutor;
    }
该TailContext类中的一些方法
        @Override
        public void exceptionCaught(ChannelHandlerContext ctx, Throwable cause) {
            onUnhandledInboundException(cause);
        }
        //在上层的handler中异常没有被捕获,最终会在tail这里打印异常信息
        protected void onUnhandledInboundException(Throwable cause) {
        try {
            logger.warn(
                    "An exceptionCaught() event was fired, and it reached at the tail of the pipeline. " +
                            "It usually means the last handler in the pipeline did not handle the exception.",
                    cause);
        } finally {
            ReferenceCountUtil.release(cause);
        }
    }

        @Override
        public void channelRead(ChannelHandlerContext ctx, Object msg) {
            onUnhandledInboundMessage(msg);
        }
        //生成的消息没有被处理,最终到tail这里会提醒建议你去检查一下pipeline的配置,最终通过release方式释放掉
        protected void onUnhandledInboundMessage(Object msg) {
        try {
            logger.debug(
                    "Discarded inbound message {} that reached at the tail of the pipeline. " +
                            "Please check your pipeline configuration.", msg);
        } finally {
            ReferenceCountUtil.release(msg);
        }
    }
head
主要做的是往下传播事件,进行读写操作的时候委托unsafe进行对数据进行操作。
 final class HeadContext extends AbstractChannelHandlerContext
            implements ChannelOutboundHandler, ChannelInboundHandler {

        private final Unsafe unsafe;  //实现对底层数据的读写

        HeadContext(DefaultChannelPipeline pipeline) {
            super(pipeline, null, HEAD_NAME, true, true);
            unsafe = pipeline.channel().unsafe();
            setAddComplete();
        }
        ......
该HeadContext 类中的一些方法
        @Override
        public void channelActive(ChannelHandlerContext ctx) {
            ctx.fireChannelActive();  //遇到一个事件,简单往下传播

            readIfIsAutoRead(); //连接创建成功之后会调用到channelActive,通过此方法注册一个
            //read事件,该连接底层对应的NioEventLoop对应的selector会轮询到一个read事件
        }
添加和删除ChannelHandler
添加ChannelHandler
- 判断是否重复添加
- 创建节点并添加至链表
- 回调添加完成事件
判断是否重复添加
    @Override
    public final ChannelPipeline addLast(ChannelHandler... handlers) {  //可传入多个handler
        return addLast(null, handlers);
    }

    @Override
    public final ChannelPipeline addLast(EventExecutorGroup executor, ChannelHandler... handlers) {
        if (handlers == null) {
            throw new NullPointerException("handlers");
        }

        for (ChannelHandler h: handlers) {  //遍历传入到每一个handler,使用重载的addLast方法添加
            if (h == null) {
                break;
            }
            addLast(executor, null, h);
        }

        return this;
    }
@Override
public final ChannelPipeline addLast(EventExecutorGroup group, String name, ChannelHandler handler) {
final AbstractChannelHandlerContext newCtx;
synchronized (this) {
checkMultiplicity(handler); //检查是否重复
newCtx = newContext(group, filterName(name, handler), handler);
addLast0(newCtx);
// If the registered is false it means that the channel was not registered on an eventLoop yet.
// In this case we add the context to the pipeline and add a task that will call
// ChannelHandler.handlerAdded(...) once the channel is registered.
if (!registered) {
newCtx.setAddPending();
callHandlerCallbackLater(newCtx, true);
return this;
}
EventExecutor executor = newCtx.executor();
if (!executor.inEventLoop()) {
callHandlerAddedInEventLoop(newCtx, executor);
return this;
}
}
callHandlerAdded0(newCtx);
return this;
}
 private static void checkMultiplicity(ChannelHandler handler) {
        if (handler instanceof ChannelHandlerAdapter) {  //判断是不是后面的实例
            ChannelHandlerAdapter h = (ChannelHandlerAdapter) handler;
            if (!h.isSharable() && h.added) {  //首先判断是不是可共享的,再判断是否已经添加过
                throw new ChannelPipelineException(
                        h.getClass().getName() +
                        " is not a @Sharable handler, so can't be added or removed multiple times.");
            }
            h.added = true;
        }
    }

public boolean isSharable() {  //如果该类有注解Sharable,则可以被添加多次,否则返回false.
        Class<?> clazz = getClass();
        Map<Class<?>, Boolean> cache = InternalThreadLocalMap.get().handlerSharableCache();
        Boolean sharable = cache.get(clazz);
        if (sharable == null) {
            sharable = clazz.isAnnotationPresent(Sharable.class);  //拿到Sharable的注解
            cache.put(clazz, sharable);
        }
        return sharable;
    }
创建节点并添加至链表
主要做了:判断名字是否重复;新建节点并添加到链表尾节点之前;
入口:
newCtx = newContext(group, filterName(name, handler), handler);
addLast0(newCtx);
判断名字是否重复
private String filterName(String name, ChannelHandler handler) {
        if (name == null) {
            return generateName(handler);  //名字为空,自动产生一个节点
        }
        checkDuplicateName(name);  //检查名字是否重复
        return name;
    }
    private void checkDuplicateName(String name) {
        if (context0(name) != null) {  //存在重复名字抛出异常
            throw new IllegalArgumentException("Duplicate handler name: " + name);
        }
    }

    private AbstractChannelHandlerContext context0(String name) {
        AbstractChannelHandlerContext context = head.next;
        while (context != tail) {
            if (context.name().equals(name)) {
                return context;   //存在重复名字
            }
            context = context.next;
        }
        return null;
    }
新建节点并添加到链表尾节点之前
private AbstractChannelHandlerContext newContext(EventExecutorGroup group, String name, ChannelHandler handler) {
        return new DefaultChannelHandlerContext(this, childExecutor(group), name, handler);//新建节点
    }
private void addLast0(AbstractChannelHandlerContext newCtx) {  //添加到tail节点之前
        AbstractChannelHandlerContext prev = tail.prev;
        newCtx.prev = prev;
        newCtx.next = tail;
        prev.next = newCtx;
        tail.prev = newCtx;
    }
补充
DefaultChannelHandlerContext(
            DefaultChannelPipeline pipeline, EventExecutor executor, String name, ChannelHandler handler) {
        super(pipeline, executor, name, isInbound(handler), isOutbound(handler)); //判断channel是不是Inbound还是Outbound
        if (handler == null) {
            throw new NullPointerException("handler");
        }
        this.handler = handler;
    }
进入isInbound()和isOutbound()方法:
private static boolean isInbound(ChannelHandler handler) {
        return handler instanceof ChannelInboundHandler;
}

private static boolean isOutbound(ChannelHandler handler) {
        return handler instanceof ChannelOutboundHandler;
    }
进入super()方法:
AbstractChannelHandlerContext(DefaultChannelPipeline pipeline, EventExecutor executor, String name,
                                  boolean inbound, boolean outbound) {
        this.name = ObjectUtil.checkNotNull(name, "name");
        this.pipeline = pipeline;
        this.executor = executor;
        this.inbound = inbound;
        this.outbound = outbound;
        // Its ordered if its driven by the EventLoop or the given Executor is an instanceof OrderedEventExecutor.
        ordered = executor == null || executor instanceof OrderedEventExecutor;
    }
回调添加完成事件
 if (!executor.inEventLoop()) {
                callHandlerAddedInEventLoop(newCtx, executor);  //不在当前线程,直接放进任务队列里
                return this;
  }
}
callHandlerAdded0(newCtx);  //在当前线程直接执行
跟进callHandlerAddedInEventLoop()方法,其实里面还是callHandlerAdded0()方法
private void callHandlerAddedInEventLoop(final AbstractChannelHandlerContext newCtx, EventExecutor executor) {
newCtx.setAddPending(); //设置更新状态
executor.execute(new Runnable() {
@Override
public void run() {
callHandlerAdded0(newCtx);
}
});
}
进入callHandlerAdded0()方法:
private void callHandlerAdded0(final AbstractChannelHandlerContext ctx) {
try {
ctx.callHandlerAdded();
} catch (Throwable t) {
boolean removed = false;
try {
remove0(ctx);
ctx.callHandlerRemoved();
removed = true;
} catch (Throwable t2) {
if (logger.isWarnEnabled()) {
logger.warn("Failed to remove a handler: " + ctx.name(), t2);
}
}
if (removed) {
fireExceptionCaught(new ChannelPipelineException(
ctx.handler().getClass().getName() +
".handlerAdded() has thrown an exception; removed.", t));
} else {
fireExceptionCaught(new ChannelPipelineException(
ctx.handler().getClass().getName() +
".handlerAdded() has thrown an exception; also failed to remove.", t));
}
}
}
进入callHandlerAdded()方法:
final void callHandlerAdded() throws Exception {
// We must call setAddComplete before calling handlerAdded. Otherwise if the handlerAdded method generates
// any pipeline events ctx.handler() will miss them because the state will not allow it.
if (setAddComplete()) {
handler().handlerAdded(this);
}
}
进入setAddComplete()方法:以自旋和CAS的方式设置状态
final boolean setAddComplete() {
for (;;) {
int oldState = handlerState;
if (oldState == REMOVE_COMPLETE) {
return false;
}
// Ensure we never update when the handlerState is REMOVE_COMPLETE already.
// oldState is usually ADD_PENDING but can also be REMOVE_COMPLETE when an EventExecutor is used that is not
// exposing ordering guarantees.
if (HANDLER_STATE_UPDATER.compareAndSet(this, oldState, ADD_COMPLETE)) {
return true;
}
}
}
进入handlerAdded()方法:
public void handlerAdded(ChannelHandlerContext ctx) throws Exception {
if (ctx.channel().isRegistered()) {
// This should always be true with our current DefaultChannelPipeline implementation.
// The good thing about calling initChannel(...) in handlerAdded(...) is that there will be no ordering
// surprises if a ChannelInitializer will add another ChannelInitializer. This is as all handlers
// will be added in the expected order.
if (initChannel(ctx)) {
// We are done with init the Channel, removing the initializer now.
removeState(ctx);
}
}
}回顾服务端启动,会创建ChannelInitializer对象,在添加完之后会调用用户的initChannel()方法,之后会使用remove()方法将自身进行删除。效果就是pipeline添加了用户自定义的handler。
进入ChannelInitializer类中的的handlerAdded()方法:
public void handlerAdded(ChannelHandlerContext ctx) throws Exception {
        if (ctx.channel().isRegistered()) {
            // This should always be true with our current DefaultChannelPipeline implementation.
            // The good thing about calling initChannel(...) in handlerAdded(...) is that there will be no ordering
            // surprises if a ChannelInitializer will add another ChannelInitializer. This is as all handlers
            // will be added in the expected order.
            if (initChannel(ctx)) {

                // We are done with init the Channel, removing the initializer now.
                removeState(ctx);
            }
        }
    }
进入initChannel()方法:
private boolean initChannel(ChannelHandlerContext ctx) throws Exception {
        if (initMap.add(ctx)) { // Guard against re-entrance.
            try {
                initChannel((C) ctx.channel());
            } catch (Throwable cause) {
                // Explicitly call exceptionCaught(...) as we removed the handler before calling initChannel(...).
                // We do so to prevent multiple calls to initChannel(...).
                exceptionCaught(ctx, cause);
            } finally {
                ChannelPipeline pipeline = ctx.pipeline();
                if (pipeline.context(this) != null) {
                    pipeline.remove(this);
                }
            }
            return true;
        }
        return false;
    }
最终得到抽象方法initChannel()方法--此方法就是用户自定义实现的initChannel()方法
protected abstract void initChannel(C ch) throws Exception;
删除ChannelHandler
应用场景:权限校验
内容
- 找到节点
- 链表的删除
- 回调删除Handler事件
@Override
    public final ChannelHandler remove(String name) {
        return remove(getContextOrDie(name)).handler();
    }
进入getContextOrDie()方法:
private AbstractChannelHandlerContext getContextOrDie(String name) {
        AbstractChannelHandlerContext ctx = (AbstractChannelHandlerContext) context(name); //找到这个节点
        if (ctx == null) {
            throw new NoSuchElementException(name);
        } else {
            return ctx;
        }
    }
找到节点
 @Override
    public final ChannelHandlerContext context(ChannelHandler handler) {
        if (handler == null) {
            throw new NullPointerException("handler");
        }

        AbstractChannelHandlerContext ctx = head.next;
        for (;;) {  //遍历整个链表

            if (ctx == null) {
                return null;
            }

            if (ctx.handler() == handler) {
                return ctx;  //找到了节点,返回
            }

            ctx = ctx.next;
        }
    }
链表的删除
private AbstractChannelHandlerContext remove(final AbstractChannelHandlerContext ctx) {
        assert ctx != head && ctx != tail;  //头节点和尾节点不能被删除

        synchronized (this) {
            remove0(ctx);

            // If the registered is false it means that the channel was not registered on an eventloop yet.
            // In this case we remove the context from the pipeline and add a task that will call
            // ChannelHandler.handlerRemoved(...) once the channel is registered.
            if (!registered) {
                callHandlerCallbackLater(ctx, false);
                return ctx;
            }

            EventExecutor executor = ctx.executor();
            if (!executor.inEventLoop()) {
                executor.execute(new Runnable() {
                    @Override
                    public void run() {
                        callHandlerRemoved0(ctx);
                    }
                });
                return ctx;
            }
        }
        callHandlerRemoved0(ctx);
        return ctx;
    }
进入remove0()方法:和链表的删除节点的方法一样
    private static void remove0(AbstractChannelHandlerContext ctx) {
        AbstractChannelHandlerContext prev = ctx.prev;
        AbstractChannelHandlerContext next = ctx.next;
        prev.next = next;
        next.prev = prev;
    }
回调删除Handler事件
if (!executor.inEventLoop()) {
                executor.execute(new Runnable() {
                    @Override
                    public void run() {
                        callHandlerRemoved0(ctx);
                    }
                });
                return ctx;
}
进入callHandlerRemoved0()方法:
private void callHandlerRemoved0(final AbstractChannelHandlerContext ctx) {
        // Notify the complete removal.
        try {
            ctx.callHandlerRemoved();
        } catch (Throwable t) {
            fireExceptionCaught(new ChannelPipelineException(
                    ctx.handler().getClass().getName() + ".handlerRemoved() has thrown an exception.", t));
        }
    }
进入callHandlerRemoved()方法:
 final void callHandlerRemoved() throws Exception {
        try {
            // Only call handlerRemoved(...) if we called handlerAdded(...) before.
            if (handlerState == ADD_COMPLETE) {
                handler().handlerRemoved(this);  //调用回调方法删除
            }
        } finally {
            // Mark the handler as removed in any case.
            setRemoved();
        }
    }
进入回调方法handlerRemoved():(例子) ChannelInitializer类中的方法
    @Override
    public void handlerRemoved(ChannelHandlerContext ctx) throws Exception {
        initMap.remove(ctx);
    }
进入setRemoved()方法:
final void setRemoved() {
        handlerState = REMOVE_COMPLETE;  //设置删除完成状态
}
事件和异常的传播
- inBound事件的传播
- outBound事件的传播
- 异常的传播
inBound事件的传播
- 何为inBound事件以及ChannelInboundHandler事件
- ChannelRead事件的传播
- SimpleInBoundHandler处理器
何为inBound事件以及ChannelInboundHandler事件
简化版继承关系

public interface ChannelHandler {
    //handler被添加到pipeline中的一个回调
    void handlerAdded(ChannelHandlerContext ctx) throws Exception;
    //handler被pipeline删除之后的一个回调
    void handlerRemoved(ChannelHandlerContext ctx) throws Exception;
    //出现异常的回调
    @Deprecated
    void exceptionCaught(ChannelHandlerContext ctx, Throwable cause) throws Exception;

    @Inherited
    @Documented
    @Target(ElementType.TYPE)
    @Retention(RetentionPolicy.RUNTIME)
    @interface Sharable {  //可被多个pipeline添加
        // no value
    }
}
public interface ChannelInboundHandler extends ChannelHandler {
//回调方法,channel注册在NioEventLoop的selelctor之后回调
void channelRegistered(ChannelHandlerContext ctx) throws Exception;
void channelUnregistered(ChannelHandlerContext ctx) throws Exception;
//回调方法,channel在激活或失效之后回调
void channelActive(ChannelHandlerContext ctx) throws Exception;
void channelInactive(ChannelHandlerContext ctx) throws Exception;
//回调方法,读数据之后回调
void channelRead(ChannelHandlerContext ctx, Object msg) throws Exception;
void channelReadComplete(ChannelHandlerContext ctx) throws Exception;
//用户可以trigger一些自定义事件
void userEventTriggered(ChannelHandlerContext ctx, Object evt) throws Exception;
//channel读写状态改变
void channelWritabilityChanged(ChannelHandlerContext ctx) throws Exception;
//异常捕获回调
@Override
@SuppressWarnings("deprecation")
void exceptionCaught(ChannelHandlerContext ctx, Throwable cause) throws Exception;
}
ChannelRead事件的传播

pipeline在调用fireChannelRead()事件时会从head开始往下传播。
进入fireChannelRead()方法:
    @Override
    public final ChannelPipeline fireChannelRead(Object msg) {
        AbstractChannelHandlerContext.invokeChannelRead(head, msg);
        return this;
    }
进入invokeChannelRead()方法:
static void invokeChannelRead(final AbstractChannelHandlerContext next, Object msg) {
        final Object m = next.pipeline.touch(ObjectUtil.checkNotNull(msg, "msg"), next);
        EventExecutor executor = next.executor();
        if (executor.inEventLoop()) {
            next.invokeChannelRead(m);
        } else {
            executor.execute(new Runnable() {
                @Override
                public void run() {
                    next.invokeChannelRead(m);
                }
            });
        }
    }
进入invokeChannelRead()方法:
private void invokeChannelRead(Object msg) {
        if (invokeHandler()) {
            try {
                ((ChannelInboundHandler) handler()).channelRead(this, msg);
            } catch (Throwable t) {
                notifyHandlerException(t);
            }
        } else {
            fireChannelRead(msg);
        }
    }
进入channelRead()方法:
    @Override
    public void channelRead(ChannelHandlerContext ctx, Object msg) throws Exception {
        ctx.fireChannelRead(msg);  //将事件传播对象通过fireChannelRead进行传播
    }
进入fireChannelRead()方法:
    @Override
    public ChannelHandlerContext fireChannelRead(final Object msg) {
        invokeChannelRead(findContextInbound(), msg); //寻找下一个InBoundHandler,通过invokeChannelRead传播
        return this;
    }
进入findContextInbound()方法:
private AbstractChannelHandlerContext findContextInbound() {
        AbstractChannelHandlerContext ctx = this;
        do {
            ctx = ctx.next;
        } while (!ctx.inbound);
        return ctx;  //找到inboundHandler,返回节点
    }
补充知识
public void channelRead(ChannelHandlerContext ctx, Object msg) {
    ctx.fireChannelRead(msg); //从当前节点开始传播
}
public void channelActive(ChannelHandlerContext ctx) {
    ctx.channel().pipeline().fireChannelRead("hello"); //从head节点开始传播
}
在Tail节点中,当一个消息从自定义handler往下传播时,一直没有处理,最后会到tail节点
protected void onUnhandledInboundMessage(Object msg) {
        try {
            logger.debug(
                    "Discarded inbound message {} that reached at the tail of the pipeline. " +
                            "Please check your pipeline configuration.", msg);
        } finally {
            ReferenceCountUtil.release(msg);  //若msg是byteBuf,不是String对象,最终会调用release释放
        }
    }
SimpleInBoundHandler处理器
应用场景
public class EchoClientHandler extends SimpleChannelInboundHandler<ByteBuf> {

	@Override
	public void channelRead(ChannelHandlerContext ctx, Object msg) throws Exception {
在handler中对msg只做了一些读写处理,而没有将msg往下传播,最终传播不到tail节点,也就没法自动释放,这时需要自己释放,若没有做这项操作,会导致内存泄露。
而SimpleChannelInboundHandler可以做到自动释放。
	}
SimpleChannelInboundHandler如何做到自动释放呢?
在类中定义了泛型SimpleChannelInboundHandler<ByteBuf>,进入该类中的channelRead()方法
public void channelRead(ChannelHandlerContext ctx, Object msg) throws Exception {
        boolean release = true;
        try {
            if (acceptInboundMessage(msg)) {
                @SuppressWarnings("unchecked")
                I imsg = (I) msg;  强制转换成byteBuf类型
                channelRead0(ctx, imsg); 抽象方法,用户在继承SimpleChannelInboundHandler时只需自己定义处理逻辑,而不需要考虑释放
            } else {
                release = false;
                ctx.fireChannelRead(msg);
            }
        } finally {
            if (autoRelease && release) {
                ReferenceCountUtil.release(msg);  最终通过release()方法释放
            }
        }
    }
}
protected abstract void channelRead0(ChannelHandlerContext ctx, I msg) throws Exception;
outBound事件的传播
- 何为outBound事件以及ChannelOutBoundHandler事件
- write()事件的传播
何为outBound事件以及ChannelOutBoundHandler事件
接口里的方法更多是向用户主动发起的方法
public interface ChannelOutboundHandler extends ChannelHandler {

    void bind(ChannelHandlerContext ctx, SocketAddress localAddress, ChannelPromise promise) throws Exception;

    void connect( ChannelHandlerContext ctx, SocketAddress remoteAddress, SocketAddress localAddress, ChannelPromise promise) throws Exception;

    void disconnect(ChannelHandlerContext ctx, ChannelPromise promise) throws Exception;


    void close(ChannelHandlerContext ctx, ChannelPromise promise) throws Exception;


    void deregister(ChannelHandlerContext ctx, ChannelPromise promise) throws Exception;


    void read(ChannelHandlerContext ctx) throws Exception;


    void write(ChannelHandlerContext ctx, Object msg, ChannelPromise promise) throws Exception;


    void flush(ChannelHandlerContext ctx) throws Exception;
}
write()事件的传播
OutBoundHandler事件的传播顺序和添加顺序相反,例如:A Handler先添加,但是传播时先传播B Handler。

write事件传播时是从tail节点开始的。
demo入口
public class OutBoundB extends ChannelOutboundHandlerAdapter {

	@Override
	public void write(ChannelHandlerContext ctx, Object msg, ChannelPromise promise){
		System.out.println("OutBoundHandlerB: " + msg);
	}

	@Override
	public void handlerAdded(final ChannelHandlerContext ctx){
		ctx.executor().schedule(() -> {
			ctx.channel().write("hello");  <--入口开始
		}, 3, TimeUnit.SECONDS);
	}
}
进入AbstractChannel类中的write()方法:
public ChannelFuture write(Object msg) {
        return pipeline.write(msg);  委托pipeline进行传播
    }
进入write()方法:
public final ChannelFuture write(Object msg) {
        return tail.write(msg);   从tail节点开始
    }
进入write()方法:
public ChannelFuture write(Object msg) {
        return write(msg, newPromise());  newPromise()是一个空的回调,因为方法中并没有传入
    }
    @Override
    public ChannelFuture write(final Object msg, final ChannelPromise promise) {
        if (msg == null) {
            throw new NullPointerException("msg");
        }
        try {
            if (isNotValidPromise(promise, true)) {
                ReferenceCountUtil.release(msg);
                // cancelled
                return promise;
            }
        } catch (RuntimeException e) {
            ReferenceCountUtil.release(msg);
            throw e;
        }
        write(msg, false, promise);  <--进入这里
        return promise;
    }
进入write()方法:
private void write(Object msg, boolean flush, ChannelPromise promise) {
        AbstractChannelHandlerContext next = findContextOutbound();  找到下一个节点
        final Object m = pipeline.touch(msg, next);
        EventExecutor executor = next.executor();
        if (executor.inEventLoop()) {  当前线程在inEventLoop()中
            if (flush) {
                next.invokeWriteAndFlush(m, promise);
            } else {
                next.invokeWrite(m, promise);  <--flush为false,进入这里
            }
        } else {
            final AbstractWriteTask task;
            if (flush) {
                task = WriteAndFlushTask.newInstance(next, m, promise);
            }  else {
                task = WriteTask.newInstance(next, m, promise);
            }
            if (!safeExecute(executor, task, promise, m)) {
                task.cancel();
            }
        }
    }
进入findContextOutbound()方法:
private AbstractChannelHandlerContext findContextOutbound() {
        AbstractChannelHandlerContext ctx = this;
        do {
            ctx = ctx.prev;  找到上一个节点
        } while (!ctx.outbound);
        return ctx;
    }
进入invokeWrite()方法:
private void invokeWrite(Object msg, ChannelPromise promise) {
        if (invokeHandler()) {
            invokeWrite0(msg, promise);  进入这里
        } else {
            write(msg, promise);
        }
进入invokeWrite0()方法:
private void invokeWrite0(Object msg, ChannelPromise promise) {
        try {
            ((ChannelOutboundHandler) handler()).write(this, msg, promise);
            拿到当前节点对应的handler,当前节点为B,因为尾节点的上一节点是B,所以此时的handler为OutBoundB,此时会调用我们自己重写的write方法
        } catch (Throwable t) {
            notifyOutboundHandlerException(t, promise);
        }
    }
}
进入OutBoundB中的write()方法:
public class OutBoundB extends ChannelOutboundHandlerAdapter {
	@Override
	public void write(ChannelHandlerContext ctx, Object msg, ChannelPromise promise){
		System.out.println("OutBoundHandlerB: " + msg);
		ctx.write(msg, promise);
        消息会在这里继续向前传播,下一个节点为C,经历同样过程,然后是A,然后是head节点,
        在head节点就不会继续传播了,会调用底层的unsafe.write()方法。
        消息的传播是靠ChannelHandlerContext向前传播的。
	}
    ......
}
补充
public class OutBoundB extends ChannelOutboundHandlerAdapter {

	@Override
	public void write(ChannelHandlerContext ctx, Object msg, ChannelPromise promise){
		System.out.println("OutBoundHandlerB: " + msg);
		ctx.write(msg, promise);
	}

	@Override
	public void handlerAdded(final ChannelHandlerContext ctx){
		ctx.executor().schedule(() -> {
			ctx.channel().write("hello"); 需要从tail节点开始向前传播
			ctx.write("hello"); 这样写表示是从当前节点进行传播,而不需要从tail节点开始
		}, 3, TimeUnit.SECONDS);
	}
}
异常的传播
- 异常的触发链
- 异常处理的最佳实践
异常的触发链
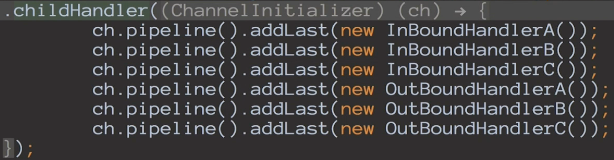
异常触发顺序
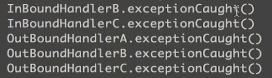

入口:在InBoundHandlerB抛出一个异常时
public class InBoundHandlerB extends ChannelInboundHandlerAdapter {

	@Override
	public void channelRead(ChannelHandlerContext ctx, Object msg) throws Exception{
		throw new BusinessException("from InBoundHandlerB ");  <--入口
	}

	@Override
	public void exceptionCaught(ChannelHandlerContext ctx, Throwable cause){
		System.out.println("InboundHandlerA: exceptionCaught()");
		ctx.fireExceptionCaught(cause);
	}
}
抛出异常时父类方法中会调用fireChannelRead()方法:
public void channelRead(ChannelHandlerContext ctx, Object msg) throws Exception {
ctx.fireChannelRead(msg);
}
@Override
public ChannelHandlerContext fireChannelRead(final Object msg) {
invokeChannelRead(findContextInbound(), msg);
return this;
}
static void invokeChannelRead(final AbstractChannelHandlerContext next, Object msg) {
final Object m = next.pipeline.touch(ObjectUtil.checkNotNull(msg, "msg"), next);
EventExecutor executor = next.executor();
if (executor.inEventLoop()) {
next.invokeChannelRead(m);
} else {
executor.execute(new Runnable() {
@Override
public void run() {
next.invokeChannelRead(m);
}
});
}
}
private void invokeChannelRead(Object msg) {
if (invokeHandler()) {
try {
((ChannelInboundHandler) handler()).channelRead(this, msg); 此时是InBoundHandlerB
} catch (Throwable t) {
notifyHandlerException(t); 此时发生异常,进入此方法
}
} else {
fireChannelRead(msg);
}
}
进入notifyHandlerException()方法:
private void notifyHandlerException(Throwable cause) {
        if (inExceptionCaught(cause)) {
            if (logger.isWarnEnabled()) {
                logger.warn(
                        "An exception was thrown by a user handler " +
                                "while handling an exceptionCaught event", cause);
            }
            return;
        }

        invokeExceptionCaught(cause); 进入此方法
    }
进入invokeExceptionCaught()方法:
private void invokeExceptionCaught(final Throwable cause) {
        if (invokeHandler()) {
            try {
                handler().exceptionCaught(this, cause);  进入此方法,此时该方法为回调方法,会进入InBoundhandlerB中的重写方法
            } catch (Throwable error) {
                if (logger.isDebugEnabled()) {
                    logger.debug(
                        "An exception {}" +
                        "was thrown by a user handler's exceptionCaught() " +
                        "method while handling the following exception:",
                        ThrowableUtil.stackTraceToString(error), cause);
                } else if (logger.isWarnEnabled()) {
                    logger.warn(
                        "An exception '{}' [enable DEBUG level for full stacktrace] " +
                        "was thrown by a user handler's exceptionCaught() " +
                        "method while handling the following exception:", error, cause);
                }
            }
        } else {
            fireExceptionCaught(cause);
        }
    }
进入InBoundhandlerB中的重写方法exceptionCaught():
public class InBoundHandlerB extends ChannelInboundHandlerAdapter {

	@Override
	public void channelRead(ChannelHandlerContext ctx, Object msg) throws Exception{
		throw new BusinessException("from B");
	}

	@Override
	public void exceptionCaught(ChannelHandlerContext ctx, Throwable cause){
		System.out.println("InboundHandlerA: exceptionCaught()");
		ctx.fireExceptionCaught(cause);  继续向下传播异常,若不进行处理,只会简单向下传播
	}
}
public ChannelHandlerContext fireExceptionCaught(final Throwable cause) {
        invokeExceptionCaught(next, cause);  next是下一节点,向下传播了
        return this;
    }
同样的会进入invokeExceptionCaught()方法:
    static void invokeExceptionCaught(final AbstractChannelHandlerContext next, final Throwable cause) {
        ObjectUtil.checkNotNull(cause, "cause");
        EventExecutor executor = next.executor();
        if (executor.inEventLoop()) {
            next.invokeExceptionCaught(cause);  进入此方法,该方法中会拿到下一节点中的重写方法,然后继续向下传播
        } else {
            try {
                executor.execute(new Runnable() {
                    @Override
                    public void run() {
                        next.invokeExceptionCaught(cause);
                    }
                });
            } catch (Throwable t) {
                if (logger.isWarnEnabled()) {
                    logger.warn("Failed to submit an exceptionCaught() event.", t);
                    logger.warn("The exceptionCaught() event that was failed to submit was:", cause);
                }
            }
        }
    }
最终到达tail节点,tail节点会调用exceptionCaught()方法:
public void exceptionCaught(ChannelHandlerContext ctx, Throwable cause){
    onUnhandledInboundException(cause);
}
protected void onUnhandledInboundException(Throwable cause) {
        try {
            logger.warn(
                    "An exceptionCaught() event was fired, and it reached at the tail of the pipeline. " +
                            "It usually means the last handler in the pipeline did not handle the exception.",
                    cause);
        } finally {
            ReferenceCountUtil.release(cause);  若前面Handler未进行处理,tail节点会进行释放处理
        }
    }
异常处理的最佳实践
在最后添加一个异常处理器,按照相应的逻辑对异常进行处理。
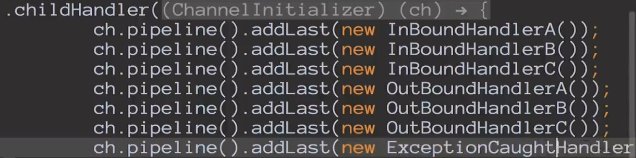
public class ExceptionCaughtHandler extends ChannelInboundHandlerAdapter {

	@Override
	public void exceptionCaught(ChannelHandlerContext ctx, Throwable cause) throws Exception {
		//super.exceptionCaught(ctx, cause);
		//在这里定义自己的异常处理逻辑
		//比如
		if(cause instanceof BusinessException){
			System.out.println("BusinessException");
		}
	}
}


 163
163


 被折叠的 条评论
为什么被折叠?
被折叠的 条评论
为什么被折叠?
 到【灌水乐园】发言


