


Pipeline初始化
Pipeline创建
Netty在创建客户端Channel和服务端Channel的时候,都会调用父类的构造函数:
    protected AbstractChannel(Channel parent) {
        this.parent = parent;
        id = newId();
        unsafe = newUnsafe();
        pipeline = newChannelPipeline();
    }
构造函数中newChannelPipeline()方法创建Pipeline,并且一个Channel对应一个Pipeline:
    protected DefaultChannelPipeline newChannelPipeline() {
        return new DefaultChannelPipeline(this);
    }
    protected DefaultChannelPipeline(Channel channel) {
        this.channel = ObjectUtil.checkNotNull(channel, "channel");
        succeededFuture = new SucceededChannelFuture(channel, null);
        voidPromise =  new VoidChannelPromise(channel, true);

        tail = new TailContext(this);
        head = new HeadContext(this);

        head.next = tail;
        tail.prev = head;
    }
从源码中可以看出Pipeline初始化的过程中增加了head和tail这两个Handler。
总结:Pipeline在创建Channel的时候创建,并被默认加了两个Handler,构成一个双向链表。
Pipleline 初始节点:head和tail
在上面讲到Pipeline初始化由两个节点组成:
    final AbstractChannelHandlerContext head;
    final AbstractChannelHandlerContext tail;
它们都继承了抽象类AbstractChannelHandlerContext,其中tail对应实现类为TailContext,构造函数为:
        TailContext(DefaultChannelPipeline pipeline) {
            super(pipeline, null, TAIL_NAME, true, false);
            setAddComplete();
        }
head实现类构造函数如下:
        HeadContext(DefaultChannelPipeline pipeline) {
            super(pipeline, null, HEAD_NAME, false, true);
            unsafe = pipeline.channel().unsafe();
            setAddComplete();
        }
在调用父类构造函数的时候,参数略有不同,父类构造函数实现:
    AbstractChannelHandlerContext(DefaultChannelPipeline pipeline, EventExecutor executor, String name,
                                  boolean inbound, boolean outbound) {
        this.name = ObjectUtil.checkNotNull(name, "name");
        this.pipeline = pipeline;
        this.executor = executor;
        this.inbound = inbound;
        this.outbound = outbound;
        ordered = executor == null || executor instanceof OrderedEventExecutor;
    }
由此可以看出tail的inbound属性为true, outbound属性为false;head的inbound属性为false,outbound属性为true。关于这两个属性什么涵义,暂且不讨论。
head节点的作用主要是将各种事件传播到后续节点,并且其携带unSafe属性用于数据的读写;tail节点的作用是作为处理链的最后一个节点,进行一些收尾操作,如发现经过整个pipeline后都没有经过处理的异常和数据,进行相应处理:
    protected void onUnhandledInboundException(Throwable cause) {
        try {
            logger.warn(
                    "An exceptionCaught() event was fired, and it reached at the tail of the pipeline. " +
                            "It usually means the last handler in the pipeline did not handle the exception.",
                    cause);
        } finally {
            ReferenceCountUtil.release(cause);
        }
    }

    protected void onUnhandledInboundMessage(Object msg) {
        try {
            logger.debug(
                    "Discarded inbound message {} that reached at the tail of the pipeline. " +
                            "Please check your pipeline configuration.", msg);
        } finally {
            ReferenceCountUtil.release(msg);
        }
    }
往Pipeline中添加ChannelHandler
先回顾下服务端Netty示例代码:
EventLoopGroup bossGroup = new NioEventLoopGroup(1);
        EventLoopGroup workerGroup = new NioEventLoopGroup();
        try {
            ServerBootstrap b = new ServerBootstrap();
            b.group(bossGroup, workerGroup)
                    .channel(NioServerSocketChannel.class)
                    .childOption(ChannelOption.TCP_NODELAY, true)
                    .childAttr(AttributeKey.newInstance("childAttr"), "childAttrValue")
                    .handler(new ServerHandler())
                    .childHandler(new ChannelInitializer<SocketChannel>() {
                        @Override
                        public void initChannel(SocketChannel ch) {
                            ch.pipeline().addLast(new AuthHandler()); // 自定义的一个权限校验的处理类
                        }
                    });
            ChannelFuture f = b.bind(8888).sync();
            f.channel().closeFuture().sync();
        } finally {
            bossGroup.shutdownGracefully();
            workerGroup.shutdownGracefully();
        }
我们可以添加了一个ChannelHandler到ChannelPipeline中,下面就来分析addLast()方法内部的具体实现。
判断是否重复添加
addLastf方法源码如下:
    @Override
    public final ChannelPipeline addLast(ChannelHandler... handlers) {
        return addLast(null, handlers);
    }

    @Override
    public final ChannelPipeline addLast(EventExecutorGroup executor, ChannelHandler... handlers) {
        if (handlers == null) {
            throw new NullPointerException("handlers");
        }
        for (ChannelHandler h: handlers) {
            if (h == null) {
                break;
            }
            addLast(executor, null, h);
        }
        return this;
    }
上述两个方法最终调用了下面的addLast()方法:
    @Override
    public final ChannelPipeline addLast(EventExecutorGroup group, String name, ChannelHandler handler) {
        final AbstractChannelHandlerContext newCtx;
        synchronized (this) {
            checkMultiplicity(handler);
            newCtx = newContext(group, filterName(name, handler), handler);
            addLast0(newCtx);
            if (!registered) {
                newCtx.setAddPending();
                callHandlerCallbackLater(newCtx, true);
                return this;
            }
            EventExecutor executor = newCtx.executor();
            if (!executor.inEventLoop()) {
                newCtx.setAddPending();
                executor.execute(new Runnable() {
                    @Override
                    public void run() {
                        callHandlerAdded0(newCtx);
                    }
                });
                return this;
            }
        }
        callHandlerAdded0(newCtx);
        return this;
    }
上述添加ChannelHandler时首先调用了checkMultiplicity(handler);这个方法就是这一小节要讨论的判断是否重复处理的部分。看下checkMultiplicity(handler);的源码:
    private static void checkMultiplicity(ChannelHandler handler) {
        if (handler instanceof ChannelHandlerAdapter) {
            ChannelHandlerAdapter h = (ChannelHandlerAdapter) handler;
            if (!h.isSharable() && h.added) {
                throw new ChannelPipelineException(
                        h.getClass().getName() +
                        " is not a @Sharable handler, so can't be added or removed multiple times.");
            }
            h.added = true;
        }
    }
可以看出这个方法判断当前要添加的ChannelHandler是否有添加@Sharable注解并且是否已经添加过(isSharable()这个方法内部就是判断是否添加了注解)。在之前的学习中我们知道当定义的ChannelHandler这个类添加了@Sharable注解后,就表示这个ChannelHandler可以同时被多个ChannelPipeline添加,而如果没有这个注解,则只能被一个ChannelPipeline添加。所以这个函数的逻辑就是如果这个ChannelHandler是不可被共享的,但是之前已经添加到某ChannelPipeline了,那么就不能再被添加了,所以就会抛出一个ChannelPipelineException异常。如果没问题,就将是否被添加过added这个标志设置为true。
创建节点并添加至链表
接着看addLast()方法的第二部分:创建节点体现在源码执行如下语句:
newCtx = newContext(group, filterName(name, handler), handler);
newContext()这个方法做的内容就是将当前传入的这个ChannelHandler这个处理类封装为ChannelPipeline中的节点对象(这个节点对象继承于AbstractChannelHandlerContext,tail和head节点也继承于这个对象,上面有提到过)。这里留意下它的第二个参数表示节点名称,这里传入了filterName(name, handler),filterName实现如下:
    private String filterName(String name, ChannelHandler handler) {
        if (name == null) {
            return generateName(handler);
        }
        checkDuplicateName(name);
        return name;
    }
示例中,我们没有给ChannelHandler添加名字,所以为空,调用generateName()方法自动生成名称,关于具体的生成规则这里就不分析了,肯定是和当前的ChannelHandler类名有关。生成名字后又调用了checkDuplicateName()方法,顾名思义就是检查这个ChannelHandler的名字是否和其他的ChannelHandler名字重复了,可以看下这个方法实现:
    private void checkDuplicateName(String name) {
        if (context0(name) != null) {
            throw new IllegalArgumentException("Duplicate handler name: " + name);
        }
    }

    private AbstractChannelHandlerContext context0(String name) {
        AbstractChannelHandlerContext context = head.next;
        while (context != tail) {
            if (context.name().equals(name)) {
                return context;
            }
            context = context.next;
        }
        return null;
    }
很清楚的看到检查的实现就是将当前新建的这个名字去从头到尾地遍历ChannelPipeline中的所有的ChannelHandler的名字进行比较是否有相同的,如果有重复就抛异常。
将当前ChannelHandler封装为节点对象后,下面要做的就是加到ChannelPipeline这个双向链表中,看下addLast0(newCtx);这个方法实现:
    private void addLast0(AbstractChannelHandlerContext newCtx) {
        AbstractChannelHandlerContext prev = tail.prev;
        newCtx.prev = prev;
        newCtx.next = tail;
        prev.next = newCtx;
        tail.prev = newCtx;
    }
很明显这就是将当前创建的节点添加为ChannelPipeline这个双向链表的最后一个tail节点的前面一个节点。这样创建节点并添加至链表这个完整的过程就分析清楚了。
回调添加完成事件
我们再来看addLast方法的最后一个关键步骤:回调添加完成事件。这一步骤体现在调用了callHandlerAdded0()这个方法,它的实现如下:
    private void callHandlerAdded0(final AbstractChannelHandlerContext ctx) {
        try {
            ctx.handler().handlerAdded(ctx);
            ctx.setAddComplete();
        } catch (Throwable t) {
          ......
        }
    }
它首先就执行了当前ChannelHandler的handlerAdded()方法,即我们传入的自定义ChannelHandler实现类的handlerAdded()方法,由此实现了回调。我们可以在这个回调方法中做一些业务侧相关的操作。
从ChannelPipeline中删除ChannelHandler
前面讲了如何创建并添加节点到ChannelPipeline中,本小节就讨论如何从ChannelPipeline中删除节点。整个删除操作可以分为:找到节点、从链表中删除、回调删除事件三个步骤。下面就依次分析这三个步骤。
找到节点
删除节点的方法为ChannelPipeline的remove()方法,参数为当前ChannelHandler对象,下面看下这个remove方法实现:
    @Override
    public final ChannelPipeline remove(ChannelHandler handler) {
        remove(getContextOrDie(handler));
        return this;
    }
    private AbstractChannelHandlerContext getContextOrDie(ChannelHandler handler) {
        AbstractChannelHandlerContext ctx = (AbstractChannelHandlerContext) context(handler);
        if (ctx == null) {
            throw new NoSuchElementException(handler.getClass().getName());
        } else {
            return ctx;
        }
    }
    @Override
    public final ChannelHandlerContext context(ChannelHandler handler) {
        if (handler == null) {
            throw new NullPointerException("handler");
        }
        AbstractChannelHandlerContext ctx = head.next;
        for (;;) {
            if (ctx == null) {
                return null;
            }
            if (ctx.handler() == handler) {
                return ctx;
            }
            ctx = ctx.next;
        }
    }
结合上面三个方法可以看出getContextOrDie()这个方法取名很美式,根据传入的ChannelHandler对象去ChannelPipeline链表中找对应的节点(AbstractChannelHandlerContext),如果找不着就抛异常(也就是die),找到要删除的节点后,再调用remove()方法进行删除。
从链表中删除
remove()方法实现如下:
    private AbstractChannelHandlerContext remove(final AbstractChannelHandlerContext ctx) {
        assert ctx != head && ctx != tail;
        synchronized (this) {
            remove0(ctx);
            if (!registered) {
                callHandlerCallbackLater(ctx, false);
                return ctx;
            }
            EventExecutor executor = ctx.executor();
            if (!executor.inEventLoop()) {
                executor.execute(new Runnable() {
                    @Override
                    public void run() {
                        callHandlerRemoved0(ctx);
                    }
                });
                return ctx;
            }
        }
        callHandlerRemoved0(ctx);
        return ctx;
    }
从源码中看出首先就判断当前要删除的节点是否是head或tail节点,这是因为ChannelPipeline初始化的头尾两个节点是不能被删除的(可能是因为双向链表中删除头尾节点的时候比较麻烦)。删除的实现在remove0()方法中:
    private static void remove0(AbstractChannelHandlerContext ctx) {
        AbstractChannelHandlerContext prev = ctx.prev;
        AbstractChannelHandlerContext next = ctx.next;
        prev.next = next;
        next.prev = prev;
    }
一看就是就是标准的双向链表删除节点的操作。
回调删除事件
在上面的remove()方法中还有一句没有分析,那就是callHandlerRemoved0()方法调用,实现如下:
    private void callHandlerRemoved0(final AbstractChannelHandlerContext ctx) {
        // Notify the complete removal.
        try {
            try {
                ctx.handler().handlerRemoved(ctx);
            } finally {
                ctx.setRemoved();
            }
        } catch (Throwable t) {
            fireExceptionCaught(new ChannelPipelineException(
                    ctx.handler().getClass().getName() + ".handlerRemoved() has thrown an exception.", t));
        }
    }
可以看出它做的就是调用待删除的ChannelHandler对象的handlerRemoved()这个回调方法,并且最终将这个节点对象标记为已经删除的状态。
由此,从ChannelPipeline中删除ChannelHandler就分析完了。
inBound事件的传播
Netty中关于ChannelPipeline其中重要的内容就是事件的传播,本节先从入站事件(inBound)开始分析事件时如何从ChannelPipeline的头部依次经过每一个节点向后传播的。为理清思路,将入站事件的传播分为三个方面进行分析:
- 何为inBound事件以及ChannelInBoundHandler
- ChannelRead事件的传播
- SimpleInBoundHandler处理器
inBound事件以及ChannelInBoundHandler
在正式开始分析之前,这里先看下ChannelHandler接口的继承关系:
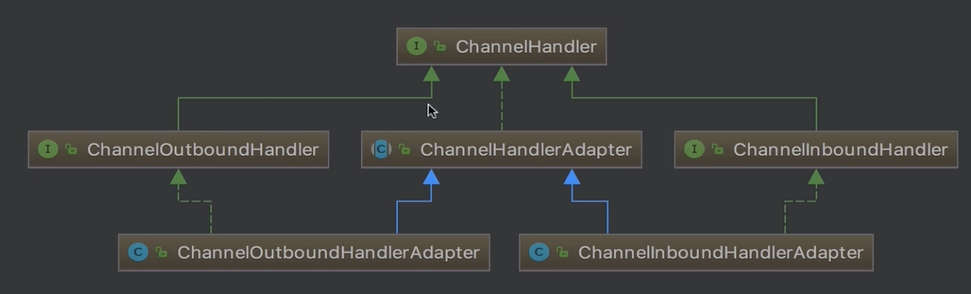
ChannelHandler类图
在ChannelHandler接口中,定义了:
void handlerAdded(ChannelHandlerContext ctx) throws Exception;
void handlerRemoved(ChannelHandlerContext ctx) throws Exception;
这两个方法之前已经分析过了,都是ChannelHandler被添加到ChannelPipeline或者从ChannelPipeline中删除后触发的回调函数。
在ChannelInboundHandler接口中,添加了一些ChannelHandler接口定义的方法外的其他方法:
void channelRegistered(ChannelHandlerContext ctx) throws Exception;
void channelUnregistered(ChannelHandlerContext ctx) throws Exception;
void channelActive(ChannelHandlerContext ctx) throws Exception;
void channelInactive(ChannelHandlerContext ctx) throws Exception;
void channelRead(ChannelHandlerContext ctx, Object msg) throws Exception;
void channelReadComplete(ChannelHandlerContext ctx) throws Exception;
void userEventTriggered(ChannelHandlerContext ctx, Object evt) throws Exception;
void channelWritabilityChanged(ChannelHandlerContext ctx) throws Exception;
其中:
- channelRegistered和channelUnregistered方法是Channel注册到NioEventLoop线程中对应的selector选择器上或是从选择器上取消注册的时候触发的回调函数;
- channelActive和channelInactive方法是通道激活和失效触发的回调函数;
- channelRead方法是Channel读到数据或者建立连接后的回调函数,channelReadComplete是Channel读取完毕后的回调函数;
- userEventTriggered方法表示用户事件被触发后的回调函数,channelWritabilityChanged表示Channel读写能力发生变化后的回调函数;
对比ChannelHandler和ChannelInboundHandler这两个接口,可知ChannelInboundHandler添加了一些Channel相关的回调函数。下面就来从channelRead这个事件来作为示例,看下事件是如何在ChannelPipeline中各个节点之间进行传播的。
ChannelRead事件的传播
在介绍事件传播的过程中,这里定义几个ChannelHandler并通过断点调试的方法来加深理解:
public class InBoundHandlerA extends ChannelInboundHandlerAdapter {
    @Override
    public void channelRead(ChannelHandlerContext ctx,Object msg) throws Exception{
        System.out.println("InBoundHandlerA: "+msg);
        ctx.fireChannelRead(msg);
    }
    @Override
    public void handlerAdded(ChannelHandlerContext ctx) throws Exception{
        System.out.println("InBoundHandlerA added");
    }
}
public class InBoundHandlerB extends ChannelInboundHandlerAdapter {
    @Override
    public void channelRead(ChannelHandlerContext ctx, Object msg) throws Exception{
        System.out.println("InBoundHandlerB: "+msg);
        ctx.fireChannelRead(msg);
    }
    @Override
    public void channelActive(ChannelHandlerContext ctx) throws Exception{
        ctx.channel().pipeline().fireChannelRead("hello world");
    }
    @Override
    public void handlerAdded(ChannelHandlerContext ctx) throws Exception{
        System.out.println("InBoundHandlerB added");
    }
}
public class InBoundHandlerC extends ChannelInboundHandlerAdapter {
    @Override
    public void channelRead(ChannelHandlerContext ctx, Object msg) throws Exception{
        System.out.println("InBoundHandlerC: "+msg);
        ctx.fireChannelRead(msg);
    }
    @Override
    public void handlerAdded(ChannelHandlerContext ctx) throws Exception{
        System.out.println("InBoundHandlerC added");
    }
}
我们定义了A,B,C三个入站事件处理类,它们都继承于ChannelInboundHandlerAdapter。接着我们将这三个ChannelHandler添加到ChannelPipeline中:
......
.childHandler(new ChannelInitializer<SocketChannel>() {
       @Override
       public void initChannel(SocketChannel ch) {
            ch.pipeline().addLast(new InBoundHandlerA());
            ch.pipeline().addLast(new InBoundHandlerB());
            ch.pipeline().addLast(new InBoundHandlerC());
      }
});
配置好了以后,ChannelPipeline中此时并未添加ABC这三个ChannelHandler,而是在bind绑定端口成功后才将这三个ChannelHandler依次添加到ChannelPipeline中。为此我们浏览器访问http://localhost:8888/来发送请求,这时打印出:
InBoundHandlerA added
InBoundHandlerB added
InBoundHandlerC added
说明这三个ChannelHandler依次添加到ChannelPipeline中了,所以触发了各自的handlerAdded方法。
之后当通道被激活后,触发了InBoundHandlerB处理类的channelActive()方法,执行了:ctx.channel().pipeline().fireChannelRead("hello world");
执行后开始发起一个读事件并从pipeline的头部开始向后传播。我们看下fireChannelRead()的实现:
    @Override
    public final ChannelPipeline fireChannelRead(Object msg) {
        AbstractChannelHandlerContext.invokeChannelRead(head, msg);
        return this;
    }
源码中的invokeChannelRead()中第一个参数就是head,表示当前节点是head节点。invokeChannelRead()方法实现:
    static void invokeChannelRead(final AbstractChannelHandlerContext next, Object msg) {
        final Object m = next.pipeline.touch(ObjectUtil.checkNotNull(msg, "msg"), next);
        EventExecutor executor = next.executor();
        if (executor.inEventLoop()) {
            next.invokeChannelRead(m);
        } else {
           ......
        }
    }
代码中的invokeChannelRead()方法实现如下:
    private void invokeChannelRead(Object msg) {
        if (invokeHandler()) {
            try {
                ((ChannelInboundHandler) handler()).channelRead(this, msg);
            } catch (Throwable t) {
                notifyHandlerException(t);
            }
        } else {
            fireChannelRead(msg);
        }
    }
上述代码中的handler()实现为HeadContext这个类的handler()方法:
        @Override
        public ChannelHandler handler() {
            return this;
        }
所以handler()方法返回的就是head节点对象,继续执行head节点的channelRead()方法:
        @Override
        public void channelRead(ChannelHandlerContext ctx, Object msg) throws Exception {
            ctx.fireChannelRead(msg);
        }
ctx.fireChannelRead()方法实现如下:
    @Override
    public ChannelHandlerContext fireChannelRead(final Object msg) {
        invokeChannelRead(findContextInbound(), msg);
        return this;
    }
其中findContextInbound()实现如下:
    private AbstractChannelHandlerContext findContextInbound() {
        AbstractChannelHandlerContext ctx = this;
        do {
            ctx = ctx.next;
        } while (!ctx.inbound);
        return ctx;
    }
可以看出这个方法做的就是查找下一个inbound类型的节点,比如这里是InBoundHandlerA。找到后再去执行invokeChannelRead()方法:
    static void invokeChannelRead(final AbstractChannelHandlerContext next, Object msg) {
        final Object m = next.pipeline.touch(ObjectUtil.checkNotNull(msg, "msg"), next);
        EventExecutor executor = next.executor();
        if (executor.inEventLoop()) {
            next.invokeChannelRead(m);
        } else {
            executor.execute(new Runnable() {
                @Override
                public void run() {
                    next.invokeChannelRead(m);
                }
            });
        }
    }
由next.invokeChannelRead(m);可以看出,又接着从InBoundHandlerA继续执行invokeChannelRead()方法了,逻辑就和之前介绍的一样,就这样实现了依次调用Pipeline中每个节点的fireChannelRead()方法,即事件的传播。
并且由上面的示例可知:执行ctx.channel().pipeline().fireChannelRead("hello world");语句时事件和消息是从pipeline的头部开始传递的,而执行ctx.fireChannelRead()语句时事件和消息是从当前节点开始向后传递的。所以本例子中A,B,C三个节点的ChannelRead()方法中都调用了ctx.fireChannelRead()使得read事件和消息可以从当前节点向后传递。
SimpleChannelInboundHandler
上面的示例中read事件最后传递到了tail节点,并执行channelRead()方法:
        @Override
        public void channelRead(ChannelHandlerContext ctx, Object msg) throws Exception {
            onUnhandledInboundMessage(msg);
        }
        protected void onUnhandledInboundMessage(Object msg) {
            try {
                      logger.debug("Discarded inbound message {} that reached at the tail of the pipeline. " +
                            "Please check your pipeline configuration.", msg);
                } finally {
                    ReferenceCountUtil.release(msg);
                }
        }
因为在每一个ChannelHandler(A,B,C)的channelRead()方法中都调用了ctx.fireChannelRead()方法将事件向后传递,并没有直接处理掉,所以到tail节点时,就会打印出上面的日志,并且调用ReferenceCountUtil.release(msg);这个方法将保存消息的内存进行释放。
但是如果我们在节点A并没有调用fireChannelRead()方法将事件向后传递,也没有处理消息,那么这个内存就永远得不到释放了,这就会导致内存泄露,为了解决这个问题,所以要介绍一下SimpleChannelInboundHandler这个类,它的channelRead()方法源码如下:
    @Override
    public void channelRead(ChannelHandlerContext ctx, Object msg) throws Exception {
        boolean release = true;
        try {
            if (acceptInboundMessage(msg)) {
                @SuppressWarnings("unchecked")
                I imsg = (I) msg;
                channelRead0(ctx, imsg);
            } else {
                release = false;
                ctx.fireChannelRead(msg);
            }
        } finally {
            if (autoRelease && release) {
                ReferenceCountUtil.release(msg);
            }
        }
    }
我们在编写inbound类型的ChannalHandler实现类的时候,只要继承这个SimpleChannelInboundHandler类就行,复写channelRead0()方法,并且在这个方法中并不需要显示调用ReferenceCountUtil.release(msg);方法来释放内存,因为在SimpleChannelInboundHandler类的channelRead()方法内部最终都会自己执行释放内存的操作。所以继承SimpleChannelInboundHandler类比直接继承ChannelInboundHandlerAdapter类更加方便和安全。
outBound事件的传播
在前面我们分析了inBound事件的传播,现在接着分析outBound事件的传播。这一节主要分为下面几个部分进行学习:
- outBound事件和ChannelOutBoundHandler
- write事件的传播
ChannelOutBoundHandler
先回顾下ChannelHandler类图:
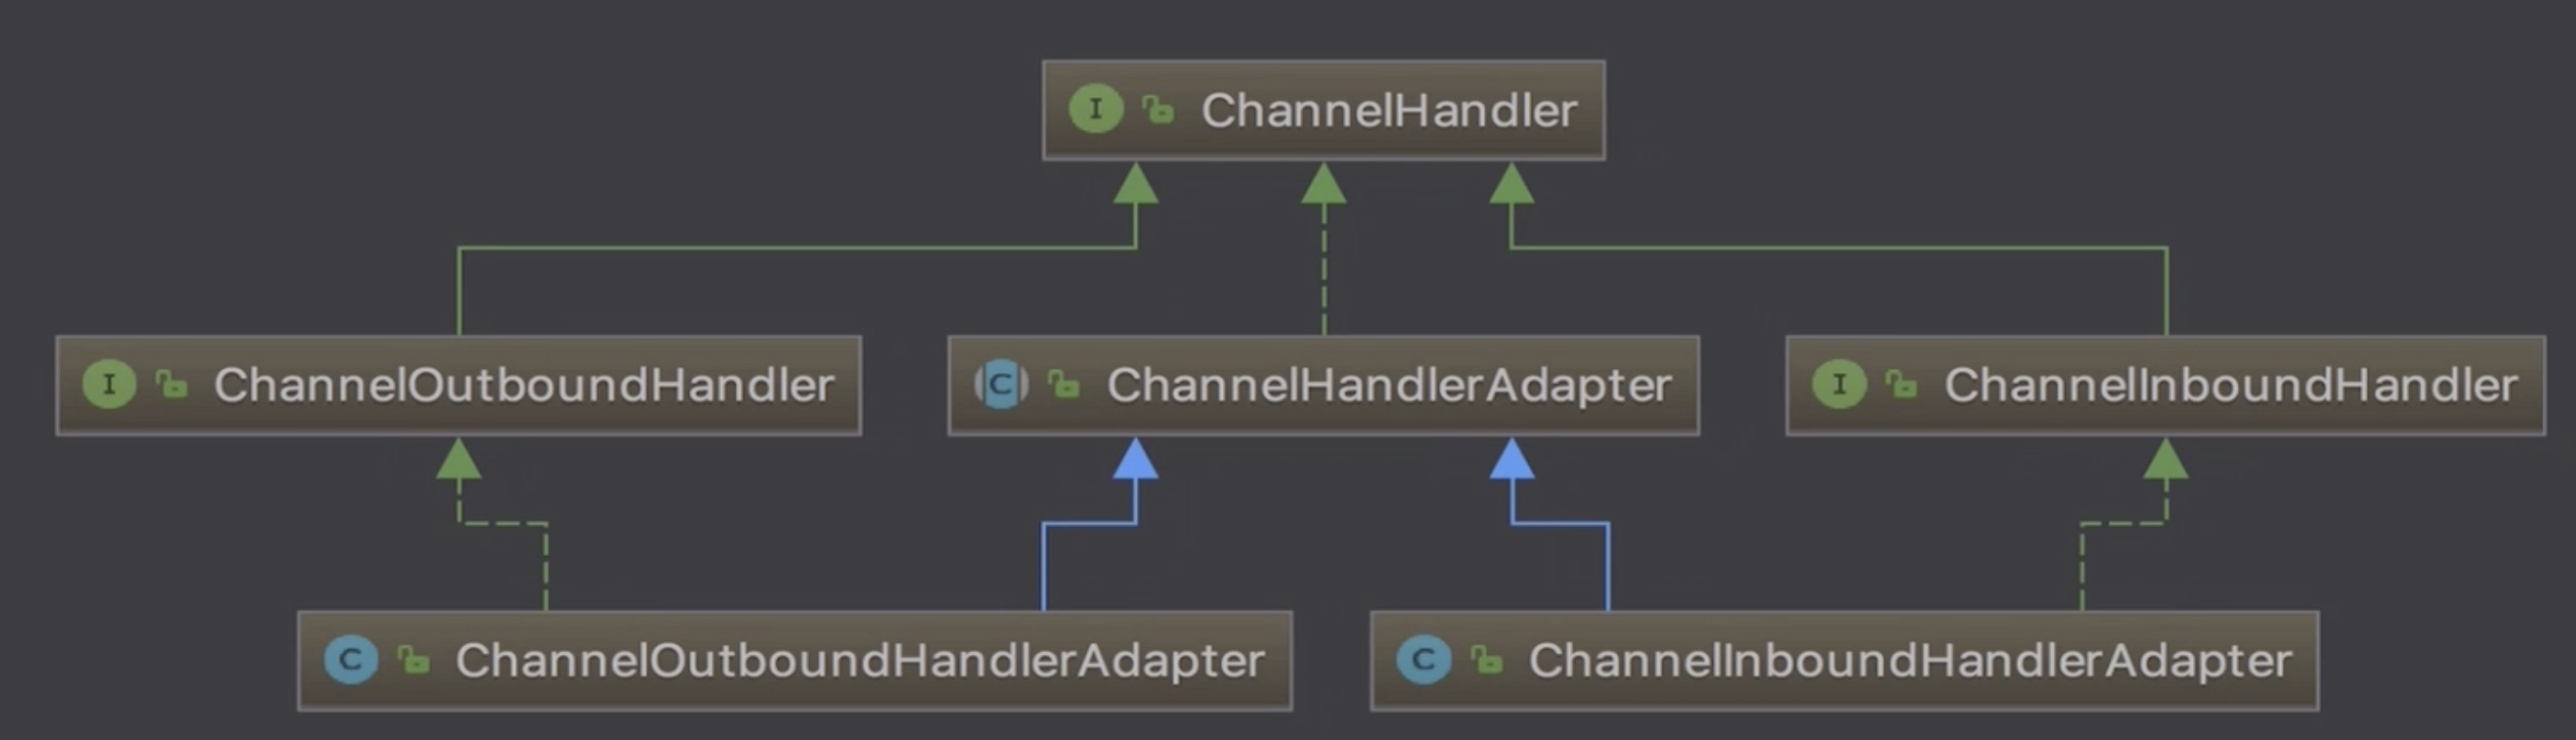
ChannelHandler
我们先看下ChannelOutBoundHandler接口定义的方法有哪些:
void bind(ChannelHandlerContext ctx, SocketAddress localAddress, ChannelPromise promise) throws Exception;
void connect(ChannelHandlerContext ctx, SocketAddress remoteAddress,SocketAddress localAddress, ChannelPromise promise) throws Exception;
void disconnect(ChannelHandlerContext ctx, ChannelPromise promise) throws Exception;
void close(ChannelHandlerContext ctx, ChannelPromise promise) throws Exception;
void deregister(ChannelHandlerContext ctx, ChannelPromise promise) throws Exception;
void read(ChannelHandlerContext ctx) throws Exception;
void write(ChannelHandlerContext ctx, Object msg, ChannelPromise promise) throws Exception;
void flush(ChannelHandlerContext ctx) throws Exception;
这些方法都是以服务端主动发起的操作为主的,bind()方法在服务端绑定端口后触发,connect()方法在服务端连接成功后触发......。下面就从write事件的传播来分析ChannelOutBoundHandler的事件传播。
write事件传播
和验证read事件传播一样,先用一个demo来帮助调试。
编写三个outBoundHandler:A,B,C,并在配置的时候将它们放入pipeline中:
     .childHandler(new ChannelInitializer<SocketChannel>() {
           @Override
           public void initChannel(SocketChannel channel) {
                   ChannelPipeline pipeline = channel.pipeline();
                   pipeline.addLast("OutBoundHandlerA",new OutBoundHandlerA());
                   pipeline.addLast("OutBoundHandlerB",new OutBoundHandlerB());
                   pipeline.addLast("OutBoundHandlerC",new OutBoundHandlerC());
            }
      });
public class OutBoundHandlerA extends ChannelOutboundHandlerAdapter {
    @Override
    public void write(ChannelHandlerContext ctx, Object msg, ChannelPromise promise) throws Exception {
        System.out.println("OutBoundHandlerA: "+ msg);
        ctx.write(msg,promise);
    }
}
public class OutBoundHandlerB extends ChannelOutboundHandlerAdapter {
    @Override
    public void write(ChannelHandlerContext ctx, Object msg, ChannelPromise promise) throws Exception {
        System.out.println("OutBoundHandlerB: "+ msg);
        ctx.write(msg,promise);
    }
    @Override
    public void handlerAdded(final ChannelHandlerContext ctx){
        ctx.executor().schedule(new Runnable() {
            @Override
            public void run() {
                ctx.channel().write("hello,world");
            }
        },3, TimeUnit.SECONDS);
    }
}
public class OutBoundHandlerC extends ChannelOutboundHandlerAdapter {
    @Override
    public void write(ChannelHandlerContext ctx, Object msg, ChannelPromise promise) throws Exception {
        System.out.println("OutBoundHandlerC: "+ msg);
        ctx.write(msg,promise);
    }
}
ABC三个Handler都复写了write方法,并且B的handlerAdded方法中添加了一个定时任务,即三秒后开始执行ctx.channel().write("hello,world");,模拟服务端向客户端写数据,并向ABC三个ChannelHandler传播write事件,所以最终打印:
OutBoundHandlerC: hello,world
OutBoundHandlerB: hello,world
OutBoundHandlerA: hello,world
看日志比较奇怪,是从CBA倒序显示的,这是为什么呢,下面就这个demo进行分析。
我们调试看下ctx.channel().write("hello,world");这句的实现:
    @Override
    public ChannelFuture write(Object msg) {
        return pipeline.write(msg);
    }
执行的pipeline对象的write方法,实现:
    @Override
    public final ChannelFuture write(Object msg) {
        return tail.write(msg);
    }
可知执行的pipeline链表的tail节点的write方法:
    @Override
    public ChannelFuture write(Object msg) {
        return write(msg, newPromise());
    }
    @Override
    public ChannelFuture write(final Object msg, final ChannelPromise promise) {
        if (msg == null) {
            throw new NullPointerException("msg");
        }
        try {
            if (!validatePromise(promise, true)) {
                ReferenceCountUtil.release(msg);
                return promise;
            }
        } catch (RuntimeException e) {
            ReferenceCountUtil.release(msg);
            throw e;
        }
        write(msg, false, promise);
        return promise;
    }
具体实现在其中的write(msg, false, promise);方法中:
    private void write(Object msg, boolean flush, ChannelPromise promise) {
        AbstractChannelHandlerContext next = findContextOutbound();
        final Object m = pipeline.touch(msg, next);
        EventExecutor executor = next.executor();
        if (executor.inEventLoop()) {
            if (flush) {
                next.invokeWriteAndFlush(m, promise);
            } else {
                next.invokeWrite(m, promise);
            }
        } else {
            AbstractWriteTask task;
            if (flush) {
                task = WriteAndFlushTask.newInstance(next, m, promise);
            }  else {
                task = WriteTask.newInstance(next, m, promise);
            }
            safeExecute(executor, task, promise, m);
        }
    }
我们先来看下第一句findContextOutbound()方法做了什么:
    private AbstractChannelHandlerContext findContextOutbound() {
        AbstractChannelHandlerContext ctx = this;
        do {
            ctx = ctx.prev;
        } while (!ctx.outbound);
        return ctx;
    }
看得出它做的就是查找当前节点,也就是tail节点的前置outBound类型的节点,并返回。demo中tail的前置outBound节点是C节点。
接着执行next.invokeWrite(m, promise);这句:
    private void invokeWrite(Object msg, ChannelPromise promise) {
        if (invokeHandler()) {
            invokeWrite0(msg, promise);
        } else {
            write(msg, promise);
        }
    }
调试的时候,发现它执行了第一个分支,调用invokeWrite0()方法:
    private void invokeWrite0(Object msg, ChannelPromise promise) {
        try {
            ((ChannelOutboundHandler) handler()).write(this, msg, promise);
        } catch (Throwable t) {
            notifyOutboundHandlerException(t, promise);
        }
    }
这一切都是熟悉的配方,看得出来outBoundHandler传播事件的思路和inBoundHandler的思路类似,它接着去执行的就是C节点自定义override的write方法,并执行demo中写的:ctx.write(msg,promise);,这个write方法实现:
    @Override
    public ChannelFuture write(final Object msg, final ChannelPromise promise) {
        if (msg == null) {
            throw new NullPointerException("msg");
        }
        try {
            if (!validatePromise(promise, true)) {
                ReferenceCountUtil.release(msg);
                // cancelled
                return promise;
            }
        } catch (RuntimeException e) {
            ReferenceCountUtil.release(msg);
            throw e;
        }
        write(msg, false, promise);
        return promise;
    }
看到这里很熟悉吧,又开始走一遍上面讲过的逻辑了,所以会依次经过C,B,A三个outBound节点的write方法,之所以能连续的原因是,它们每个的write方法中都执行了ctx.write(msg,promise);方法,将事件向前传递,如果其中一个节点没有执行,那么前面的节点就再也不会执行write方法了。
并且调试最后执行的是head节点的write方法:
        @Override
        public void write(ChannelHandlerContext ctx, Object msg, ChannelPromise promise) throws Exception {
            unsafe.write(msg, promise);
        }
即最终还是用unsafe实现了写操作。这样outBound事件传播和write事件具体传播已经分析完了,我们在阅读源码的过程中发现:inBound事件或outBound事件传播都是从head节点或是tail节点开始传播的,并且也最终也是以head和tail节点结束的。这样就构成了一个完整的ChannelPipeline事件传递过程。
异常的传播
为帮助理解,这里用一个demo进行调试。首先创建下面几个ChannelHandler:
public class InBoundHandlerA extends ChannelInboundHandlerAdapter {
    @Override
    public void exceptionCaught(ChannelHandlerContext ctx, Throwable cause){
        System.out.println("InBoundHandlerA.exceptionCaught()");
        ctx.fireExceptionCaught(cause);
    }
}
public class InBoundHandlerB extends ChannelInboundHandlerAdapter {
    @Override
    public void channelRead(ChannelHandlerContext ctx, Object msg) throws Exception{
        throw new Exception("from inboundHandlerB");
    }
    @Override
    public void exceptionCaught(ChannelHandlerContext ctx, Throwable cause){
        System.out.println("InBoundHandlerB.exceptionCaught()");
        ctx.fireExceptionCaught(cause);
    }
}
public class InBoundHandlerC extends ChannelInboundHandlerAdapter {
    @Override
    public void exceptionCaught(ChannelHandlerContext ctx, Throwable cause){
        System.out.println("InBoundHandlerC.exceptionCaught()");
        ctx.fireExceptionCaught(cause);
    }
}
public class OutBoundHandlerA extends ChannelOutboundHandlerAdapter {
    @Override
    public void exceptionCaught(ChannelHandlerContext ctx, Throwable cause){
        System.out.println("OutBoundHandlerA.exceptionCaught()");
        ctx.fireExceptionCaught(cause);
    }
}
public class OutBoundHandlerB extends ChannelOutboundHandlerAdapter {
    @Override
    public void exceptionCaught(ChannelHandlerContext ctx, Throwable cause){
        System.out.println("OutBoundHandlerB.exceptionCaught()");
        ctx.fireExceptionCaught(cause);
    }
}
public class OutBoundHandlerC extends ChannelOutboundHandlerAdapter {
    @Override
    public void exceptionCaught(ChannelHandlerContext ctx, Throwable cause){
        System.out.println("OutBoundHandlerC.exceptionCaught()");
        ctx.fireExceptionCaught(cause);
    }
}
demo中创建了三个InBoundHandler和三个OutBoundHandler,这六个ChannelHandler都override了exceptionCaught()方法,顾名思义这个方法在有异常传播到当前节点的时候被调用。另外inBoundB这个节点又重写了channelRead方法,当有read事件进来的时候会抛出一个异常,这就模拟了事件的发生。启动应用后,当发送一个请求后,日志打印如下:
InBoundHandlerB.exceptionCaught()
InBoundHandlerC.exceptionCaught()
OutBoundHandlerA.exceptionCaught()
OutBoundHandlerB.exceptionCaught()
OutBoundHandlerC.exceptionCaught()
接下来就要打断点调试在ChannelPipeline中事件是如何传播的了。我们在inBoundB节点read方法抛异常的地方打个断点:
@Override
    public void channelRead(ChannelHandlerContext ctx, Object msg) throws Exception{
        throw new Exception("from inboundHandlerB");
    }
下一步跳进了:
    private void invokeChannelRead(Object msg) {
        if (invokeHandler()) {
            try {
                ((ChannelInboundHandler) handler()).channelRead(this, msg);
            } catch (Throwable t) {
                notifyHandlerException(t);
            }
        } else
            fireChannelRead(msg);
        }
    }
这没毛病,我们之前分析read事件时也是分析的这个方法,现在当前节点执行channelRead方法时抛异常了,就跳到了catch部分,并执行了notifyHandlerException ()方法:
    private void notifyHandlerException(Throwable cause) {
        if (inExceptionCaught(cause)) {
            if (logger.isWarnEnabled()) {
                logger.warn(
                        "An exception was thrown by a user handler " +
                                "while handling an exceptionCaught event", cause);
            }
            return;
        }
        invokeExceptionCaught(cause);
    }
重点分析invokeExceptionCaught ()方法:
    private void invokeExceptionCaught(final Throwable cause) {
        if (invokeHandler()) {
            try {
                handler().exceptionCaught(this, cause);
            } catch (Throwable error) {
                if (logger.isDebugEnabled()) {
                    logger.debug(
                        "An exception {}" +
                        "was thrown by a user handler's exceptionCaught() " +
                        "method while handling the following exception:",
                        ThrowableUtil.stackTraceToString(error), cause);
                } else if (logger.isWarnEnabled()) {
                    logger.warn(
                        "An exception '{}' [enable DEBUG level for full stacktrace] " +
                        "was thrown by a user handler's exceptionCaught() " +
                        "method while handling the following exception:", error, cause);
                }
            }
        } else {
            fireExceptionCaught(cause);
        }
    }
第一句的handler()方法:
    @Override
    public ChannelHandler handler() {
        return handler;
    }
即返回当前节点,所以执行exceptionCaught()方法,执行的就是自定义的InBoundHandlerA的exceptionCaught()方法:
    @Override
    public void exceptionCaught(ChannelHandlerContext ctx, Throwable cause){
        System.out.println("InBoundHandlerB.exceptionCaught()");
        ctx.fireExceptionCaught(cause);
    }
在这个自定义的方法中,又添加了ctx.fireExceptionCaught(cause);方法,这个方法实现:
    @Override
    public ChannelHandlerContext fireExceptionCaught(final Throwable cause) {
        invokeExceptionCaught(next, cause);
        return this;
    }
这时调试的时候发现:next已经不再是InBoundHandlerB了,而是InBoundHandlerC。invokeExceptionCaught方法实现如下:
    static void invokeExceptionCaught(final AbstractChannelHandlerContext next, final Throwable cause) {
        ObjectUtil.checkNotNull(cause, "cause");
        EventExecutor executor = next.executor();
        if (executor.inEventLoop()) {
            next.invokeExceptionCaught(cause);
        } else {
            try {
                executor.execute(new Runnable() {
                    @Override
                    public void run() {
                        next.invokeExceptionCaught(cause);
                    }
                });
            } catch (Throwable t) {
                if (logger.isWarnEnabled()) {
                    logger.warn("Failed to submit an exceptionCaught() event.", t);
                    logger.warn("The exceptionCaught() event that was failed to submit was:", cause);
                }
            }
        }
    }
可知下面又执行inBoundHandlerC节点的next.invokeExceptionCaught()方法,这个和inBoundHandlerB节点的逻辑是一样的,就这样实现了inBoundHandlerC->B->A节点依次调用exceptionCaught()方法,那每个节点这个方法中ctx.fireExceptionCaught(cause);都是必须的吗?我们看下我们自定义的这几个节点的父类ChannelInboundHandlerAdapter的这个方法:
    @Override
    public void exceptionCaught(ChannelHandlerContext ctx, Throwable cause)
            throws Exception {
        ctx.fireExceptionCaught(cause);
    }
可以看到父类已经默认调用了ctx.fireExceptionCaught(cause);这个方法,如果我们没有override这个exceptionCaught()方法,那么事件向后传递这个功能其实也是具备的,不用担心;但是如果override了这个方法,那么就得自己也记得在方法中自行调用这个方法,这样才能将事件向后传递。
经过调试后发现,事件从inBoundHandlerB-> inBoundHandlerC-> outBoundHandlerA-> outBoundHandlerB-> outBoundHandlerC->tail的顺序进行传播,所以很明显就是根据pipeline中ChannelHandler的顺序从当前节点向后依次传递事件。当异常传播到tail节点后,会执行tailContext的重写方法:
   @Override
   public void exceptionCaught(ChannelHandlerContext ctx, Throwable cause) throws Exception {
            onUnhandledInboundException(cause);
   }
    protected void onUnhandledInboundException(Throwable cause) {
        try {
            logger.warn(
                    "An exceptionCaught() event was fired, and it reached at the tail of the pipeline. " +
                            "It usually means the last handler in the pipeline did not handle the exception.",
                    cause);
        } finally {
            ReferenceCountUtil.release(cause);
        }
    }
可以看出当异常传播到tail节点,也就意味着在之前的节点中都未被处理过,打印出一个警告提示信息,并最后释放。


 3629
3629


 被折叠的 条评论
为什么被折叠?
被折叠的 条评论
为什么被折叠?
 到【灌水乐园】发言


