


在上一个文章已经配置了pom.xml的依赖jar包和插件,现在配置web.xml:
<?xml version="1.0" encoding="UTF-8"?>
<web-app xmlns:xsi="http://www.w3.org/2001/XMLSchema-instance" xmlns="http://java.sun.com/xml/ns/javaee" xsi:schemaLocation="http://java.sun.com/xml/ns/javaee http://java.sun.com/xml/ns/javaee/web-app_3_0.xsd" id="WebApp_ID" version="3.0">
<display-name></display-name>
<welcome-file-list>
<welcome-file>index.jsp</welcome-file>
</welcome-file-list>
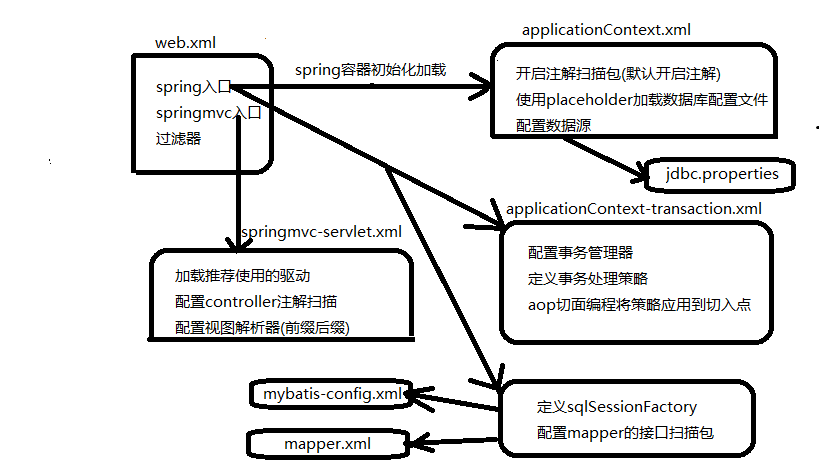
<!-- 配置spring容器初始化要加载的xml文件 -->
<context-param>
<param-name>contextConfigLocation</param-name>
<param-value>classpath:spring/applicationContext*.xml</param-value>
</context-param>
<!-- ContextLoaderListener:上下文监听器,当应用被部署到tomcat上时,就会产生上下文,那么监听器就能
监听到这一动作,监听器监听到这一动作后就会根据 context-param里面配置的xml地址创建spring容器,
也就是说,spring在应用部署到内存中之后就会初始化容器,并且只创建一次-->
<!-- spring的ApplicationContext载入 -->
<listener>
<!-- 配置spring容器入口 -->
<listener-class>org.springframework.web.context.ContextLoaderListener</listener-class>
</listener>
<!-- 配置编码过滤器,以utf-8编码 -->
<filter>
<filter-name>EncodingFilter</filter-name>
<filter-class>org.springframework.web.filter.CharacterEncodingFilter</filter-class>
<init-param>
<param-name>encoding</param-name>
<param-value>UTF-8</param-value>
</init-param>
<!-- 配置是否强制使用过滤器 -->
<init-param>
<param-name>forceEncoding</param-name>
<param-value>true</param-value>
</init-param>
</filter>
<filter-mapping>
<filter-name>EncodingFilter</filter-name>
<url-pattern>/*</url-pattern>
</filter-mapping>
<!-- 配置springmvc核心控制器 -->
<servlet>
<servlet-name>springmvc</servlet-name>
<servlet-class>org.springframework.web.servlet.DispatcherServlet</servlet-class>
<init-param>
<param-name>contextConfigLocation</param-name>
<param-value>classpath:springmvc-servlet.xml</param-value>
</init-param>
<!-- 设置初始化优先级,数字越小越高,会在部署到tomcat时就被初始化创建 -->
<load-on-startup>1</load-on-startup>
</servlet>
<!-- 配置springmvc入口 -->
<servlet-mapping>
<servlet-name>springmvc</servlet-name>
<url-pattern>/rest/*</url-pattern>
</servlet-mapping>
</web-app>springmvc-servlet.xml(springmvc入口):
<?xml version="1.0" encoding="UTF-8"?>
<beans xmlns="http://www.springframework.org/schema/beans"
       xmlns:xsi="http://www.w3.org/2001/XMLSchema-instance"
       xmlns:context="http://www.springframework.org/schema/context"
       xmlns:aop="http://www.springframework.org/schema/aop"
       xmlns:tx="http://www.springframework.org/schema/tx"
       xmlns:mvc="http://www.springframework.org/schema/mvc"
       xsi:schemaLocation="
http://www.springframework.org/schema/beans http://www.springframework.org/schema/beans/spring-beans.xsd
http://www.springframework.org/schema/context http://www.springframework.org/schema/context/spring-context.xsd
http://www.springframework.org/schema/aop http://www.springframework.org/schema/aop/spring-aop.xsd
http://www.springframework.org/schema/tx http://www.springframework.org/schema/tx/spring-tx.xsd
http://www.springframework.org/schema/mvc http://www.springframework.org/schema/mvc/spring-mvc.xsd">


	<!-- 加载推荐使用的驱动 -->
	<mvc:annotation-driven/>
	<!-- 配置controller注解扫描 -->
	<context:component-scan base-package="com.lemon.usermanager.controller"></context:component-scan>

	<!-- HandlerMapping和HandlerAdaptaher在服务被部署时就已经被创建 -->
	<!-- 配置视图解析器 -->
	<bean class="org.springframework.web.servlet.view.InternalResourceViewResolver">
		<!-- 配置视图解析路径 -->
		<!-- prefix="/WEB-INF/jsp/", suffix=".jsp", viewname="test" -> "/WEB-INF/jsp/test.jsp"  -->
		<property name="prefix" value="/WEB-INF/views/"></property>
		<property name="suffix" value=".jsp"></property>
	</bean>

	<!-- 配置文件上传功能 -->
<!-- 	<bean class="org.springframework.web.multipart.commons.CommonsMultipartResolver" id="multipartResolver">
		配置编码格式
		<property name="DefaultEncoding" value="utf-8"></property>
		配置文件上传大小:5M(自定义) 1024*1024*5
		<property name="maxUploadSize" value="5242880"></property>
	</bean> -->

	<!-- 配置拦截器 -->
<!-- 	<mvc:interceptors>
		<mvc:interceptor>
			配置拦截器要拦截的路径 ,/**拦截所有目录
			<mvc:mapping path="/**"/>
			配置自定义拦截器
			<bean class="com.action.MyHandlerInterceptor"></bean>
		</mvc:interceptor>
	</mvc:interceptors> -->


</beans>
在本项目中spring容器需要初始化三个配置文件:
1.applicationContext.xml:
1.1.开启spring注解扫描包(默认注解功能开启)
1.2.使用placeholder加载数据库配置文件(jdbc.properties)
1.3.配置数据源
<?xml version="1.0" encoding="UTF-8"?>
<beans xmlns="http://www.springframework.org/schema/beans"
       xmlns:xsi="http://www.w3.org/2001/XMLSchema-instance"
       xmlns:context="http://www.springframework.org/schema/context"
       xsi:schemaLocation="
http://www.springframework.org/schema/beans http://www.springframework.org/schema/beans/spring-beans.xsd
http://www.springframework.org/schema/context http://www.springframework.org/schema/context/spring-context.xsd">

	<!-- 开启spring注解功能,默认是关闭的 -->

	<!-- <context:annotation-config/> -->
	<!-- 配置注解扫描包,它会扫描基本包和子包的所有类,会检测当前的类中是否含有spring注解(@Controller,@Service,@Respitory,@Component)
		这些注解的功能一致,名字不同是为了区别类在mvc中属于那一层:
		@Controller:前端数据交互
		@Service:业务逻辑层
		@Respitory:dao层
		@Component:不属于mvc层可以使用该注解
		(开启了注解扫描自动开启注解功能)
	 -->
	<context:component-scan base-package="com.lemon"></context:component-scan>


	<!-- 使用placeholder加载properties文件 -->
	<bean class="org.springframework.context.support.PropertySourcesPlaceholderConfigurer">
		<!-- 允许JVM参数覆盖 -->
		<!-- <property name="systemPropertiesModeName" value="SYSTEM_PROPERTIES_MODE_OVERRIDE"></property> -->
		<!-- 忽略没有找到的文件 -->
		<property name="ignoreResourceNotFound" value="true"></property>
		<!-- 配置资源文件 -->
		<property name="locations">
			<list>
				<value>classpath:jdbc.properties</value>
			</list>
		</property>
	</bean>

	<!-- 定义数据源,destory-method销毁的回调方法 -->
	<bean class="com.jolbox.bonecp.BoneCPDataSource" id="dataSource" destroy-method="close">
		<!-- 数据库地址 -->
		<property name="jdbcUrl" value="${jdbc.url}"></property>
		<!-- 驱动 -->
		<property name="driverClass" value="${jdbc.driverClassName}"></property>
		<!-- 账号 -->
		<property name="user" value="${jdbc.username}"></property>
		<!-- 数据库地址 -->
		<property name="password" value="${jdbc.password}"></property>
		<!-- 检查数据库连接池中空闲连接的时间间隔,单位是分,默认值:240分,如果要取消则设置为0 -->
		<property name="idleConnectionTestPeriod" value="60"></property>
		<!-- 连接池中未使用链接的最大存活时间,单位是分,默认是60分,如果永远存活设置为0 -->
		<property name="idleMaxAge" value="30"></property>
		<!-- 每个分区的最大连接数-->
		<!-- 判断依据:请求并发数
		 -->
		 <!-- <property name="maxConnectionPerPartition" value="100"></property>
		 每个分区最小连接数
		 <property name="minConnectionPerPartition" value="5"></property> -->
	</bean>
</beans>
jdbc.properties:
jdbc.driverClassName=com.mysql.jdbc.Driver
jdbc.url=jdbc:mysql://localhost:3306/cost?useUnicode=true&characterEncoding=utf8&&autoReconnect=true&allowMultiQueries=true
jdbc.username=root
jdbc.password=root
2.applicationContext-transaction.xml(第二个spring事务文件):
2.1.配置事务管理器
2.2.定义事务处理策略
2.3.定义aop将策略应用到切入点
<?xml version="1.0" encoding="UTF-8"?>
<beans xmlns="http://www.springframework.org/schema/beans"
       xmlns:xsi="http://www.w3.org/2001/XMLSchema-instance"
       xmlns:context="http://www.springframework.org/schema/context"
       xmlns:aop="http://www.springframework.org/schema/aop"
       xmlns:tx="http://www.springframework.org/schema/tx"
       xsi:schemaLocation="
http://www.springframework.org/schema/beans http://www.springframework.org/schema/beans/spring-beans.xsd
http://www.springframework.org/schema/context http://www.springframework.org/schema/context/spring-context.xsd
http://www.springframework.org/schema/aop http://www.springframework.org/schema/aop/spring-aop.xsd
http://www.springframework.org/schema/tx http://www.springframework.org/schema/tx/spring-tx.xsd">


	<!-- 配置事务管理器 -->
	<bean class="org.springframework.jdbc.datasource.DataSourceTransactionManager" id="transactionManager">
		<!-- 往事务管理器中注入数据源 -->
		<property name="dataSource" ref="dataSource"></property>
	</bean>


	<!-- 配置开启事务扫描transcation功能,并对含有注解的方法或类进行事务管理 -->
	<tx:annotation-driven transaction-manager="transactionManager"/>

	<!-- 定义事务策略,增强通知 -->
	<tx:advice transaction-manager="transactionManager" id="txAdvice">
		<tx:attributes>
			<tx:method name="query*" read-only="true"/>
			<tx:method name="*"/>
		</tx:attributes>
	</tx:advice>

	<!--  -->
	<aop:config>
		<!-- *返回类型 *类 *方法 ..参数不限 -->
		<aop:pointcut expression="execution(* com.lemon.usermanager.service.*.*(..))" id="mypoint"/>
		<!-- 将上述定义好的事务处理策略应用到上述切入点 -->
		<aop:advisor advice-ref="txAdvice" pointcut-ref="mypoint"/>
	</aop:config>
</beans>
3.applicationContext.mybatis.xml(spring和mybatis整合)
3.1.定义sqlSessionFactory
3.2.配置接口扫描包
<?xml version="1.0" encoding="UTF-8"?>
<beans xmlns="http://www.springframework.org/schema/beans"
       xmlns:xsi="http://www.w3.org/2001/XMLSchema-instance"
       xmlns:context="http://www.springframework.org/schema/context"
       xmlns:aop="http://www.springframework.org/schema/aop"
       xmlns:tx="http://www.springframework.org/schema/tx"
       xsi:schemaLocation="
http://www.springframework.org/schema/beans http://www.springframework.org/schema/beans/spring-beans.xsd
http://www.springframework.org/schema/context http://www.springframework.org/schema/context/spring-context.xsd
http://www.springframework.org/schema/aop http://www.springframework.org/schema/aop/spring-aop.xsd
http://www.springframework.org/schema/tx http://www.springframework.org/schema/tx/spring-tx.xsd">

	<!-- 定义sqlSessionFactory,在spring和mybatis整合包里 -->
	<bean class="org.mybatis.spring.SqlSessionFactoryBean">
		<!-- 配置数据源 -->
		<property name="dataSource" ref="dataSource"></property>
		<!-- 配置要加载的全局配置文件 -->
		<property name="configLocation" value="classpath:mybatis/mybatis-config.xml"></property>
		<!-- 配置要加载的mapper.xml映射文件路径,这里放在mapper.xml中 -->
<!-- 		<property name="mapperLocations" value="classpath:mybatis/mapper/**/*.xml"></property> -->
		<!-- 配置别名 -->
		<property name="typeAliasesPackage" value="com.lemon.usermanager.pojo"></property>
	</bean>

	<!-- 配置mapper的接口扫描包,会为我们动态创建mapper代理并注入到spring容器中 -->
	<bean class="org.mybatis.spring.mapper.MapperScannerConfigurer">
		<!-- 定义扫描的包名 -->
		<property name="basePackage" value="com.lemon.usermanager.mapper"></property>
	</bean>
</beans>
mapper.xml和mybatis-config.xml简单配置一下就行了.
最后,创建controller和views视图进行测试.


 114
114

 被折叠的 条评论
为什么被折叠?
被折叠的 条评论
为什么被折叠?
 到【灌水乐园】发言


