


待到秋来九月八,我花开后百花杀
与Cucumber配合的标准化开发流程
我们从官方网站中发现,cypress入门编程以及大多数初学cypress开发者,秉持跟随官网的方式编写测试实现,然而事实中,在无头模式下运行cypress测试时,执行时间会变得非常臃肿,这是因为默认情况下cypress会在每个如下编程的功能之间重新启动浏览器。
describe('My First Test', () => {
  it('Does not do much!', () => {
    expect(true).to.equal(true)
  })
})
配合使用cucumber插件,通过cucumber预处理器,提供在运行测试之前捆绑所有功能的选项,从而减少执行时间。
您可以通过创建.features文件来实现这一点。你可以选择在目录cypress/integrations的根目录中或每个目录中创建唯一一个,且只有一个。
您还必须在 Cypress 配置中添加对 .features文件的支持
{
   " testFiles " : " **/*.{feature,features} "
}
当你想要运行测试文件时,
cypress run --spec **/*.features
如果你在配置中忽略了.js文件,那么你可以直接运行测试:
{
   "ignoreTestFiles": "*.js",
   " testFiles " : " **/*.{feature,features} "
}
cypress run
如何巧妙地使用cucumber建立功能丰富的feature文件
测试前预处理步骤定义
当在package.json文件中配置了nonGlobalStepDefinitions选项,那么你可以在测试文件中的编写在测试运行中需要全局使用,或是预处理的步骤。
配置:
"cypress-cucumber-preprocessor": {
  "nonGlobalStepDefinitions": true
}
例如:你在cypress/integration/common目录下增加了.js文件,并写入了:
before(() => {
  cy.log(
    "This will run once before all tests, you can use this to for example start up your server, if that's your thing"
  );
});
那么,当运行测试时就会在每个测试文件执行之前运行:
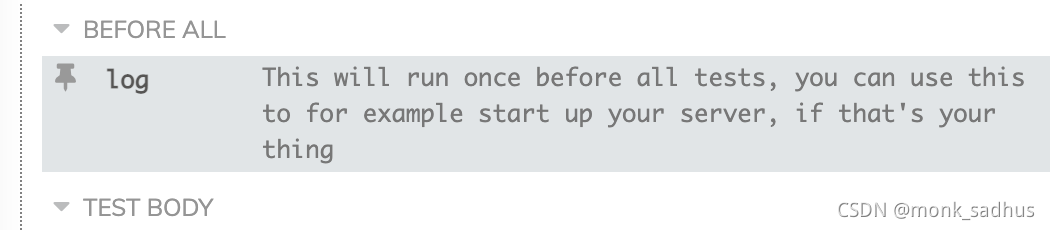
这是放置与该特定功能相关的before/beforeEach/after/afterEach的好地方。
如何编写测试
Cucumber使用https://docs.cucumber.io/cucumber/cucumber-expressions/来解析您的 .feature 文件,请使用该文件作为您的参考。
在.js文件中你需要使用到,Given/When/Then 函数,你可以使用IDE直接导入它们,或者如下所示:
/* global Given, When, Then */
对于.featrue文件你可以使用直接释义的方式编写测试,例如:
  Scenario:Play an A on my piano
    Given I set down before the piano
    When I press the 1st key of my piano
    And piano input key
    Then I should hear an A sound
同时,也可以直接使用中文进行编写:
  Scenario:在我的钢琴上按下A
    Given 我在钢琴前坐下
    When 我按下了我钢琴的第一个按键
    And 钢琴输入了按键
    Then 我应该听到一个A的声音
同时需要编写同名的.js文件,实现每个scenario的具体功能:
Given("I set down before the piano", () => {
  console.log(‘I set down before the piano’);
});
When("I press the 1st key of my piano", () => {
  console.log(‘I press the 1st key of my piano’);
});
And("piano input key", () => {
  console.log(‘piano input key’);
});
Then("I should hear an A sound", () => {
  expect(string).to.equal(‘I should hear an A sound’);
});
自定义参数类型解析
我们现在可以使用自定义参数类型解析。这是一个带有相关.feature 文件的示例
.feature 文件:
  Scenario: Play an A on my piano
    When I press the 1st key of my piano
    Then I should hear an A sound

  Scenario: Play an E on my piano
    When I press the 26th key of my piano
    Then I should hear an E sound
.js文件:
const notes = ["A", "B", "C", "D", "E", "F", "G"];

defineParameterType({
  name: "note",
  regexp: new RegExp(notes.join("|")),
});

defineParameterType({
  name: "ordinal",
  regexp: /(\d+)(?:st|nd|rd|th)/,
  transformer(s) {
    return parseInt(s, 10);
  },
});

let keySound = null;

When("I press the {ordinal} key of my piano", (number) => {
  keySound = notes[(number - 1) % 7];
});

Then("I should hear a(n) {note} sound", (note) => {
  expect(note).to.equal(keySound);
});
数据表参数类型使用
Cucumber支持使用数据表的形式编写测试,你可以像示例中一样使用它:
Feature: Being a plugin handling DataTable scenario

  As a cucumber cypress plugin which handles DataTables
  I want to allow people to write DataTable scenarios and run it in cypress

  Scenario: DataTable
    When I add all following numbers:
      | number | another number |
      | 1      | 2              |
      | 3      | 4              |
    Then I verify the datatable result is equal to 10


  Scenario: New line character
    Given I have a table with "<foo>" and "<bar>"

    Examples:
      | foo      | bar      |
      | foo\nfoo | bar\nbar |
let sum = 0;

When("I add all following numbers:", (dataTable) => {
  //你可以通过对象调用表的行和列
  console.log("a, ", dataTable.rawTable.slice(1))
  sum = dataTable.rawTable
    .slice(1)
    .reduce(
      (rowA, rowB) =>
        rowA.reduce((a, b) => parseInt(a, 10) + parseInt(b, 10)) +
        rowB.reduce((a, b) => parseInt(a, 10) + parseInt(b, 10))
    );
  //你也可以直接打印表
  console.log(dataTable);
});

Then("I verify the datatable result is equal to {int}", (result) => {
  expect(sum).to.equal(result);
});

Given("I have a table with "([^"]*)" and "([^"]*)"", (foo,bar) => {
//你也可以通过直接访问属性一样访问每个的元素,它可以按照列名,循环运行该Scenario,直到使用完每一行的元素
  console.log(foo);
  console.log(bar);
});
Before 和 After 的 hooks
Cucumber 支持 Mocha的 before/beforeEach/after/afterEach hooks,你可以在cypress/integration/common中编写这些测试前预处理步骤,但它会在每一个.featrue文件的所有测试前运行它,如果你不想在每个测试文件都运行预处理步骤,那么,Cucumber也带有自己支持的 Before 和 After hooks,你只需要在同名的.js文件中编写即可。
Hooks用于在每个场景之前和之后设置和拆除环境。有关传递给Hooks的参数规范,请参阅API 参考:https://github.com/cucumber/cucumber-js/blob/master/docs/support_files/api_reference.md。多个Before Hooks按照它们定义的顺序执行。多个After Hooks以它们定义的相反顺序执行。
同时它也支持指定标签的Scenario前执行。
// this will get called before each scenario
Before(() => {
  beforeCounter += 1;
  beforeWithTagCounter = 0;
});

// this will only get called before scenarios tagged with @foo
Before({ tags: "@foo" }, () => {
  beforeWithTagCounter += 1;
});
更多关于Hooks的用法请参考:
https://github.com/cucumber/cucumber-js/blob/master/docs/support_files/hooks.md
Background 场景前处理
将Background 添加到您.featrue文件前将使您能够在每个场景之前运行。例如,我们有一个需要在每个场景之前重置的计数器。我们可以创建一个给定的步骤来重置计数器。
Feature: Background Section

   Background:
    Given counter has been reset

   Scenario: Basic example #1
     When counter is incremented
     Then counter equals 1

   Scenario: Basic example #2
     When counter is incremented
     When counter is incremented
     Then counter equals 2
let counter = 0;

Given("counter has been reset", () => {
  counter = 0;
});

When("counter is incremented", () => {
  counter += 1;
});

Then("counter equals {int}", value => {
  expect(counter).to.equal(value);
});
智能标记
在不设置任何标记的情况下也可以启动测试。在开发或修复bug时,你想要重点关注的scenario,你可以将@focus之类的标签,放在您想要关注的scenario上。
例如:
Feature: Smart Tagging

  As a cucumber cypress plugin which handles Tags
  I want to allow people to select tests to run if focused
  So they can work more efficiently and have a shorter feedback loop

  Scenario: This scenario should not run if @focus is on another scenario
    Then this unfocused scenario should not run

  @focus
  Scenario: This scenario is focused and should run
    Then this focused scenario should run

  @this-tag-affects-nothing
  Scenario: This scenario should also not run
    Then this unfocused scenario should not run

  @focus
  Scenario: This scenario is also focused and also should run
    Then this focused scenario should run
如何运行测试
常规运行方式
按照通常的方式运行 Cypress,例如:
./node_modules/.bin/cypress open
单击规格列表中的一个.feature文件,就可以看到神奇的事情发生了!
通过npx指令工具运行
在cypress文件所在目录下运行:
npx cypress open
单击规格列表中的一个.feature文件,就可以看到神奇的事情发生了!
无头模式运行(Headless)
./node_modules/.bin/cypress run
或
在cypress文件所在目录下运行:
npx cypress run
限制指定feature文件运行
npx cypress run --spec cypress/integration/文件夹/文件名.feature
执行特征标签的场景
您可以使用标签来选择应该让cypress运行哪个测试。为了使用标签初始化测试,您必须运行 cypress 并传递 TAGS 环境变量。
./node_modules/.bin/cypress-tags run -e TAGS= ' not @foo and (@bar or @zap) '
请注意:这里使用的 cypress-tags 包装器来加快速度。这个包装器从本地模块调用 cypress 可执行文件,如果没有找到,它会回退到全局安装的。
或者你可以直接在配置文件中指定标签,在运行 cypress 测试运行程序时使用标签来跳过或忽略特定的测试/场景(您无法像上面的示例那样传递参数以进行执行)
诀窍在于在 cypress.json 配置文件中添加带有“TAGS”子属性的“env”属性。它看起来像这样:
{
    "env": {
        "TAGS": "not @ignore"
    },
    //rest of configuration options
    "baseUrl": "yourBaseUrl",
    "ignoreTestFiles": "*.js",
}
然后,在使用 cypress 测试运行程序运行测试时,任何标有 @ignore 标签的场景都将被跳过
运行时操作cypress.json配置文件
当从命令行运行cypress或是通过shell脚本运行时,你可以传递一个–config标志,用来临时更改配置:
cypress open --config pageLoadTimeout=30000,baseUrl=https://myapp.com
或是
cypress run --config integrationFolder=tests,videoUploadOnPasses=false
对于更复杂的配置对象,您可能需要考虑传递一个由单引号括起来的 JSON.stringified对象。
cypress open --config '{"watchForFileChanges":false,"testFiles":["**/*.js","**/*.ts"]}'
或是,直接指定使用其他配置文件
cypress run --config-file ../cypress.json
测试运行错误报告及测试日志的生成
cypress支持创建您自己的自定义报告器或使用任何类型的第三方报告器,这里列举无需安装任何工具下可使用的两种报告生成形式。
mochawesome自定义报告生成器
因为 Cypress 建立在 Mocha 之上,这意味着任何为 Mocha 构建的报告器都可以与 Cypress 一起使用。
可以通过相对或绝对路径加载自定义 Mocha 报告器。这些可以在您的配置文件中指定(cypress.json默认情况下)或通过命令行指定。
配置文件
{
  "reporter": "mochawesome"
}
命令行
cypress run --reporter mochawesome
你还可以通过reporterOption来控制你希望对自定义报告的选项的定义:
配置文件
{
  "reporter": "mochawesome",
  "reporterOptions": {
    "reportDir": "cypress/results",
    "overwrite": false,
    "html": false,
    "json": true
  }
}
命令行
cypress run --reporter mochawesome \
  --reporter-options reportDir="cypress/results",overwrite=false,html=false,json=true
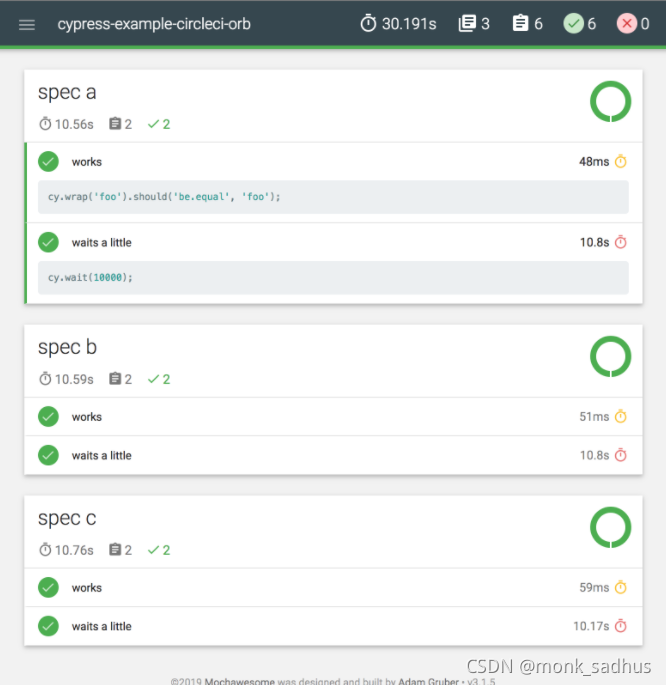
这样,每当运行一个.feature测试文件时,就会在cypress/results目录下生成一个类似mochawesome_001.json测试报告。
如果你希望所有生成的测试报告可以放在一个.json文件中,你可以使用merge命令,例如:
npx mochawesome-merge "cypress/results/*.json" > mochawesome.json
它会将该目录下的所有.json文件合并成一个文件
通过以下命令,还可以生成方便阅读的html文件:
npx mochawesome-report-generator mochawesome.json
如果你希望了解更多,测试日志报告的生成,可以参考:
https://docs.cypress.io/guides/tooling/reporters
Cucumber 报告生成器
每次运行.feature时会输出产生cucumber.json。这与 Cypress 中配置的任何 Mocha 报告器是分开的,并且是它们的补充。
这些文件旨在用于与许多可用的 Cucumber 报告生成器一起配合使用。适用于https://github.com/jenkinsci/cucumber-reports-plugin(在Jenkins上发布漂亮的Cucumber报告)和https://github.com/wswebcreation/multiple-cucumber-html-reporter

默认情况下,输出被写入文件夹cypress/cucumber-json,并且每个feature文件生成一个json文件。
此行为是可配置的。使用cosmiconfig为插件创建配置,请参阅上面的预处理步骤定义章节并将以下内容添加到 package.json 中的 cypress-cucumber-preprocessor 部分以将其关闭或更改默认值:
  "cypress-cucumber-preprocessor": {
    "cucumberJson": {
      "generate": true,
      "outputFolder": "cypress/cucumber-json",
      "filePrefix": "",
      "fileSuffix": ".cucumber"
    }
  }
Cucumber.json 配置选项
| Option | Default value | Description |
|---|---|---|
| outputFolder | cypress/cucumber-json | 要将文件写入的文件夹 |
| filePrefix | '' (no prefix) | 根据feature文件的名称为每个feature生成单独的json文件。如果指定,所有生成的文件名都将以此选项作为前缀 |
| fileSuffix | .cucumber | 要添加到每个生成的文件名的后缀 |
| generate | false | 标记是否输出cucumber.json |


 414
414


 被折叠的 条评论
为什么被折叠?
被折叠的 条评论
为什么被折叠?
 到【灌水乐园】发言


