


目录
Servlet 在容器中运行
处理逻辑业务
有多线程机制,可同时服务 多个请求,不必对每个请求 开辟 1 个进程
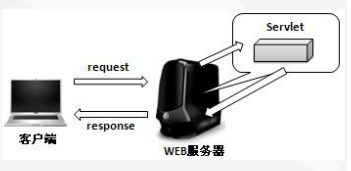
Servlet 和 客户 的通信模式:请求 / 响应
其工作协议:HTTP(超文本传输协议 HyperText Transfer Protocol)
HTTP:
以 TCP / IP 为基础
明文方式 发送数据
JSP 在执行时,被编译成 Servlet
执行步骤
| 客户端(可以是 Web 浏览器)通过 HTTP 提出 请求 |
| Web 服务器 接受请求,将请求 发给 Servlet |
| 若 Servlet 未加载,Web 服务器会 把请求加载到 Java 虚拟机执行 |
| 若 Servlet 已加载,它会接收 HTTP 请求,处理并把结果返回给 Web 服务器,作为应答 |
| Web 服务器把 Servlet 发来的应答 返回给客户端 |
Servlet 容器
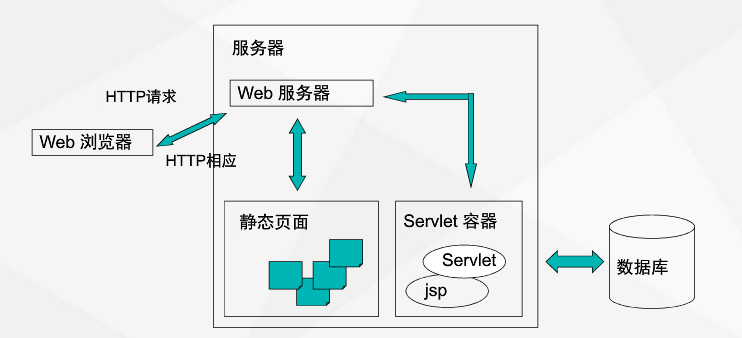
Servlet 容器(也是 JavaWeb 容器、Servlet / JSP 容器):
提供 JavaWeb 的运行环境
管理 Servlet、JSP 的生命周期、即它们的共享数据
常的 Servlet 容器:tomcat、J2EE服务器(如 Weblogic)
实现方式
最重要的是 Servlet 接口
Servlet 接口的子类 GenericServlet
GenericServlet 的子类 HttpServlet
用户自定义的 Servlet 类不继承 GenericServlet,当用 HTTP 协议时,继承 HttpServlet

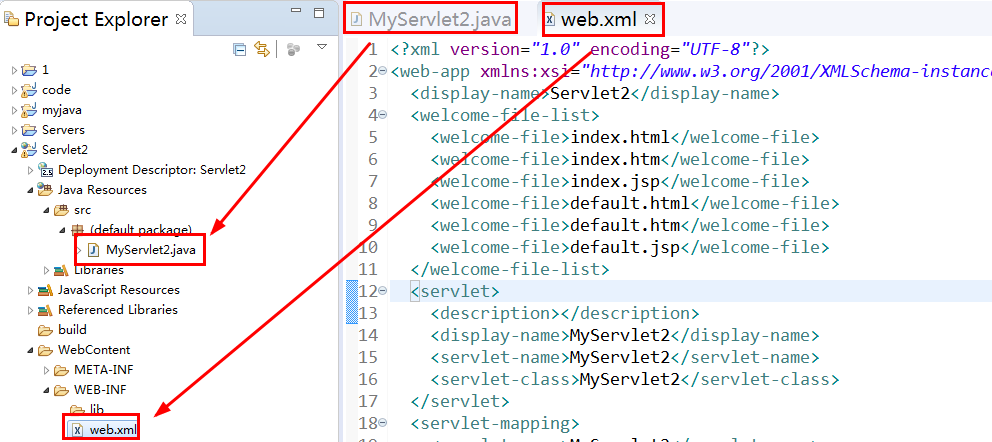
Servlet 2
eclipse


因为地址不对

地址后面加上 MyServlet2

解决:


classes:


重启 eclipse

代码:
MyServlet2.java
import java.io.IOException;
import javax.servlet.ServletException;
import javax.servlet.http.HttpServlet;
import javax.servlet.http.HttpServletRequest;
import javax.servlet.http.HttpServletResponse;

/**
 * Servlet implementation class MyServlet2
 */
public class MyServlet2 extends HttpServlet {
	private static final long serialVersionUID = 1L;

    /**
     * Default constructor.
     */
    public MyServlet2() {
        // TODO Auto-generated constructor stub
    }

	/**
	 * @see HttpServlet#doGet(HttpServletRequest request, HttpServletResponse response)
	 */
	protected void doGet(HttpServletRequest request, HttpServletResponse response) throws ServletException, IOException {
		// TODO Auto-generated method stub
		response.getWriter().append("Served at: ").append(request.getContextPath());
	}

	/**
	 * @see HttpServlet#doPost(HttpServletRequest request, HttpServletResponse response)
	 */
	protected void doPost(HttpServletRequest request, HttpServletResponse response) throws ServletException, IOException {
		// TODO Auto-generated method stub
		doGet(request, response);
	}
}
其中:doGet(请求,相应) 处理 Get 请求
web.xml
<?xml version="1.0" encoding="UTF-8"?>
<web-app xmlns:xsi="http://www.w3.org/2001/XMLSchema-instance" xmlns="http://java.sun.com/xml/ns/javaee" xsi:schemaLocation="http://java.sun.com/xml/ns/javaee http://java.sun.com/xml/ns/javaee/web-app_2_5.xsd" id="WebApp_ID" version="2.5">
  <display-name>Servlet2</display-name>
  <welcome-file-list>
    <welcome-file>index.html</welcome-file>
    <welcome-file>index.htm</welcome-file>
    <welcome-file>index.jsp</welcome-file>
    <welcome-file>default.html</welcome-file>
    <welcome-file>default.htm</welcome-file>
    <welcome-file>default.jsp</welcome-file>
  </welcome-file-list>
  <servlet>
    <description></description>
    <display-name>MyServlet2</display-name>
    <servlet-name>MyServlet2</servlet-name>
    <servlet-class>MyServlet2</servlet-class>
  </servlet>
  <servlet-mapping>
    <servlet-name>MyServlet2</servlet-name>
    <url-pattern>/MyServlet2</url-pattern>
  </servlet-mapping>
</web-app>
Servlet 3
Servlet 2 和 3 的区别:
Servlet 2 的配置:在xml 中完成
Servlet 3 的配置:以注解方式进行,不需要 xml 文件了


代码:
import java.io.IOException;
import javax.servlet.ServletException;
import javax.servlet.annotation.WebServlet;
import javax.servlet.http.HttpServlet;
import javax.servlet.http.HttpServletRequest;
import javax.servlet.http.HttpServletResponse;

/**
 * Servlet implementation class MyServlet3
 */
@WebServlet("/MyServlet3")
public class MyServlet3 extends HttpServlet {
	private static final long serialVersionUID = 1L;

    /**
     * Default constructor.
     */
    public MyServlet3() {
        // TODO Auto-generated constructor stub
    }

	/**
	 * @see HttpServlet#doGet(HttpServletRequest request, HttpServletResponse response)
	 */
	protected void doGet(HttpServletRequest request, HttpServletResponse response) throws ServletException, IOException {
		// TODO Auto-generated method stub
		response.getWriter().append("Served at: ").append(request.getContextPath());
	}

	/**
	 * @see HttpServlet#doPost(HttpServletRequest request, HttpServletResponse response)
	 */
	protected void doPost(HttpServletRequest request, HttpServletResponse response) throws ServletException, IOException {
		// TODO Auto-generated method stub
		doGet(request, response);
	}
}

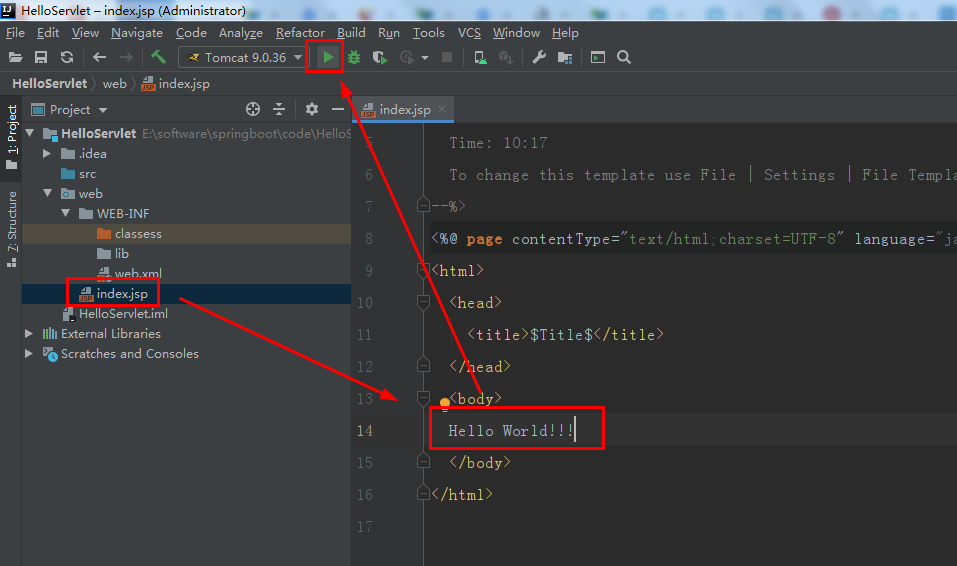
第一个程序 输出 Hello World!
新建工程
思路来源:https://www.cnblogs.com/jianyungsun/p/6526301.html


WEB-INF 中,新建 2 个文件夹:classess、lib,后面要用到(应该是 classes 的,图太多,不想改了)


进入:http://localhost:8080/HelloServlet_war_exploded/

src 中,新建类 HelloServlet,加入代码:
import javax.servlet.ServletException;
import javax.servlet.http.HttpServlet;
import javax.servlet.http.HttpServletRequest;
import javax.servlet.http.HttpServletResponse;
import java.io.IOException;
import java.io.PrintWriter;

public class HelloServlet extends HttpServlet {
    public void doGet(HttpServletRequest httpServletRequest, HttpServletResponse httpServletResponse)throws ServletException, IOException {
        PrintWriter printWriter = httpServletResponse.getWriter();
        printWriter.println("<html><head><title>HelloWorldServlet</title></head>");
        printWriter.println("<body><h1>Hello World!!!!!!</h1>");
        printWriter.println("</body></html>");
        printWriter.close();
    }
}
WEB-INF/ web.xml 中,加入代码:
<servlet>
        <servlet-name>hello</servlet-name>
        <servlet-class>HelloServlet</servlet-class>
    </servlet>

    <servlet-mapping>
        <servlet-name>hello</servlet-name>
        <url-pattern>/helloServlet</url-pattern>
    </servlet-mapping>
其中 servlet-class 是 类 HelloServlet 在 src 下的路径
这个代码相当于,在 HelloServlet 添加注解@WebServlet("/helloServlet")
启动 tomcat:

进入 http://localhost:8080/HelloServlet_war_exploded/helloServlet

表单
| GET 请求 | 请求数据 会附在 网址 URL 后 URL?参数名1=值 & 参数名2=值&... 安全性低 处理小规模数据 |
| POST 请求 | 请求数据 不会附在 网址 URL 后 安全性高 处理大规模数据 |
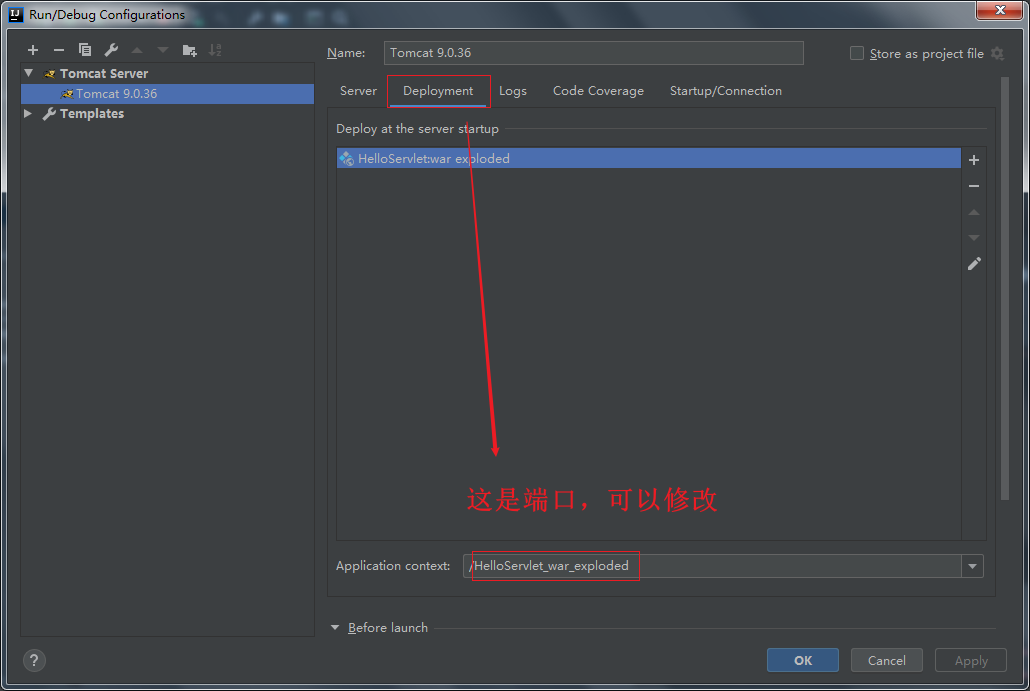
为方便网址测试,修改端口:

get
src 中,新建类 InputServlet,加入代码:
import javax.servlet.ServletException;
import javax.servlet.annotation.WebServlet;
import javax.servlet.http.HttpServlet;
import javax.servlet.http.HttpServletRequest;
import javax.servlet.http.HttpServletResponse;
import java.io.IOException;
import java.io.PrintWriter;

@WebServlet("/inputServlet")
public class InputServlet extends HttpServlet {
    public void doGet(HttpServletRequest httpServletRequest, HttpServletResponse httpServletResponse)
    		throws ServletException, IOException {
        PrintWriter printWriter = httpServletResponse.getWriter();

        String info = httpServletRequest.getParameter("info");

        printWriter.println("<html><head><title>表单输入</title></head>");
        printWriter.println("<body>");

        printWriter.println("<h1>" + info + "</h1>");

        printWriter.println("</body></html>");
        printWriter.close();
    }
}
进入:http://localhost:8080/inputServlet?info=234

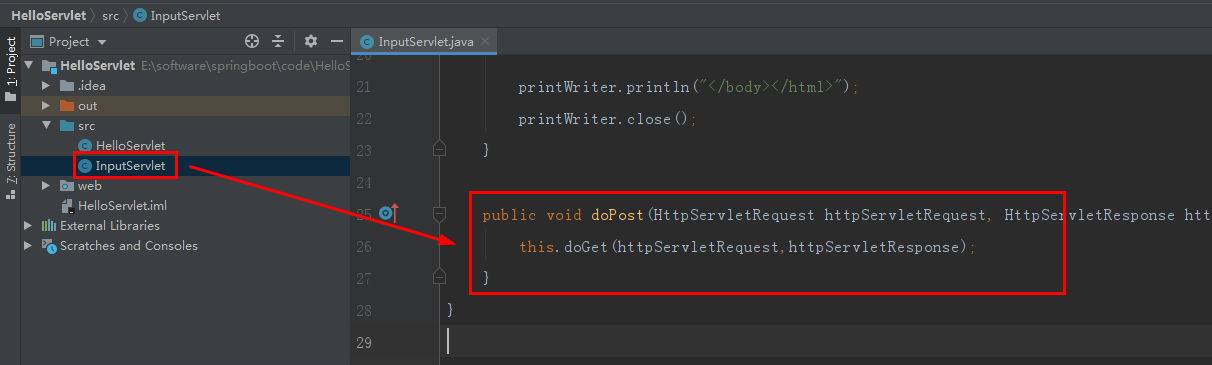
post
InputServlet 中,添加代码:
	public void doPost(HttpServletRequest httpServletRequest, HttpServletResponse httpServletResponse)
			throws ServletException, IOException{
        this.doGet(httpServletRequest,httpServletResponse);
    }
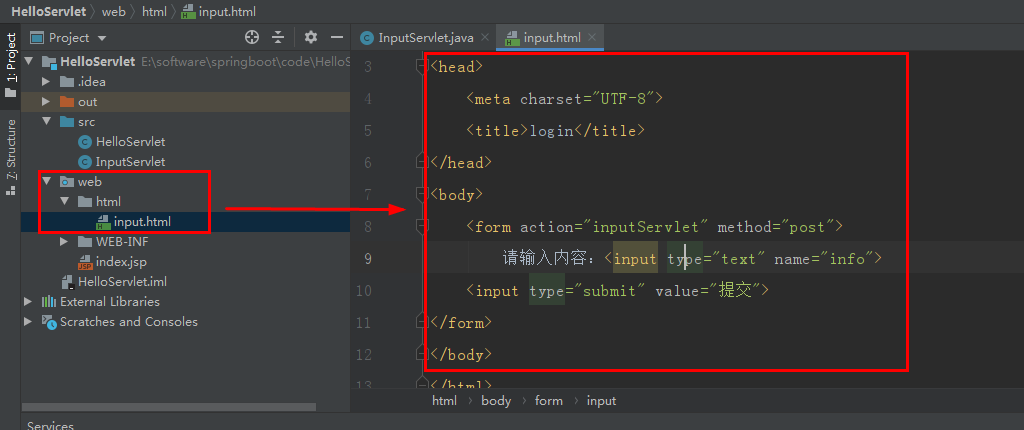
web 中,创包 html,其内 新建 input.html,加入代码:
<!DOCTYPE html>
<html lang="en">
<head>
    <meta charset="UTF-8">
    <title>login</title>
</head>
<body>
    <form action="inputServlet" method="post">
        请输入内容:<input type="text" name="info">
    <input type="submit" value="提交">
</form>
</body>
</html>
进入:http://localhost:8080/html/input.html


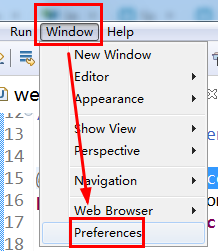
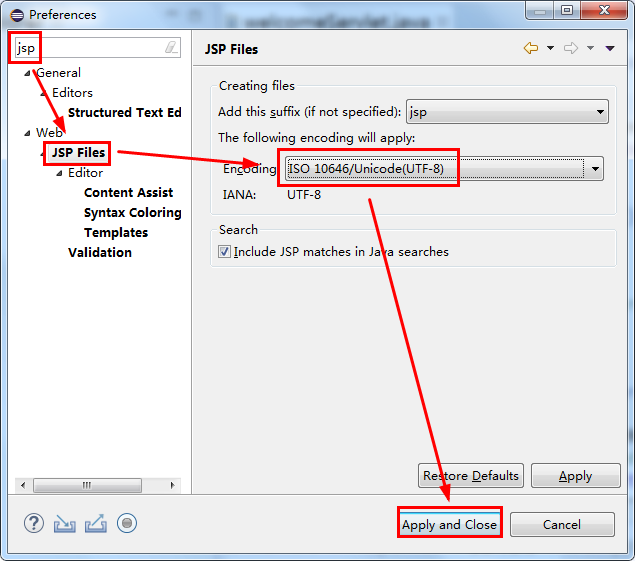
中文乱码
| 字符集 | 解释 |
|---|---|
ASCII | 128个 单字节 |
ISO-8859-1 | 256 个 前 128 同 ASCII,后 128 扩展其他字符单字节 |
UNICODE | 前 256 同 ISO-8859-1双字节,第 1 个字节数是0 |
UTF-8 | 变长字节 前 128 同 ASCIIUNICODE 在 0X007f ~ 0X0080 之间,用双字节表示UNICODE 在 0X0080 ~ 0XFFF |
GB2312GBK | 有中文 双字节 GBK 包含 GB2312. |
乱码原因:
Java 用字符集 UNICODE
浏览器 常用字符集 GBK
Web 容器 对待 Post 提交的数据 用字符集 ISO-8859-1
解决:
1 页面中文乱码:
java 文件中,加入 reponse.setContentType("text/html;charset=GBK");
2 post 请求 中文乱码:
java 文件中,加入 requset.setCharacterEncoding("GBK);
3 get 请求 中文乱码:
tomcat 配置文件中,加入 URIEncoding="UTF-8"
1 InputServlet 中加入httpServletResponse.setContentType("text/html;charset=UTF-8");
位置 一定在最前面!!!
这个解决 页面的中文乱码

重启 tomcat,进入 http://localhost:8080/inputServlet

2 InputServlet 中加入httpServletRequest.setCharacterEncoding("UTF-8");
位置 一定在最前面!!!
这个解决 post 传参 中文乱码

重启 tomcat,进入 http://localhost:8080/html/input.html


3


这个解决 get 传参 中文乱码

重启 tomcat,进入 http://localhost:8080/html/input.html
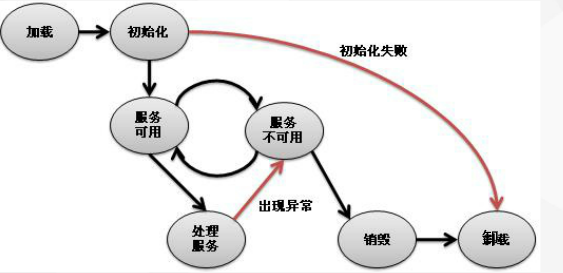
Servlet 生命周期
| 5 个阶段 | 解释 |
|---|---|
| 加载程序 | WEB 容器启动 或 第 1 次用 Servlet 时,创建 Servlet 实例 用 web.xml 描述 Servlet 的位置 成功加载后,WEB 容器以 反射的方式对 Servlet 实例化 |
| 初始化 | 方法:init() 如:数据库连接、读取资源文件 若初始化失败,直接卸载 |
| 服务 | doGet() 或 doPost() httpServletRequest.getParameter 是接受请求 httpServletResponse.getWriter(); 是响应请求 |
| 销毁 | 方法:destroy() |
| 卸载 | destroy() 后,Servlet 实例被垃圾收集器回收 |
src 中,新建类 LifeCycleServlet,加入代码:
import javax.servlet.ServletException;
import javax.servlet.annotation.WebServlet;
import javax.servlet.http.HttpServlet;
import javax.servlet.http.HttpServletRequest;
import javax.servlet.http.HttpServletResponse;
import java.io.IOException;

@WebServlet("/liftServlet")
public class LifeCycleServlet extends HttpServlet {

    public void init()throws ServletException{
        System.out.println("Servlet 初始化 --> init()");
    }
    public void doGet(HttpServletRequest httpServletRequest, HttpServletResponse httpServletResponse)
            throws ServletException, IOException {
        System.out.println("Servlet 服务 --> doGet()、doPost()");
    }

    public void doPost(HttpServletRequest httpServletRequest, HttpServletResponse httpServletResponse)
            throws ServletException, IOException{
        this.doGet(httpServletRequest,httpServletResponse);
    }

    public void destroy(){
        System.out.println("Servlet 销毁 --> destory()");
        try {
            Thread.sleep(5000);
        }catch (InterruptedException e){
            e.printStackTrace();
        }
    }
}
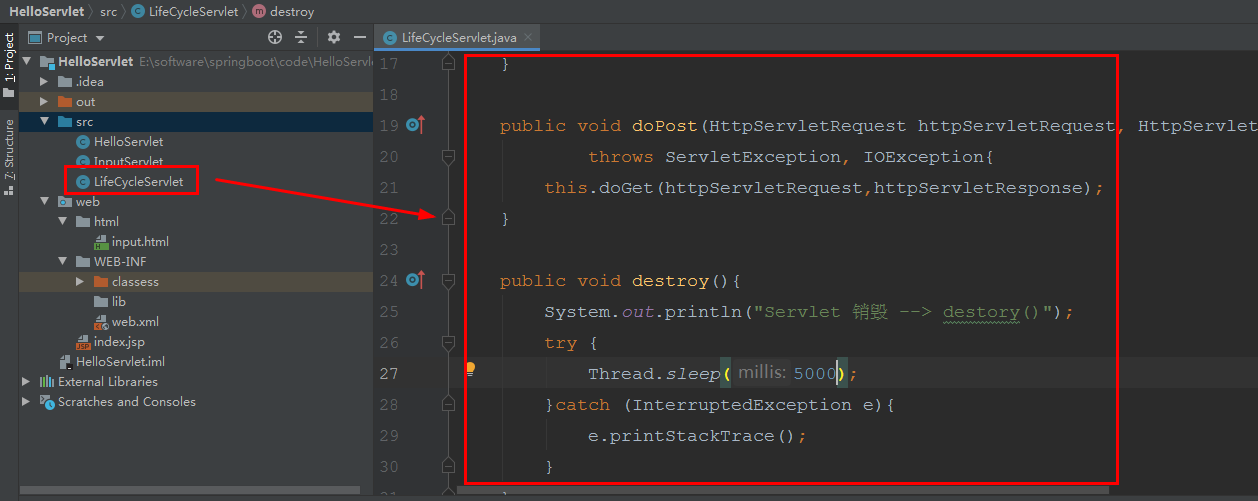
其中 destroy() 方法中
	try {
            Thread.sleep(5000);
        }catch (InterruptedException e){
            e.printStackTrace();
        }
若不用 idea,而用 tomcat 手动 startup 启动 、shutdown 关闭,那么 tomcat 的控制台会快速关闭,我观察不到 destroy() 语句的输出,这个代码是 线程延迟的作用
进入 http://localhost:8080/liftServlet

什么都没有

停止 tomcat 服务:


自动初始化
之前的代码 页面启动,才初始化 Servlet
可以程序一运行就初始化,就初始化 Servlet
LifeCycleServlet 中,注释掉 @WebServlet("/liftServlet")

在 web.xml 中,添加代码:
	<servlet>
        <servlet-name>lift</servlet-name>
        <servlet-class>LifeCycleServlet</servlet-class>
        <load-on-startup>1</load-on-startup>
    </servlet>

    <servlet-mapping>
        <servlet-name>lift</servlet-name>
        <url-pattern>/liftServlet</url-pattern>
    </servlet-mapping>
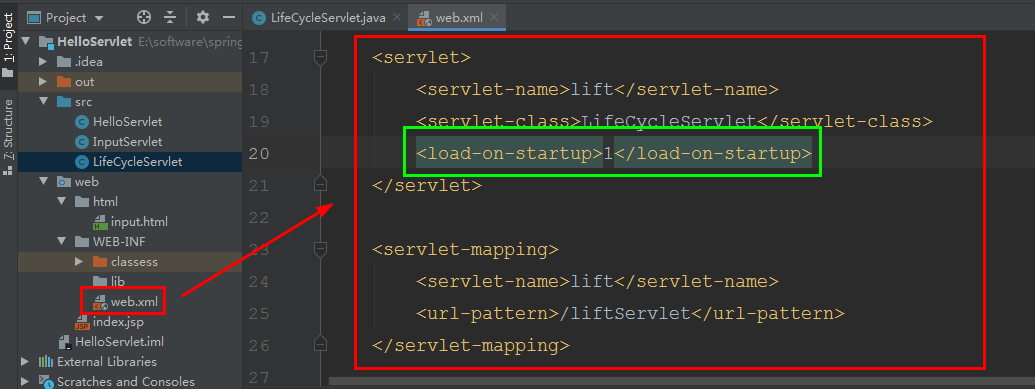 绿框就是自动加载
重启 tomcat:

多线程机制
第一次请求 Servlet,会实例化 Servlet 这个类
再次请求 Servlet,不会实例化 Servlet
相当于 多个线程在使用 这个实例
Servlet 容器 会用线程池来支持系统运行
用户登录
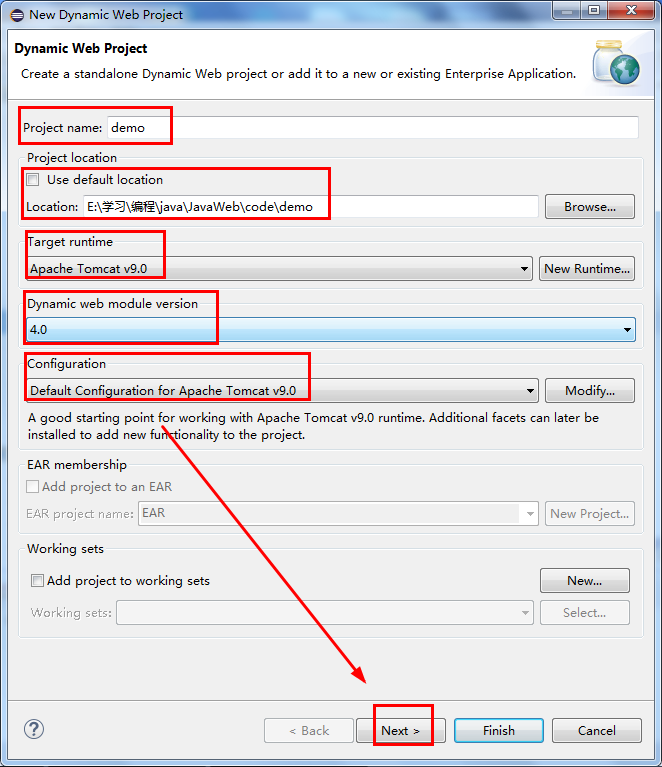
新建工程 JavaWebProject,步骤同 HelloServlet
后面要用到 BootStrap,下载教程:
https://blog.csdn.net/qq_42709262/article/details/82183033
下载好后:

web 中,粘贴进 bootstrap

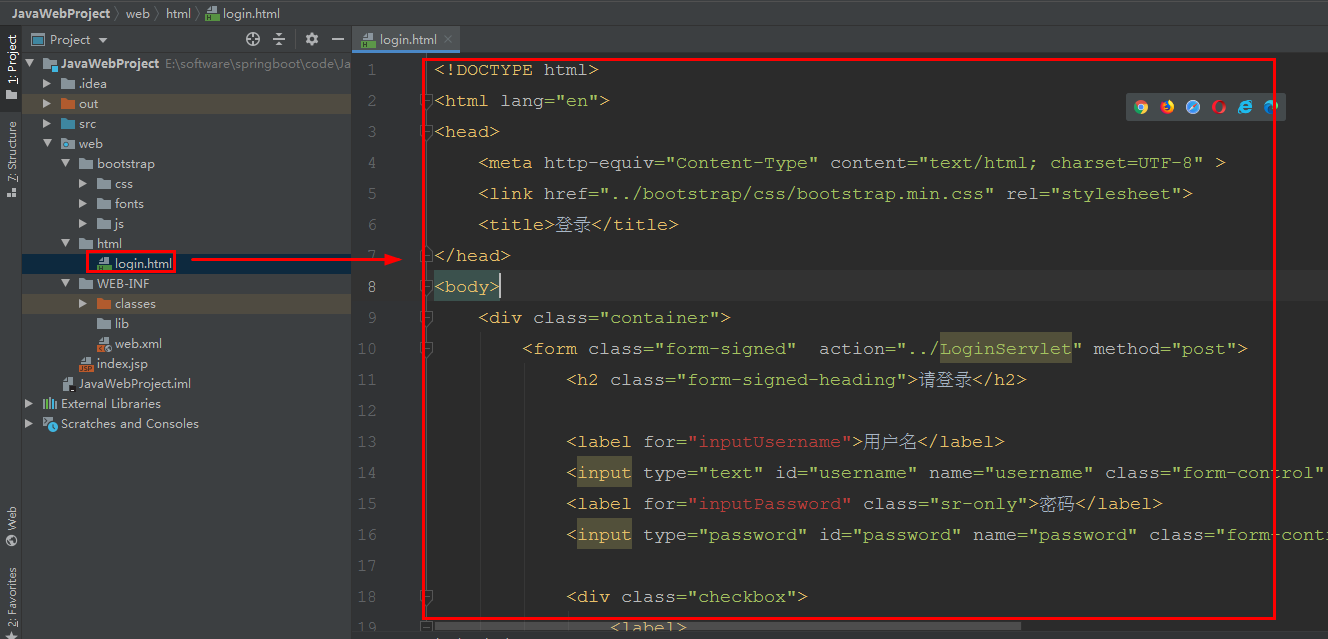
web 中,创包 html,其内新建 login.html,加入代码:
<!DOCTYPE html>
<html lang="en">
<head>
    <meta http-equiv="Content-Type" content="text/html; charset=UTF-8" >
    <link href="../bootstrap/css/bootstrap.min.css" rel="stylesheet">
    <title>登录</title>
</head>
<body>
    <div class="container">
        <form class="form-signed"  action="../LoginServlet" method="post">
            <h2 class="form-signed-heading">请登录</h2>

            <label for="inputUsername">用户名</label>
            <input type="text" id="username" name="username" class="form-control" placeholder="用户名" required autofocus>
            <label for="inputPassword" class="sr-only">密码</label>
            <input type="password" id="password" name="password" class="form-control" placeholder="密码" required>

            <div class="checkbox">
                <label>
                    <input type="checkbox" value="remember-me">Remember me
                </label>
            </div>

            <button class="btn btn-lg btn-primary btn-block" type="submit">
                登录
            </button>

        </form>
    </div>
</body>
</html>
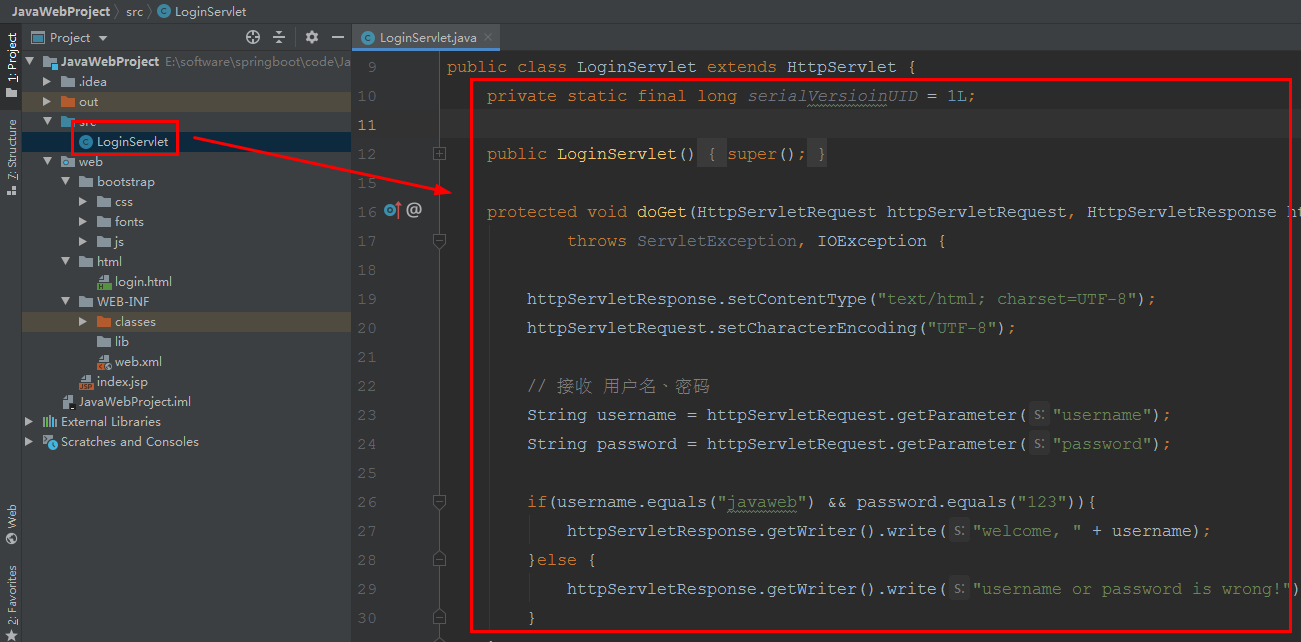
src 中,新建类 LoginServlet,加入代码:
import javax.servlet.ServletException;
import javax.servlet.annotation.WebServlet;
import javax.servlet.http.HttpServlet;
import javax.servlet.http.HttpServletRequest;
import javax.servlet.http.HttpServletResponse;
import java.io.IOException;

@WebServlet("/LoginServlet")
public class LoginServlet extends HttpServlet {
    private static final long serialVersioinUID = 1L;

    public LoginServlet(){
        super();
    }

    protected void doGet(HttpServletRequest httpServletRequest, HttpServletResponse httpServletResponse)
            throws ServletException, IOException {

        httpServletResponse.setContentType("text/html; charset=UTF-8");
        httpServletRequest.setCharacterEncoding("UTF-8");

        // 接收 用户名、密码
        String username = httpServletRequest.getParameter("username");
        String password = httpServletRequest.getParameter("password");

        if(username.equals("javaweb") && password.equals("123")){
            httpServletResponse.getWriter().write("welcome, " + username);
        }else {
            httpServletResponse.getWriter().write("username or password is wrong!");
        }
    }

    protected void doPost(HttpServletRequest httpServletRequest, HttpServletResponse httpServletResponse)
            throws ServletException,IOException{
        doGet(httpServletRequest,httpServletResponse);
    }
}
启动 tomcat


网址有点奇怪,因为端口没改


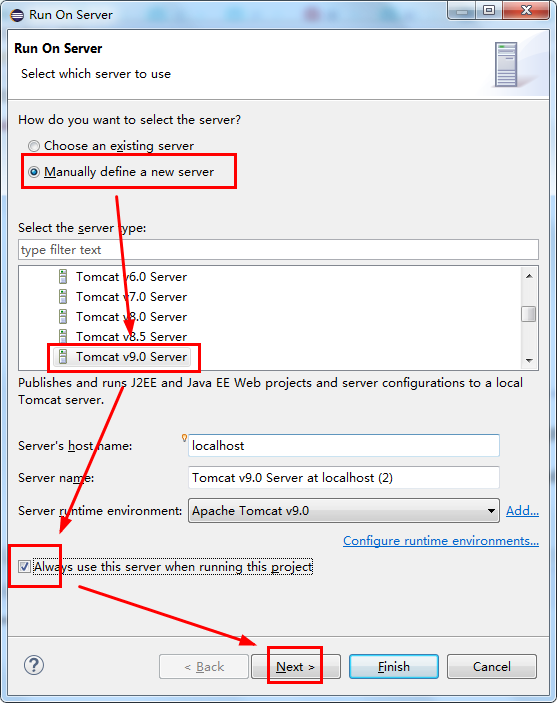
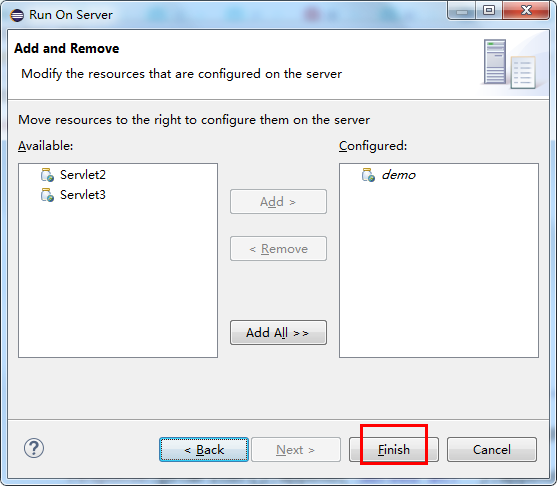
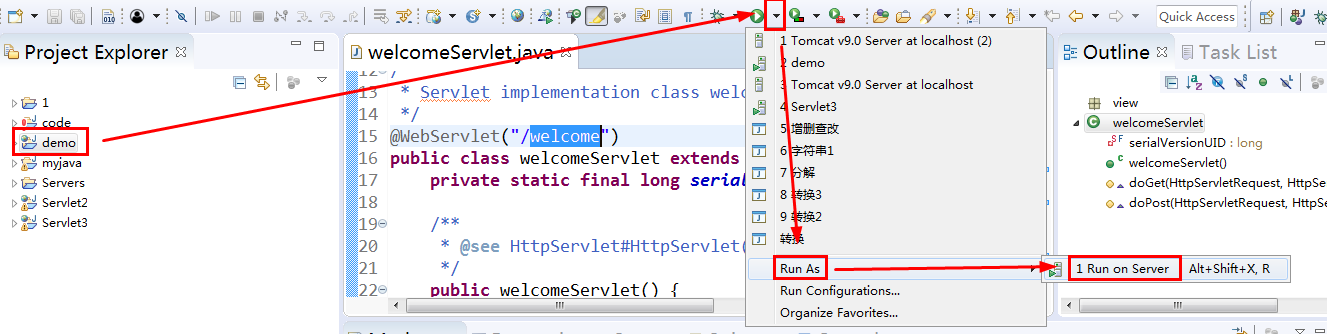
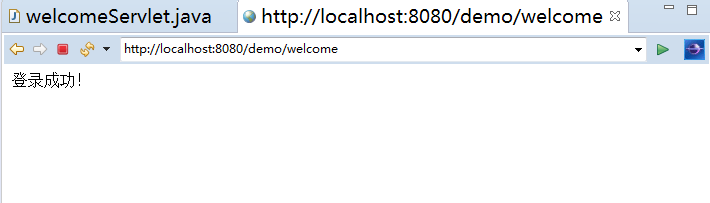
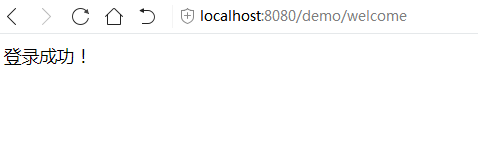
第一个 JavaWeb 应用程序


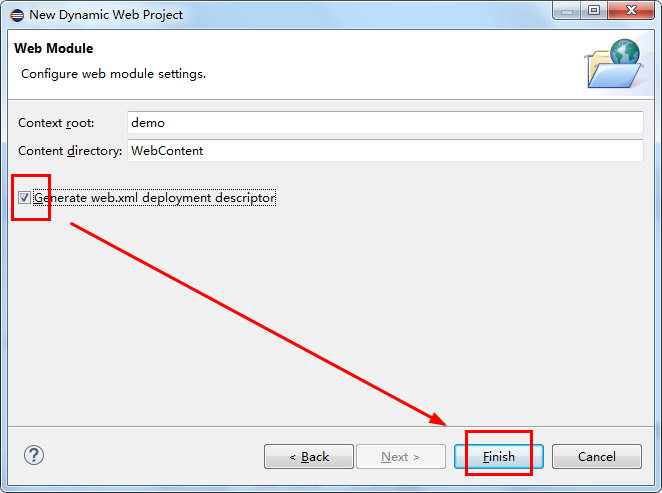
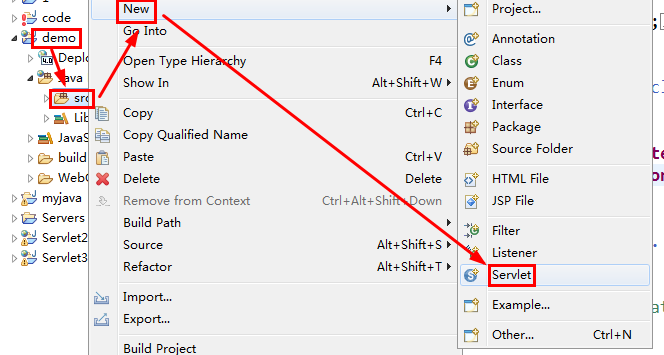
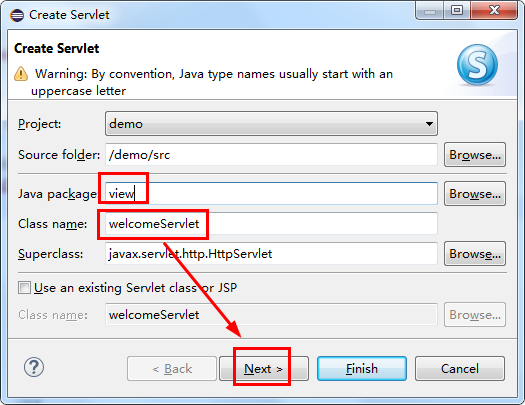
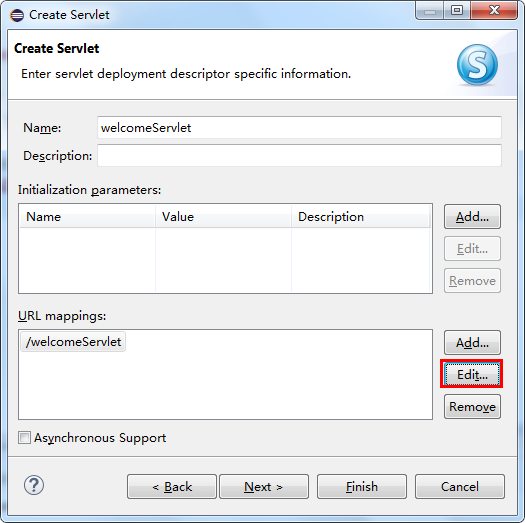
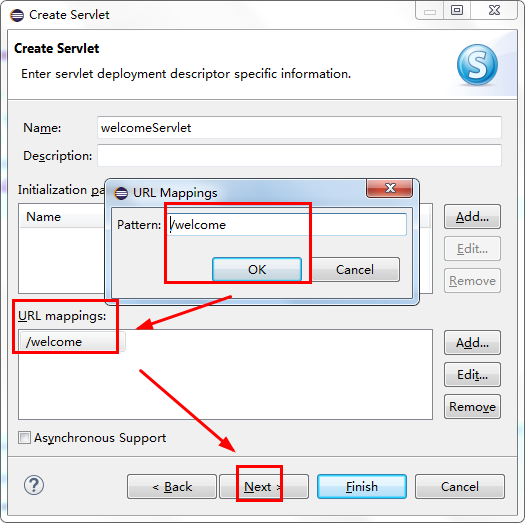
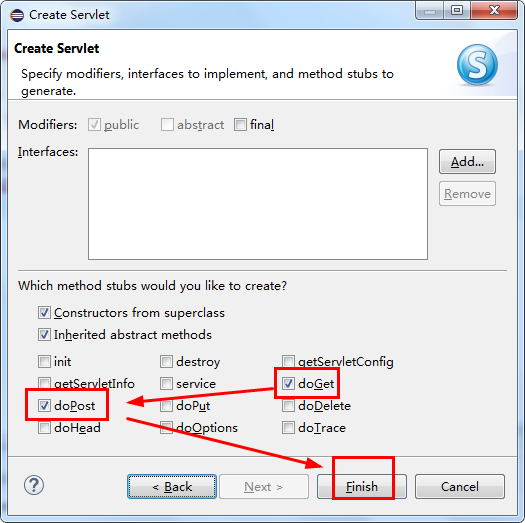
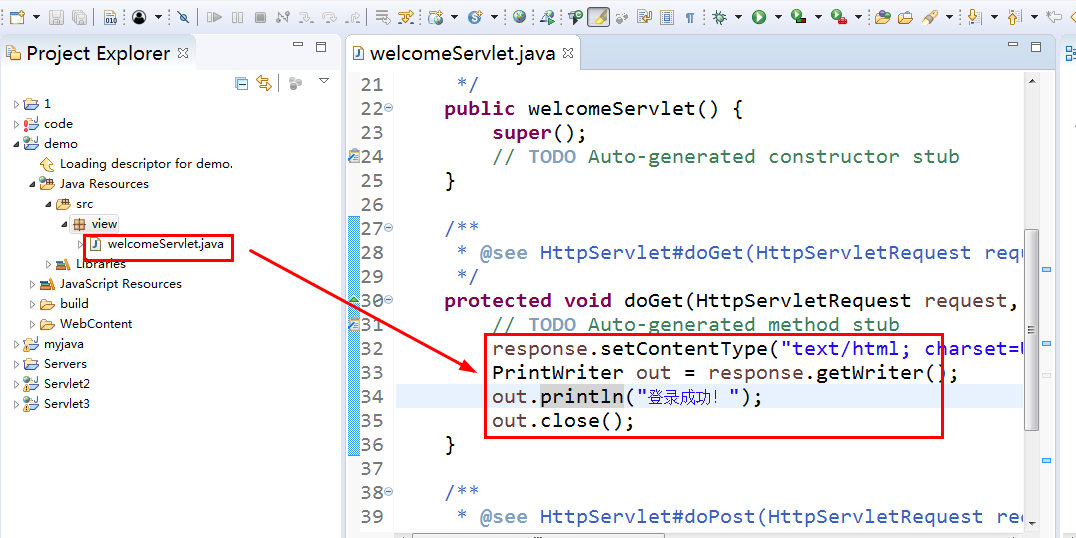
welcomeServlet 中,添加代码:
		response.setContentType("text/html; charset=UTF-8");
		PrintWriter out = response.getWriter();
		out.println("登录成功!");
		out.close();

 一模一样的过程,第一次各种报错 重启电脑再打开就好了... 还是 idea 好用,省心
jsp 程序
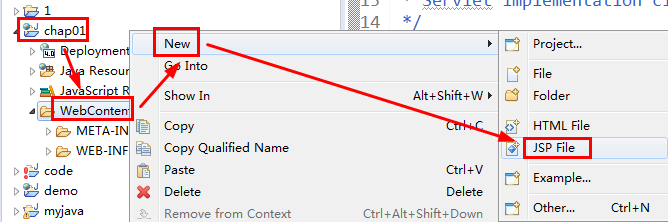
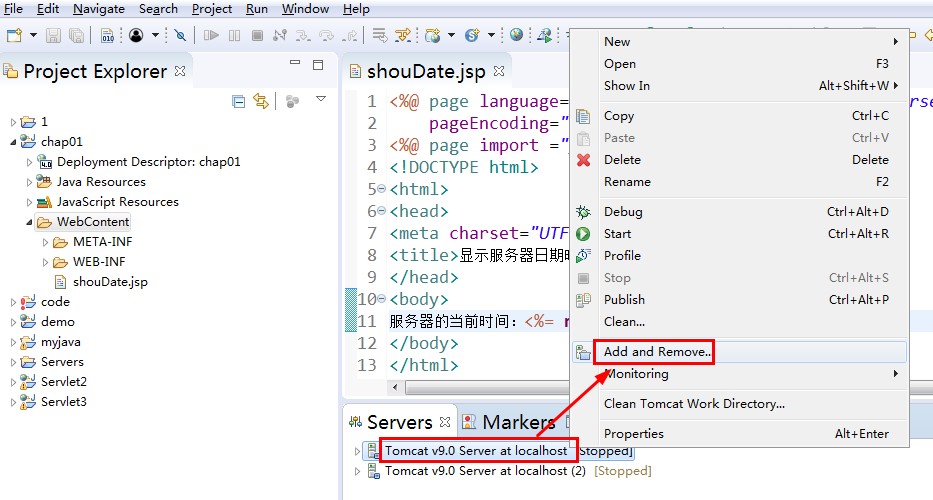
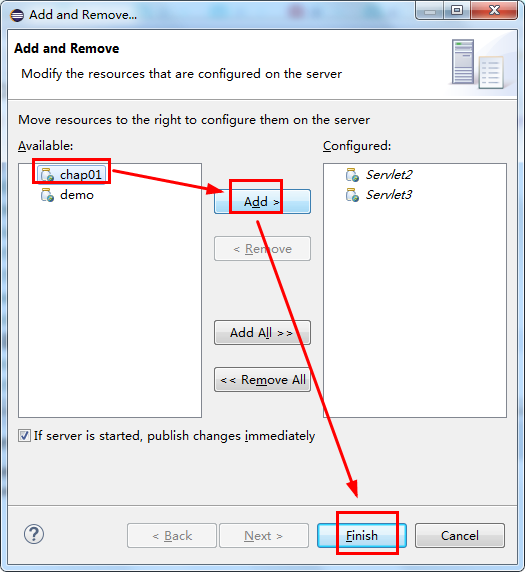
新建工程


下图 WebContent\WEB-INF\classes


编写程序
showDate.jsp
下图名字输错了,后来改过来了…

加入代码:
<%@ page language="java" contentType="text/html; charset=UTF-8"
    pageEncoding="UTF-8"%>
<%@ page import ="java.util.Date" %>
<!DOCTYPE html>
<html>
<head>
<meta charset="UTF-8">
<title>显示服务器日期时间</title>
</head>
<body>
服务器的当前时间:<%= new Date() %>
</body>
</html>

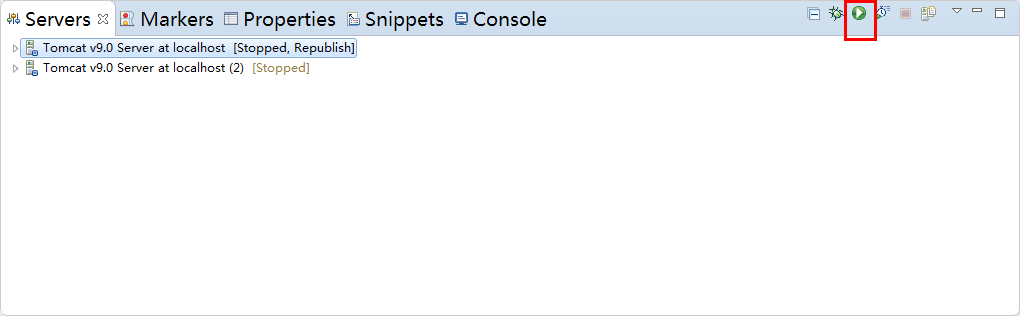
运行
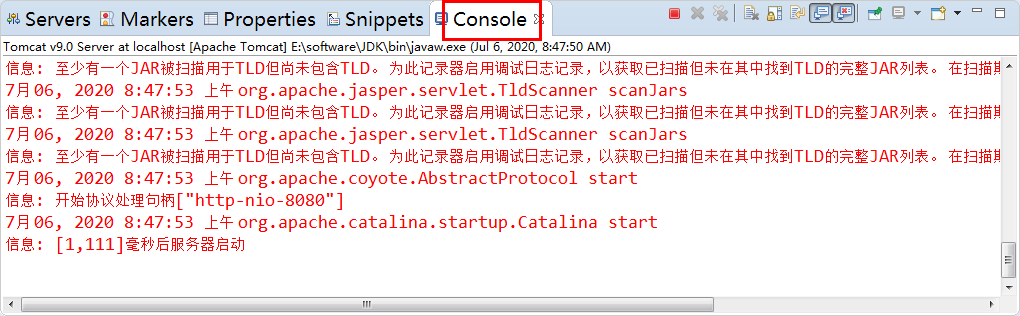
启动成功
进入 http://localhost:8080/chap01/showDate.jsp

Mapping
https://blog.csdn.net/qq_44706176/article/details/122699398
一个Servlet指定一个映射路径
<servlet-mapping>
    <servlet-name>hello</servlet-name>
    <url-pattern>/hello</url-pattern>
</servlet-mapping>
一个Servlet指定多个映射路径
<!--Servlet的请求路径-->
<servlet-mapping>
    <servlet-name>hello</servlet-name>
    <url-pattern>/hello</url-pattern>
</servlet-mapping>
<servlet-mapping>
    <servlet-name>hello</servlet-name>
    <url-pattern>/hello2</url-pattern>
</servlet-mapping>
<servlet-mapping>
    <servlet-name>hello</servlet-name>
    <url-pattern>/hello3</url-pattern>
</servlet-mapping>
<servlet-mapping>
    <servlet-name>hello</servlet-name>
    <url-pattern>/hello4</url-pattern>
</servlet-mapping>
<servlet-mapping>
    <servlet-name>hello</servlet-name>
    <url-pattern>/hello5</url-pattern>
</servlet-mapping>
一个Servlet指定通用映射路径
<servlet-mapping>
    <servlet-name>hello</servlet-name>
    <url-pattern>/hello/*</url-pattern>
</servlet-mapping>
自定义后缀实现请求映射
<servlet-mapping>
    <servlet-name>hello</servlet-name>
    <url-pattern>*.godairo</url-pattern>
</servlet-mapping>


 1830
1830

 被折叠的 条评论
为什么被折叠?
被折叠的 条评论
为什么被折叠?
 到【灌水乐园】发言


