C# NPOI 把一张图片画在excel表格中

之前闲得没事干,了解了C#中有关Bitmap的简单使用。

尝试写了一个将图片画在excel表格中的一个程序

逻辑就是将图片通过Bitmap.GetPixel(x, y)获取指定像素位置的颜色,并将其填充在excel单元格内

由于我使用的是xls,2003版最大行数是65536行,最大列数是256列

所以在处理图片时,受到excel最大列数的限制,所以需要将图片进行等比例缩放,使其宽度保持在256px及一下,

这里使用了Bitmap(Bitmap, new Size(width, height))进行图片的缩放。

补充:进行excel表格的绘制时使用了插件Aspose.Cells。
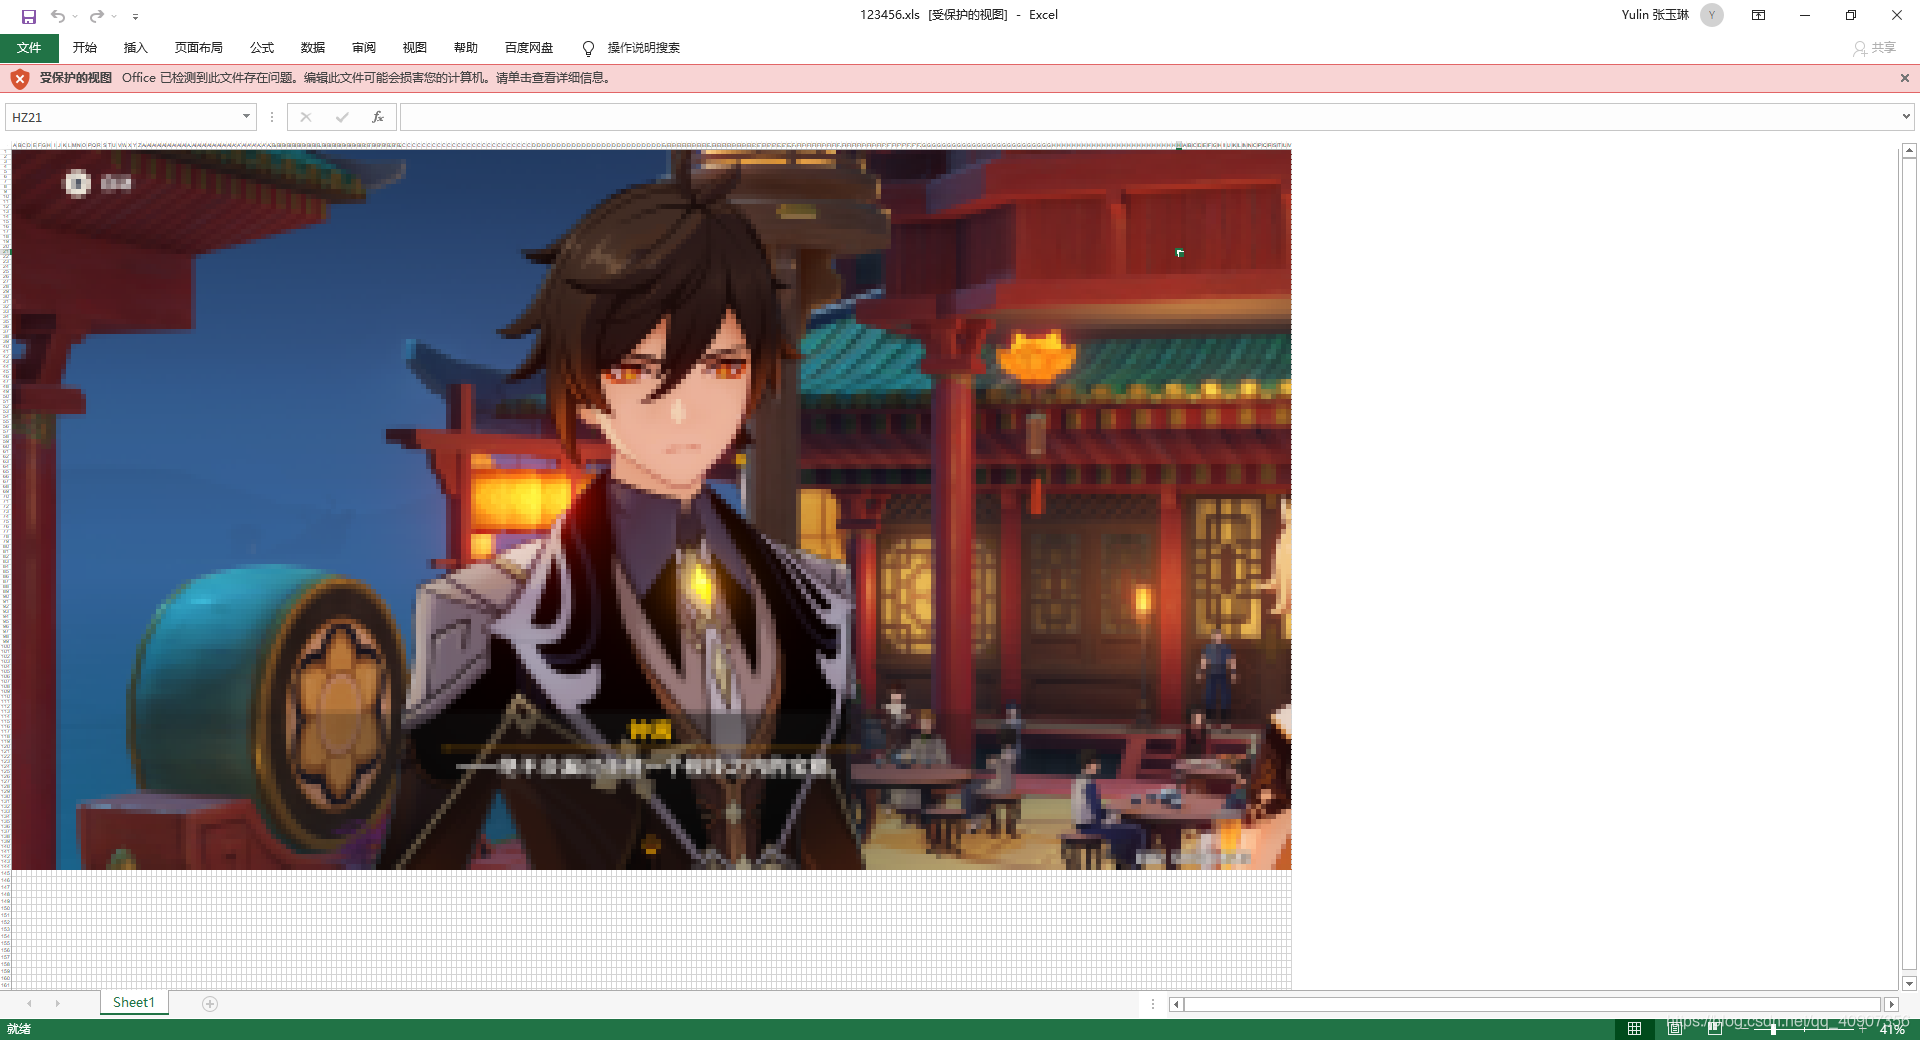
下面为效果图:

示例图片

下面的部分代码


using Aspose.Cells;
using System;
using System.Collections.Generic;
using System.ComponentModel;
using System.Data;
using System.Drawing;
using System.IO;
using System.Linq;
using System.Text;
using System.Threading;
using System.Threading.Tasks;
using System.Windows.Forms;

namespace imgtoexcel
{
    public partial class Form1 : Form
    {
        public Form1()
        {
            InitializeComponent();
        }


        public void forColor(string fileName)
        {
            initExcel();
            Cells cells = sheet.Cells;
            Bitmap bm = new Bitmap(fileName);

            if (bm.Width > 256)
            {
                //计算 最大列数是256 
                Decimal wx = (Decimal)256 / (Decimal)bm.Width;
                int newheight = Convert.ToInt32(wx * bm.Height);
                Bitmap nbm = new Bitmap(bm, new Size(256, newheight));//缩放
                bm = nbm;
            }
            for (int x = 0; x < 256; x++)
            {
                sheet.Cells.SetColumnWidth(x, 1);
                
                for (int y = 0; y < bm.Height; y++)
                {
                    sheet.Cells.SetRowHeight(y, 10);
                    Color pixelColor = bm.GetPixel(x, y);
                    byte[] rgb = new byte[] { pixelColor.R, pixelColor.G, pixelColor.B };
                    cells[y, x].Value = "";
                    Style s = cells[y, x].GetStyle();
                    s.ForegroundColor = Color.FromArgb(pixelColor.A, pixelColor.R, pixelColor.G, pixelColor.B);
                    s.Pattern = BackgroundType.Solid;
                    cells[y, x].SetStyle(s);
                }
            }

            SaveFileDialog sfd = new SaveFileDialog();
            sfd.Filter = "Excel(*.xls)|*.xls";
            sfd.FileName = "保存";
            sfd.DefaultExt = "xls";
            sfd.AddExtension = true;
            if (sfd.ShowDialog() == DialogResult.OK)
            {
                workbook.Save(sfd.FileName);
            }
        }
        public static Workbook workbook { get; set; }
        public static Worksheet sheet { get; set; }
        public void initExcel()
        {
            workbook = new Workbook();
            sheet = workbook.Worksheets[0];

        }


        private void button1_Click(object sender, EventArgs e)
        {
            OpenFileDialog openFileDialog = new OpenFileDialog();
            openFileDialog.InitialDirectory = @"C:\";
            openFileDialog.Filter = "(*.jpg,*.png,*.jpeg,*.bmp,*.gif)|*.jgp;*.png;*.jpeg;*.bmp;*.gif";
            openFileDialog.RestoreDirectory = true;
            openFileDialog.FilterIndex = 1;
            if (openFileDialog.ShowDialog() == DialogResult.OK)
            {
                Thread.Sleep(1000);
                forColor(openFileDialog.FileName);
            }
        }

    }
}

  • 1
    点赞
  • 0
    收藏
    觉得还不错? 一键收藏
  • 1
    评论
使用C#和NPOI库可以方便地导出Excel表格。下面是一个简单的示例: 1. 首先,你需要安装NPOI库,可以使用NuGet包管理器进行安装。 2. 在代码,首先创建一个工作簿和一个工作表: ``` using NPOI.SS.UserModel; using NPOI.XSSF.UserModel; using System.IO; ... // 创建一个工作簿 var workbook = new XSSFWorkbook(); // 创建一个工作表 var sheet = workbook.CreateSheet("Sheet1"); ``` 3. 接下来,你可以向表格添加数据。以下是将数据添加到第一行的示例: ``` // 创建第一行并添加数据 var headerRow = sheet.CreateRow(0); headerRow.CreateCell(0).SetCellValue("ID"); headerRow.CreateCell(1).SetCellValue("Name"); headerRow.CreateCell(2).SetCellValue("Age"); ``` 4. 然后,你可以循环遍历数据并将其添加到表格。以下是将数据添加到第二行和第三行的示例: ``` // 模拟数据 var data = new List<Person> { new Person { ID = 1, Name = "Alice", Age = 18 }, new Person { ID = 2, Name = "Bob", Age = 20 } }; // 循环遍历数据 for (int i = 0; i < data.Count; i++) { var row = sheet.CreateRow(i + 1); row.CreateCell(0).SetCellValue(data[i].ID); row.CreateCell(1).SetCellValue(data[i].Name); row.CreateCell(2).SetCellValue(data[i].Age); } ``` 5. 最后,将工作簿保存到文件: ``` // 保存工作簿到文件 using (var fileStream = new FileStream("output.xlsx", FileMode.Create)) { workbook.Write(fileStream); } ``` 完整的代码示例: ``` using NPOI.SS.UserModel; using NPOI.XSSF.UserModel; using System.Collections.Generic; using System.IO; class Person { public int ID { get; set; } public string Name { get; set; } public int Age { get; set; } } ... // 创建一个工作簿 var workbook = new XSSFWorkbook(); // 创建一个工作表 var sheet = workbook.CreateSheet("Sheet1"); // 创建第一行并添加数据 var headerRow = sheet.CreateRow(0); headerRow.CreateCell(0).SetCellValue("ID"); headerRow.CreateCell(1).SetCellValue("Name"); headerRow.CreateCell(2).SetCellValue("Age"); // 模拟数据 var data = new List<Person> { new Person { ID = 1, Name = "Alice", Age = 18 }, new Person { ID = 2, Name = "Bob", Age = 20 } }; // 循环遍历数据 for (int i = 0; i < data.Count; i++) { var row = sheet.CreateRow(i + 1); row.CreateCell(0).SetCellValue(data[i].ID); row.CreateCell(1).SetCellValue(data[i].Name); row.CreateCell(2).SetCellValue(data[i].Age); } // 保存工作簿到文件 using (var fileStream = new FileStream("output.xlsx", FileMode.Create)) { workbook.Write(fileStream); } ```

“相关推荐”对你有帮助么?

  • 非常没帮助
  • 没帮助
  • 一般
  • 有帮助
  • 非常有帮助
提交
评论 1
添加红包

请填写红包祝福语或标题

红包个数最小为10个

红包金额最低5元

当前余额3.43前往充值 >
需支付:10.00
成就一亿技术人!
领取后你会自动成为博主和红包主的粉丝 规则
hope_wisdom
发出的红包
实付
使用余额支付
点击重新获取
扫码支付
钱包余额 0

抵扣说明:

1.余额是钱包充值的虚拟货币,按照1:1的比例进行支付金额的抵扣。
2.余额无法直接购买下载,可以购买VIP、付费专栏及课程。

余额充值