spring&mybatis
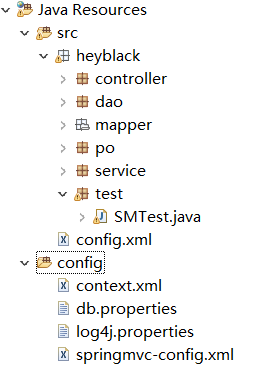
创建项目,以下是文件结构

config是源文件夹为后面整合springmvc铺垫
然后看看需要的jar包

基本上就是spring的包和mybatis的包,包括核心包和依赖包,其中:
mybatis-spring是整合的中间包
mysql驱动这个不讲了
commons-dbcp和commons-pool是DBCP数据源需要使用的包
先配置好spring
上面的context.xml就是我配置spring的xml文件
代码:
<?xml version="1.0" encoding="UTF-8"?>
<beans xmlns="http://www.springframework.org/schema/beans"
    xmlns:xsi="http://www.w3.org/2001/XMLSchema-instance"
    xmlns:aop="http://www.springframework.org/schema/aop"
    xmlns:tx="http://www.springframework.org/schema/tx"
    xmlns:context="http://www.springframework.org/schema/context"
    xsi:schemaLocation="http://www.springframework.org/schema/beans
    http://www.springframework.org/schema/beans/spring-beans-4.3.xsd
    http://www.springframework.org/schema/tx
    http://www.springframework.org/schema/tx/spring-tx-4.3.xsd
    http://www.springframework.org/schema/context
    http://www.springframework.org/schema/context/spring-context-4.3.xsd
    http://www.springframework.org/schema/aop
    http://www.springframework.org/schema/aop/spring-aop-4.3.xsd">
    <!-- 配置db.properties -->
    <context:property-placeholder location="classpath:db.properties"/>
     <!-- 配置数据源 -->
    <bean id="dataSource" class="org.apache.commons.dbcp2.BasicDataSource">
    	 <!--数据库驱动 -->
        <property name="driverClassName" value="${jdbc.driver}" />
        <!--连接数据库的url -->
        <property name="url" value="${jdbc.url}" />
        <!--连接数据库的用户名 -->
        <property name="username" value="${jdbc.username}" />
        <!--连接数据库的密码 -->
        <property name="password" value="${jdbc.password}" />
        <!--最大连接数 -->
        <property name="maxTotal" value="${jdbc.maxTotal}" />
        <!--最大空闲连接  -->
        <property name="maxIdle" value="${jdbc.maxIdle}" />
        <!--初始化连接数  -->
        <property name="initialSize" value="${jdbc.initialSize}" />
	</bean>
    <!-- 事务管理器,依赖于数据源 -->
	<bean id="transactionManager" class=
     "org.springframework.jdbc.datasource.DataSourceTransactionManager">
		<property name="dataSource" ref="dataSource" />
	</bean>
	<!--开启事务注解 -->
	<tx:annotation-driven transaction-manager="transactionManager"/>
    <!--配置MyBatis工厂 -->
    <bean id="sqlSessionFactory"
            class="org.mybatis.spring.SqlSessionFactoryBean">
         <!--注入数据源 -->
         <property name="dataSource" ref="dataSource" />
         <!--指定核心配置文件位置,已注释config配置的setting可以在这里以property的方式配置 -->
   		<!-- <property name="configLocation" value="classpath:config.xml"/> -->
   		<property name="mapperLocations" value="classpath:heyblack/mapper/*.xml"></property>
		<property name="typeAliasesPackage" value="heyblack.po"/>
   </bean>
   </beans>
这个配置和只使用mybatis的区别是environment内DataSource的配置,基本上也可以不使用mybatis的配置文件,即我创建的config.xml
还缺一个db.properties
jdbc.driver=com.mysql.jdbc.Driver
jdbc.url=jdbc:mysql://localhost:3306/ssm_learning
jdbc.username=账号
jdbc.password=密码
jdbc.maxTotal=30
jdbc.maxIdle=10
jdbc.initialSize=5
这里的几个属性对应context里的dataSource标签的内容
这个标签前面的property-placeholder不能忘了,就是用来读取properties文件的
这样基本上数据源和连接池就配置好了,spring实例范围默认是单例正好不用配
mybatis配置
这里有好几种方式,其中有无配置文件,传统dao配置,mapper映射配置,是否包扫描区分了几种方式,顺便记录一下吧!
首先,配置文件
<?xml version="1.0" encoding="UTF-8"?>
<!DOCTYPE configuration PUBLIC "-//mybatis.org//DTD Config 3.0//EN"
    "http://mybatis.org/dtd/mybatis-3-config.dtd">
<configuration>
    <!--配置别名 -->
    <typeAliases>
        <package name="heyblack.po" />
    </typeAliases>
    <!--配置Mapper的位置 -->
	<mappers>
       <!-- <mapper resource="heyblack/po/CustomerMapper.xml" /> -->
       <!-- Mapper接口开发方式 -->
	   <mapper resource="heyblack/mapper/AccountMapper.xml" />
	</mappers>
</configuration>
如果按照我上面的context配置的话,是不需要cofig.xml的不过也可以看一下如果需要要怎么配
由于datasource已经配好了所以不需要再config里面再配,只需要配置别名和mappers映射
传统DAO配置
大概是这样
首先定义DAO接口,再定义实现类,然后在Mapper.xml文件里配置好映射,上面我已经配置了,注释了的部分
这里的例子就是很简单的根据id查用户信息
实现方法:
package heyblack.dao.impl;
import org.mybatis.spring.support.SqlSessionDaoSupport;
import heyblack.dao.CustomerDao;
import heyblack.po.Customer;
public class CustomerDaoImpl
                      extends SqlSessionDaoSupport implements CustomerDao {
	// 通过id查询客户
	public Customer findCustomerById(Integer id) {
         	return this.getSqlSession().selectOne("heyblack.po"
				      + ".CustomerMapper.findCustomerById", id);
	}
}
这里可以继承mybatis-spring包提供的sqlSessionTemple或sqlSessionDaoSupport类来实现,这两个类还是有很大区别的。
mapper的配置:
<?xml version="1.0" encoding="UTF-8"?>
<!DOCTYPE mapper PUBLIC "-//mybatis.org//DTD Mapper 3.0//EN"
    "http://mybatis.org/dtd/mybatis-3-mapper.dtd">
<mapper namespace="com.itheima.po.CustomerMapper">
	<!--根据id查询客户信息 -->
	<select id="findCustomerById" parameterType="Integer"
		     resultType="customer">
		select * from t_customer where id = #{id}
	</select>
</mapper>
context.xml增加代码:
<!--实例化Dao -->
	<bean id="customerDao" class="com.itheima.dao.impl.CustomerDaoImpl">
	<!-- 注入SqlSessionFactory对象实例-->
	     <property name="sqlSessionFactory" ref="sqlSessionFactory" />
	</bean>
在context.xml里注册bean,再由service或controller调用
serice代码:
package heyblack.service.impl;
import org.springframework.beans.factory.annotation.Autowired;
import org.springframework.stereotype.Service;
import org.springframework.transaction.annotation.Transactional;
import heyblack.mapper.CustomerMapper;
import heyblack.po.Customer;
import heyblack.service.CustomerService;
@Service
//@Transactional
public class CustomerServiceImpl implements CustomerService {
	//注解注入CustomerMapper
	@Autowired
	private CustomerMapper customerMapper;
	//添加客户
	public void addCustomer(Customer customer) {
		this.customerMapper.addCustomer(customer);
		int i=1/0; //模拟添加操作后系统突然出现的异常问题
	}
}
test类:
@Test
	public void findCustomerByIdDaoTest(){
		ApplicationContext act =
		    new ClassPathXmlApplicationContext("applicationContext.xml");
          // 根据容器中Bean的id来获取指定的Bean
	     CustomerDao customerDao =
                              (CustomerDao) act.getBean("customerDao");
//	     CustomerDao customerDao = act.getBean(CustomerDao.class);
		 Customer customer = customerDao.findCustomerById(1);
		 System.out.println(customer);
	}
这里使用了Junit测试,结果就不放了
mapper接口代理配置
首先分析一下为什么会出这个东西,传统的DAO方法,首先需要定义一个接口,然后在定义实现类,再写mapper配置映射
这里面好几个流程要走太麻烦了而且会有大量的重复代码
1.DAO接口
2.DAO实现类
3.mapper.xml
这时候出现了mapper代理的方式,我认为这种方式就是把接口和mapper.xml牢牢的绑定了,跳过了中间的实现类,那么就要注意5点:
1.Mapper接口的名称和对应的Mapper.xml映射文件的名称必须一致。
2.Mapper.xml文件中的namespace与Mapper接口的类路径相同
3.Mapper接口中的方法名和Mapper.xml中定义的每个执行语句的id相同
4.Mapper接口中方法的输入参数类型要和Mappe.xml中定义的每个sql的parameterType的类型相同
5.Mapper接口方法的输出的参数类型要和Mapper.xml中定义的每个sql的resultType的类型相同。
这时候配置包扫描就好了,当然也可以一个个注册
<!-- Mapper代理开发(基于MapperFactoryBean) -->
	<!-- <bean id="accountrMapper" class="org.mybatis.spring.mapper.MapperFactoryBean">
	    <property name="mapperInterface" value="heyblack.dao.AccountMapper" />
	    <property name="sqlSessionFactory" ref="sqlSessionFactory" />
	</bean> -->
   	<!-- Mapper代理开发(基于MapperScannerConfigurer) -->
   	<!-- value是接口包路径会扫描包下所有的文件 -->
	<bean class="org.mybatis.spring.mapper.MapperScannerConfigurer">
	     <property name="basePackage" value="heyblack.dao" />
	</bean>
   <!-- 开启扫描 -->
	<context:component-scan base-package="heyblack.service" />
加上上面已经配置的map路径,再写一个和mapper.xml文件名一样的接口,定义一个和sql语句id一样的方法,就OK了
结果看一下:


 1544
1544


 被折叠的 条评论
为什么被折叠?


