


14-WebDriverAgent安装、编译
推荐使用Appium-mac-1.18.3.dmg,及时Appium-mac-1.18.2.dmg其他版本都是问题特别多
方式1:使用Appium-mac-1.18.3.dmg自带的WebDriverAgent
(使用1.15和1.18.0.1版本appium自带的WebDriverAgent在使用命令sh ./Scripts/bootstrap.sh进行编译时,始终都不成功)
1-进入appium安装目录下WebDriverAgent文件夹,具体路径参照自己的路径(不同appium版本,WebDriverAgent目录所在位置和名称都不一定一样)
cd /Applications/Appium.app/Contents/Resources/app/node_modules/appium/node_modules/appium-WebDriverAgent
(目测1.15版本之前都是活在这个目录下:cd /Applications/Appium.app/Contents/Resources/app/node_modules/appium/node_modules/appium-xcuitest-driver/WebDriverAgent)
2-在WebDriverAgent(appium-WebDriverAgent)目录下执行以下两条命令
mkdir -p Resources/WebDriverAgent.bundle
sh ./Scripts/bootstrap.sh
****在使用命令sh ./Scripts/bootstrap.sh编译时会出现各种牛马鬼蛇的问题:
常见问题:
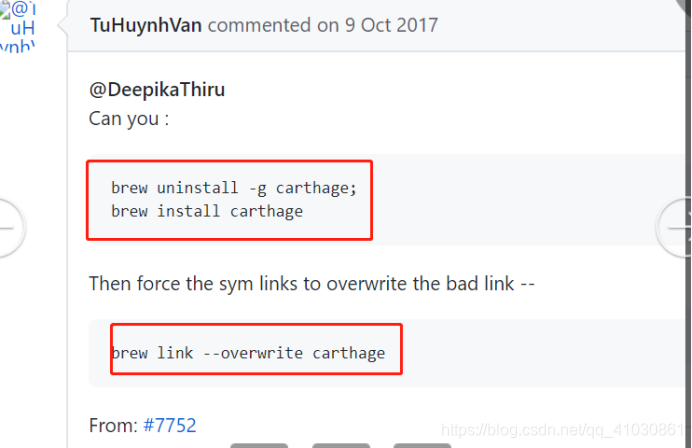
问题1:
报错信息:
Skipped installing YYCache.framework binary due to the error:
This usually indicates that project itself failed to compile
解决办法:
终端输入:
Brew uninstall -g carthage
Brew install carthage
Brew link --overwrite carthage
3-编译WebDriverAgent.xcodeproj
(使用Xcode打开WebDriverAgent(appium-WebDriverAgent)目目录下的WebDriverAgent.xcodeproj文件)
注意⚠️:进入项目后要编辑一些内容,请务必按照步骤全部修改。步骤见下图!!
- TARGETS->WebDriverAgentLib的Bundle Identifier更改为自己命名的Identifier和设置ios版本。(所有Identifier注意保持一致!!)
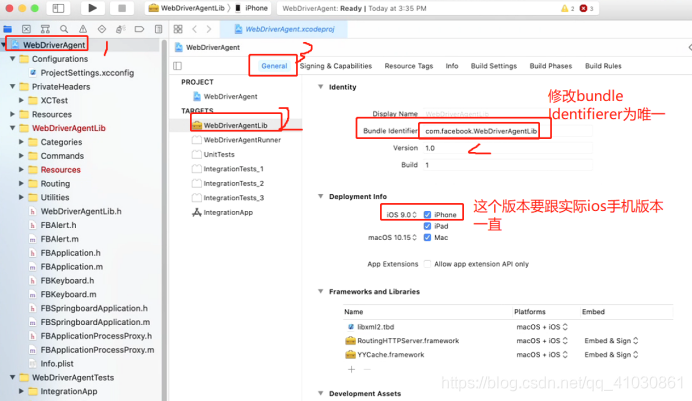
2、TARGETS->WebDriverAgentLib的Signing选择使用个人的证书。

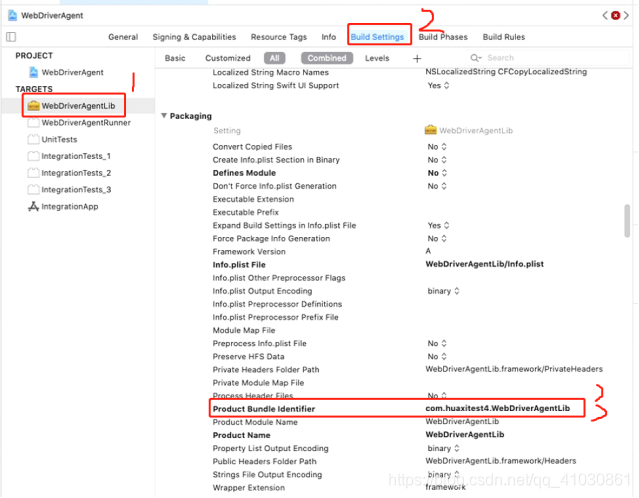
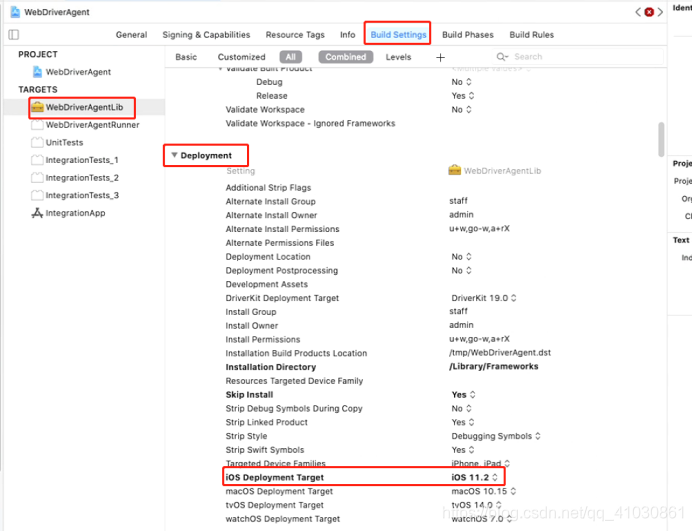
3、TARGETS->WebDriverAgentLib的Product Bundle Identifier更改为自己命名的Identifier和ios deployment target 的版本号和目标手机的ios系统版本号一致。(所有Identifier注意保持一致!!)
4、PROJECT->WebDriverAgent的Product Bundle Identifier更改为自己命名的Identifierios deployment target 的版本号和目标手机的ios系统版本号一致。(所有Identifier注意保持一致!!)
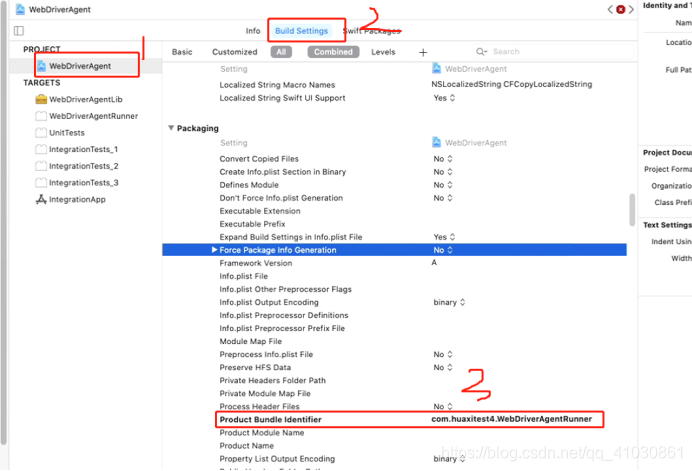
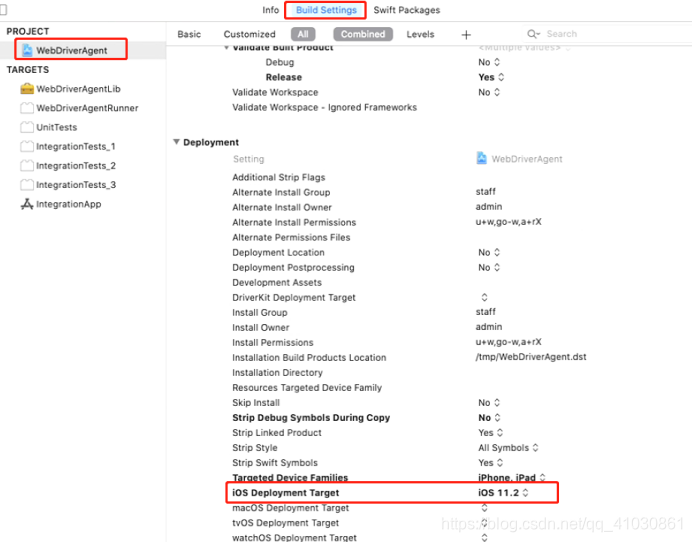
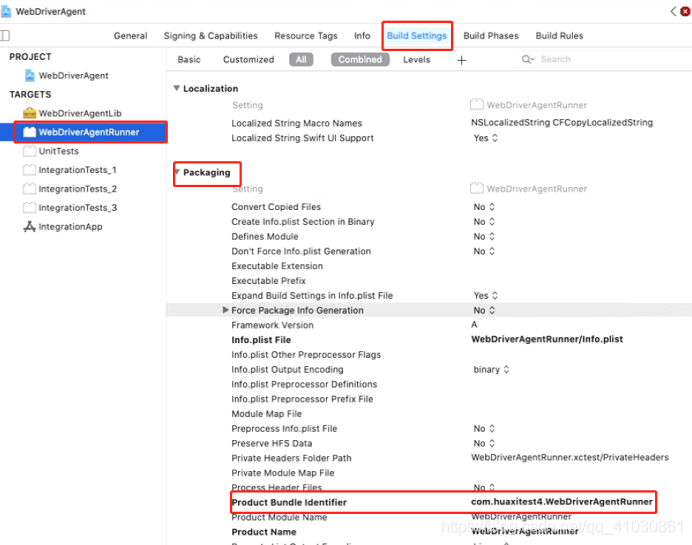
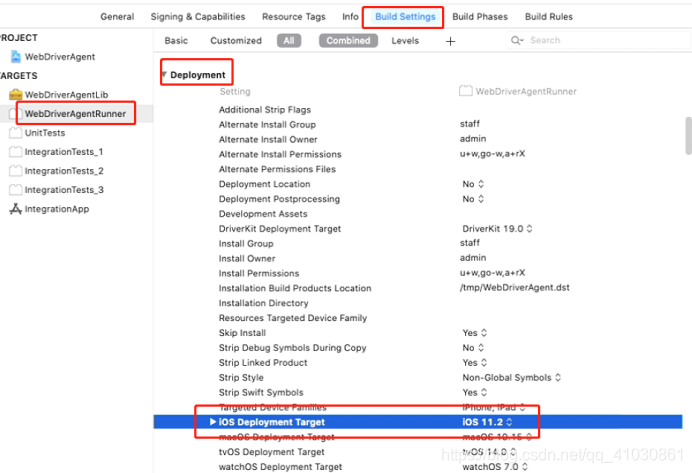
5-ARGETS->WebDriverAgentRunner的Product Bundle Identifier更改为自己命名的Identifierios deployment target 的版本号和目标手机的ios系统版本号一致。(所有Identifier注意保持一致!!)
6、TARGETS->WebDriverAgentRunner的Signing选择使用个人的证书。
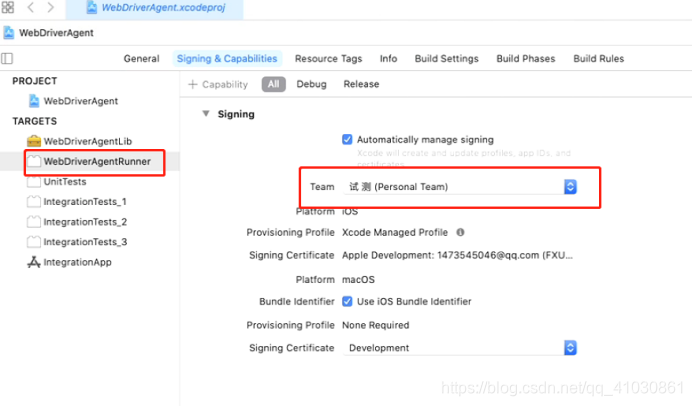
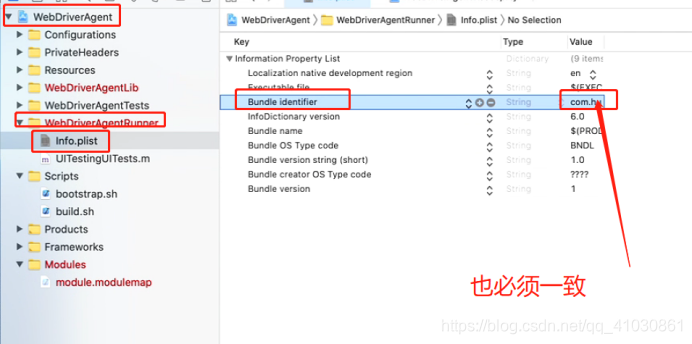
7-WebDriverAgent/WebDriverAgentRunner/info.plist的PBundle Identifier更改为自己命名(和前面几部中保存一致)
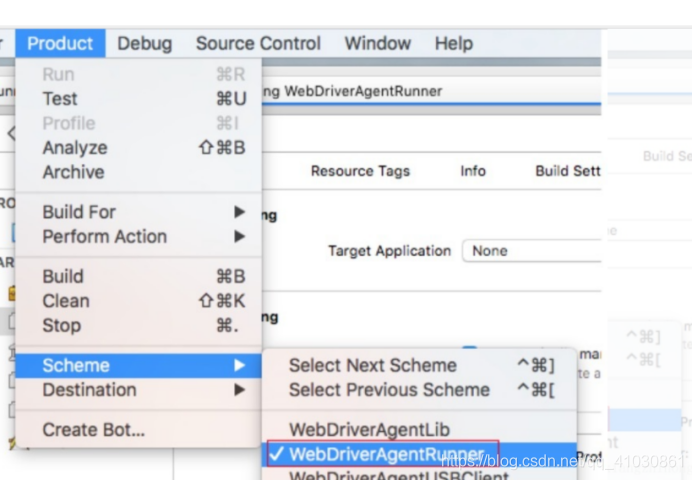
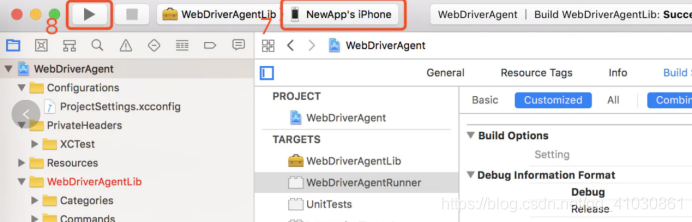
7、Device选择已连接的测试机
8、点击build按钮来测试,按照步骤设置后,可build succeeded~
9、测试机上安装证书,执行以下命令:
xcodebuild -project WebDriverAgent.xcodeproj -scheme WebDriverAgentRunner -destination 'id=测试机的udid' test
***udid获取方式:https://www.jianshu.com/p/c44d5c3424be
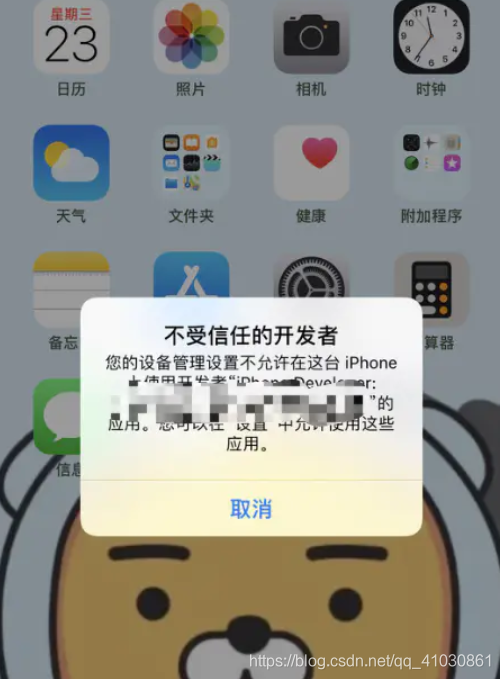
如果没有报错证明安装成功,同时手机上会安装一个WebDriverAgent软件。需要在手机设置->通用->设备管理->信任开发者。如下图:

**问题1:
报错信息:Messaging unqualified id
解决办法:(本人采用第二方法有效)
方法一:
打开终端进入webdriveagentr的目录,我的目录如下
xcodebuild -project WebDriverAgent.xcodeproj -scheme WebDriverAgentRunner -destination 'id=测试机udid' GCC_TREAT_WARNINGS_AS_ERRORS=0 test
命令中的id填入你自己设备的udid,等待构建完成,构建完成后,你的设备将会出现webdriverAgent的图标,表示构建成功。
如果方法一失败,可以尝试方法二
方法二:
找到如下文件
/Applications/Appium.app/Contents/Resources/app/node_modules/appium/node_modules/appium-xcuitest-driver/WebDriverAgent/Configurations/ProjectSettins.xcconfig
将
WARNING_CFLAGS = $(inherited) -Weverything -Wno-objc-missing-property-synthesis -Wno-unused-macros -Wno-disabled-macro-expansion -Wno-gnu-statement-expression -Wno-language-extension-token -Wno-overriding-method-mismatch -Wno-missing-variable-declarations -Rno-module-build -Wno-auto-import -Wno-objc-interface-ivars -Wno-documentation-unknown-command -Wno-reserved-id-macro -Wno-unused-parameter -Wno-gnu-conditional-omitted-operand -Wno-explicit-ownership-type -Wno-date-time -Wno-cast-align -Wno-cstring-format-directive -Wno-double-promotion -Wno-partial-availability
修改为
WARNING_CFLAGS = $(inherited) -Weverything -Wno-objc-missing-property-synthesis -Wno-unused-macros -Wno-disabled-macro-expansion -Wno-gnu-statement-expression -Wno-language-extension-token -Wno-overriding-method-mismatch -Wno-missing-variable-declarations -Rno-module-build -Wno-auto-import -Wno-objc-interface-ivars -Wno-documentation-unknown-command -Wno-reserved-id-macro -Wno-unused-parameter -Wno-gnu-conditional-omitted-operand -Wno-explicit-ownership-type -Wno-date-time -Wno-cast-align -Wno-cstring-format-directive -Wno-double-promotion -Wno-partial-availability -Wno-objc-messaging-id
再次build即可成功
参考链接:https://www.cnblogs.com/iamluoli/p/11083496.html
**问题2:
报错信息:

pium-xcuitest-driver/WebDriverAgent/Carthage/Build/iOS/RoutingHTTPServer.framework/Headers/RouteResponse.h:8:1: 'assign' property of object type may become a dangling reference; consider using 'unsafe_unretained'
解决方式:将 assign 改为 strong ,并重新build,如下的两个错误同步解决掉(或:修改assign为unsafe_unretained)
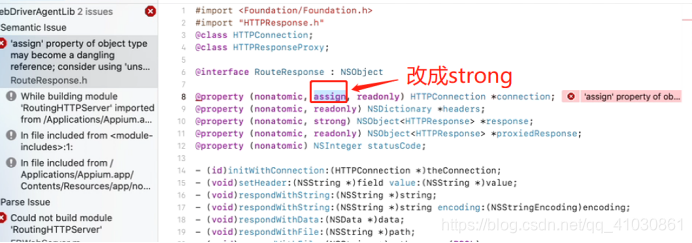
参考链接:https://www.jianshu.com/p/d4609fbb6a87
**问题3:
报错信息:
Undefined symbols for architecture arm64: "_OBJC_CLASS_$_XCElementSnapshot", referenced from: l_OBJC_$_CATEGORY_XCElementSnapshot_$_FBIsVisible in XCUIElement+FBIsVisible.o l_OBJC_$_CATEGORY_XCElementSnapshot_$_FBUID in XCUIElement+FBUID.o l_OBJC_$_CATEGORY_XCElementSnapshot_$_WebDriverAttributes in XCUIElement+FBWebDriverAttributes.o objc-class-ref in XCUIElement+FBWebDriverAttributes.o objc-class-ref in XCUIElement+FBUtilities.o l_OBJC_$_CATEGORY_XCElementSnapshot_$_FBAccessibility in XCUIElement+FBAccessibility.o l_OBJC_$_CATEGORY_XCElementSnapshot_$_FBScrolling in XCUIElement+FBScrolling.o ... ld: symbol(s) not found forarchitecture arm64 clang: error: linker command failed with exit code 1 (use -v to see invocation)
解决办法:
Add -Wl,-U,"_OBJC_CLASS_$_XCElementSnapshot" in other linker flags in WebDriverAgentLib target.
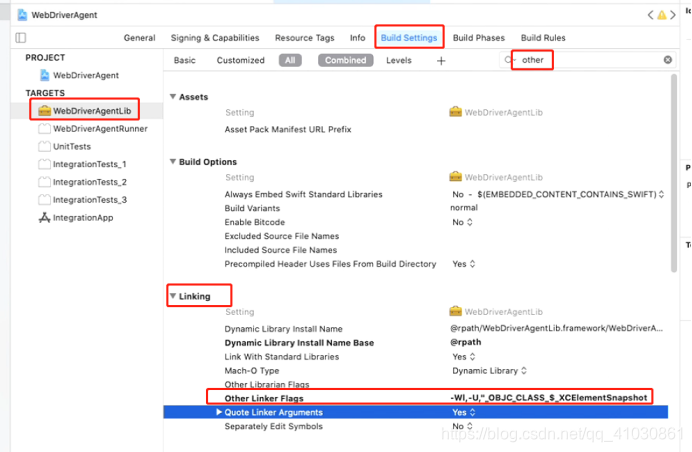
及:
参考链接:
https://stackoverflow.com/questions/52504743/webdriveragent-linker-command-failed-with-exit-code-1-use-v-to-see-invocation
**问题4:
ERROR in ./js/app.js
Module parse failed: /Applications/Appium.app/Contents/Resources/app/node_modules/appium/node_modules/appium-xcuitest-driver/WebDriverAgent/Inspector/js/app.js Unexpected token (67:6)
You may need an appropriate loader to handle this file type.
SyntaxError: Unexpected token (67:6)
解决办法:修改WebDriverAgent/Inspector/webpack.config.js这个文件,删除下文“, exclude: /node_modules/ ”,再次执行sh

参考链接:
https://blog.csdn.net/xlyrh/article/details/108410738
方式2:使用git上的WebDriverAgent
下载链接:git clone https://github.com/facebook/WebDriverAgent
其他步骤和一样(facebook的WDA在iOS 10 时代苹果已经废弃了,目前依然在更新的是Appium官方的WDA,官方链接如下https://github.com/appium/WebDriverAgent)
二 appium
1-启动app
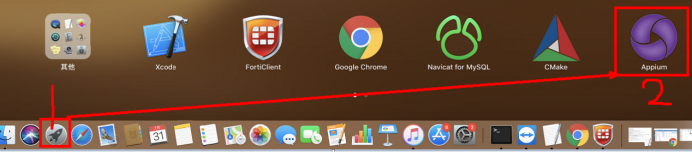
打开软件“Appium”(不要升级版本)
输入127.0.0.1,点击Start Server
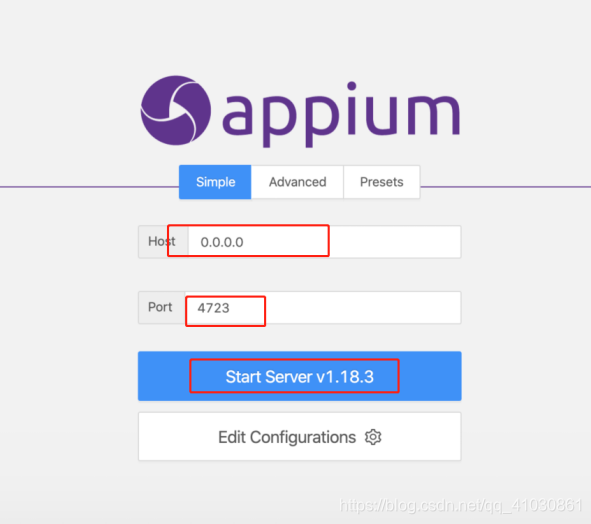
看到下图所示,就代表Appium启动成功了
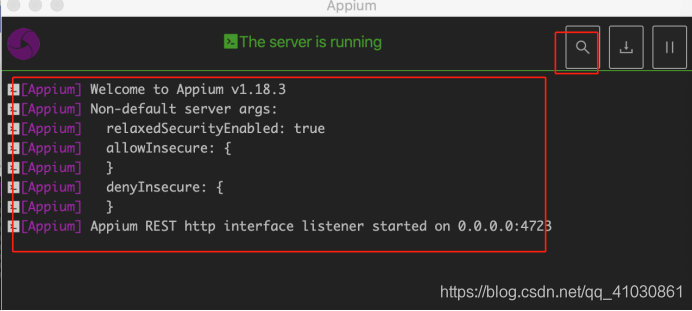
现在来测试下是否可用:
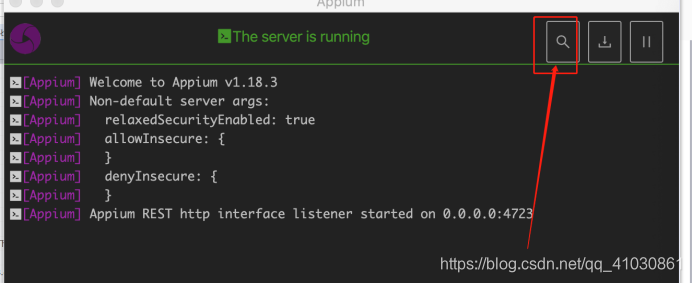
点击“搜索”的图标
再点击Custom Server-》Saved Capability Sets 1-》test1-》Start Session
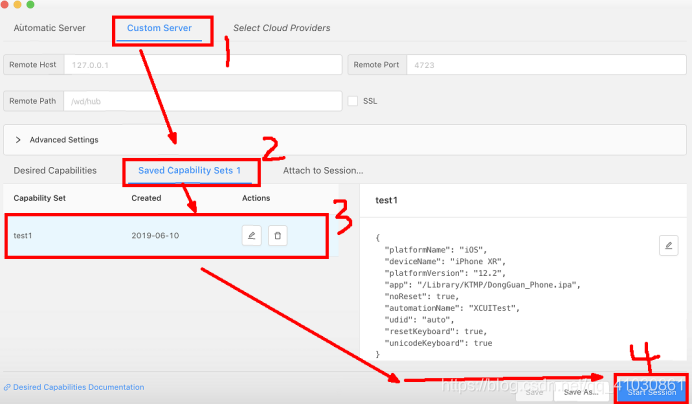
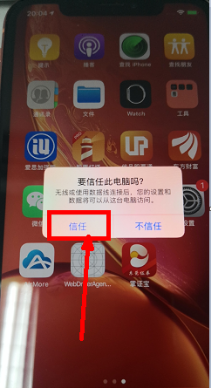
此时这个界面一直在加载,再观察苹果手机是否有弹出“信任”的提示,如下图所示,
点击“信任”
然后等待一会儿,苹果手机会自动打开“掌证宝”APP,同时Appium的界面也截屏了苹果手机“掌证宝”APP的界面,如下图所示


 246
246

 被折叠的 条评论
为什么被折叠?
被折叠的 条评论
为什么被折叠?
 到【灌水乐园】发言


