


多线程
1.什么是线程?
在了解线程前,要先了解什么是进程:
| 进程 | 正在运行的程序的一个实例 ,每个进程都有自己独立的地址空间(内存空间)。每启动一个进程,操作系统就会为该进程分配独立的地址空间。 |
| 线程 | 进程中的一个实体,是被系统独立调度和分派的基本单位。线程本身不具有系统资源的调度权,同一个进程的线程共享进程所拥有的全部资源。 |
注意:一个进程可以启动多个线程
在java程序中至少有两个线程并发,一个是 垃圾回收线程,一个是 执行main方法的主线程。
2.线程的生命周期及五种状态
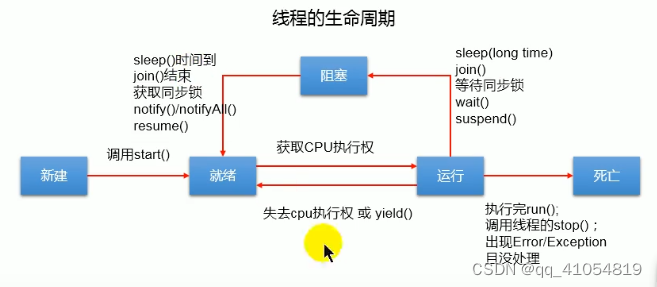
1)新建状态
用new语句创建一个线程对象时,它处于新建状态。
2)就绪状态
当线程被创建后,调用start()方法之前,它处于就绪状态。就绪状态的线程已经准备好运行,只等待CPU调度。
3)运行状态
当就绪状态中的线程获得了CUP执行资源,执行run()中的代码。
4)阻塞状态
处于运行中的线程,由于某种原因放弃了cpu使用权,暂时通知执行,处于阻塞状态。直到线程进入就绪状态,才有机会再次获得cpu的使用权,进入运行状态。
阻塞的情况分三种:
-
等待阻塞:运行状态中的线程执行wait方法,Java虚拟机就会把该线程放入到等待队列中。
-
同步阻塞:运行状态中的线程获取同步锁时,若该同步锁被其他线程占用,Java虚拟机就会把这个线程放入锁池中;
-
其他阻塞:运行状态中的线程执行了sleep方法或join方法,或者发出I/O请求时,Java虚拟机会把该线程置为阻塞状态,当sleep()状态超时、join()等待线程终止或者超时,或者I/O处理完毕,线程重新转入就绪状态;
5)死亡状态
线程run()、main()方法执行结束,或者因异常退出了run()方法,则该线程结束生命周期。
3.并行与并发
| 并行 | 多个cpu同时执行多个任务(同时执行) |
| 并发 | 一个cpu(采用时间片)同时执行多个任务(交替执行) |
4.创建多线程的方式
1)继承Thread
/*
创建线程:继承Thread
1、创建一个继承于Thread类的子类
2、重写Thread类的run()方法
3、创建Thread类的子类对象
4、通过此对象调用start()
        4.1、启动当前线程
        4.2、调用当前线程的run()
 */
public class ThreadTest02 {
    public static void main(String[] args) {
        test1();
        //test2();
    }
    public static void test1(){
        MyThread myThread=new MyThread();
        myThread.start();
        for(int i=0;i<1000;i++){
            System.out.println("------MainThread "+i+"-------");
        }
    }

    //使用继承Thread类的方法来创建线程时,多个线程之间无法共享线程类的实例变量
    public static void test2(){
        for(int i=0;i<100;i++){
            System.out.println(Thread.currentThread().getName()+"-------"+i);
            if(i==20){
                new MyThread().start();
                new MyThread().start();
            }
        }
    }
}
class MyThread extends Thread{
    private int i;
    @Override
    public void run() {
        for(;i<100;i++){
            System.out.println(Thread.currentThread().getName()+"-------"+i);
        }
    }
}
2)实现Runnable接口
 /*
创建线程:实现Runnable接口
1、创建一个实现了Runnable接口
2、实现类去实现Runnable中的抽象方法:run
3、创建实现类的对象
4、将此对象作为参数传递到Thread类的构造器中,创建Thread类的对象
5、通过Thread类的对象调用start()
 */
public class ThreadTest03 {
    public static void main(String[] args) {
        //test1();
        test2();
    }
    //采用Runnable接口的方式创建的多个线程可以共享线程类的实例变量
    public static void test2(){
        for(int i=0;i<100;i++){
            System.out.println(Thread.currentThread().getName()+"-------"+i);
            if(i==20){
                Runnable runnable = new MyRunnable();
                new Thread(runnable,"线程1").start();
                new Thread(runnable,"线程2").start();
            }
        }
    }
    public static void test1(){
        MyRunnable myRunnable=new MyRunnable();
        Thread thread=new Thread(myRunnable);
        thread.start();

        //匿名内部类创建
//        Thread thread1=new Thread(new Runnable() {
//            @Override
//            public void run() {
//                for(int i=0;i<100;i++){
//                    System.out.println("------MyRunnable2 "+i+"-------");
//                }
//            }
//        });
//        thread1.start();

        //lambda表达式替换内部匿名类
//        Thread thread2=new Thread(()->{
//            for(int i=0;i<100;i++){
//                System.out.println("------MyRunnable3 "+i+"-------");
//            }
//        });
//        thread2.start();

        for(int i=0;i<100;i++){
            System.out.println("------MainThread "+i+"-------");
        }
    }
}
class MyRunnable implements Runnable{
    private int i;
    @Override
    public void run() {
        for(;i<100;i++){
            System.out.println(Thread.currentThread().getName()+"-------"+i);
        }
    }
3)实现Callable接口
- 与Runnable相比,Callable功能更强大
- 相比run()方法,可以有返回值
- 方法可以抛出异常
- 支持泛型的返回值
- 需要借助FutureTask类,比如获取返回结果
public class ThreadTest04 {
    public static void main(String[] args) throws Exception {
        MyCallable  myCallable=new MyCallable();
        FutureTask task=new FutureTask(myCallable);
        Thread thread=new Thread(task);

        thread.start();
        System.out.println("sum:"+task.get());

        for(int i=0;i<100;i++){
            System.out.println("------MainThread "+i+"-------");
        }

    }
}

class MyCallable implements Callable{
    @Override
    public Object call() throws Exception {
        int sum=0;
        for(int i=0;i<100;i++){
            sum+=i;
            System.out.println("------MyCallable "+i+"-------");
        }
        return sum;
    }
}
4)使用线程池创建线程(见线程池)
5.线程休眠和唤醒
/*
   sleep睡眠太久了,如果希望中途醒来,应该怎么做(如何唤醒睡眠的线程)
 */
public class ThreadTest08 {
    public static void main(String[] args) {
        Thread t=new Thread(new MyRunnable2());
        t.setName("MyRunnable2");
        t.start();

        try {
            Thread.sleep(1000*5);
        } catch (InterruptedException e) {
            e.printStackTrace();
        }
        t.interrupt();  //中断睡眠,依靠了java的异常处理机制
    }
}

class MyRunnable2 implements Runnable{
    @Override
    public void run() {
        System.out.println(Thread.currentThread().getName()+"-----begin");
        try {
            Thread.sleep(1000*60*60);
            //为什么这里只能try-catch,因为子类不能比父类抛出更宽泛的异常
        } catch (InterruptedException e) {
            e.printStackTrace();
        }
        System.out.println(Thread.currentThread().getName()+"-----over");

    }
}
6.终止线程
1)强制终止一个线程
/*
   强制终止一个线程
 */
public class ThreadTest09 {
    public static void main(String[] args) {
        Thread t=new Thread(new MyRunnable3());
        t.setName("MyRunnable3");
        t.start();

        try {
            Thread.sleep(1000*5);
        } catch (InterruptedException e) {
            e.printStackTrace();
        }
        //终止线程  缺点:直接杀死线程,容易丢失数据
        t.stop(); //已过时(不建议使用)

    }
}

class MyRunnable3 implements Runnable{
    @Override
    public void run() {
        for(int i=0;i<10;i++){
            System.out.println(Thread.currentThread().getName()+"-----"+i);
            try {
                Thread.sleep(1000);
            } catch (InterruptedException e) {
                e.printStackTrace();
            }
        }
    }
}
2)合理的终止一个线程
/*
   合理的终止一个线程
 */
public class ThreadTest10 {
    public static void main(String[] args) {
        MyRunnable4 myRunnable4 = new MyRunnable4();
        Thread t=new Thread(myRunnable4);
        t.setName("MyRunnable4");
        t.start();
        try {
            Thread.sleep(1000*5);
        } catch (InterruptedException e) {
            e.printStackTrace();
        }
        //终止线程
        myRunnable4.run=false;
    }
}

class MyRunnable4 implements Runnable{
    //一个布尔标记
    boolean run=true;

    @Override
    public void run() {
        for (int i = 0; i < 10; i++) {
            if(run){
                System.out.println(Thread.currentThread().getName()+"-----"+i);
                try {
                    Thread.sleep(1000);
                } catch (InterruptedException e) {
                    e.printStackTrace();
                }
            }else {
                return;
            }
        }
    }
}
7.线程优先级
/**
 * 关于线程优先级
 *
 * 注意:高优先级的线程不一定优于低优先级的线程执行(被CPU调度)
 * 只是机会更大而已
 */
public class ThreadTest11 {
    public static void main(String[] args) {

        System.out.println("最高优先级:"+Thread.MAX_PRIORITY); //10
        System.out.println("最低优先级:"+Thread.MIN_PRIORITY); //1
        System.out.println("默认优先级:"+Thread.NORM_PRIORITY); //5

        Thread currentThread = Thread.currentThread();
        currentThread.setPriority(1);
        System.out.println(currentThread.getName()+"的优先级是"+currentThread.getPriority());

        Thread t=new Thread(()->{
            System.out.println(Thread.currentThread().getName()+"的优先级是"+Thread.currentThread().getPriority());
            for (int i = 0; i <100 ; i++) {
                System.out.println("分支线程--->"+i);
            }
        });
        t.setName("tt");
        t.setPriority(10);
        t.start();

        for (int i = 0; i <100 ; i++) {
            System.out.println("主线程--->"+i);

        }
    }
}
8.线程让位
/*
   让位,当前线程暂停,回到就绪状态,让给其他线程
   静态方法:Thread.yield();
 */
public class ThreadTest12 {
    public static void main(String[] args) {
        Thread t=new Thread(()->{
            for (int i = 0; i <100 ; i++) {
                if(i%10==0){
                    Thread.yield();
                }
                System.out.println(Thread.currentThread().getName()+"---"+i);
            }
        });
        t.setName("tt");
        t.start();

        for (int i = 0; i <100 ; i++) {
            System.out.println(Thread.currentThread().getName()+"---"+i);
        }
    }
}
9.线程合并
//线程合并 join()方法
public class ThreadTest13 {
    public static void main(String[] args) {

        System.out.println("main begin");

        Thread t=new Thread(()->{
            for (int i = 0; i <100 ; i++) {
                System.out.println(Thread.currentThread().getName()+"---"+i);
            }
        });
        t.setName("tt");
        t.start();

        try {
            t.join(); //t合并到当前线程中,当前线程受阻塞,t线程执行直到结束
        } catch (InterruptedException e) {
            e.printStackTrace();
        }
        for (int i = 0; i <100 ; i++) {
            System.out.println(Thread.currentThread().getName()+"---"+i);
        }
        for (int i = 0; i <100 ; i++) {
            System.out.println(Thread.currentThread().getName()+"---"+i);
        }
        System.out.println("main over");
    }
}
10.守护线程
/*
   守护线程
 */
public class ThreadTest14 {
    public static void main(String[] args) {
        Thread t=new BakDataThread();
        t.setName("备份数据的线程");
        //设置true-为守护线程  设置false——为用户线程,不设置属性默认为用户线程
        t.setDaemon(true);
        t.start();
        //主线程(用户线程)
        for (int i = 0; i <10 ; i++) {
            System.out.println(Thread.currentThread().getName()+"---"+i);

            try {
                Thread.sleep(1000);
            } catch (InterruptedException e) {
                e.printStackTrace();
            }
        }
    }
}

class BakDataThread extends Thread{
    @Override
    public void run() {
        int i=0;
        while (true){
            System.out.println(Thread.currentThread().getName()+"---"+(++i));
            try {
                Thread.sleep(1000);
            } catch (InterruptedException e) {
                e.printStackTrace();
            }
        }
    }
}
11.线程通信—生产者消费者模式
/*
   1.使用wait方法和notify方法实现生产者和消费者模式
   2.什么是生产者和消费者模式
      生产线程负责生产,消费线程负责消费
      生产线程和消费线程要达到均衡
      使用wait和notify方法
   3.不是线程对象的方法,java对象都有
   4.建立在synchronized线程安全基础上
   5.模拟需求:
      仓库采用List集合
      只能存储一个元素
      如果元素个数为0,表示仓库空了
 */
public class ThreadTest17 {
    public static void main(String[] args) {
        List list=new ArrayList();
        //生产者线程
        Thread producer=new Thread(new Producer(list));
        //消费者线程
        Thread consumer=new Thread(new Consumer(list));
        producer.setName("生产者");
        consumer.setName("消费者");
        producer.start();
        consumer.start();
    }
}

//生产线程
class Producer implements Runnable{
    private List list;

    public Producer(List list) {
        this.list = list;
    }
    @Override
    public void run() {
        while (true){
            //给仓库对象list加锁
            synchronized (list){
                if (list.size()>4) {
                    //当前线程进入等待状态,释放之前占有的List集合的锁
                    try {
                        list.wait();
                    } catch (InterruptedException e) {
                        e.printStackTrace();
                    }
                } else {
                    list.add(new Object());
                    System.out.println("生产");
                    //唤醒消费者消费
                    list.notify();
                }
            }
        }
    }
}

//消费线程
class Consumer implements Runnable{

    private List list;

    public Consumer(List list) {
        this.list = list;
    }

    @Override
    public void run() {
        while (true){
            synchronized (list){
                if(list.size()==0){
                    //当前线程进入等待状态,释放Consumer的锁
                    try {
                        list.wait();
                    } catch (InterruptedException e) {
                        e.printStackTrace();
                    }
                }else {
                    list.remove(0);
                    System.out.println("消费");
                    //唤醒生产者消费’
                    list.notify();
                }
            }
        }
    }
}
12.定时器
/*
   使用定时器指定定时任务
 */
public class TimerTest {

    public static void main(String[] args) {
        // TODO Auto-generated method stub
        //创建定时器对象
        Timer timer = new Timer();
        //Timer timer = new Timer(true);//指定守护线程的方式
        //指定定时任务
        //timer.schedule(定时任务,第一次执行时间,间隔多久执行一次);
        SimpleDateFormat sdf = new SimpleDateFormat("yyyy-MM-dd HH:mm:ss");
        Date firstTime = null;
        try {
            firstTime = sdf.parse("2023-09-14 15:20:00");
        } catch (ParseException e) {
            // TODO Auto-generated catch block
            e.printStackTrace();
        }
        timer.schedule(new LogTimerTask(), firstTime, 1000*4);
    }

}
//假设这是一个记录日志的定时任务
class LogTimerTask extends TimerTask{
    public void run() {
        System.out.println("完成了一次数据备份");
    }
}
13.线程死锁
/*
   死锁代码要会写
   死锁很难调试
   synchronized在开发中最好不要嵌套使用,容易形成死锁
 */
public class DeadLock {
    public static void main(String[] args) {
        Object o1=new Object();
        Object o2=new Object();

        //t1,t2共享o1,o2
        Thread t1=new MyThread1(o1,o2);
        Thread t2=new MyThread2(o1,o2);
        t1.start();
        t2.start();
    }
}

class MyThread1 extends Thread{
    Object o1;
    Object o2;

    public MyThread1(Object o1,Object o2){
        this.o1=o1;
        this.o2=o2;
    }

    @Override
    public void run() {
        synchronized (o1){
            try {
                Thread.sleep(1000);
                System.out.println("MyThread1->o1");
            } catch (InterruptedException e) {
                e.printStackTrace();
            }
            synchronized (o2){
                System.out.println("MyThread1->o2");
            }
        }
    }
}

class MyThread2 extends Thread{
    Object o1;
    Object o2;

    public MyThread2(Object o1,Object o2){
        this.o1=o1;
        this.o2=o2;
    }

    @Override
    public void run() {
        synchronized (o2){
            try {
                Thread.sleep(1000);
                System.out.println("MyThread2->o2");
            } catch (InterruptedException e) {
                e.printStackTrace();
            }
            synchronized (o1){
                System.out.println("MyThread2->o1");
            }
        }
    }
}
线程池
1.什么是线程池?
池化技术思想:主要是为了减少每次获取资源的消耗,提高对资源的利用率。
线程池(ThreadPool)是⼀种利用池化技术管理和使⽤线程的机制。它是将多个线程预先存储在⼀个“池子”内,当有任务出现时可以避免重新创建和销毁线程所带来性能开销,只需要从“池子”内取出相应的线程执行对应的任务即可。
2.为什么使用线程池?
使用线程池最大的原因就是可以根据系统的需求和硬件环境灵活的控制线程的数量,且可以对所有线程进行统一的管理和控制,从而提高系统的运行效率,降低系统运行运行压力。可以从线程池自身的优点上来进一步了解线程池的好处。
3.线程池的优点
1)降低资源消耗,通过重复利用已创建的线程降低线程创建和销毁造成的消耗。
2)控制线程数量,避免了因为线程创建过多而导致的内存溢出问题。
3)提供了任务管理功能,从而可以实现任务缓存和任务拒绝的情况。
4)提供更多更强⼤的功能:线程池具备可拓展性,允许开发⼈员向其中增加更多的功能。
4.线程池的状态
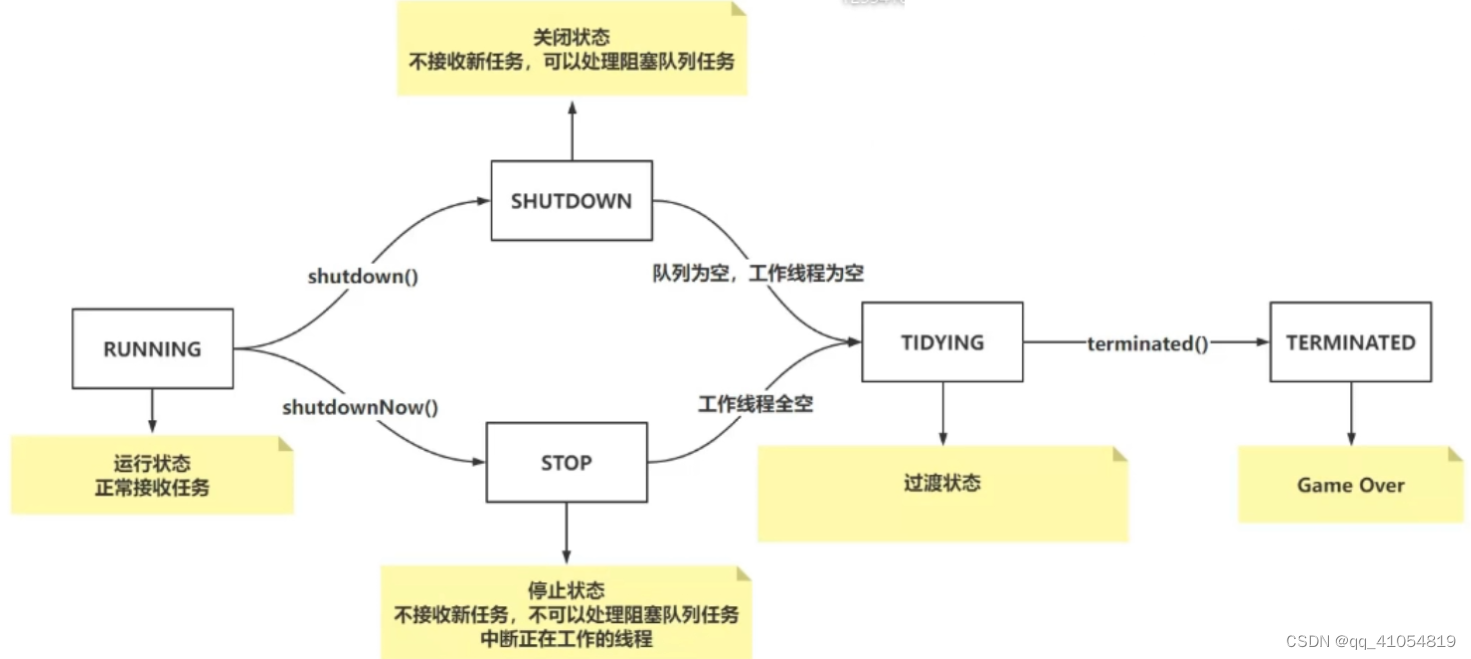
- RUNNING:线程池创建之后的状态,这种状态下可以执行任务;
- SHUTDOWN:该状态下线程池不再接受新任务,但是会将工作队列中的任务执行结束;
- STOP:该状态下线程池不再接受新任务,不会处理工作队列中的任务,并且会中断线程;
- TIDYING:该状态下所有任务都已终止,将会执行terminated方法;
- TEIMINATED:执行完terminated方法之后。
5.线程池处理流程
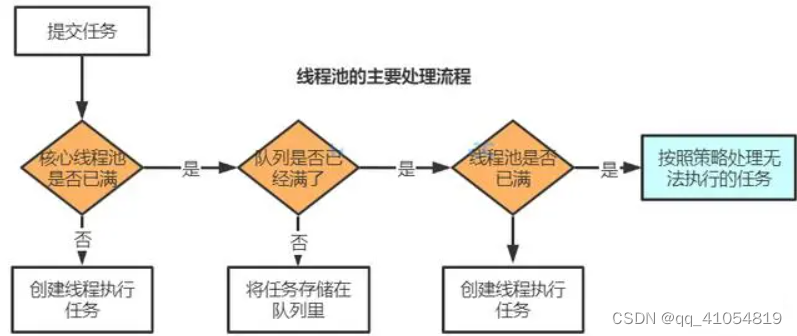
- 线程池会先判断是否有空闲的核心线程,如果有则将任务分配给其中一个空闲的核心线程执行。如果没有空闲的核心线程或者核心线程的数量还没达到最大值,则创建一个新的核心线程来执行任务。如果核心线程已经达到最大值,则进入下一个流程。
- 如果工作队列未满,则将新提交的任务存储在这个工作队列中。如果工作队列已满,则会判断线程池中的线程数是否已经达到最大值,如果没有则创建一个新的非核心线程来执行任务。如果线程数已经达到最大值,则进入下一个流程。
- 如果线程池中的线程都已经处于工作状态,即核心线程和非核心线程都在执行任务,则交给拒接策略来处理这个任务。拒接策略可以决定如何处理无法处理的任务,例如抛出异常或者阻塞任务提交。
6.线程池的使用
1.通过Executors自动创建的线程池((6种)
1)固定大小的线程池
/**
 * 创建一个固定大小的线程池,可控制并发线程数。
 * excute和submit区别
 * 1. execute只能提交Runnable类型的任务,没有返回值,而submit既能提交Runnable类型任务也能提交Callable类型任务,返回Future类型。
 * 2. execute方法提交的任务异常是直接抛出的,而submit方法是是捕获了异常的,当调用FutureTask的get方法时,才会抛出异常。
 */

public class TestFixedThreadPool {
    public static void main(String[] args) {
        test1();
    }
    public static void test1(){
        //创建2个线程的线程池
        ExecutorService threadPool = Executors.newFixedThreadPool(2);

        //创建任务
        Runnable runnable=()->{
            System.out.println("任务被执行,线程:"+Thread.currentThread().getName());
        };
        // 线程池执行任务(一次添加 4 个任务)
        // 执行任务的方法有两种:submit 和 execute
        threadPool.submit(runnable);  // 执行方式 1:submit
        threadPool.execute(runnable); // 执行方式 2:execute
        threadPool.execute(runnable);
        threadPool.execute(runnable);
    }
}
2)线程可以缓存的线程池
/**
 * 创建一个可缓存的线程池,若线程数超过任务所需,那么多余的线程会被缓存一段时间后才被回收,若线程数不够,则会新建线程。
 */
public class TestCachedThreadPool {
    public static void main(String[] args) {
        ExecutorService threadPool = Executors.newCachedThreadPool();

        // 执行任务
        for (int i = 0; i < 10; i++) {
            threadPool.execute(() -> {
                System.out.println("任务被执行,线程:" + Thread.currentThread().getName());
                try {
                    TimeUnit.SECONDS.sleep(1);
                } catch (InterruptedException e) {
                }
            });
        }
    }
}
3)单个线程的线程池
/**
 * 创建单个线程的线程池,它可以保证先进先出的执行顺序
 */
public class TestSingleThreadExecutor {
    public static void main(String[] args) {
        // 创建线程池
        ExecutorService threadPool = Executors.newSingleThreadExecutor();
        // 执行任务
        for (int i = 0; i < 10; i++) {
            final int index = i;
            threadPool.execute(() -> {
                System.out.println(index + ":任务被执行");
                try {
                    TimeUnit.SECONDS.sleep(1);
                } catch (InterruptedException e) {
                }
            });
        }

    }
}
4)可以执行延迟任务的线程池
/**
 * 执行延迟任务的线程池
 */
public class TestScheduledThreadPool {
    public static void main(String[] args) {
        // 创建线程池
        ScheduledExecutorService threadPool = Executors.newScheduledThreadPool(5);
        // 添加定时执行任务(1s 后执行)
        SimpleDateFormat sdf=new SimpleDateFormat("yyyy-MM-dd HH:mm:ss SS");
        System.out.println("添加任务,时间:" + sdf.format(new Date()));
        threadPool.schedule(() -> {
            System.out.println("任务被执行,时间:" + sdf.format(new Date()));
            try {
                TimeUnit.SECONDS.sleep(1);
            } catch (InterruptedException e) {
            }
        }, 1, TimeUnit.SECONDS);
    }
}
5)单线程可以执行延迟任务的线程池
/**
 * 单线程的可以执行延迟任务的线程池,此线程池可以看作是 ScheduledThreadPool 的单线程池版本。
 */
public class TestSingleThreadScheduledExecutor {
    public static void main(String[] args) {
        // 创建线程池
        ScheduledExecutorService threadPool = Executors.newSingleThreadScheduledExecutor();
        // 添加定时执行任务(2s 后执行)
        SimpleDateFormat sdf=new SimpleDateFormat("yyyy-MM-dd HH:mm:ss SS");
        System.out.println("添加任务,时间:" + sdf.format(new Date()));
        threadPool.schedule(() -> {
            System.out.println("任务被执行,时间:" + sdf.format(new Date()));
            try {
                TimeUnit.SECONDS.sleep(1);
            } catch (InterruptedException e) {
            }
        }, 2, TimeUnit.SECONDS);
  }
}
6)根据当前服务器的CPU创建线程池
/**
 * 抢占式执行的线程池(任务执行顺序不确定),此方法是 JDK 1.8 版本新增的
 */
public class TestNewWorkStealingPool {
    public static void main(String[] args) {
        // 创建线程池
        ExecutorService threadPool = Executors.newWorkStealingPool();
        // 执行任务
        for (int i = 0; i < 10; i++) {
            final int index = i;
            threadPool.execute(() -> {
                System.out.println(index + " 被执行,线程名:" + Thread.currentThread().getName());
            });
        }
        // 确保任务执行完成
        while (!threadPool.isTerminated()) {
        }
    }
}
2.通过ThreadPoolExecutor手动创建线程池(1种);
**
 * 线程池的创建推荐使用最后一种 ThreadPoolExecutor 的方式来创建,因为使用它可以明确线程池的运行规则,规避资源耗尽的风险。

 */
public class TestThreadPoolExecutor {
    public static void main(String[] args) {
        // 创建线程池
        ThreadPoolExecutor threadPool = new ThreadPoolExecutor(5, 10, 100, TimeUnit.SECONDS, new LinkedBlockingQueue<>(10));
        // 执行任务
        for (int i = 0; i < 10; i++) {
            final int index = i;
            threadPool.execute(() -> {
                System.out.println(index + " 被执行,线程名:" + Thread.currentThread().getName());
                try {
                    Thread.sleep(1000);
                } catch (InterruptedException e) {
                    e.printStackTrace();
                }
            });
        }
    }
}
3.参数说明和拒接策略
7大参数:
- corePoolSize:核心线程数。——是指线程池中长期存活的线程数。
- maximumPoolSize:最大线程数。——线程池允许创建的最大线程数量 *
- keepAliveTime:空闲线程存活时间。
- TimeUnit:时间单位。
- BlockingQueue:线程池任务队列。
- ThreadFactory:创建线程的工厂。——通过此方法可以设置线程的优先级、线程命名规则以及线程类型(用户线程还是守护线程)等。
- RejectedExecutionHandler:拒绝策略。
四大拒接策略:
- AbortPolicy:拒绝并抛出异常。
- CallerRunsPolicy:使用当前调用的线程来执行此任务。(谁提交任务,谁就负责执行任务)
- DiscardOldestPolicy:抛弃队列头部(最旧)的一个任务,并执行当前任务。
- DiscardPolicy:忽略并抛弃当前任务。


 3605
3605


 被折叠的 条评论
为什么被折叠?
被折叠的 条评论
为什么被折叠?
 到【灌水乐园】发言


