


1.常见ES6语法
1.1变量和常量
var/let/const

var作用域为函数
let作用域为块(函数内)
const作用域为块,常量
    不能修改info常量,可以修改里面的value和id
<script>
    const info = {id:1,value:18};  // 块级作用域 + 常量(ref)

    info.value = 999;
</script>
1.2模板字符串
使用模板字符串更加方便
<script>
    let name = "张开";
    let age = 73;

    let info =  `我叫${name},今年${age}岁`;
</script>
1.3动态参数
 动态参数:...data
实现一次接收多个参数或者传入多个参数
<script>
    function info(v1,...data){
        console.log(v1,data);
    }

    info(11,22,333,444,55);    //将11传给v1,后续的其他数传给data
</script>


<script>
    function info(v1,v2,v3,v4){
        console.log(v1,v2,v3,v4);
    }

    info(11,22,333,444);
    nums = [22,33,44,55,66,77,88];
    info(11,...nums)                //nums打散后依次传入,多余的数不会传入,少于参数时未传入值的参数为undefine
</script>
1.4解构赋值
<script>
    let info = {name:"武沛齐",email:"wupeiqi@live.com",addr:"北京"};
    let {name,addr} = info;

    console.log(name);
    console.log(addr);
</script>
Vue3中需要什么就要导入什么,不像vue2中this.$router this.$route。
import {name,addr} from 'vue'
<script>

    function getData(n1,{name,addr}){
        //let {name,addr} = info;

        console.log(name);
        console.log(addr);
    }

    let info = {name:"武沛齐",email:"wupeiqi@live.com",addr:"北京"};
    getData(111,info);    //传入info对象,解构出name和addr直接使用

</script>
列表中同样可以使用:
<script>
    let nums = [11,22,33,44];
    let [n1,n2] = nums;
</script>
<script>
    function getData(n1,[n2,n3,n4]){
        console.log(n1,n2,n3,n4)
    }
    let nums = [11,22,33,44];
    getData(100,nums);
</script>
1.5 箭头函数
注意:使用箭头函数时,this对象指的当前,使用普通函数时,this对象不一定指当前。
<script>
    function f1(name,age){
        console.log(name,age);
    }
    f1("张开",99);

    //箭头函数
    let f2 = (name,age) =>{
        console.log(name,age);
    }
    f2("张开",99);

</script>

<script>
    var name = "源代码";
    let info = {
        name: "武沛齐",
        func: function () {
            console.log(this.name); // 函数内部默认都有this关键字,输出武沛齐
        }
    }
    info.func();

    function getData() {
        console.log(this.name); // 这里的this=window,输出 源代码
    }

    getData();
</script>

<script>
    var name = "源代码";
    let info = {
        name: "武沛齐",
        func: function () {
            console.log(this.name); // 函数内部默认都有this关键字,this=info对象,输出武沛齐

            function getData() {
                console.log(this.name); // 函数内部默认都有this关键字,this=window,输出 源代码
            }
            getData();
        }
    }
    info.func();
</script>


将getData改成箭头函数:

<script>
    var name = "源代码";
    let info = {
        name: "武沛齐",
        func: function () {
            console.log(this.name); // 函数内部默认都有this关键字,this=info对象

            let getData = () => {
                console.log(this.name); //无this关键字,找到上一级info的this,输出 武沛齐
            }
            getData();
        }
    }
    info.func();


</script>
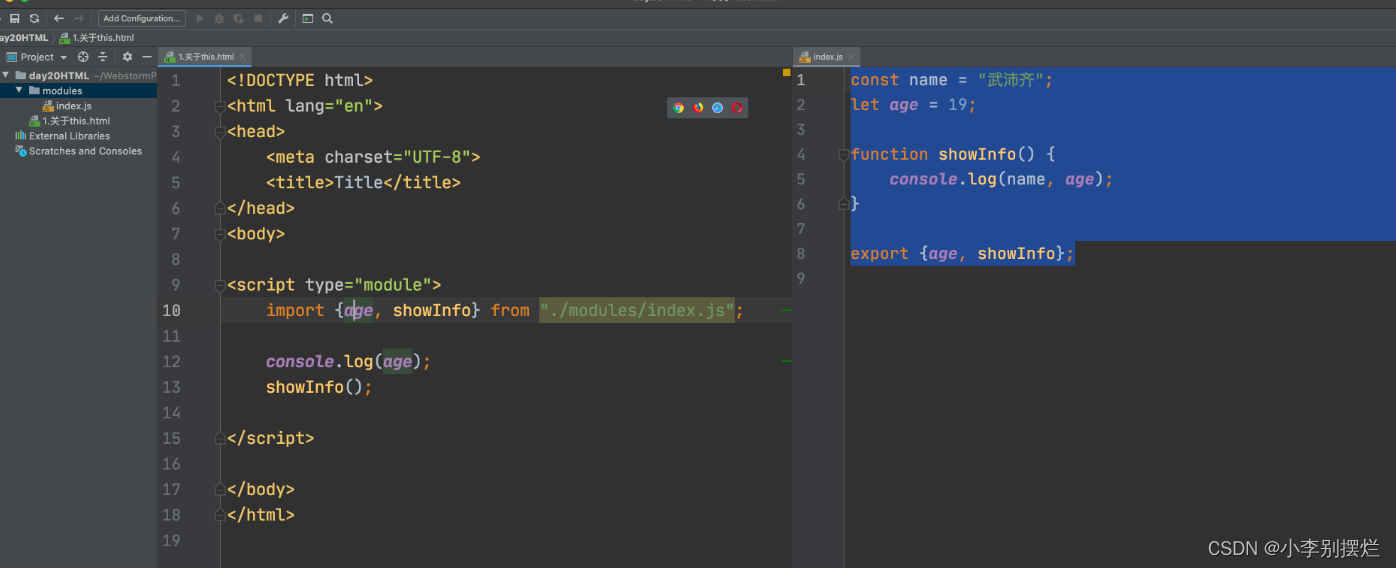
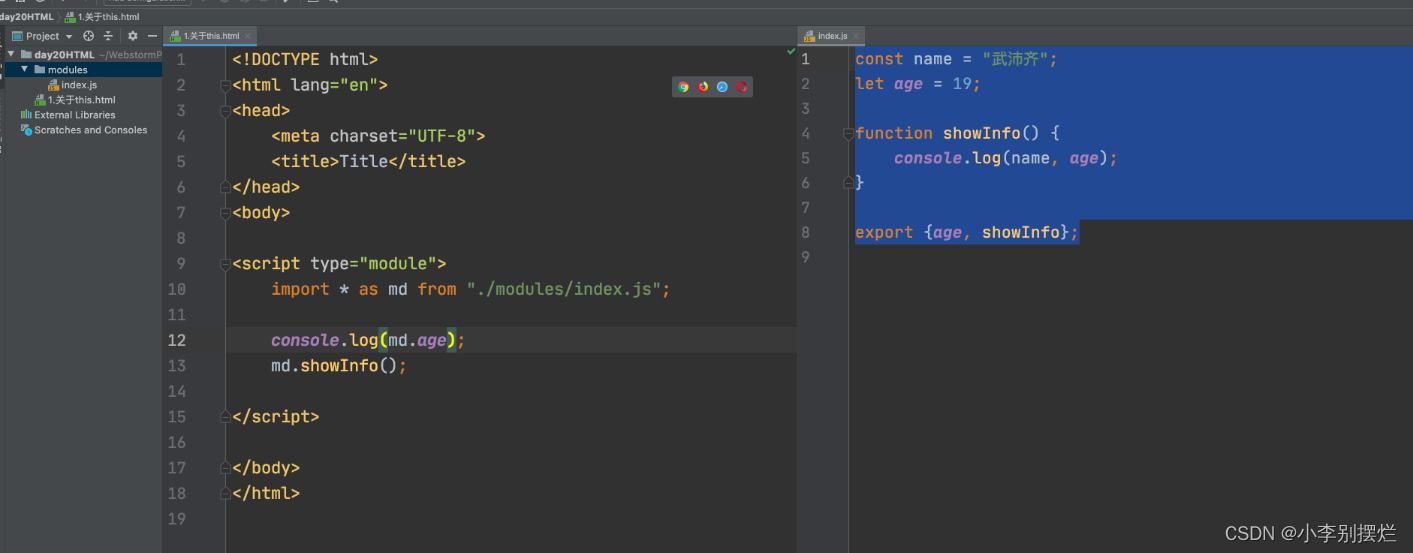
1.6 模块导入
通过export导出变量或方法,通过import导入使用:
也可以通过直接导出对象使用:
2.flex布局
传统的页面布局:div+css+float实现。
flex布局更简单,包括容器和元素
2.1 容器
1.布局
<div class='menu'>
    <div class='item'>北京</div>
    <div class='item'>上海</div>
</div>

<style>
    .menu{

        display:flex;
    }
</style>
2.元素方向
<!DOCTYPE html>
<html lang="en">
<head>
    <meta charset="UTF-8">
    <title>Title</title>
    <style>
        .menu {
            border: 1px solid red;
            width: 500px;

            display: flex;
            flex-direction: row; /*主轴=横向*/,item元素横向排列
        }
    </style>
</head>
<body>
<div class='menu'>
    <div class='item'>北京</div>
    <div class='item'>上海</div>
</div>


</body>
</html>
3.元素排列方式
justify-content: 主轴
align-items: 副轴
<!DOCTYPE html>
<html lang="en">
<head>
    <meta charset="UTF-8">
    <title>Title</title>
    <style>
        .menu {
            border: 1px solid red;
            width: 500px;
            height: 500px;

            display: flex;
            flex-direction: row; /*主轴=横向*/
            /*justify-content: space-evenly;*/
            justify-content: space-between;

            align-items: center;
            /*align-items: flex-start;*/
            /*align-items: flex-end;*/
        }
        .menu .item{
            width: 45px;
            height: 50px;
            border: 1px solid green;
        }
    </style>
</head>
<body>
<div class='menu'>
    <div class='item'>北京</div>
    <div class='item'>上海</div>
    <div class='item'>深圳</div>
</div>


</body>
</html>
4.换行
<!DOCTYPE html>
<html lang="en">
<head>
    <meta charset="UTF-8">
    <title>Title</title>
    <style>
        .menu {
            border: 1px solid red;
            width: 500px;
            height: 500px;

            display: flex;
            flex-direction: row; /*主轴=横向*/
            /*justify-content: space-evenly;*/
            justify-content: flex-start;

            /*align-items: center;*/
            align-items: flex-start;
            /*align-items: flex-end;*/

            flex-wrap: wrap;   //超过时自动进行换行
        }
        .menu .item{
            width: 45px;
            height: 50px;
            border: 1px solid green;
        }
    </style>
</head>
<body>
<div class='menu'>
    <div class='item'>北京</div>
    <div class='item'>上海</div>
    <div class='item'>深圳</div>
    <div class='item'>深圳</div>
    <div class='item'>深圳</div>
    <div class='item'>深圳</div>
    <div class='item'>深圳</div>
    <div class='item'>深圳</div>
    <div class='item'>深圳</div>
    <div class='item'>深圳</div>
    <div class='item'>深圳</div>
    <div class='item'>深圳</div>
    <div class='item'>深圳</div>
    <div class='item'>深圳</div>
    <div class='item'>深圳</div>
    <div class='item'>深圳</div>
</div>


</body>
</html>
5.多行控制
<!DOCTYPE html>
<html lang="en">
<head>
    <meta charset="UTF-8">
    <title>Title</title>
    <style>
        .menu {
            border: 1px solid red;
            width: 500px;
            height: 500px;

            display: flex;
            flex-direction: row; /*主轴=横向*/
            /*justify-content: space-evenly;*/
            justify-content: flex-start;

            /*align-items: center;*/
            align-items: flex-start;
            /*align-items: flex-end;*/

            flex-wrap: wrap;
            align-content: center;   //多行时起作用,控制换行时多行的垂直排放
        }
        .menu .item{
            width: 45px;
            height: 50px;
            border: 1px solid green;
        }
    </style>
</head>
<body>
<div class='menu'>
    <div class='item'>北京</div>
    <div class='item'>上海</div>
    <div class='item'>深圳</div>
    <div class='item'>深圳</div>
    <div class='item'>深圳</div>
    <div class='item'>深圳</div>
    <div class='item'>深圳</div>
    <div class='item'>深圳</div>
    <div class='item'>深圳</div>
    <div class='item'>深圳</div>
    <div class='item'>深圳</div>
    <div class='item'>深圳</div>
    <div class='item'>深圳</div>
    <div class='item'>深圳</div>
    <div class='item'>深圳</div>
    <div class='item'>深圳</div>
</div>


</body>
</html>
案例
<!DOCTYPE html>
<html lang="en">
<head>
    <meta charset="UTF-8">
    <title>Title</title>
    <style>
        .menu {
            border: 1px solid red;
            width: 500px;
            height: 500px;

            display: flex;
            flex-direction: row; /*主轴=横向*/


            /*justify-content: space-between;*/
            justify-content: space-around; /*横轴*/

            align-items: flex-start; /*纵轴*/

            flex-wrap: wrap;

            align-content: flex-start; /*多行文本,从顶部开始*/
        }

        .menu .item {
            width: 150px;
            height: 50px;
            border: 1px solid green;
        }
    </style>
</head>
<body>
<div class='menu'>
    <div class='item'>北京</div>
    <div class='item'>上海</div>
    <div class='item'>深圳</div>
    <div class='item'>深圳</div>
    <div class='item'>深圳</div>
    <div class='item'>深圳</div>
    <div class='item'>深圳</div>
    <div class='item'>深圳</div>
    <div class='item'>深圳</div>
    <div class='item'>深圳</div>
    <div class='item'>深圳</div>
    <div class='item'>深圳</div>
    <div class='item'>深圳</div>
    <div class='item'>深圳</div>
    <div class='item'>深圳</div>
    <div class='item'>深圳</div>
    <div class='item'>深圳</div>
    <div class='item'>深圳</div>
</div>


</body>
</html>
2.2 元素
1.顺序
<!DOCTYPE html>
<html lang="en">
<head>
    <meta charset="UTF-8">
    <title>Title</title>
    <style>
        .menu {
            border: 1px solid red;
            width: 500px;
            height: 500px;

            display: flex;
            flex-direction: row; /*主轴=横向*/


            /*justify-content: space-between;*/
            justify-content: space-around; /*横轴*/

            align-items: flex-start; /*纵轴*/

            flex-wrap: wrap;

            align-content: flex-start; /*多行文本,从顶部开始*/
        }

        .menu .item {
            width: 50px;
            height: 50px;
            border: 1px solid green;
        }
    </style>
</head>
<body>
<div class='menu'>
    <div class='item' style="order: 1">北京</div>    //order指定顺序
    <div class='item' style="order: 0">上海</div>
    <div class='item' style="order: 2">深圳</div>
</div>


</body>
</html>
2.剩余空间
<!DOCTYPE html>
<html lang="en">
<head>
    <meta charset="UTF-8">
    <title>Title</title>
    <style>
        .menu {
            border: 1px solid red;
            width: 500px;
            height: 500px;

            display: flex;
            flex-direction: row; /*主轴=横向*/


            /*justify-content: space-between;*/
            justify-content: flex-start; /*横轴*/
        }

        .menu .item {
            width: 50px;
            height: 50px;
            border: 1px solid green;
        }
    </style>
</head>
<body>
<div class='menu'>
    <div class='item' style="">北京</div>
    <div class='item' style="flex-grow: 2">上海</div>    //剩余空间使用flex-grow填充
    <div class='item' style="flex-grow: 1">深圳</div>
</div>


</body>
</html>
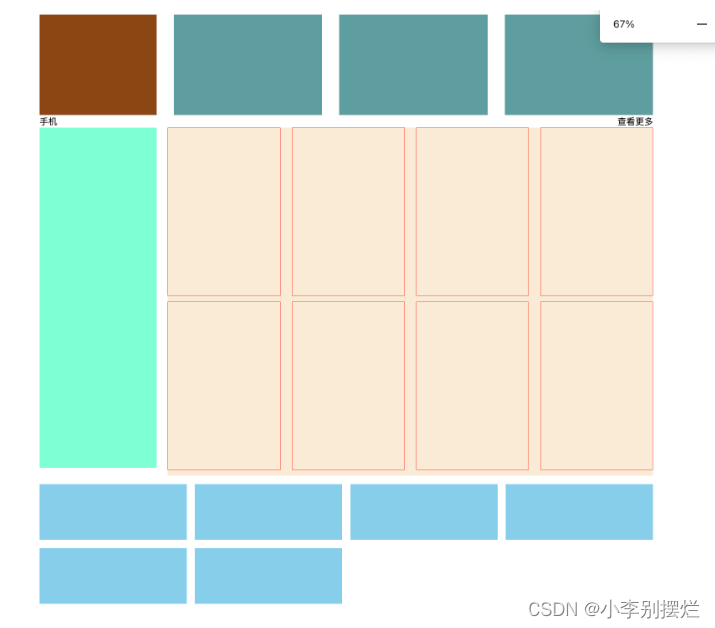
案例
<!DOCTYPE html>
<html lang="en">
<head>
    <meta charset="UTF-8">
    <title>Title</title>
    <style>
        .container {
            width: 1100px;
            margin: 0 auto;
        }

        .row1 {
            display: flex;
            flex-direction: row;
            justify-content: space-between;
        }

        .row1 .company {
            width: 210px;
            height: 180px;
            background-color: saddlebrown;
        }

        .row1 .pic {
            width: 266px;
            height: 180px;
            background-color: cadetblue;
        }

        .row2 .title {
            display: flex;
            flex-direction: row;
            justify-content: space-between;
        }

        .row2 .pic-list {
            display: flex;
            flex-direction: row;
            justify-content: space-between;
        }

        .row2 .pic-list .big {
            background-color: aquamarine;
            height: 610px;
            width: 210px;
            margin-right: 20px;
        }

        .row2 .pic-list .right-list {
            background-color: antiquewhite;
            flex-grow: 1;
        }

        .row2 .pic-list .right-list .group {
            display: flex;
            flex-direction: row;
            justify-content: space-between;
            flex-wrap: wrap;
        }

        .row2 .pic-list .right-list .phone {
            margin-bottom: 10px;
            border: 1px solid red;
            width: 200px;
            height: 300px;
        }

        .course-list {
            display: flex;
            justify-content: space-between;
            flex-wrap: wrap;
        }

        .course-list .item {
            width: 24%;
            height: 100px;
            background-color: skyblue;
            margin-top: 15px;
        }
        /*如果最后一个元素,是第3个,右边距=一个位置 + 所有空白位置/3(有三个空白位置)*/
        .course-list .item:last-child:nth-child(4n - 1) {
            margin-right: calc(24% + 4% / 3);
        }
        .course-list .item:last-child:nth-child(4n - 2) {
            margin-right: calc(48% + 8% / 3);
        }
    </style>
</head>
<body>

<div class="container">

    <div class="row1">
        <div class="company"></div>
        <div class="pic"></div>
        <div class="pic"></div>
        <div class="pic"></div>
    </div>

    <div class="row2">
        <div class="title">
            <div>手机</div>
            <div>查看更多</div>
        </div>

        <div class="pic-list">
            <div class="big"></div>
            <div class="right-list">
                <div class="group">
                    <div class="phone"></div>
                    <div class="phone"></div>
                    <div class="phone"></div>
                    <div class="phone"></div>
                </div>
                <div class="group">
                    <div class="phone"></div>
                    <div class="phone"></div>
                    <div class="phone"></div>
                    <div class="phone"></div>
                </div>
            </div>
        </div>
    </div>

    <div class="course-list">
        <div class="item"></div>
        <div class="item"></div>
        <div class="item"></div>
        <div class="item"></div>
        <div class="item"></div>
        <div class="item"></div>

    </div>
</div>

</body>
</html>
3.vue-router
3.1 安装
npm install vue-router --save
手动创建文件+配置
或
vue add router
3.2 必备操作
router下配置路由:
使用匿名指向组件和直接指向一样
使用什么需要导入什么
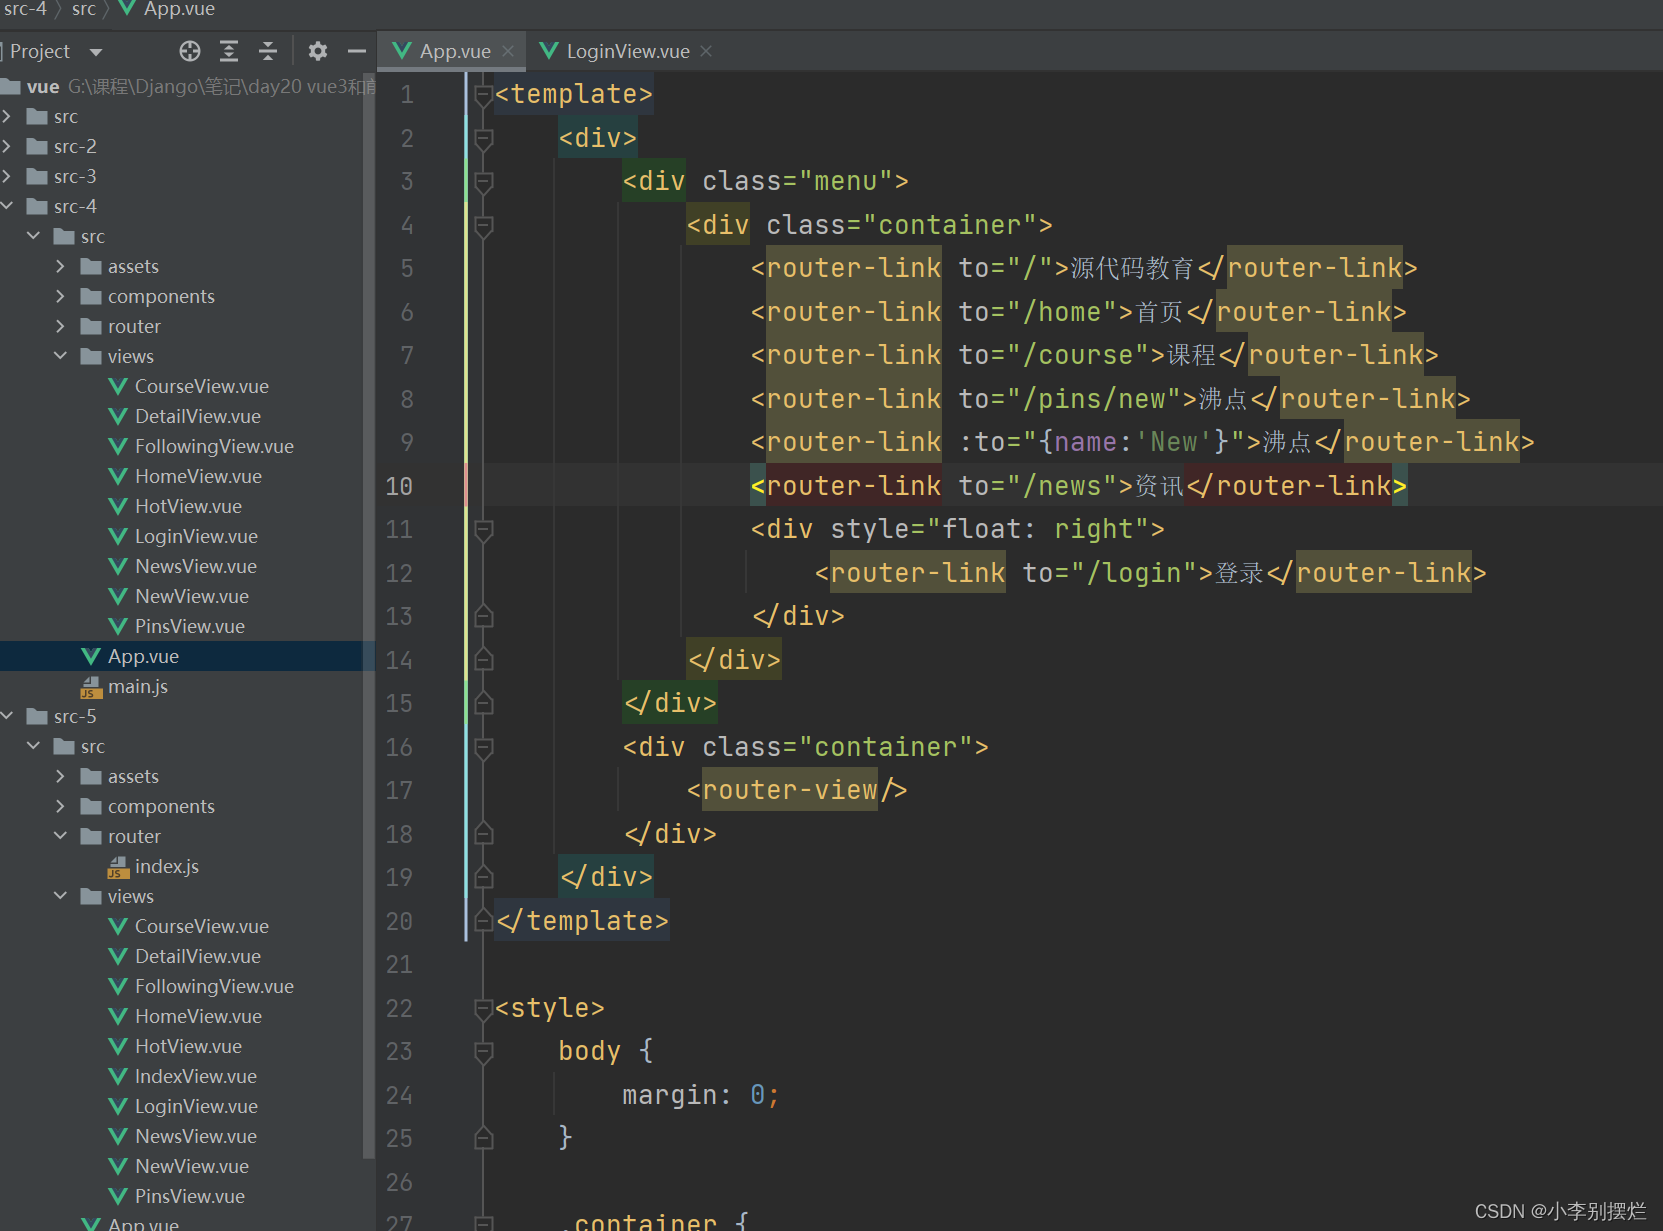
App.vue:
使用链接到组件,可以使用router里配置的path或者name来指向
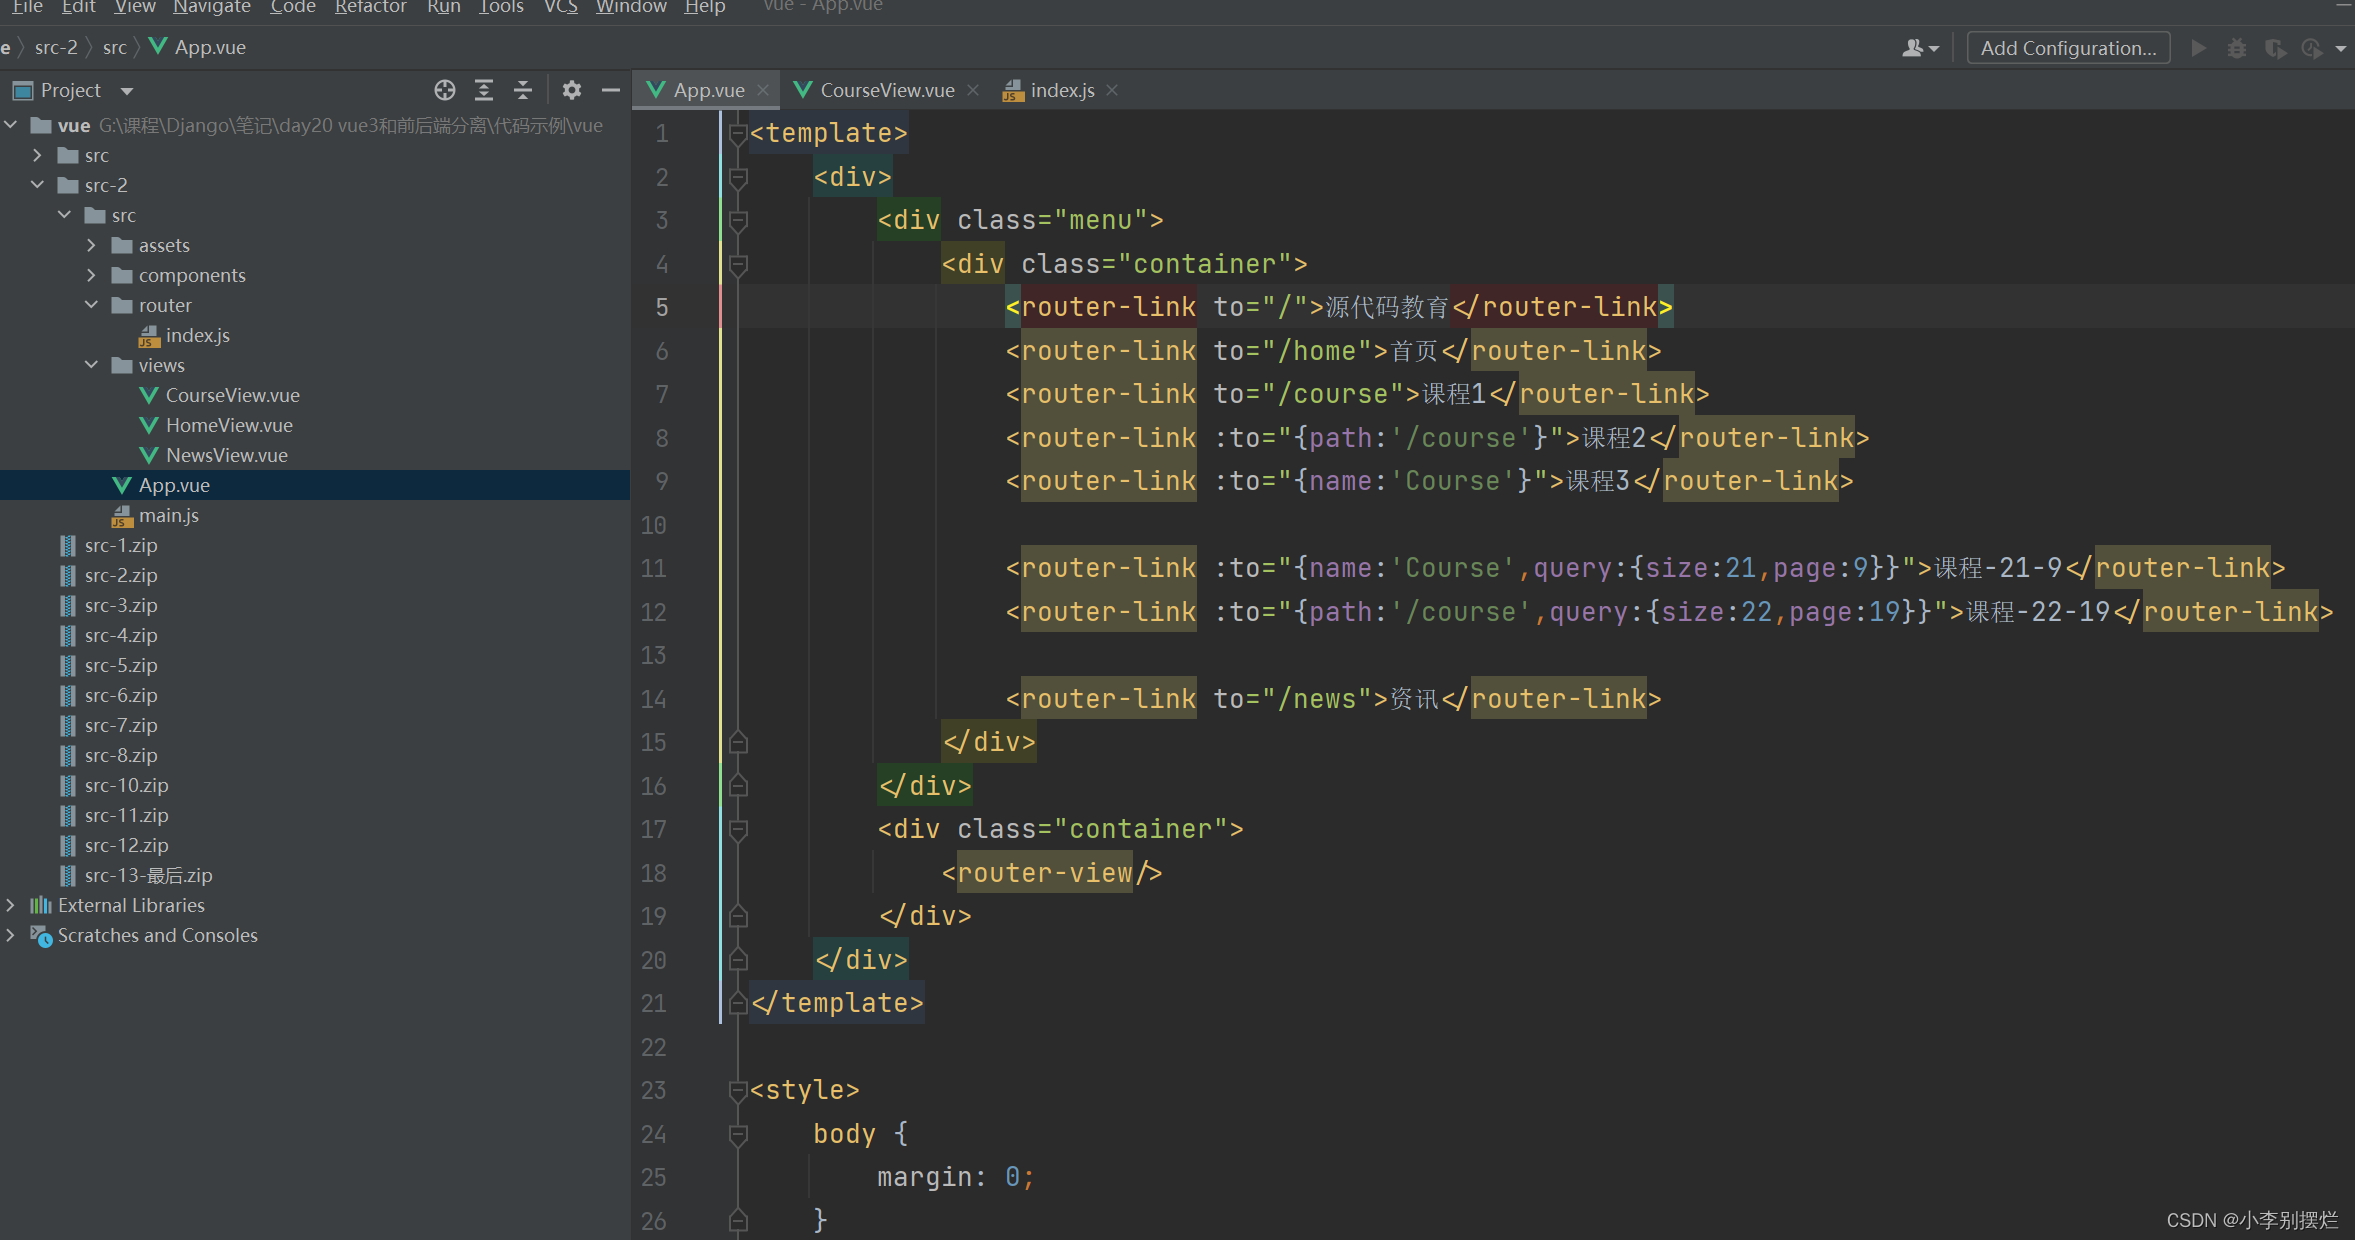
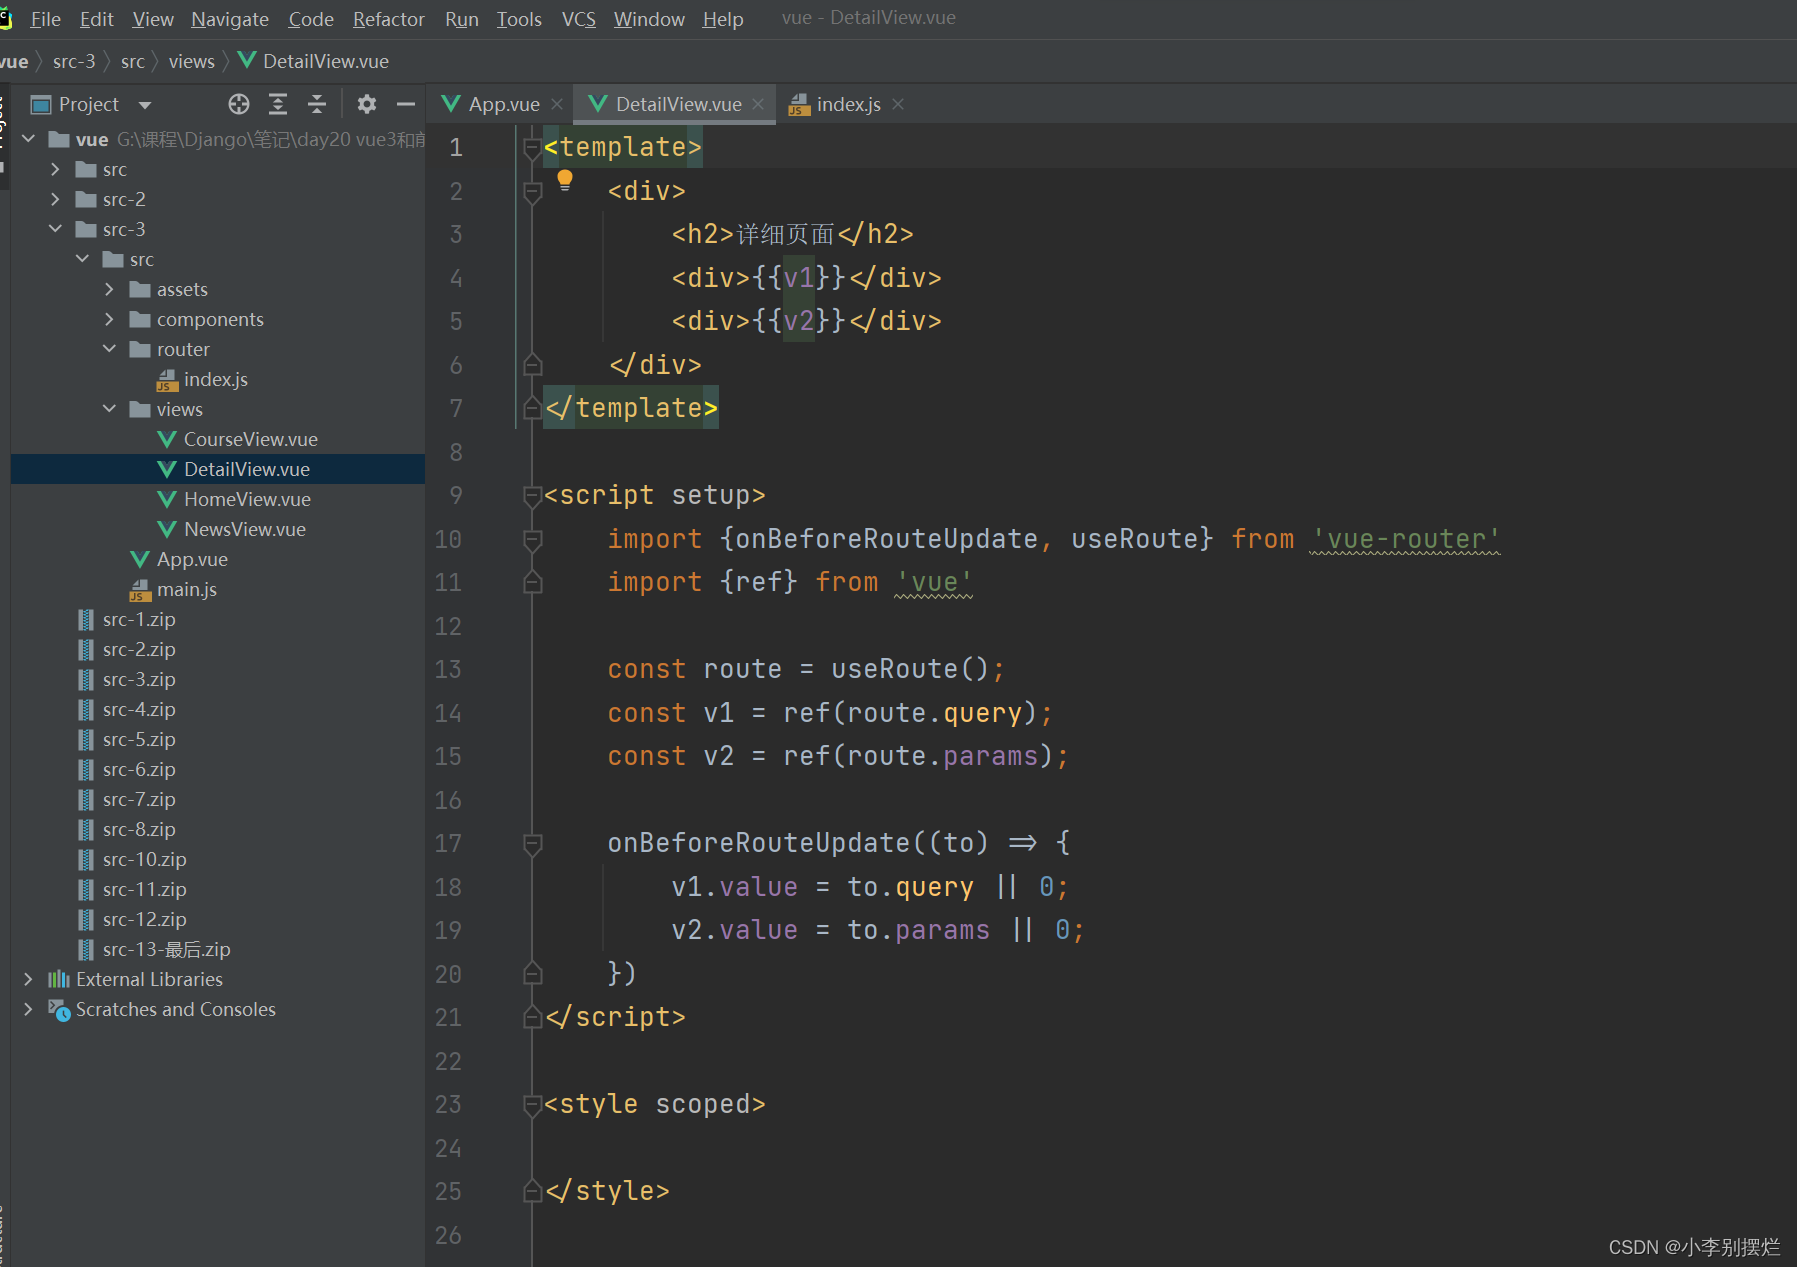
1.URL传值(GET)
在App.vue中使用query来在url中传递值。
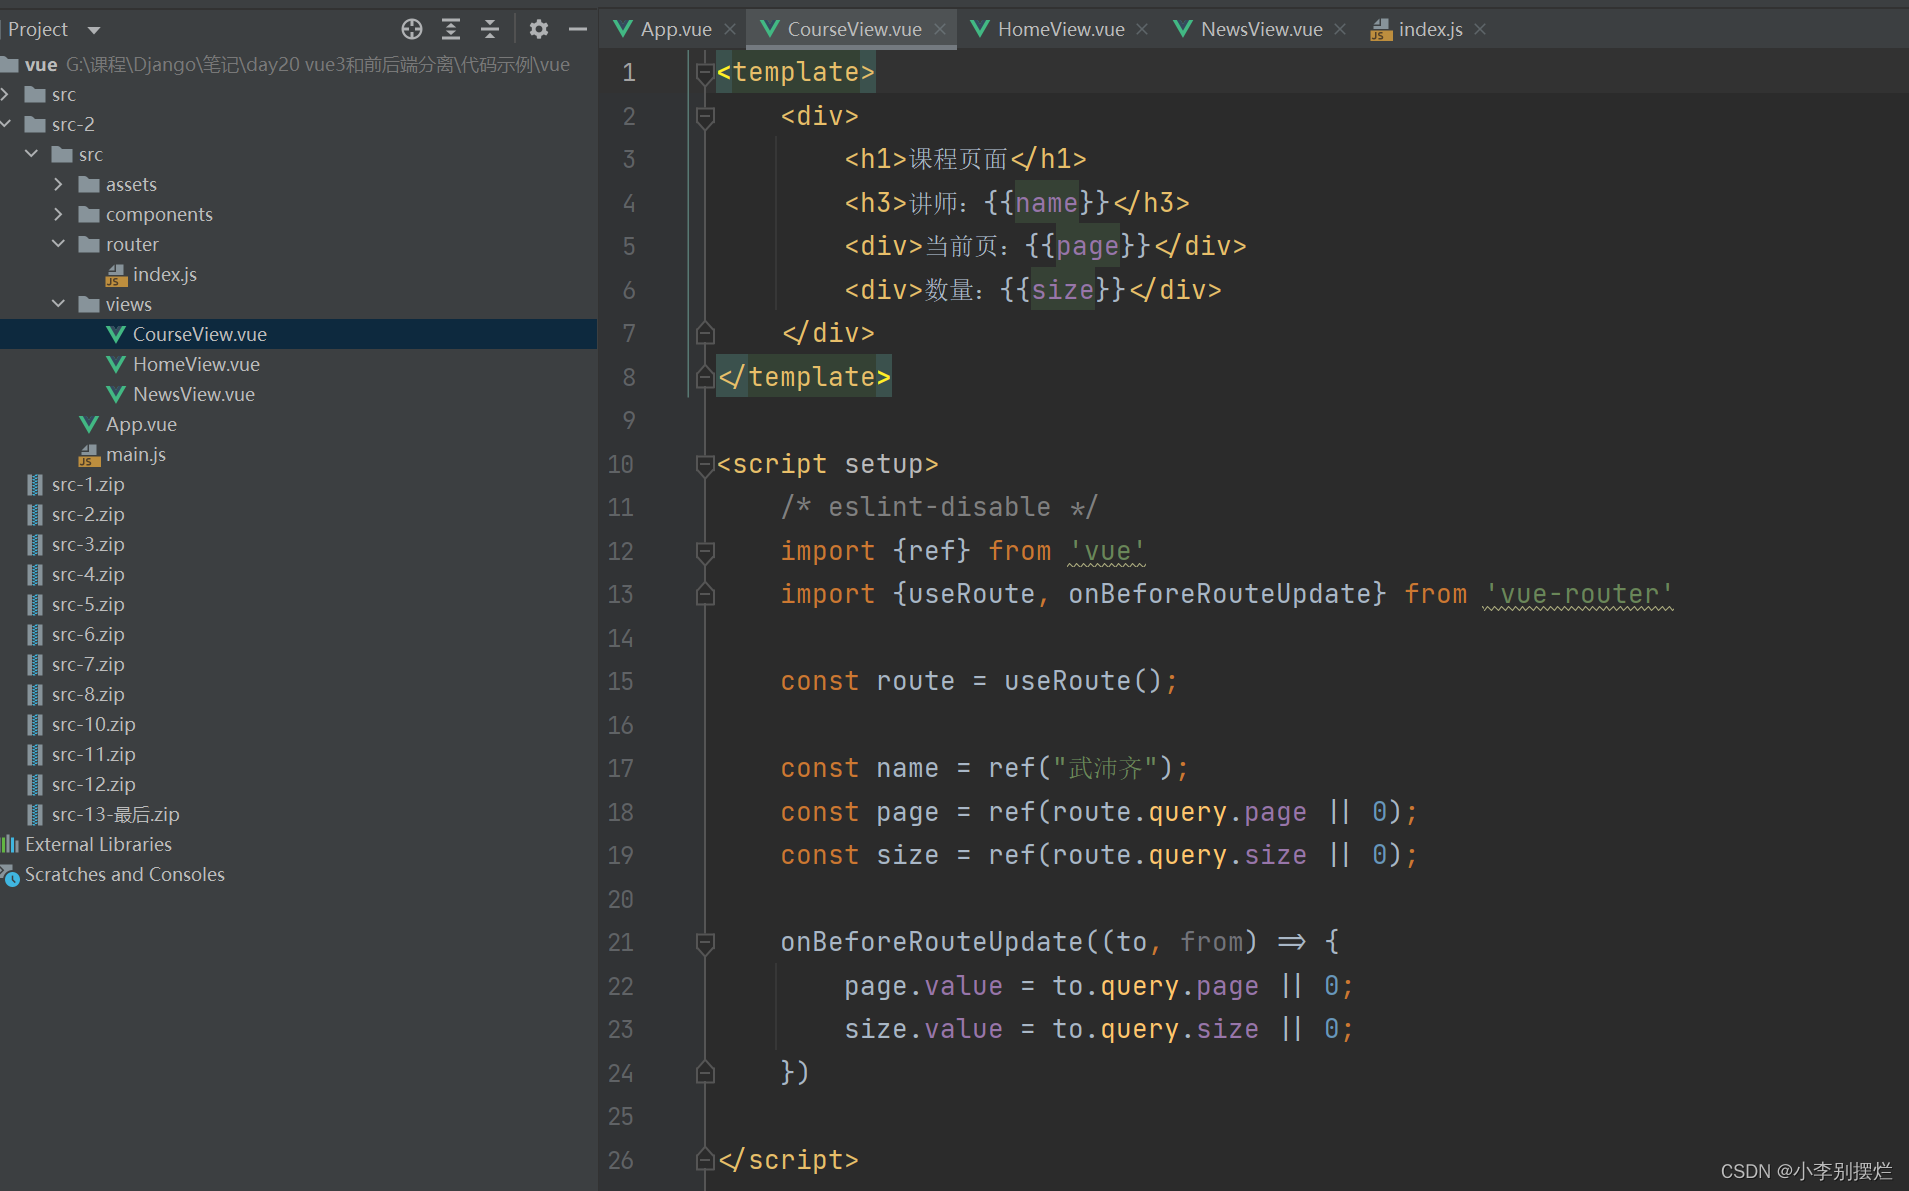
在组件中接收值需要:
1.导入useRoute,然后创建对象
2.使用route.query.变量来取到对应的值,变量需要使用ref包裹
此时存在的问题:
在url都传递了值的组件件跳转时,页面的参数数据不会变化
解决方法:
导入onBeforeRouteUpdate,参数to代表要跳转的组件
使用to.query.变量取出要跳转组件的数据赋值给当前页变量
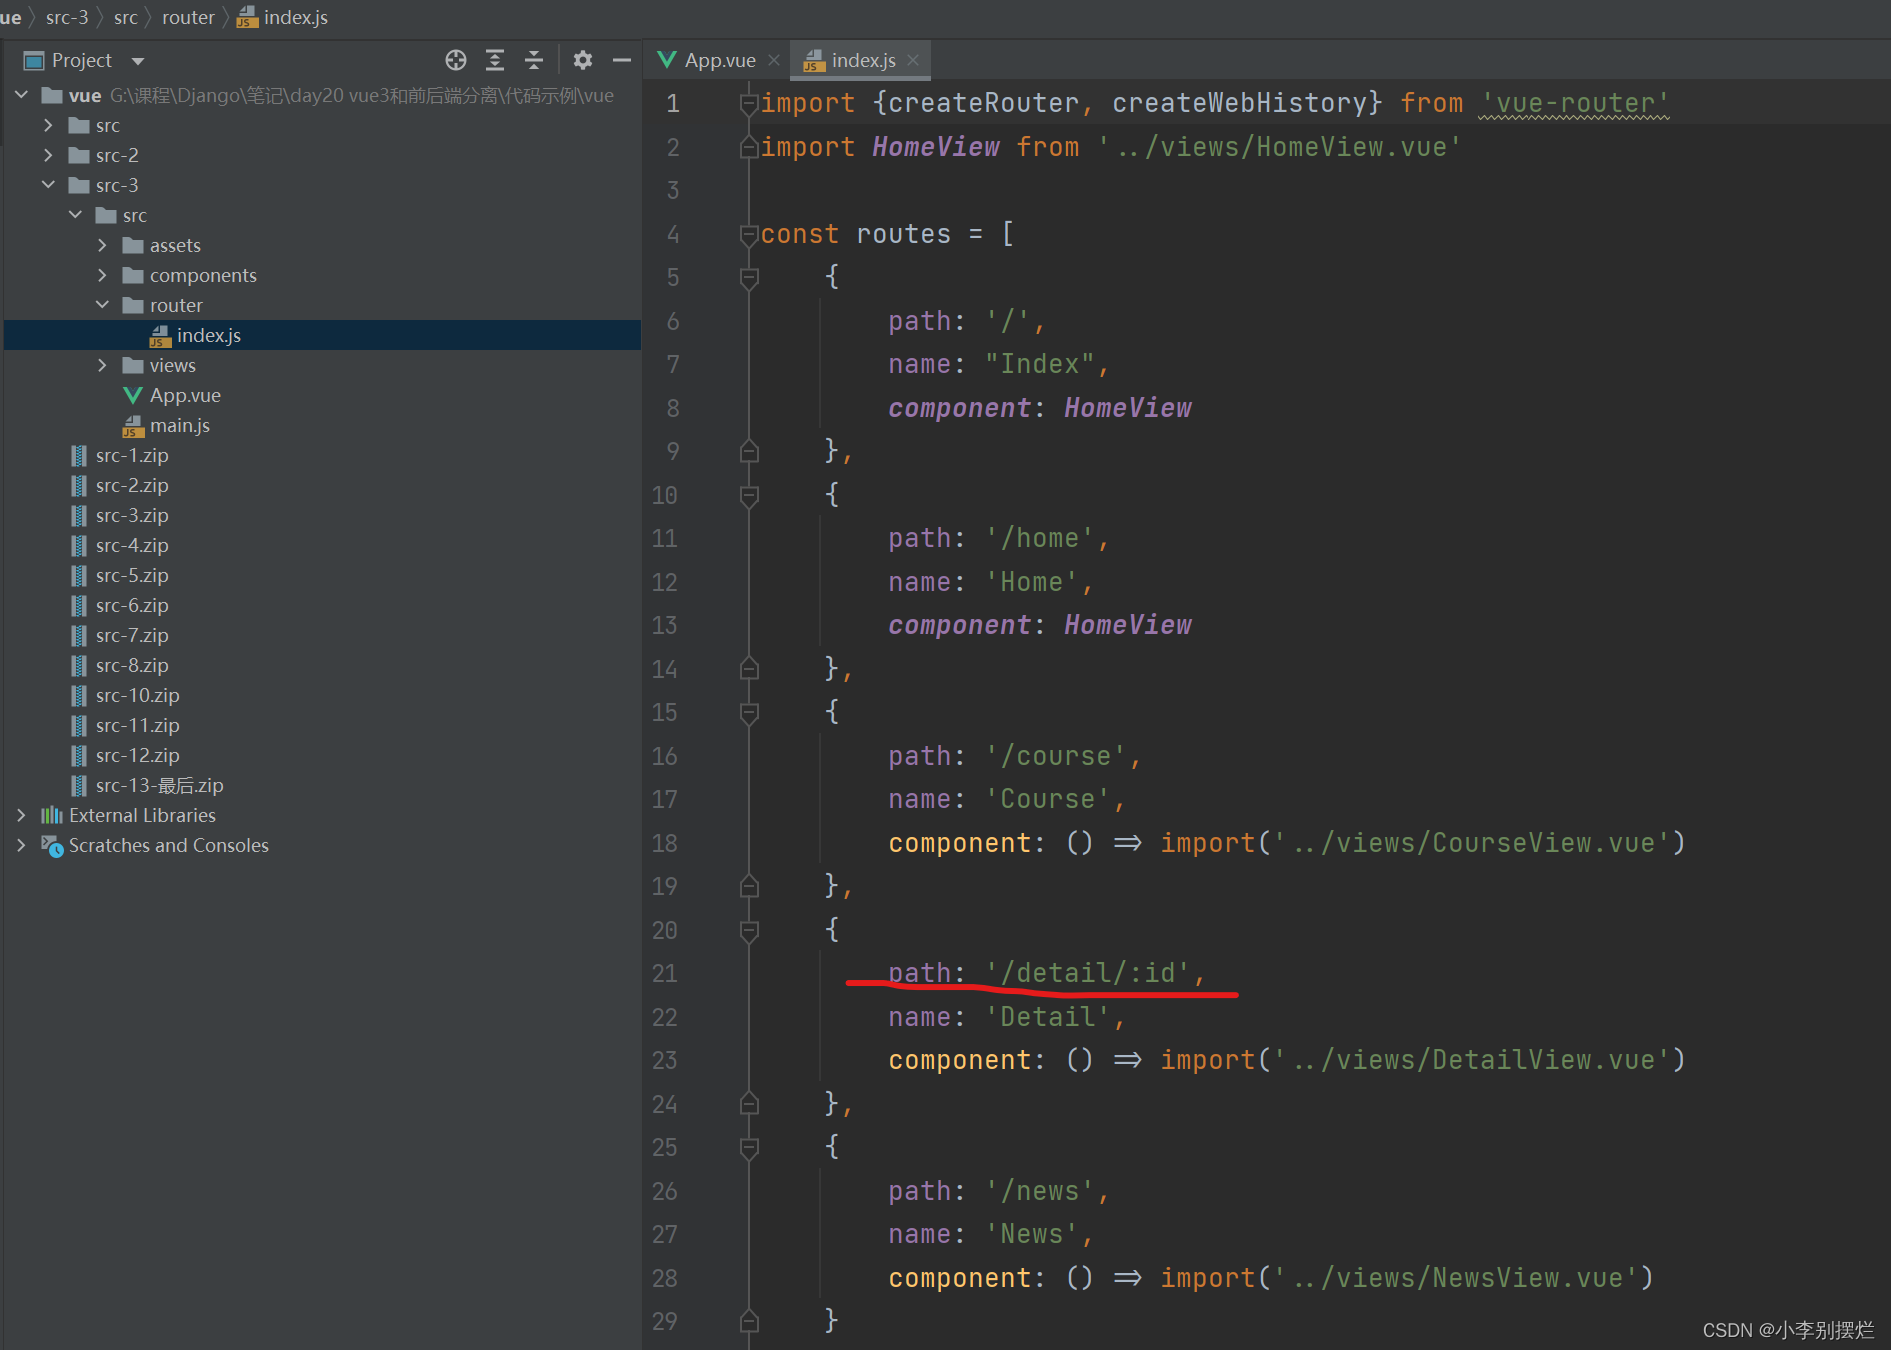
2.URL动态参数params
参数在path中传递:
通过params传递参数:
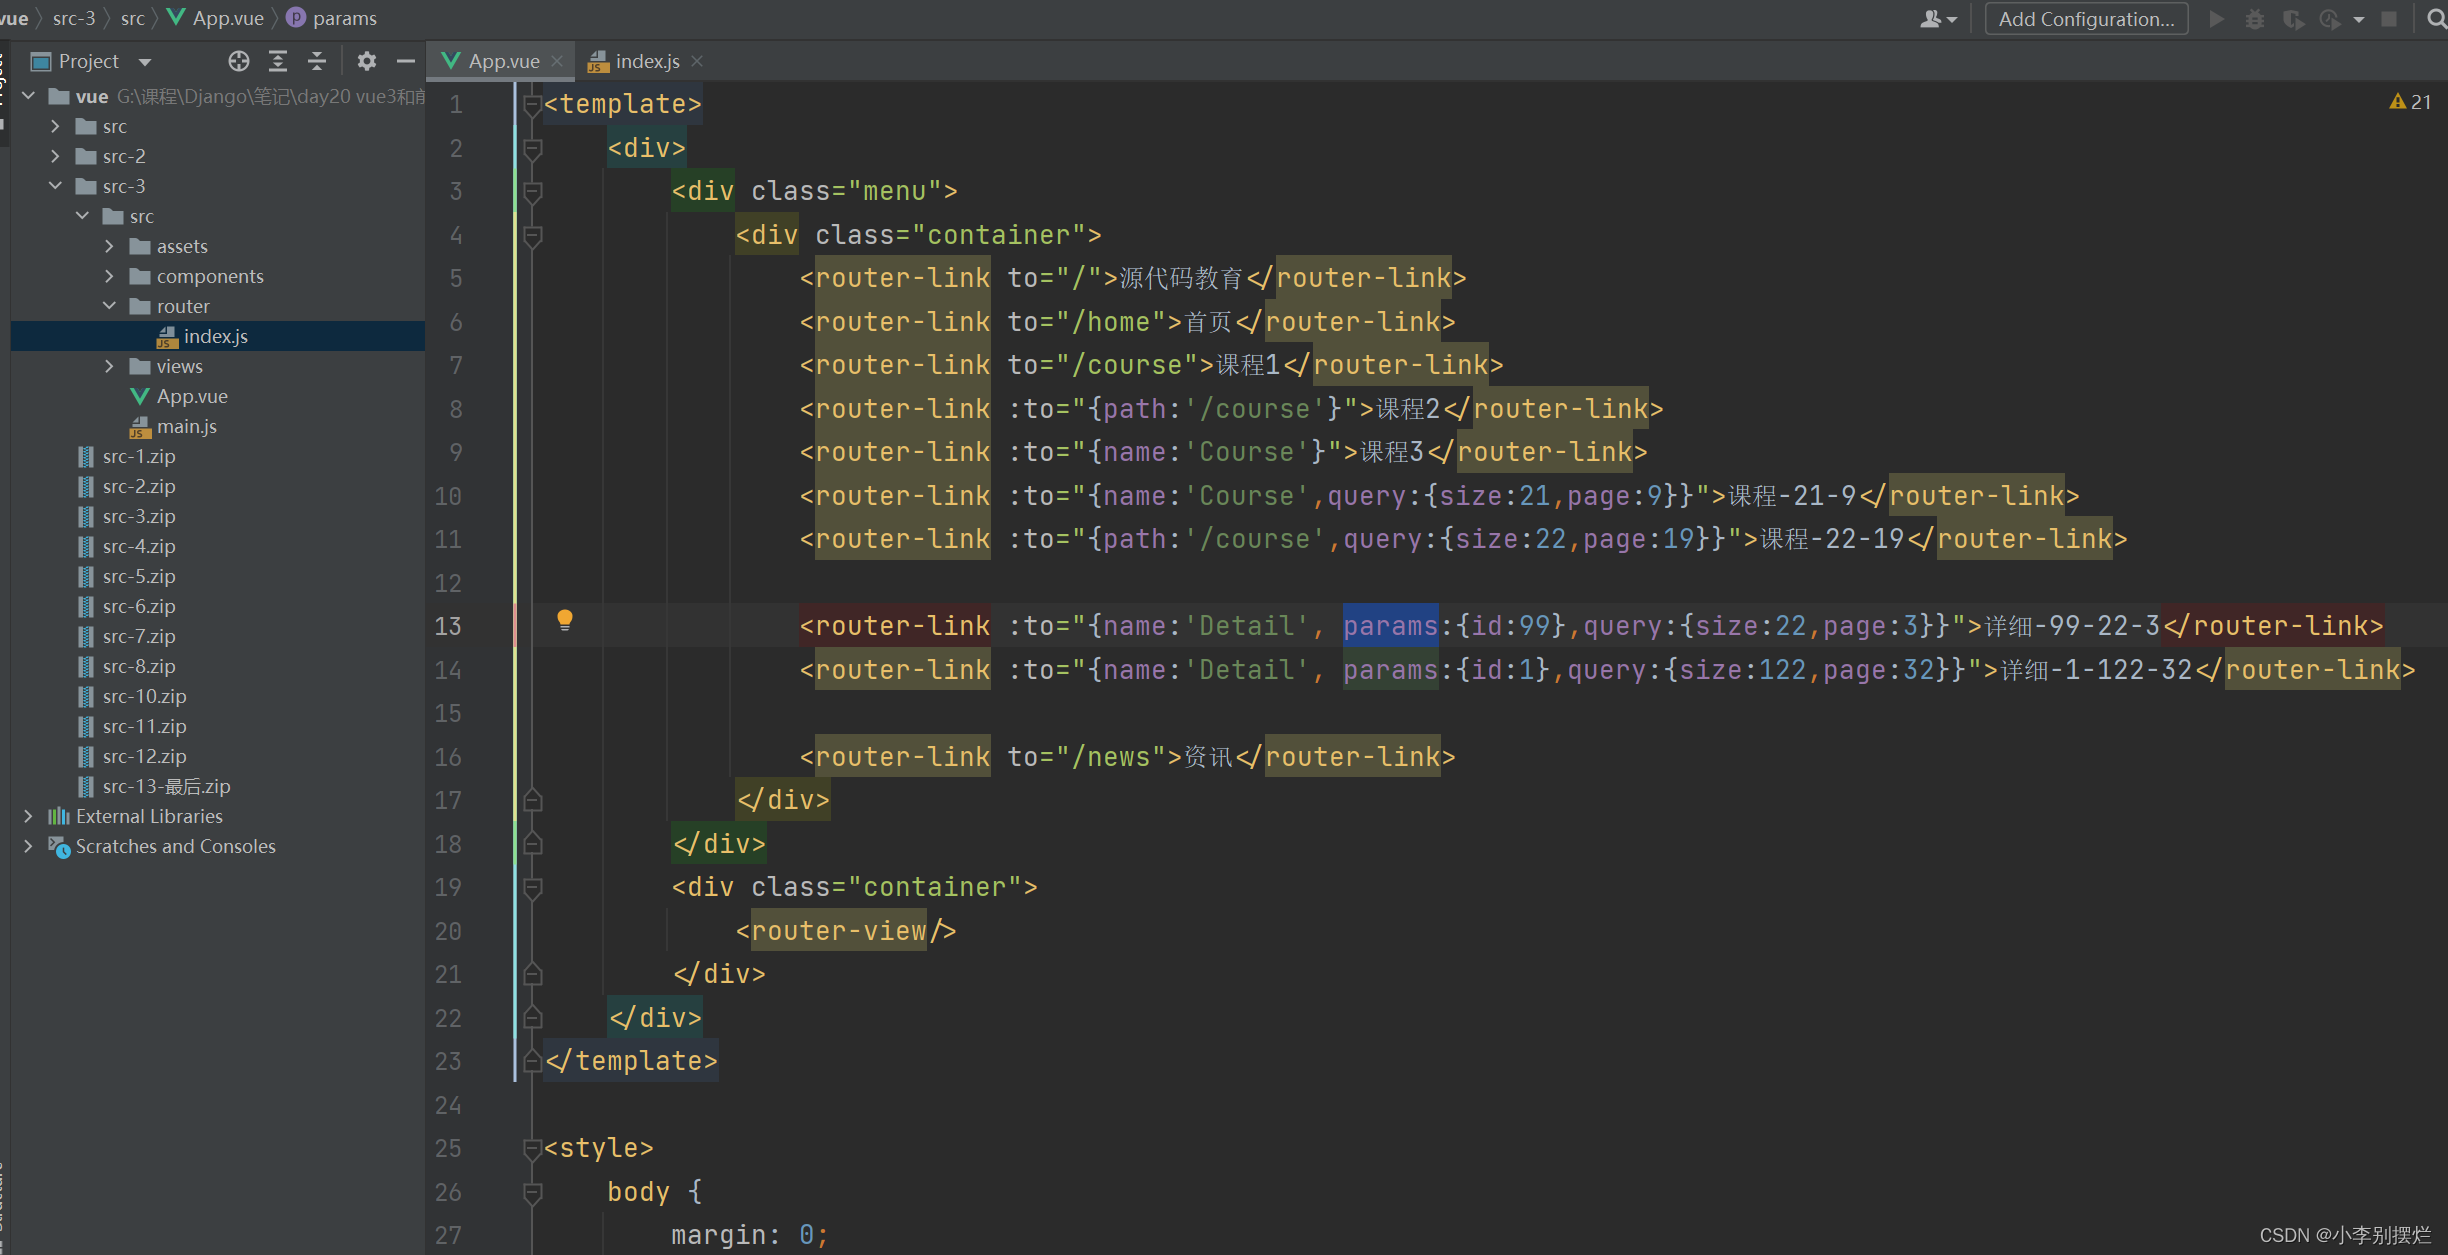
在组件中接收展示:
3.路由嵌套
实现进入一个模块后,可选择下级多个路由进入子模块
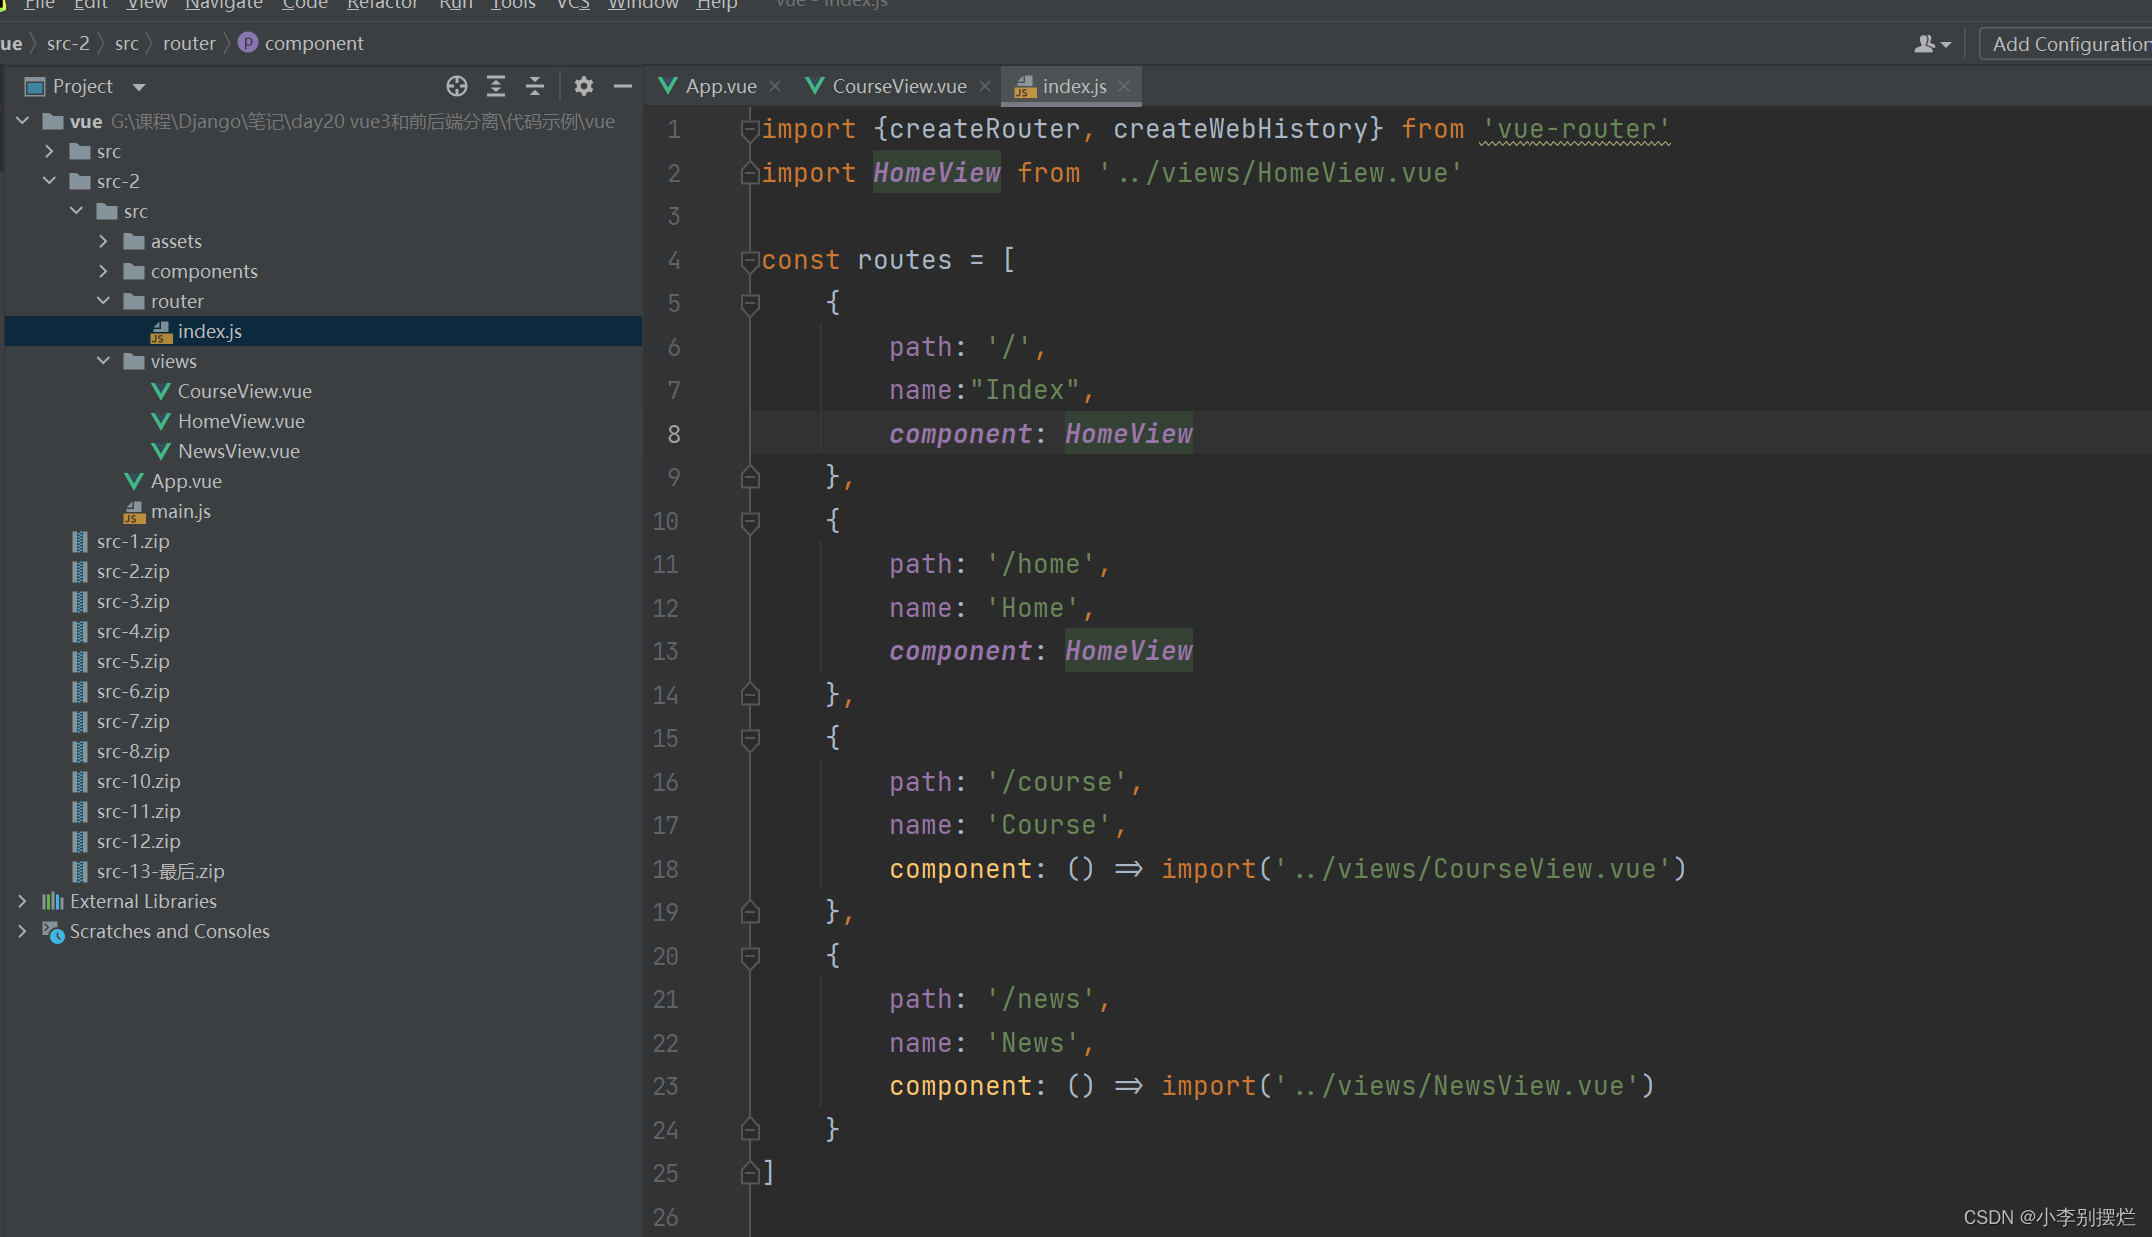
router/index.js:
import {createRouter, createWebHistory} from 'vue-router'
import HomeView from '../views/HomeView.vue'

const routes = [
    {
        path: '/',
        name: "Index",
        component: HomeView
    },
    {
        path: '/home',
        name: 'Home',
        component: HomeView
    },
    {
        path: '/login',
        name: 'Login',
        component: () => import('../views/LoginView.vue'),
    },
    {
        path: '/pins',
        // name: 'Pins',
        component: () => import('../views/PinsView.vue'),
        children: [
            {
                path: '',    //访问pins组件时默认打开New组件,可以使用导入组件也可以使用重定向
                //component: () => import('../views/NewView.vue'),
                redirect: {name: "New"},
            },
            {
                path: 'new',
                name: 'New',
                component: () => import('../views/NewView.vue'),
            },
            {
                path: 'hot',
                name: 'Hot',
                component: () => import('../views/HotView.vue'),
            },
            {
                path: 'following',
                name: 'Following',
                component: () => import('../views/FollowingView.vue'),
            }
        ]
    },
    {
        path: '/course',
        name: 'Course',
        component: () => import('../views/CourseView.vue')
    },
    {
        path: '/detail/:id',
        name: 'Detail',
        component: () => import('../views/DetailView.vue')
    },
    {
        path: '/news',
        name: 'News',
        component: () => import('../views/NewsView.vue')
    }
]

const router = createRouter({
    history: createWebHistory(),
    routes
})

export default router
views/PinsView.vue
<template>
    <div>
        <div>上面的内容</div>
        <div>
            <h3>左边菜单</h3>
            <router-link :to="{name:'Hot'}">热点</router-link>
            <router-link :to="{name:'New'}">最新</router-link>
            <router-link :to="{name:'Following'}">关注</router-link>
        </div>
        <div>右边的内容</div>
        <div>
            <router-view/>
        </div>
    </div>
</template>

<script>
    export default {
        name: "PinsView"
    }
</script>

<style scoped>

</style>
4.编程式导航
实现跳转:
router-link标签
router对象实现 this.$router.push
使用push和replace的区别:
在浏览器回退时,push能回退到实现跳转的页面,replace会覆盖而直接回退到上一个页面
<template>
    <div>
        <h1>新闻页面</h1>
        <input type="button" value="跳转" @click="doClick"/>
    </div>
</template>

<script setup>
    import {useRouter} from 'vue-router'

    const router = useRouter();


    function doClick() {
        //跳转到首页 [Course,]
        // router.push({path:"/home"})
        // router.push({name:"Home"})
        // router.push({name: "Course", query: {page: 10, size: 20}})
        router.push({name: "Detail", params: {id: 100}, query: {page: 10, size: 20}})

        // router.replace({path:"/home"})
        // router.replace({name:"Home"})
        // router.replace({name: "Course", query: {page: 10, size: 20}})
        // router.replace({name: "Detail", params: {id: 100}, query: {page: 10, size: 20}})
        // router.replace({name: "Course", query: {page: 10, size: 20}})

    }
</script>

<style scoped>

</style>
4.1 登录跳转(保留顶部)
登录跳转时,有些会保留顶部的原始导航栏有些不保留。
LoginView.vue
<template>
    <div style="width: 400px;height: 200px;margin: 100px auto;">
        <input type="text" v-model="username">
        <input type="password" v-model="password">
        <input type="button" value="登录" @click="doLogin"/>
    </div>
</template>

<script setup>
    import {useRouter} from 'vue-router'
    import {ref} from 'vue'

    const router = useRouter();

    const username = ref("");
    const password = ref("");

    function doLogin() {
        //...
        if (username.value.length > 0 && password.value.length > 0) {
            console.log("登录成功");
            router.replace({name: "Home"})
        } else {
            console.log("登录失败");
        }
    }
</script>

<style scoped>

</style>
App.vue中导航保留
router/index.js:

4.2 登录跳转(不含顶部)
router/index.js:
import {createRouter, createWebHistory} from 'vue-router'
import HomeView from '../views/HomeView.vue'

const routes = [
    {
        path: '/login',
        name: 'Login',
        component: () => import('../views/LoginView.vue'),
    },
    {
        path: '/',
        component: HomeView,
        children: [
            {
                path: '',
                // name: 'Index',
                // component: () => import('../views/IndexView.vue'),
                redirect: {name: "Index"}
            },
            {
                path: 'index',
                name: 'Index',
                component: () => import('../views/IndexView.vue'),
            },
            {
                path: '/course',
                name: 'Course',
                component: () => import('../views/CourseView.vue')
            },
            {
                path: '/news',
                name: 'News',
                component: () => import('../views/NewsView.vue')
            },
            {
                path: '/pins',
                component: () => import('../views/PinsView.vue'),
                children: [
                    {
                        path: '',
                        //component: () => import('../views/NewView.vue'),
                        redirect: {name: "New"},
                    },
                    {
                        path: 'new',
                        name: 'New',
                        component: () => import('../views/NewView.vue'),
                    },
                    {
                        path: 'hot',
                        name: 'Hot',
                        component: () => import('../views/HotView.vue'),
                    },
                    {
                        path: 'following',
                        name: 'Following',
                        component: () => import('../views/FollowingView.vue'),
                    }
                ]
            },
        ]
    },
]

const router = createRouter({
    history: createWebHistory(),
    routes
})

export default router
5.导航守卫(全局)
未登录时,部分内容不允许访问,会跳转带登录页
import {createRouter, createWebHistory} from 'vue-router'
import HomeView from '../views/HomeView.vue'

const routes = [
    {
        path: '/login',
        name: 'Login',
        component: () => import('../views/LoginView.vue'),
    },
    {
        path: '/',
        component: HomeView,
        children: [
            {
                path: '',
                // name: 'Index',
                // component: () => import('../views/IndexView.vue'),
                redirect: {name: "Index"}
            },
            {
                path: 'index',
                name: 'Index',
                component: () => import('../views/IndexView.vue'),
            },
            {
                path: '/course',
                name: 'Course',
                component: () => import('../views/CourseView.vue')
            },
            {
                path: '/news',
                name: 'News',
                component: () => import('../views/NewsView.vue')
            },
            {
                path: '/pins',
                component: () => import('../views/PinsView.vue'),
                children: [
                    {
                        path: '',
                        //component: () => import('../views/NewView.vue'),
                        redirect: {name: "New"},
                    },
                    {
                        path: 'new',
                        name: 'New',
                        component: () => import('../views/NewView.vue'),
                    },
                    {
                        path: 'hot',
                        name: 'Hot',
                        component: () => import('../views/HotView.vue'),
                    },
                    {
                        path: 'following',
                        name: 'Following',
                        component: () => import('../views/FollowingView.vue'),
                    }
                ]
            },
        ]
    },
]

const router = createRouter({
    history: createWebHistory(),
    routes
})


router.beforeEach((to, from, next) => {
    // to,即将访问路由对象
    // from,当前正要离开路由
    // next() 继续向后执行,去to的页面
    // next(false) 不跳转,还在当前页面。
    // next("/xxx")  next({name:"xxx"})  next({pat:"/xxx"})
    let token = sessionStorage.getItem("isLogin");

    if (token) {
        // 已登录,可以向目标地址访问
        next();
        return
    }

    // 未登录,登录页面
    if (to.name === "Login") {
        next();
        return;
    }

    // 未登录,访问的其他地址
    next({name: "Login"});

})


export default router
4.vuex
4.1 安装
npm install vue-vuex --save
手动创建文件+配置
或
vue add vuex (推荐)
4.2 使用示例
登录后,将导航栏的登录替换成显示用户名
4.2.1 案例(vuex)
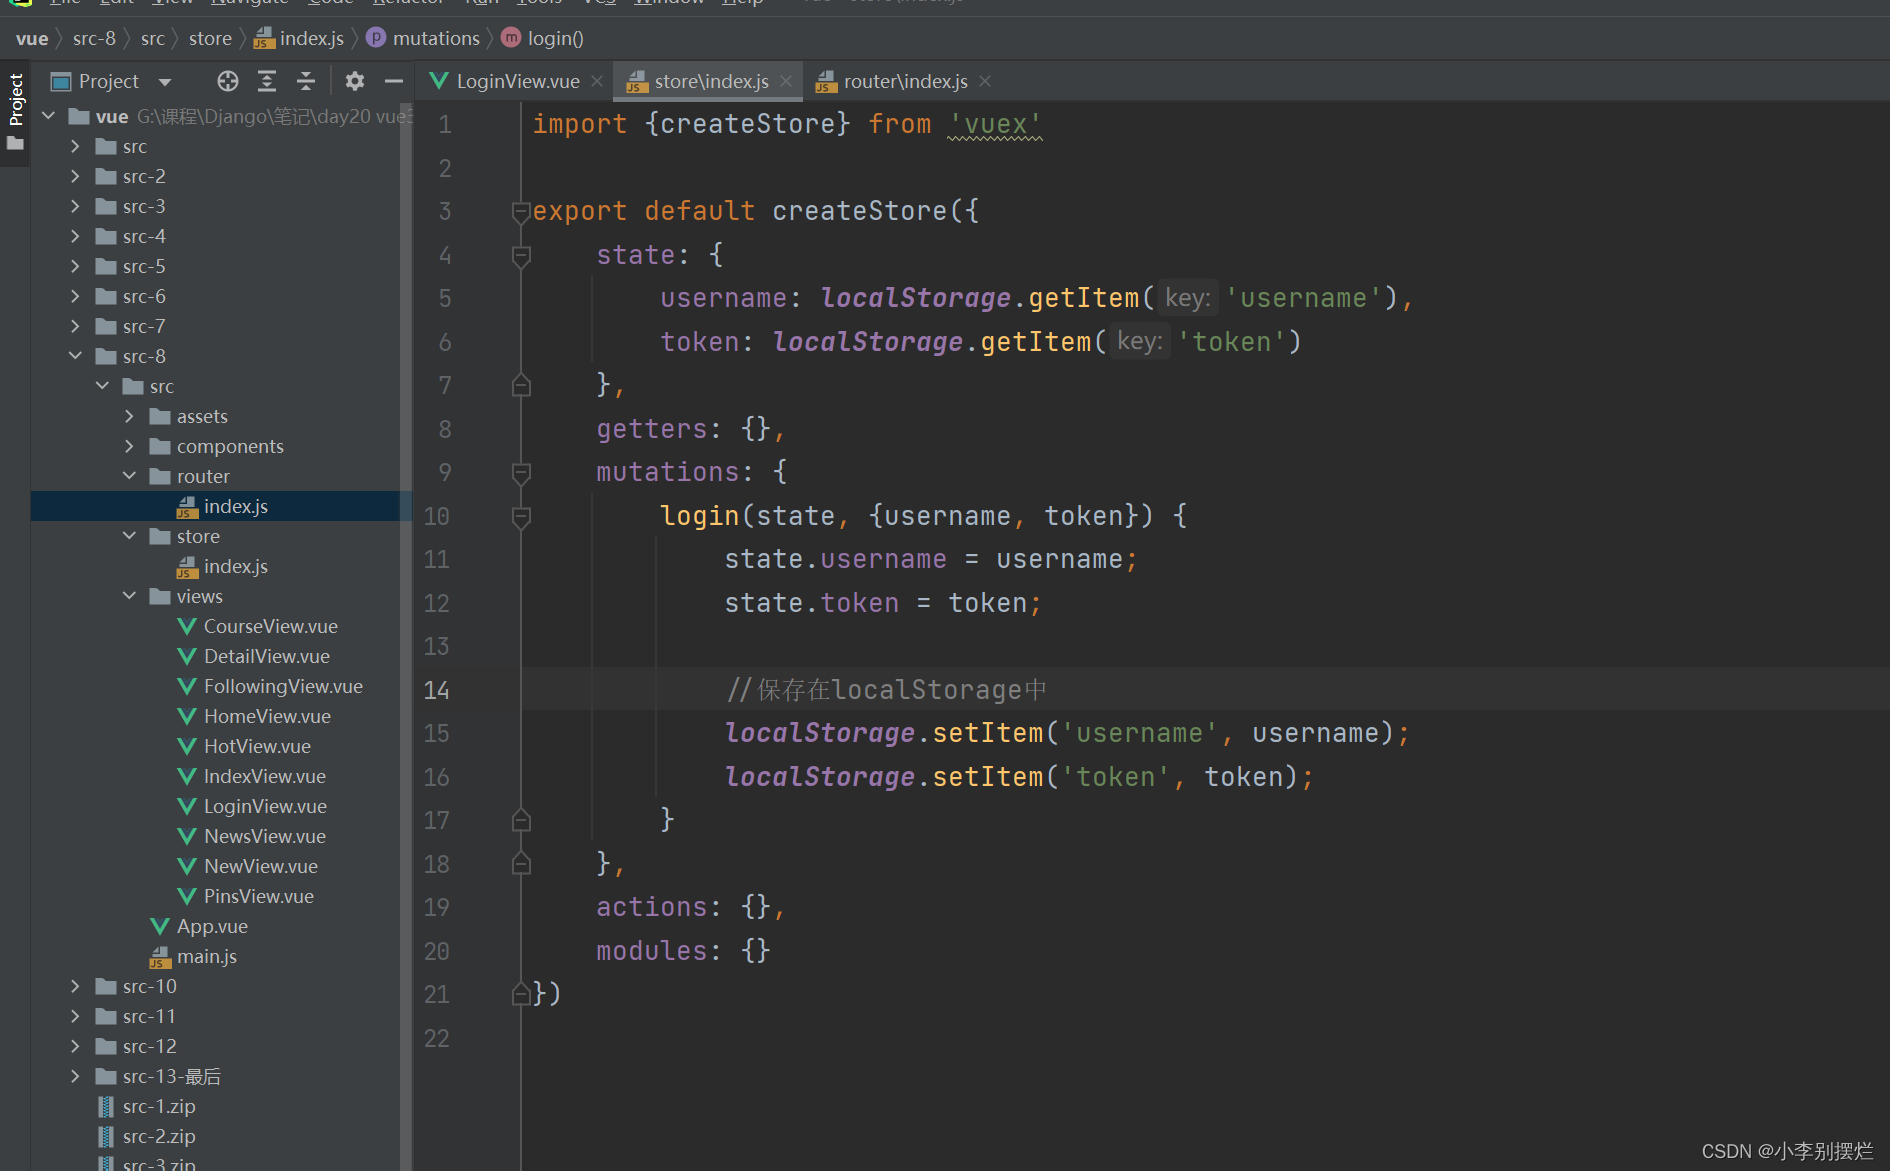
store/index.js
import {createStore} from 'vuex'

export default createStore({
    state: {
        username: "",
        token: ""
    },
    getters: {},
    mutations: {
        login(state, {username, token}) {
            state.username = username;
            state.token = token;
        }
    },
    actions: {},
    modules: {}
})
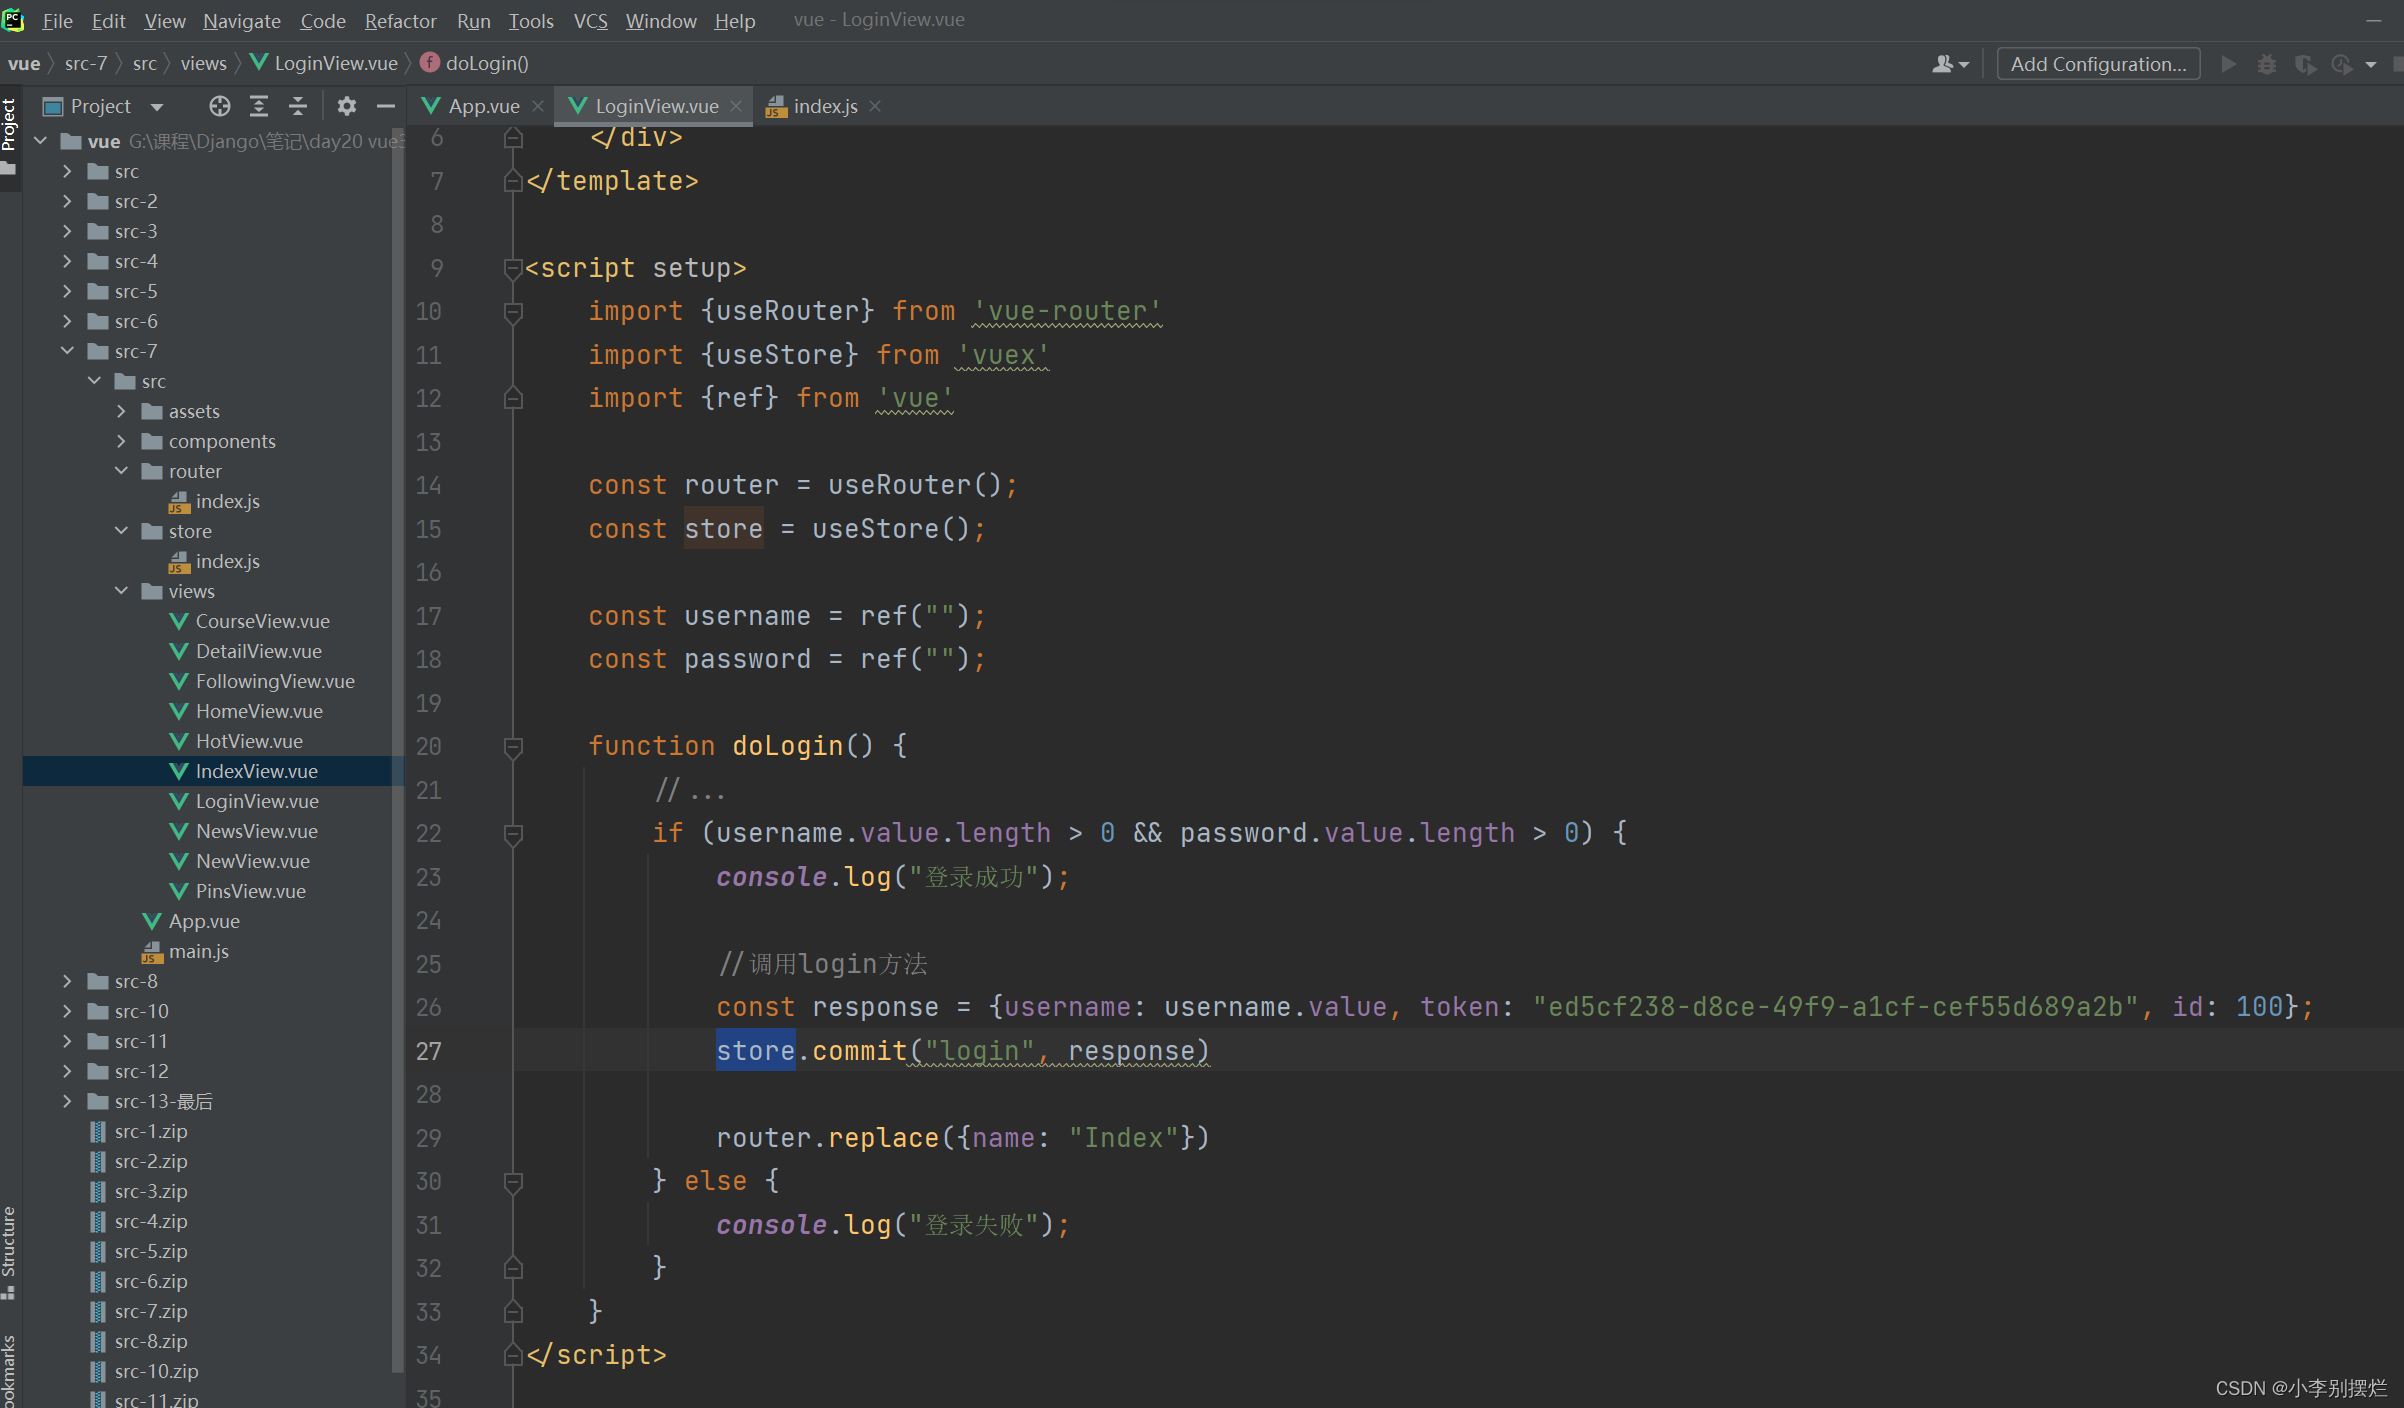
LoginView:
使用store,调用login方法
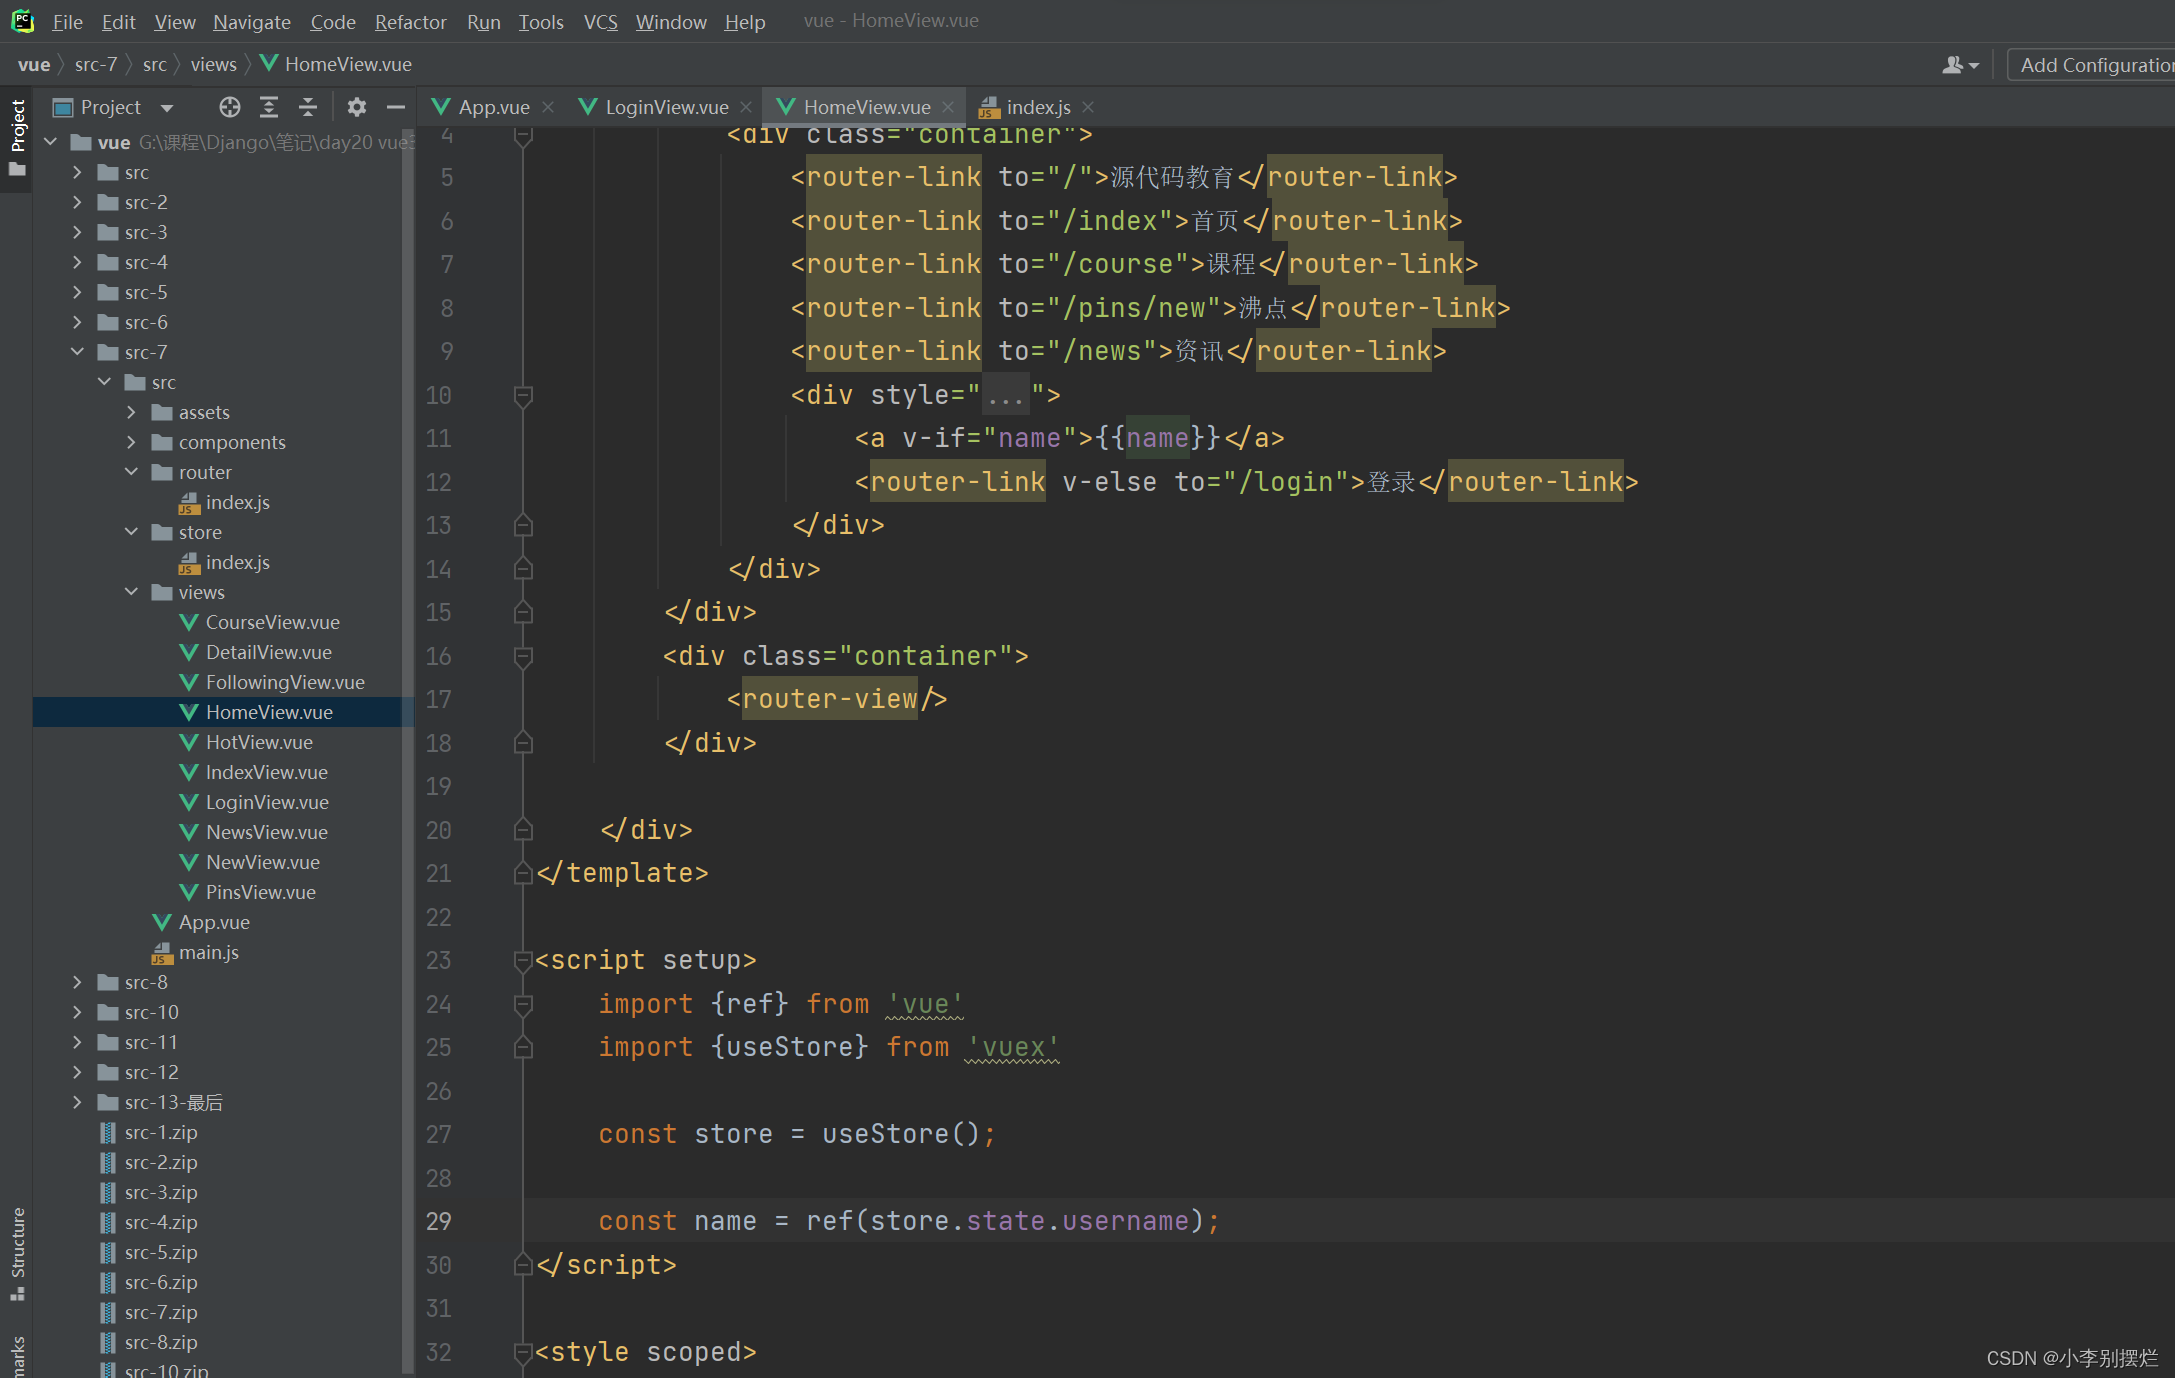
HomeView:
调用store.state.username获取用户名,将导航栏登录改为v-if使用
此时存在的问题:
登录后导航栏会变成用户名,但是刷新页面后又会消失
解决方法:使用vuex+存储
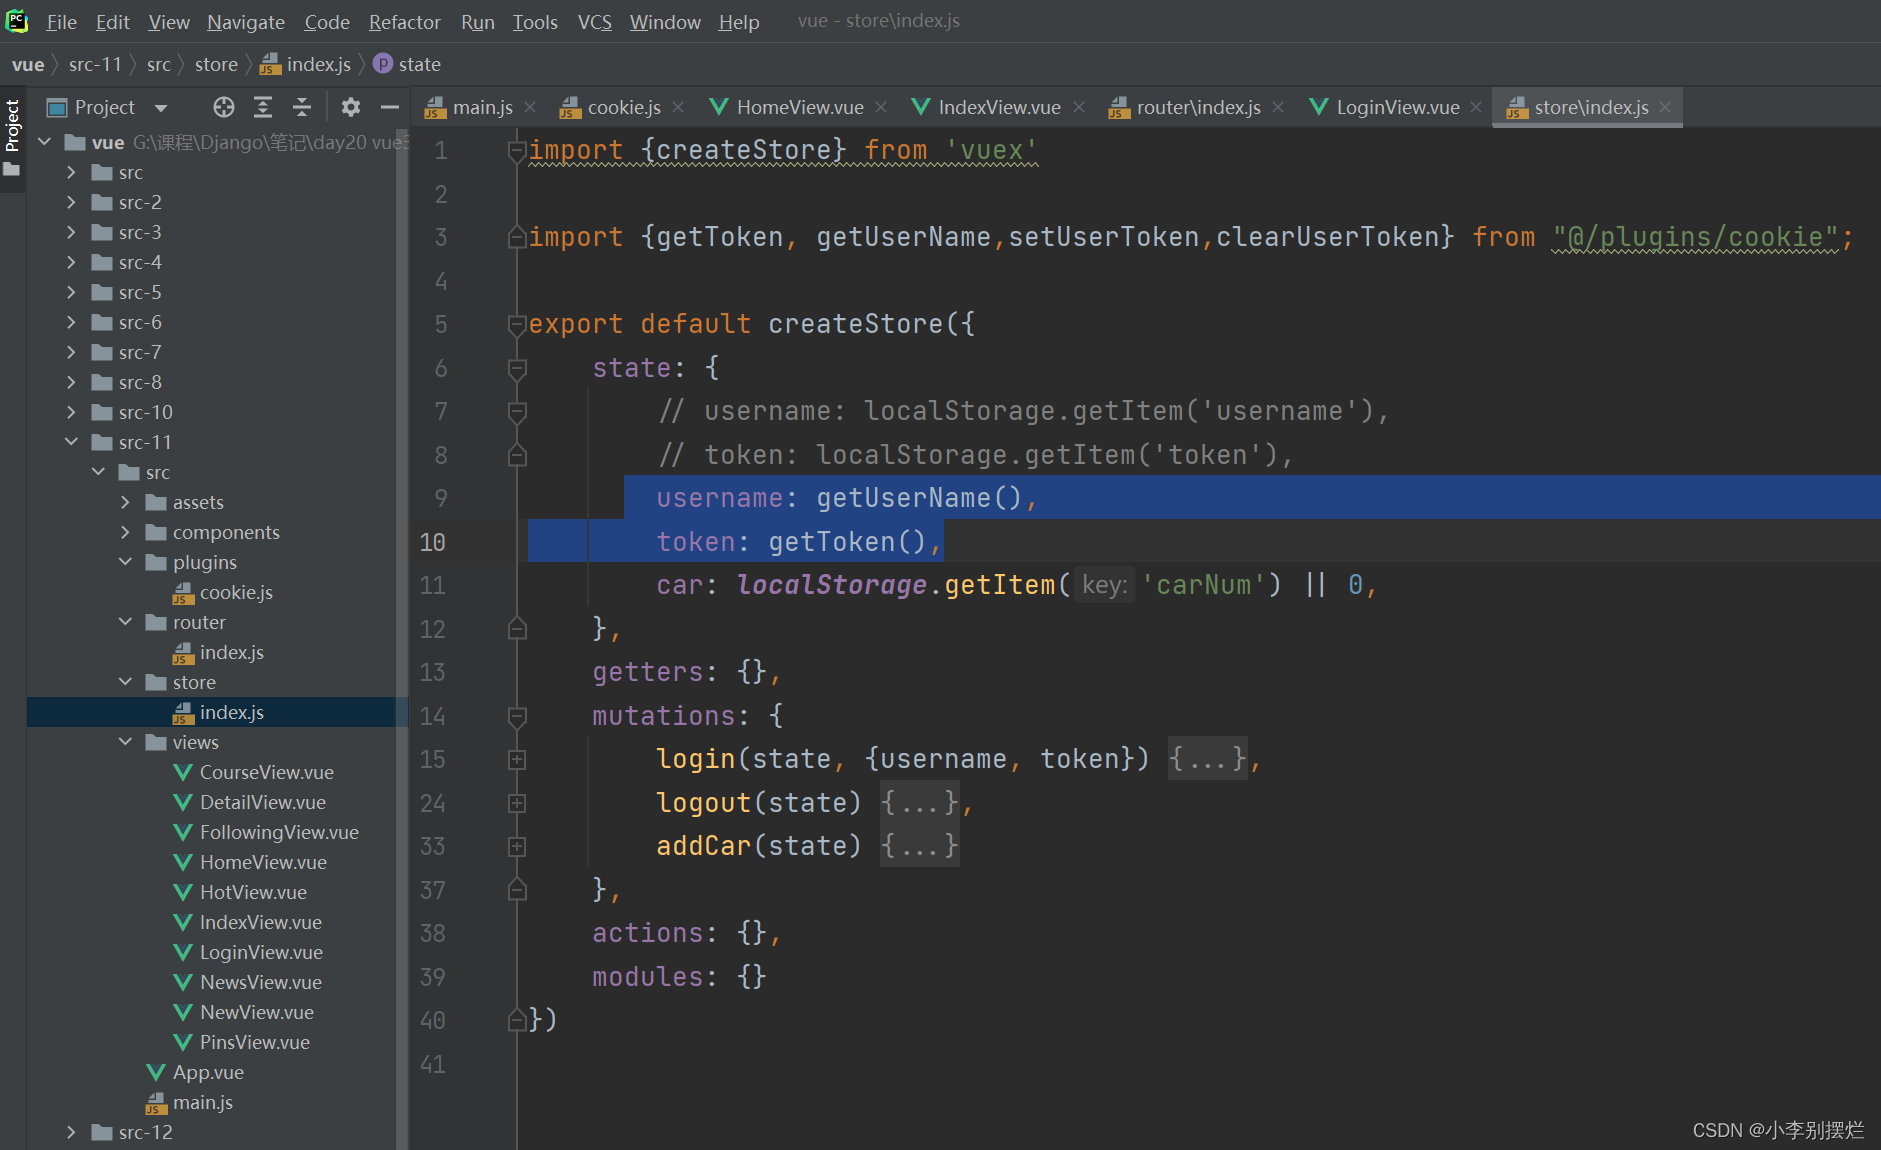
4.2.2 案例(vuex+存储)
这里使用localStorage存储,将用户信息存储到localStorage,调用state时先读取
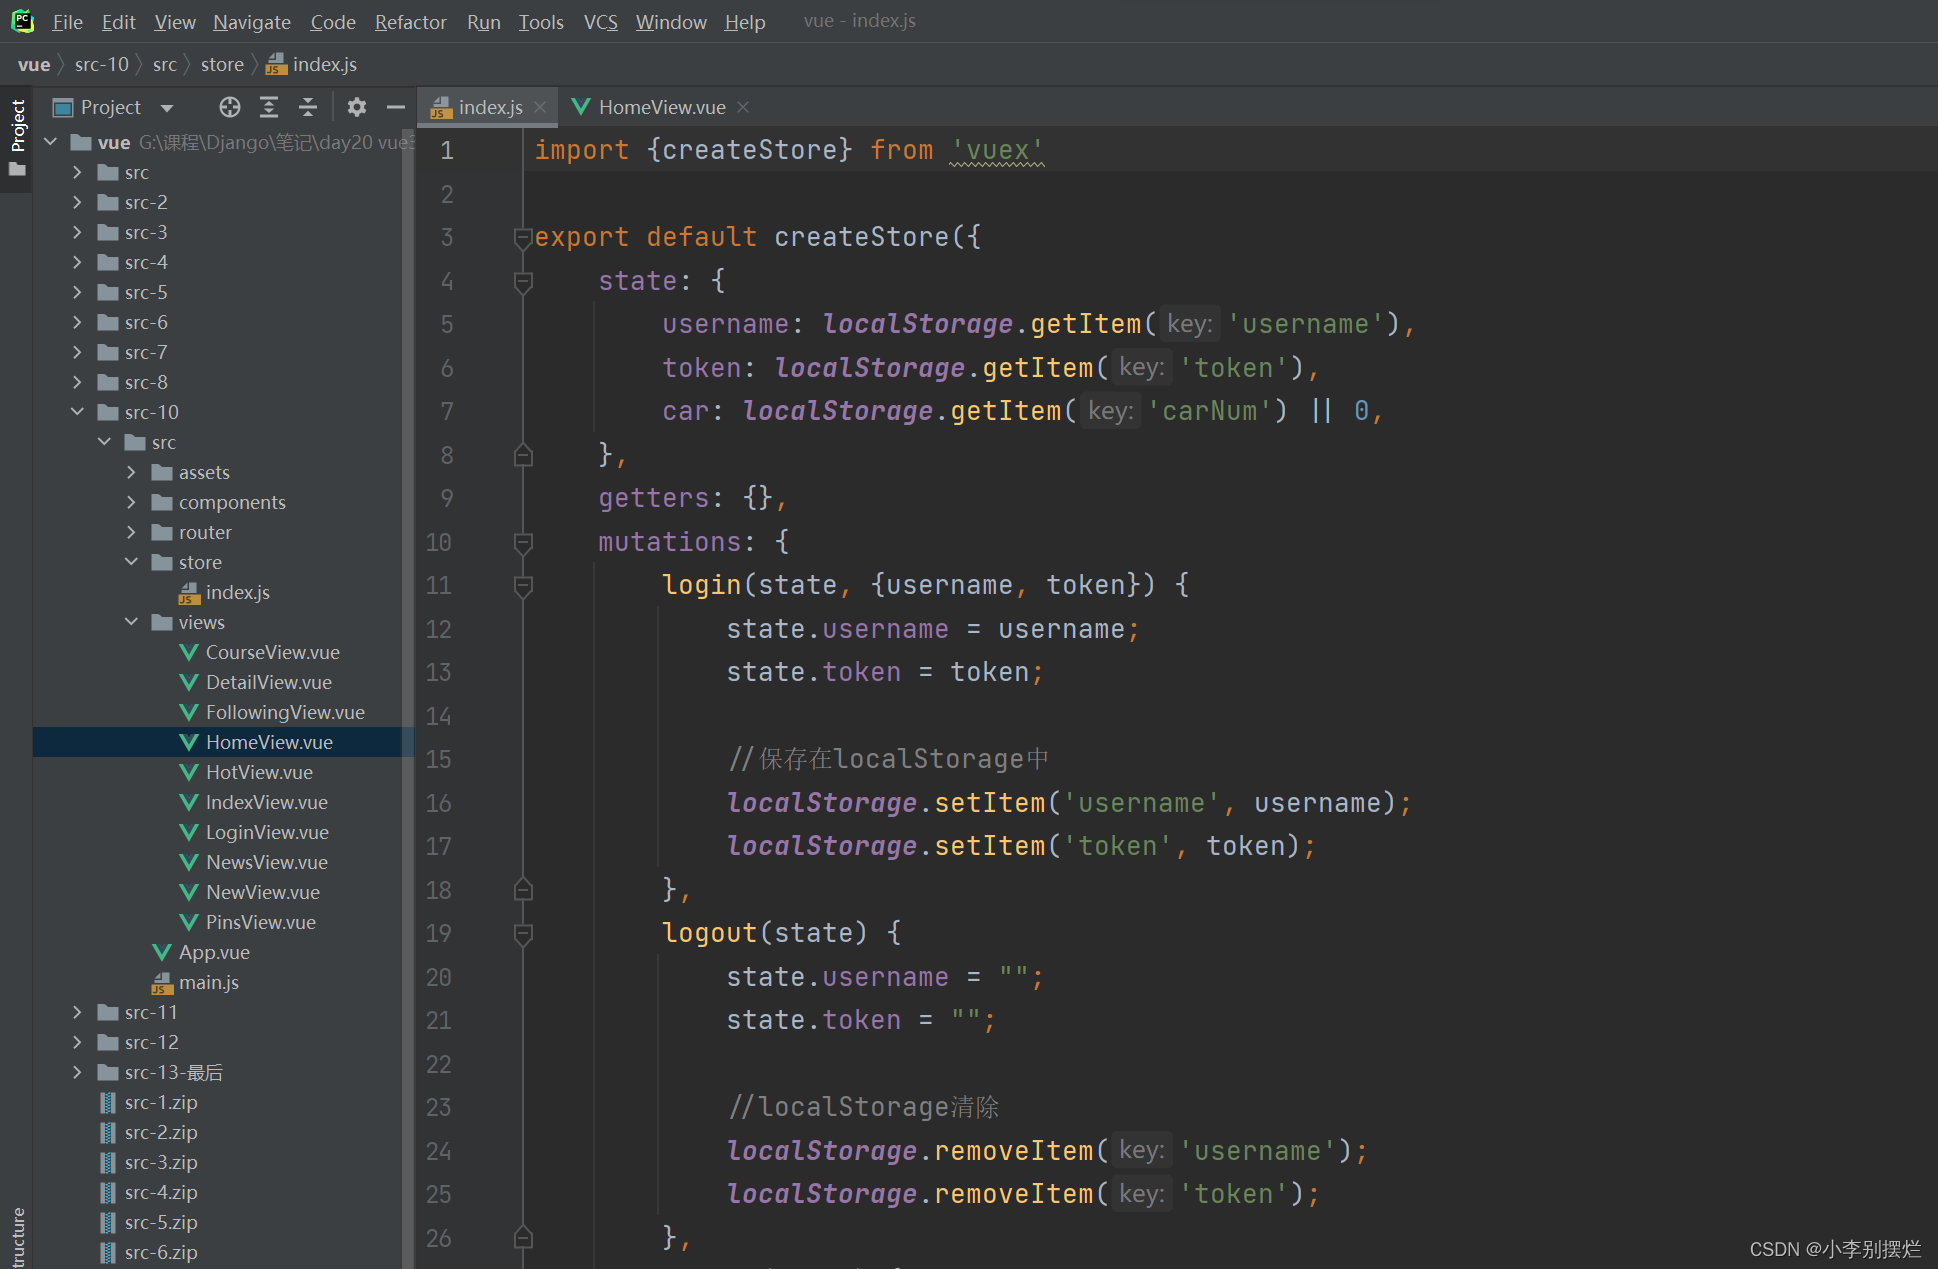
4.2.3 案例(注销功能)
清空state及localStorage的值,跳转到登录页

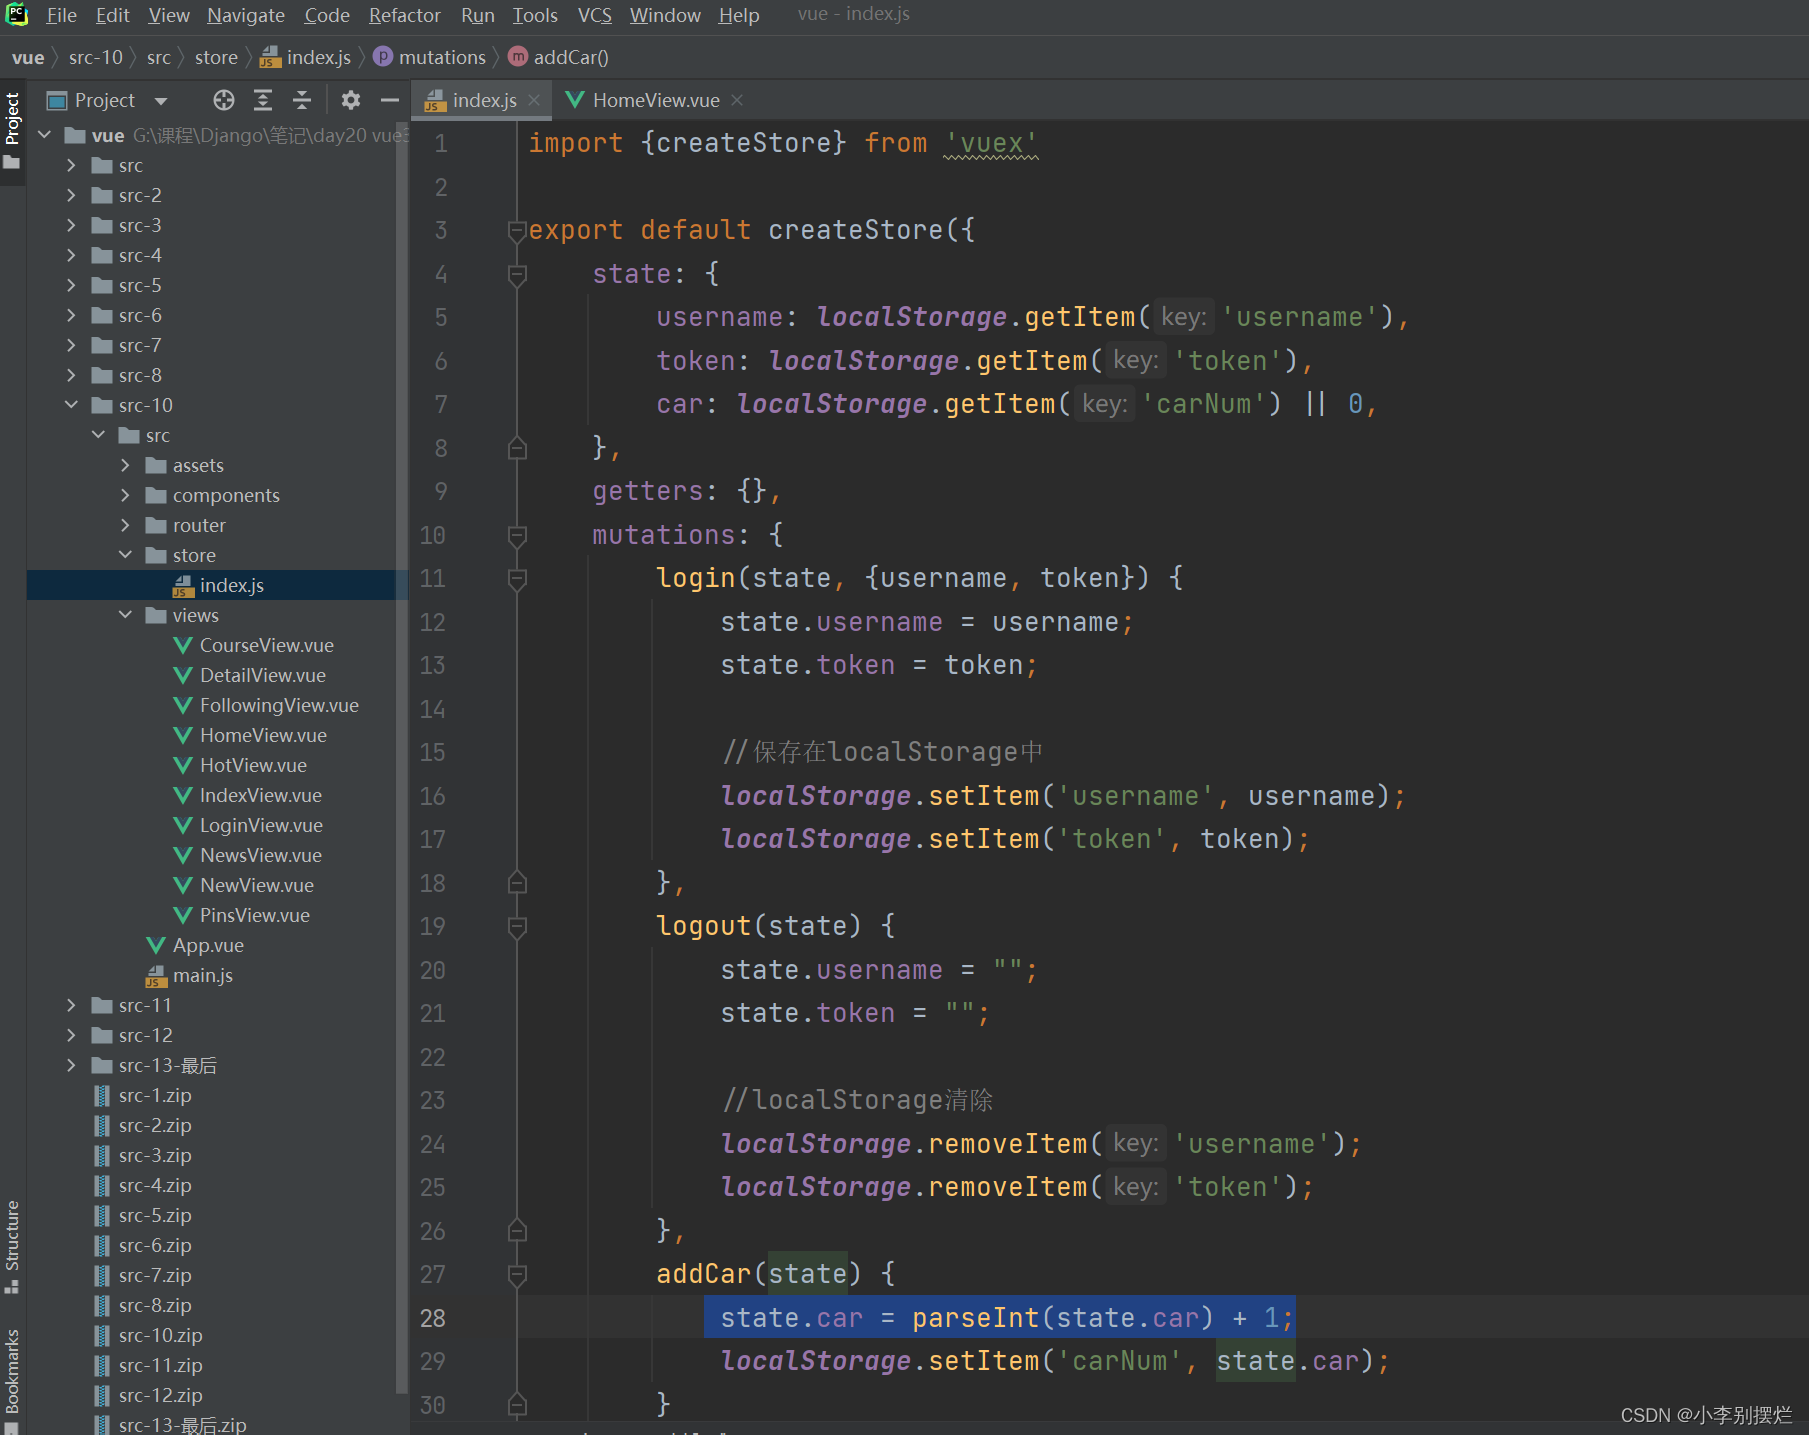
4.2.4 动态购物车案例
动态改变state中数据需要使用computed计算属性
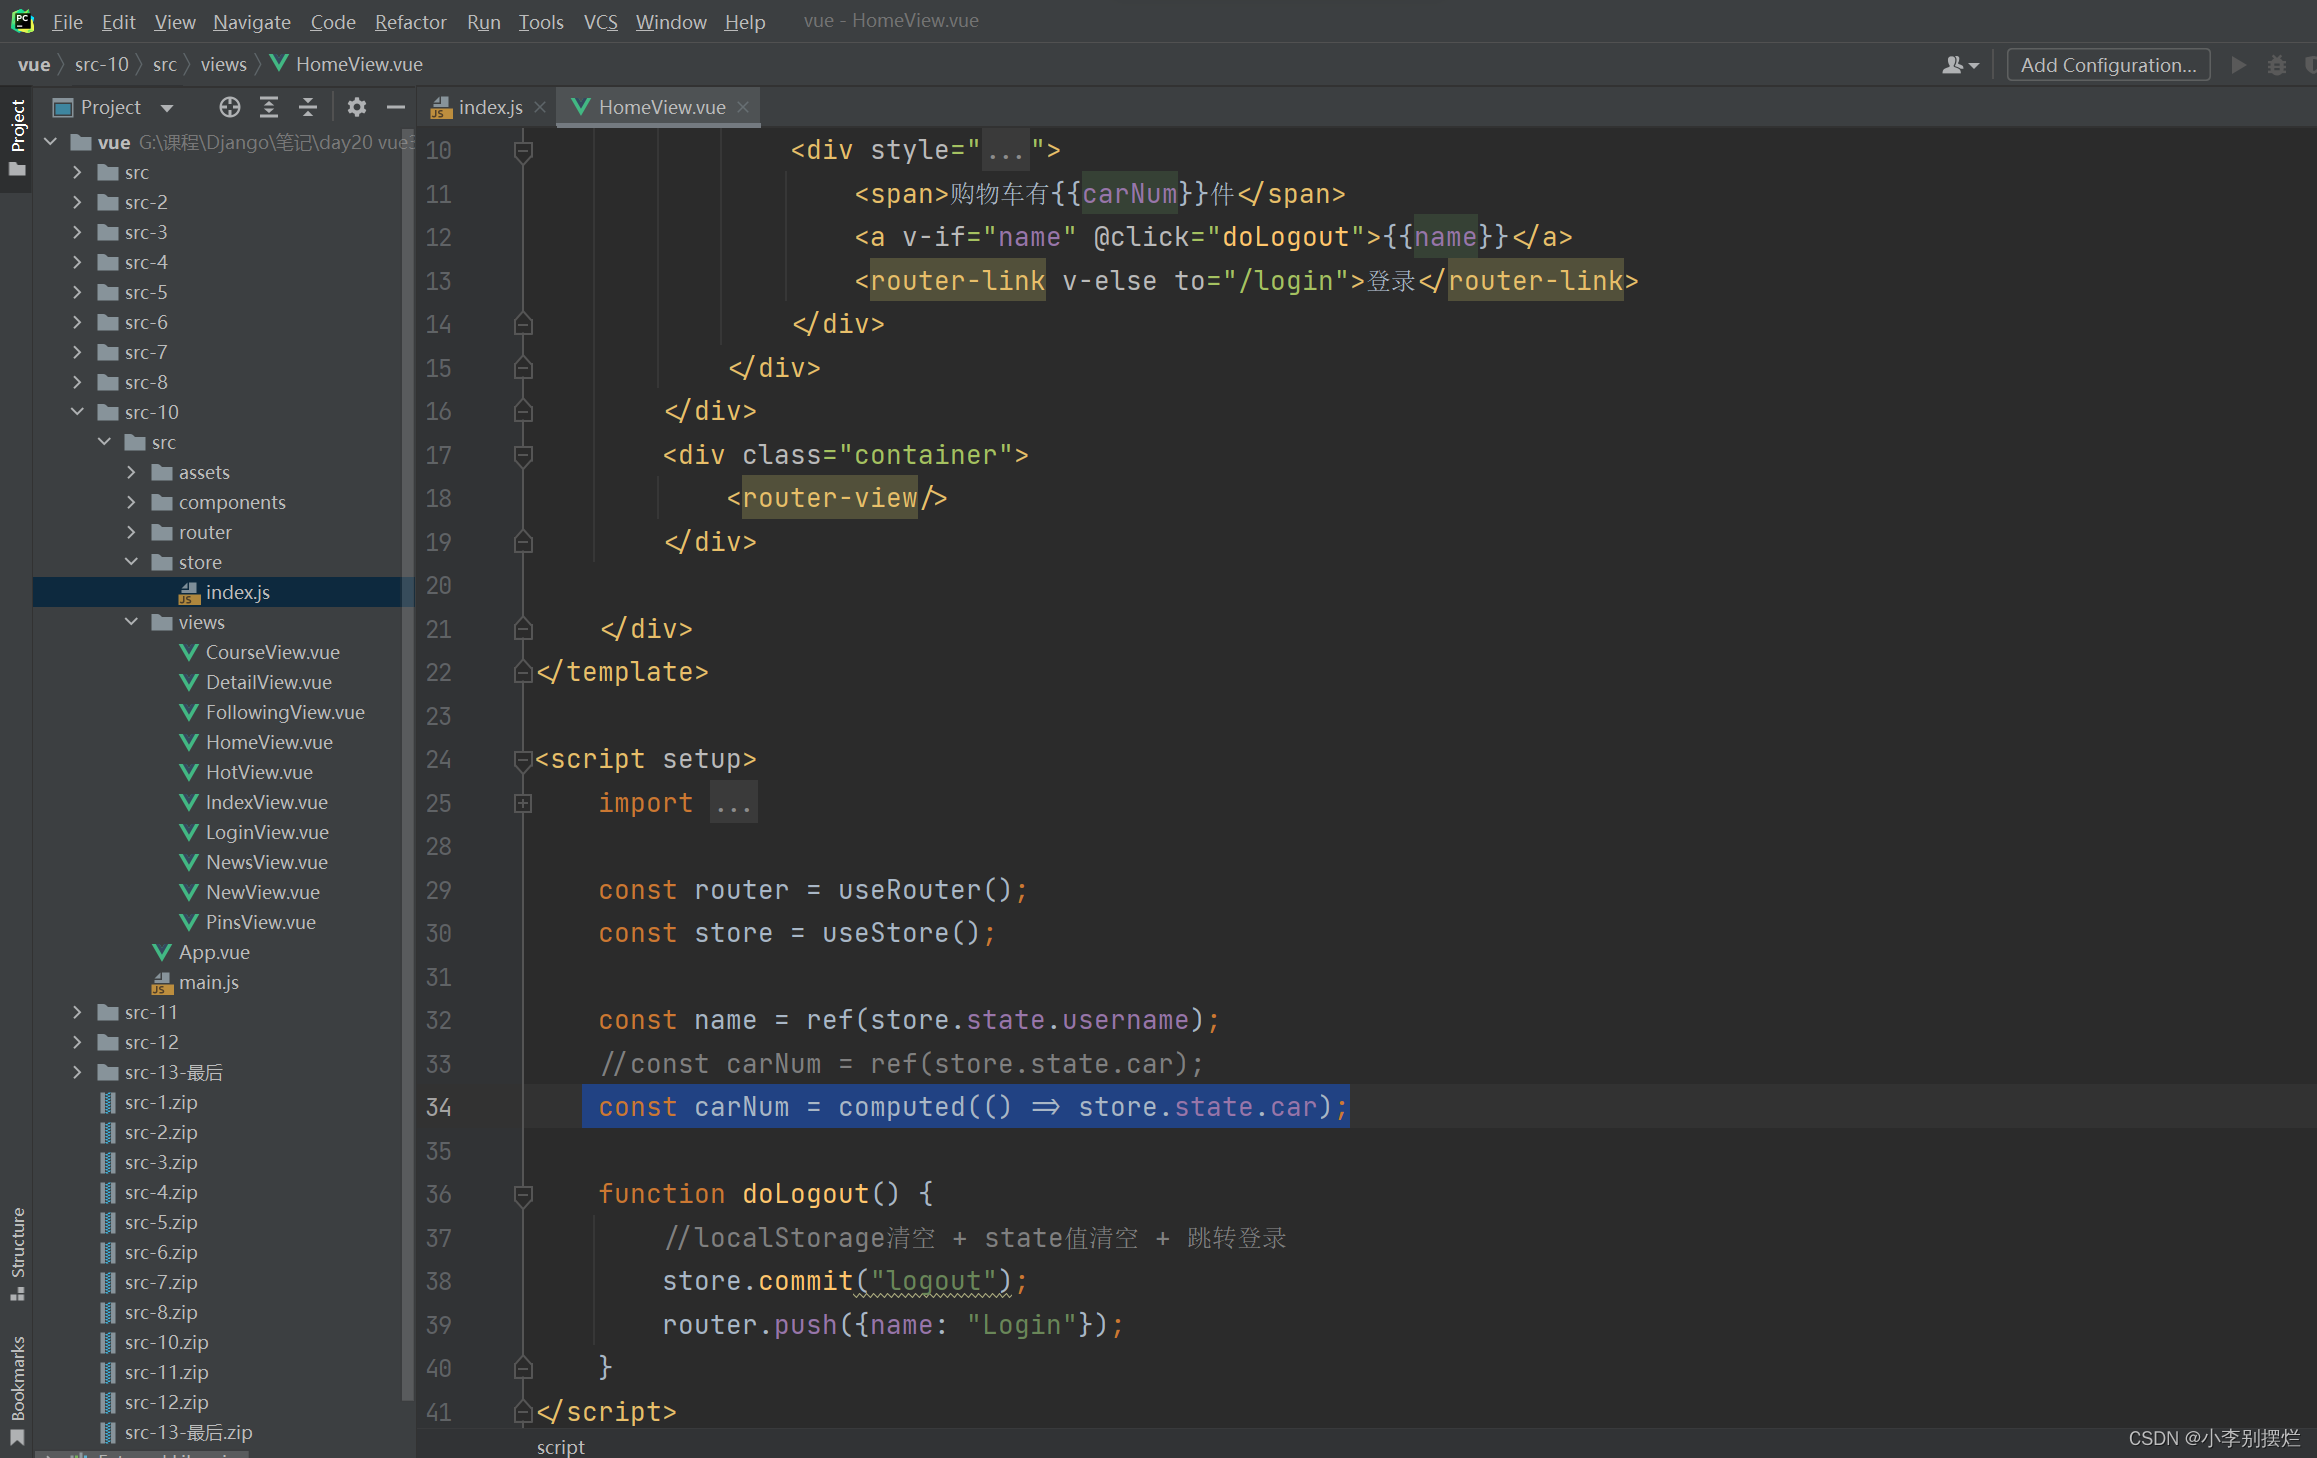
同时注意进行计算的变量的数据类型:
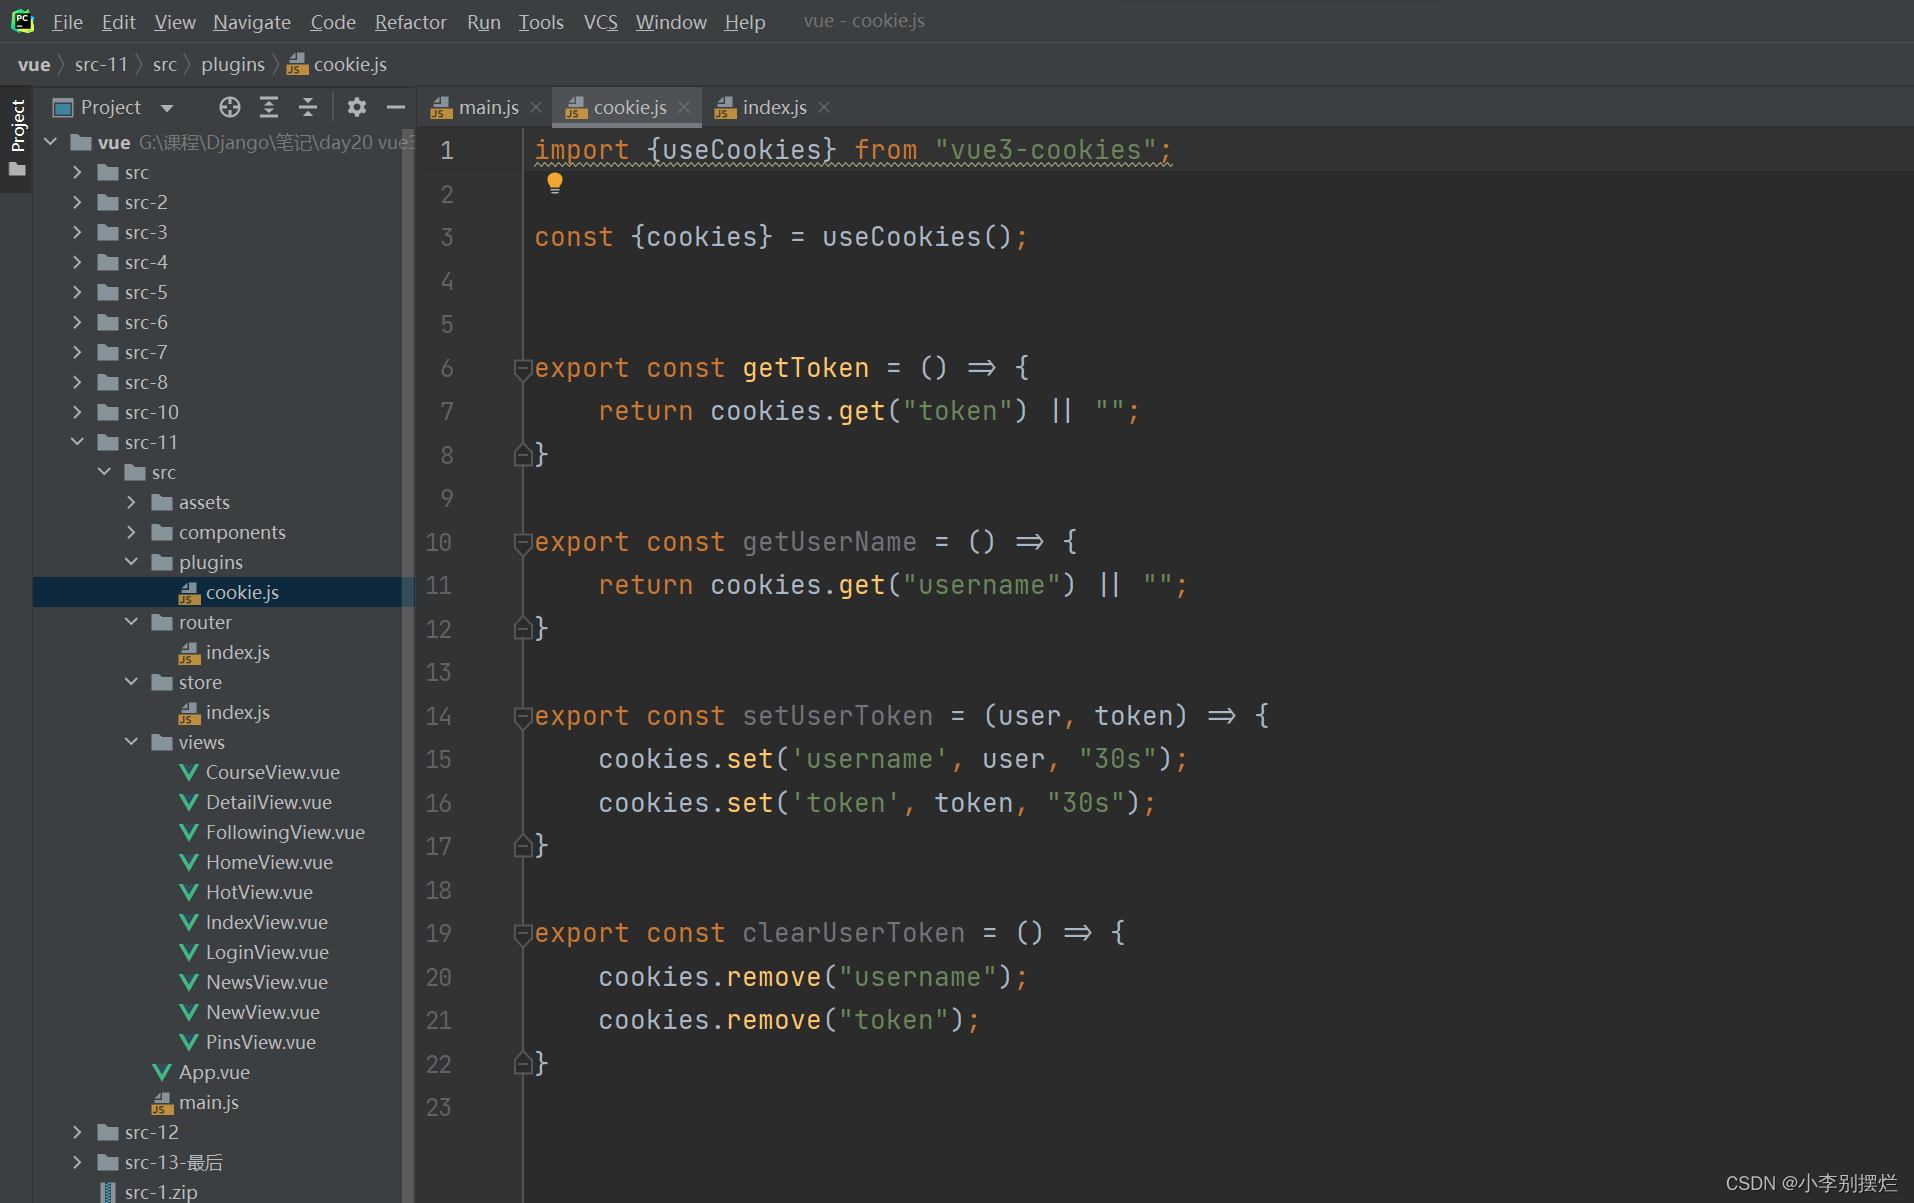
5.vue3-cookies
实现将数据在cookie中进行存取。
5.1 安装
npm install vue3-cookies --save
5.2 使用
导入
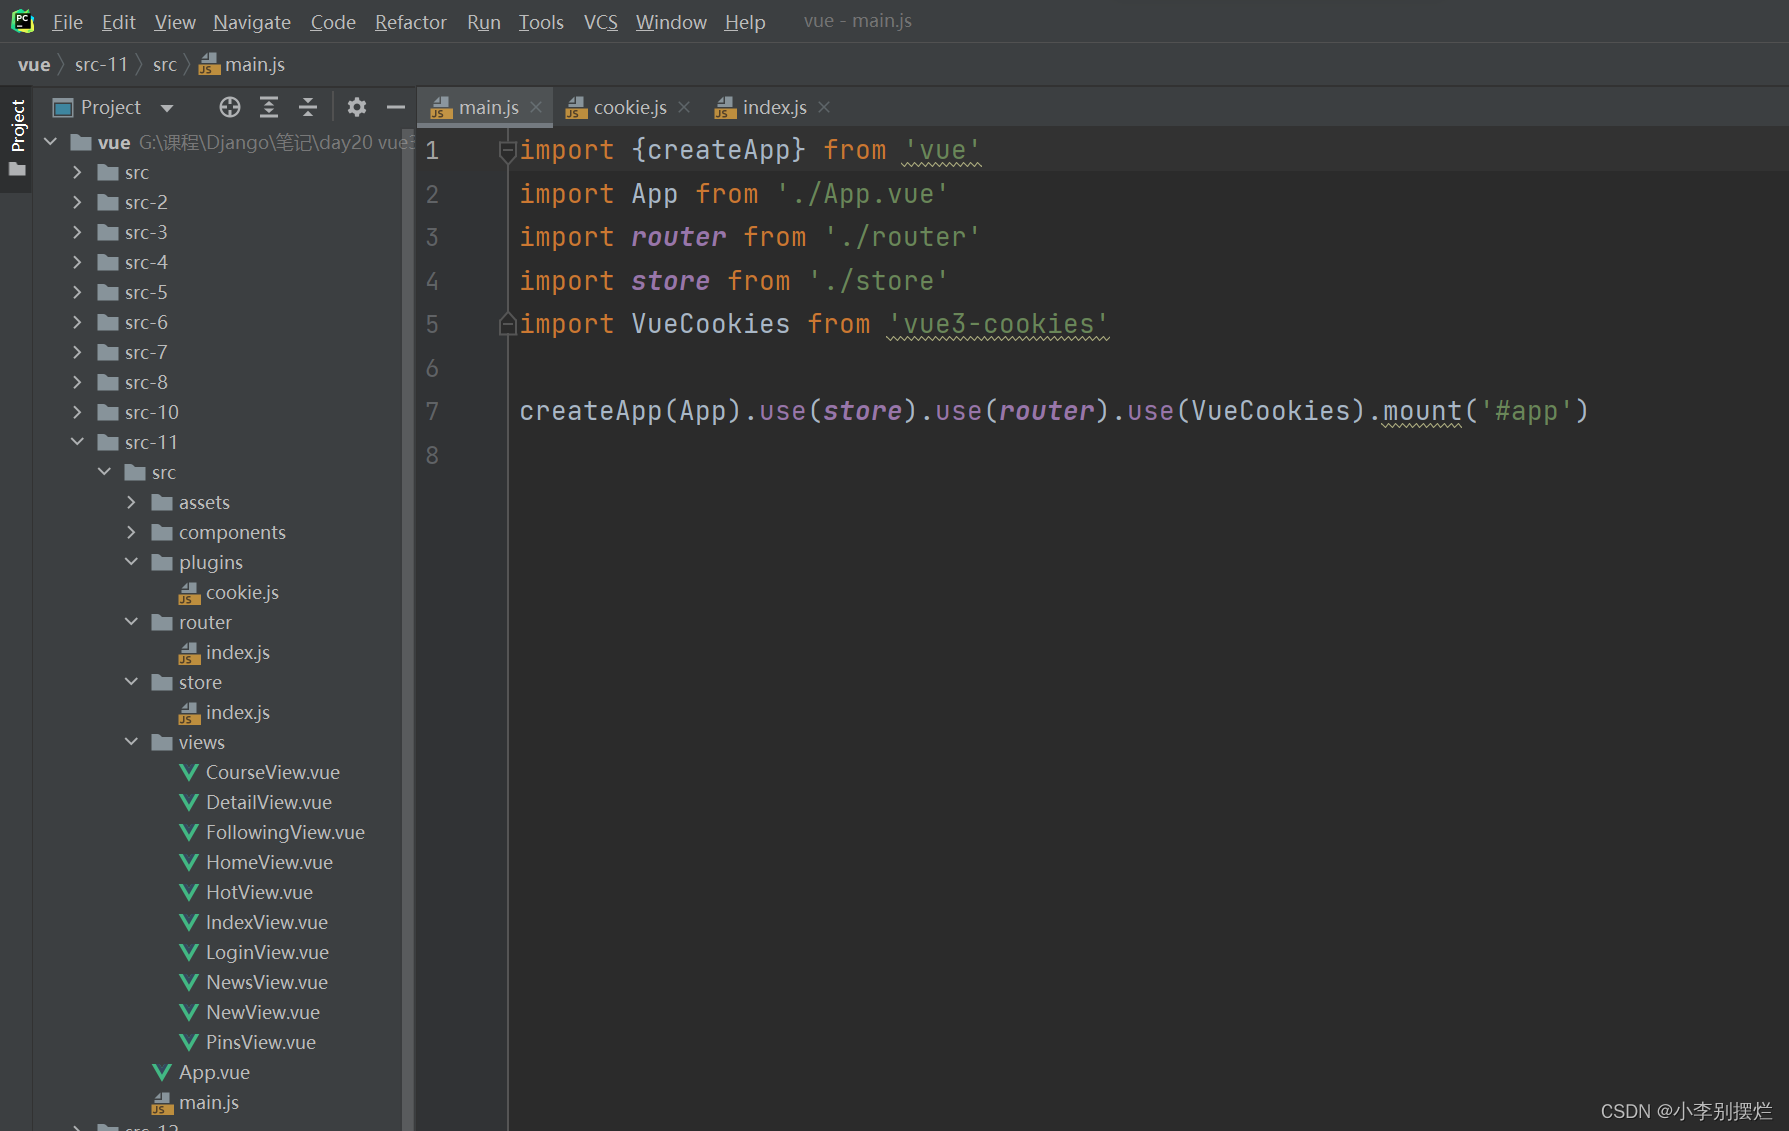
使用:
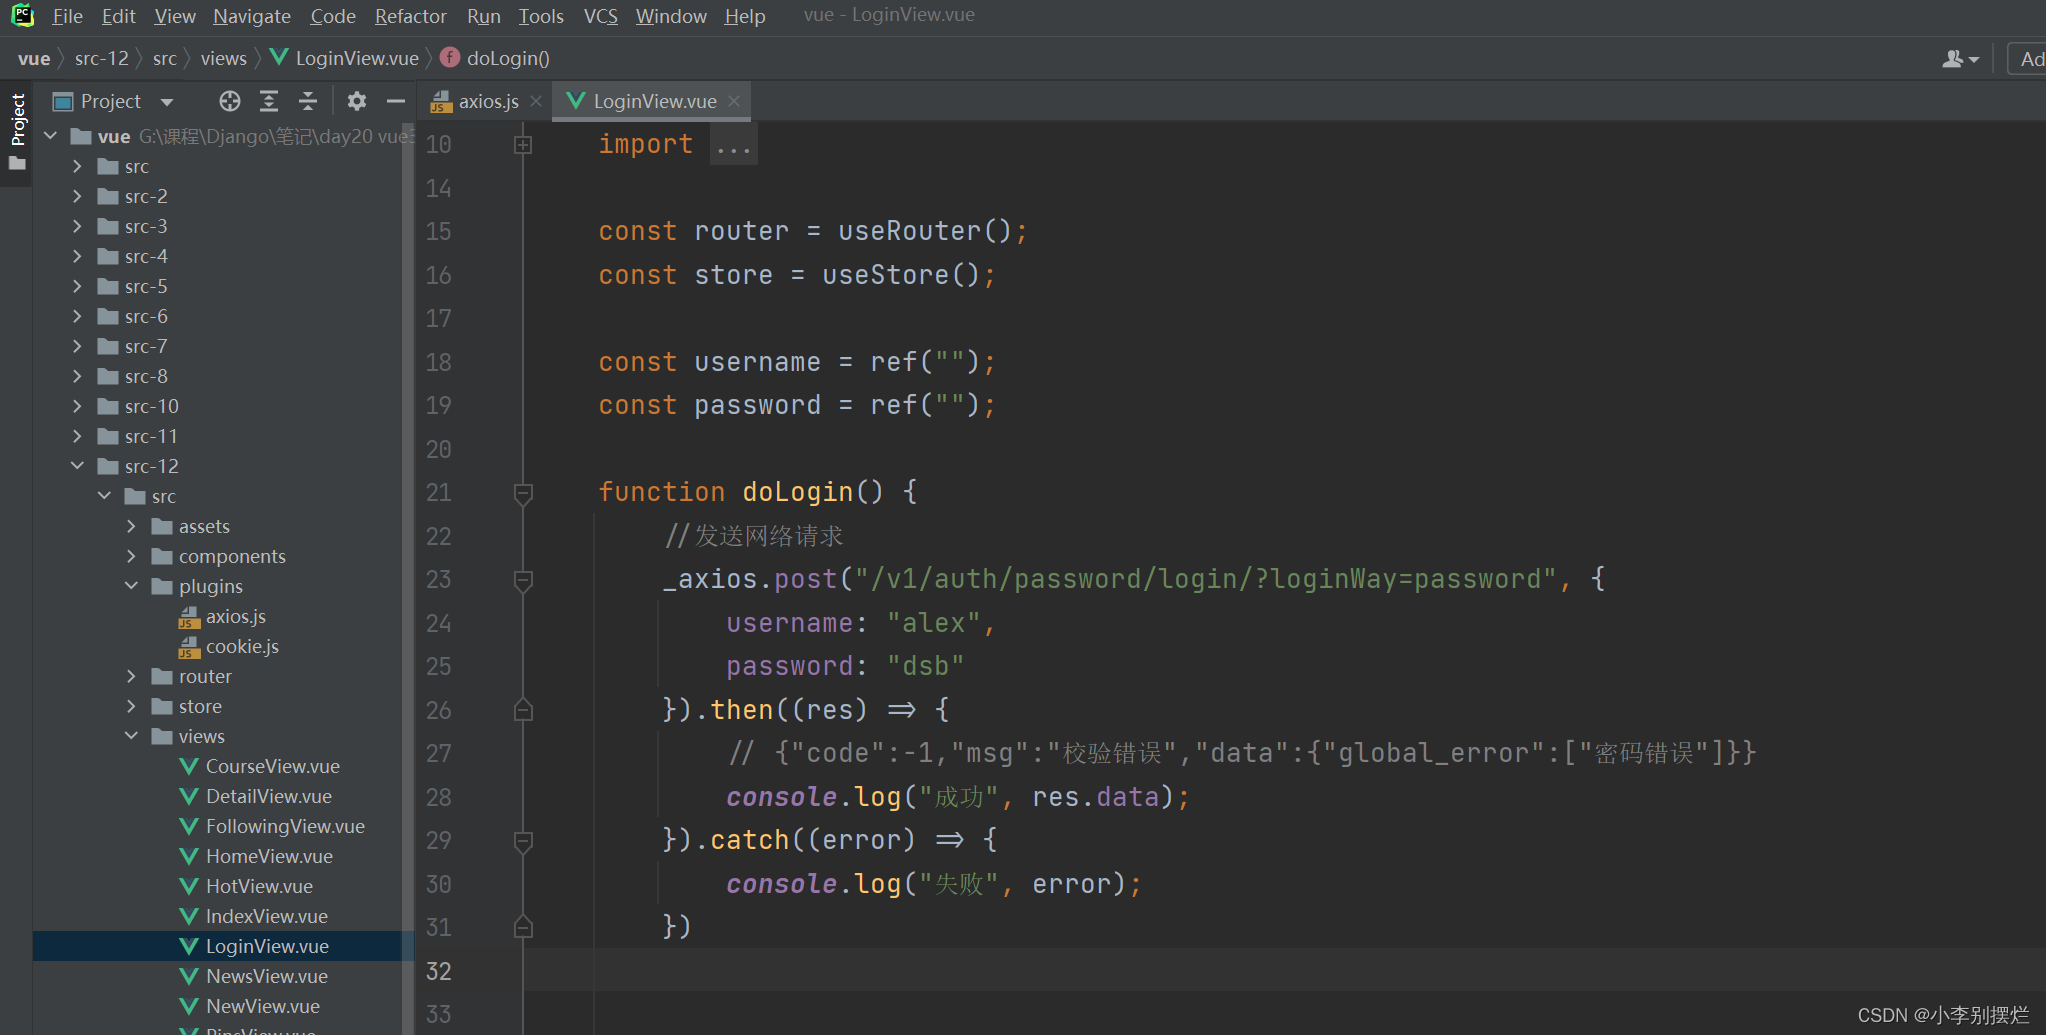
6.axios
6.1 安装
npm install axios --save
手动配置
或
vue add axios
6.2 使用示例
6.2.1 快速发送
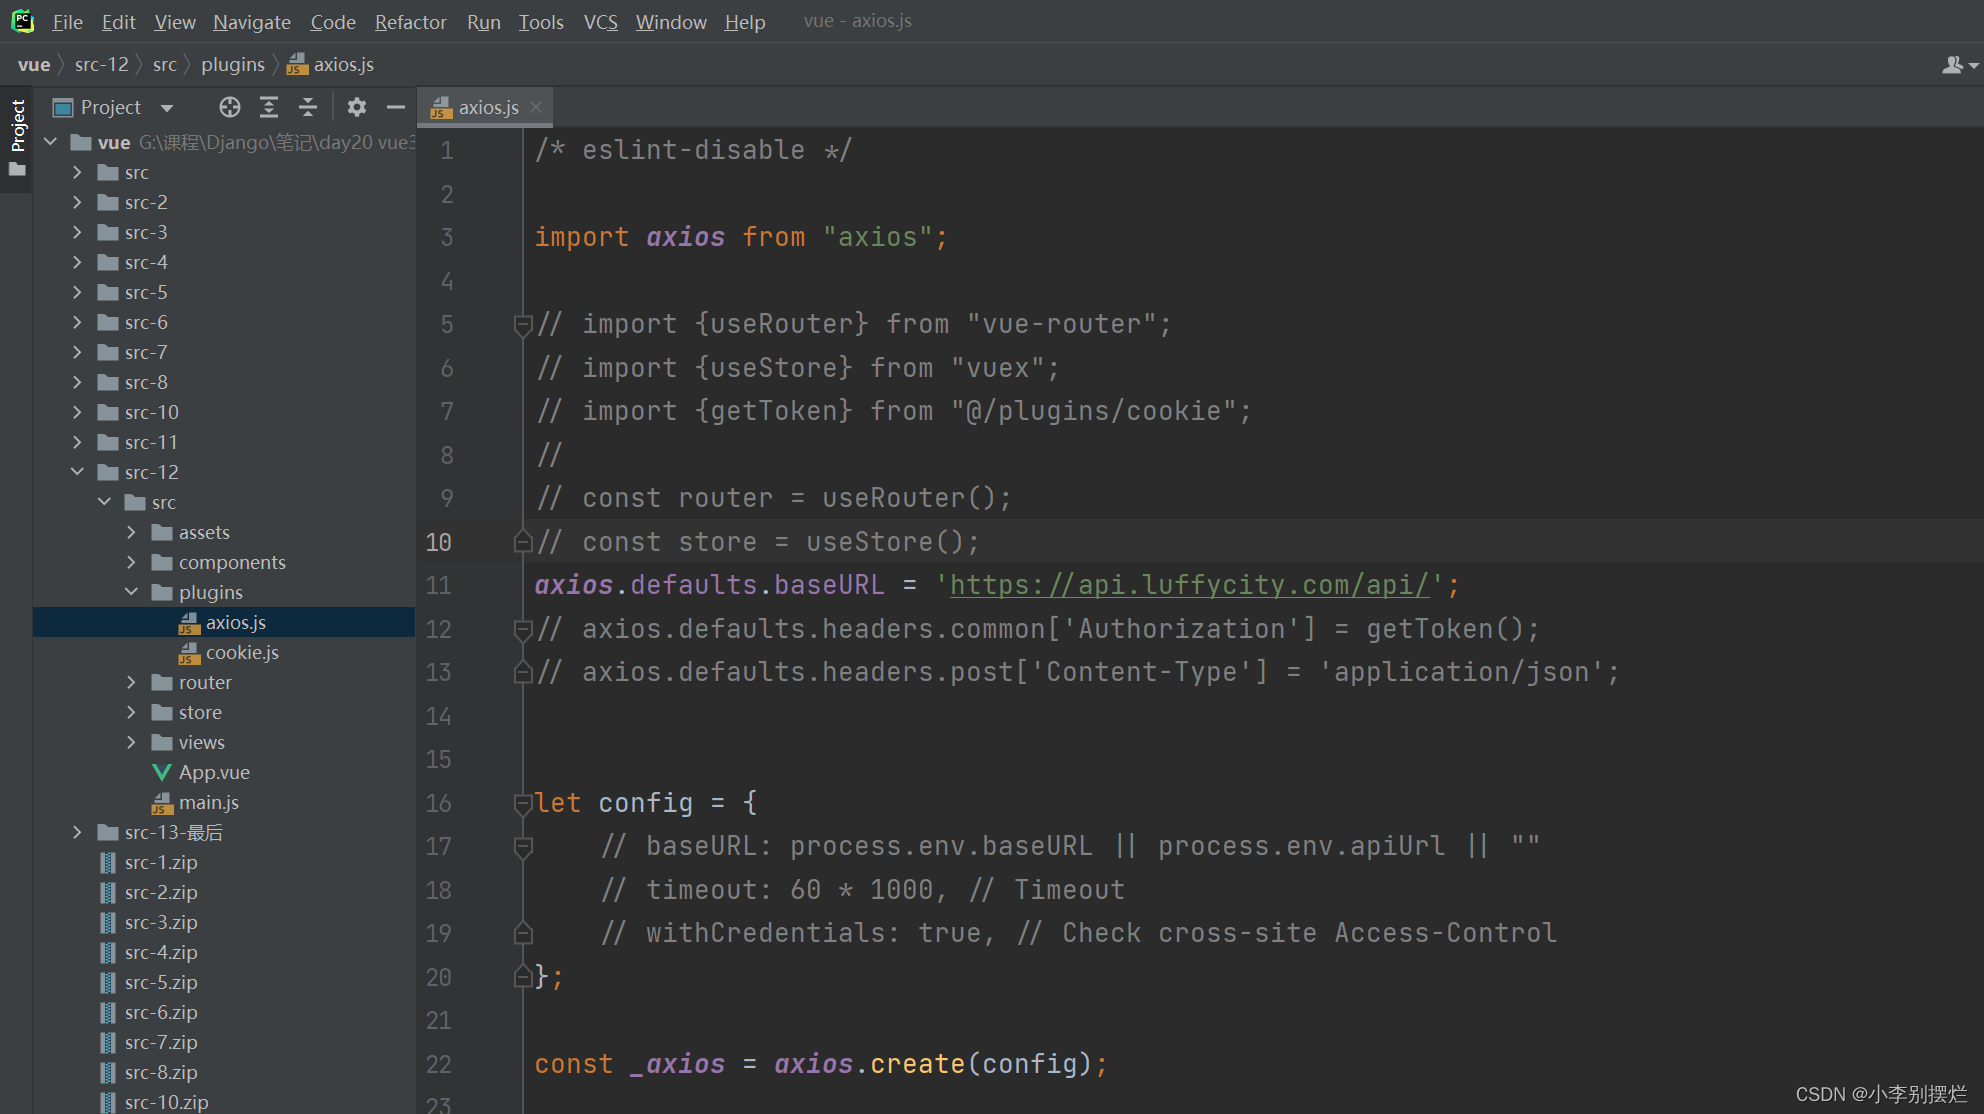
6.2.2 拦截器
请求拦截器,响应拦截器
/* eslint-disable */

import axios from "axios";

// import {useRouter} from "vue-router";
// import {useStore} from "vuex";
// import {getToken} from "@/plugins/cookie";
//
// const router = useRouter();
// const store = useStore();
axios.defaults.baseURL = 'https://api.luffycity.com/api/';
// axios.defaults.headers.common['Authorization'] = getToken();
// axios.defaults.headers.post['Content-Type'] = 'application/json';


let config = {
    // baseURL: process.env.baseURL || process.env.apiUrl || ""
    // timeout: 60 * 1000, // Timeout
    // withCredentials: true, // Check cross-site Access-Control
};

const _axios = axios.create(config);

_axios.interceptors.request.use(
    function (config) {
        // Do something before request is sent
        // console.log("请求前执行");
        const token = getToken();
        if (token) {
            config.headers['token'] = token;
        }
        return config;
    }
);


// 浏览器上有Token,但是Token在后端已经失效
_axios.interceptors.response.use(
    function (response) {
        // Do something with response data
        // 请求成功 200成功(登录失效了){code:-1,msg:"登录失效"}   {code:0,msg:data}   {code:1000,msg:"认证失败"}
        if (response.data.code === 1000) {
            //认证失败,token过期,登录失败 -> 登录页面
            store.commit("logout");
            router.replace({name: "Login"});
            return Promise.reject();
        }

        return response;
    },
    function (error) {
        // Do something with response error
        // 请求失败自动执行此处的代码,返回的状态码:500(认证401)
        if (error.response.status === 401) {
            store.commit("logout");
            router.replace({name: "Login"});
        }
        return Promise.reject(error);
    }
);


export default _axios;
7.后端API
7.1 跨域问题
前端调用的后端接口不属于同一个域(域名或端口不同),就会产生跨域问题
本质上想要处理跨域,添加一些响应头即可。
from django.shortcuts import render
from django.http import JsonResponse


def user_list(request):
    info = {"code": 0, 'data': "success"}
    response = JsonResponse(info)

    # 响应头
    print(request.method)

    # 任意网址
    response["Access-Control-Allow-Origin"] = "*"
    # 任意的请求方式
    response["Access-Control-Allow-Methods"] = "*"  # "PUT,DELETE,GET,POST"
    # 允许任意的请求头
    response["Access-Control-Allow-Headers"] = "*"

    return response
注意:测试时一定要移除csrf认证。
写在中间件的process_response中
from django.utils.deprecation import MiddlewareMixin


class CorsMiddleware(MiddlewareMixin):
    def process_response(self, request, response):
        # 任意网址
        response["Access-Control-Allow-Origin"] = "*"
        # 任意的请求方式
        response["Access-Control-Allow-Methods"] = "*"   # "PUT,DELETE,GET,POST"
        # 允许任意的请求头
        response["Access-Control-Allow-Headers"] = "*"
        return response
7.2 发送两个请求现象
跨域时发送的是:
简单请求:1个请求
复杂请求:2个请求
OPTIONS请求,预检
真正的请求
条件:
  ``1``、请求方式:HEAD、GET、POST
  ``2``、请求头信息:
    ``Accept
    ``Accept``-``Language
    ``Content``-``Language
    ``Last``-``Event``-``ID
    ``Content``-``Type` `对应的值是以下三个中的任意一个
                ``application``/``x``-``www``-``form``-``urlencoded
                ``multipart``/``form``-``data
                ``text``/``plain
注意:同时满足以上两个条件时,则是简单请求,否则为复杂请求


 412
412


 被折叠的 条评论
为什么被折叠?
被折叠的 条评论
为什么被折叠?
 到【灌水乐园】发言


