


1.创建一个启动器模块和一个自动配置模块
springboot官方的启动器格式都是 spring-boot-starter-xxx
自定义启动器格式应为xxx-spring-boot-starter


在启动器模块中添加自动配置模块的依赖
<!--引入自动配置模块-->
        <dependency>
            <groupId>com.sprinboot</groupId>
            <artifactId>mystart-spring-boot-start-autoconfigurer</artifactId>
            <version>0.0.1-SNAPSHOT</version>
        </dependency>
在自动配置模块中需要有spring-boot-starter的依赖
<!--引入springboot-start,所有starter都需要引入-->
		<dependency>
			<groupId>org.springframework.boot</groupId>
			<artifactId>spring-boot-starter</artifactId>
		</dependency>
2.写一个属性类,将配置文件中的值映射到类上
@ConfigurationProperties(prefix = "com.hello")
public class HelloProperties {
    private String prefix;
    private String suffix;

    public String getPrefix() {
        return prefix;
    }

    public void setPrefix(String prefix) {
        this.prefix = prefix;
    }

    public String getSuffix() {
        return suffix;
    }

    public void setSuffix(String suffix) {
        this.suffix = suffix;
    }
}
@ConfigurationProperties注解使用需要指定配置文件中的前缀,如例子中的com.hello,然后在配置文件中配置对应属性名即可映射,每个属性一定要有公共属性的set方法
3.写一个简单的业务和自动配置类
简单的业务类:
public class HelloService {

    private HelloProperties helloProperties;

    public HelloProperties getHelloProperties() {
        return helloProperties;
    }

    public void setHelloProperties(HelloProperties helloProperties) {
        this.helloProperties = helloProperties;
    }

    public String sayHello(String name){
        return helloProperties.getPrefix()+"-"+name+"-"+helloProperties.getSuffix();
    }
}
自动配置类:
在这里面将自己的业务类配置到容器中。
@Configuration
@ConditionalOnWebApplication
@EnableConfigurationProperties(HelloProperties.class) //生效配置属性文件
public class HelloServiceAutoConfiguration {

    @Autowired
    private HelloProperties helloProperties;
    @Bean
    public HelloService helloService(){
        HelloService service=new HelloService();
        service.setHelloProperties(helloProperties);
        return service;
    }
}
@Configuration注解声明此类为一个配置类;@ConditionalOnWebApplication注解验证是否为web应用,是web应用时启用;@EnableConfigurationProperties(HelloProperties.class) 生效自己的配置文件属性映射类。
然后需要在类路径的WEB-INF文件夹下写一个spring.factories文件

这个文件是来记录需要注册的bean的类名,其中需要记录我们的自动配置类的类名,提供后才能将我们的自动配置类添加到springboot的spring容器中
org.springframework.boot.autoconfigure.EnableAutoConfiguration=\
  com.sprinboot.start.HelloServiceAutoConfiguration
4.测试使用
将starter和自动配置模块都打包后,只用在另一个项目中添加starter的依赖
		<dependency>
            <groupId>org.example</groupId>
            <artifactId>mystart-spring-boot-starter</artifactId>
            <version>1.0-SNAPSHOT</version>
        </dependency>
        <dependency>
            <groupId>org.springframework.boot</groupId>
            <artifactId>spring-boot-starter-web</artifactId>
        </dependency>
在springboot的application配置文件中写需要的属性
com.hello.prefix=Hello
com.hello.suffix=!!!!
写一个控制器来测试
@RestController
public class HelloController {
    @Autowired
    HelloService helloService;

    @GetMapping("/hello")
    public String hello(){
        return helloService.sayHello("老王");
    }
}
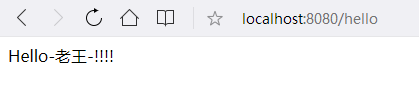
浏览器发送请求,没有问题


 1万+
1万+


 被折叠的 条评论
为什么被折叠?
被折叠的 条评论
为什么被折叠?
 到【灌水乐园】发言


