


PHP 请求
server {
    listen      80;
    server_name example.org www.example.org;
    root        /data/www;

    location / {
        index   index.html index.php;
    }

    location ~* \.(gif|jpg|png)$ {
        expires 30d;
    }

    location ~ \.php$ {
        fastcgi_pass  localhost:9000;
        fastcgi_param SCRIPT_FILENAME
                      $document_root$fastcgi_script_name;
        include       fastcgi_params;
    }
}
stub_status 七种状态
通用网站架构
静态 VS 动态区别
- 静态资源(请求):nginx自己处理的内容,(html,js,css,图片,视频,音频)
- 动态资源(请求):交互内容(评论,发布文章,订单,金钱(直播刷礼物)) url连接中 包含特殊符号 & 符号 或 ? 符号 都是动态请求
- 动态请求需要开发语言处理:php,java,go,python
| 分类 | 静态 | 动态 |
|---|---|---|
| 处理 | web服务器自己处理(nginx) | nginx+php/java/python/go |
| 数据存放 | 站点目录 | 站点目录+数据库+存储 |
| url | .html .css .js .png | 含有 & ?特殊符号 |
| 效率 | 效率高,速度快,用户体验好 | 效率低,处理缓慢 |
| 是否容易被搜索引擎收入 | 容易被收入 | 不容易被收入.(伪静态:把动态url伪装为静态url) |
常用架构
| 架构 | |
|---|---|
| LAMP | Linux Apache MySql PHP(Fastcgi) |
| LNMP | Linux Nginx MySql PHP(Fastcgi) |
| LNMT | Linux Nginx MySql Tomcat(java) Weblogic(配合Oracle数据库) |
| LNMP | Linux Nginx MySql Python(Uwsgi) |
| LNM??? | Linux Nginx MySql 自己研发的 |
环境准备
| 虚拟主机 | 环境 |
|---|---|
| web01 | Linux Nginx MySql PHP |
# nginx 环境准备  blog.huhao.com.conf

location ~ \.php$ {
   fastcgi_pass 127.0.0.1:9000;
   fastcgi_param SCRIPT_FILENAME $document_root$fastcgi_script_name;
   include  fastcgi_params;

}

# fastcgi_param 修改或设置 nginx 向php发送的数据包

#SCRIPT_FILENAME  修改后的格式  #这是PHP内置变量
#$document_root  站点目录(网站) root
#fastcgi_script_name uri 用户请求uri

[root@web01 /etc/nginx/conf.d]#cat blog.huhao.com.conf
server {
  listen 80;
  server_name blog.huhao.com;
  root /code/blog;

 location / {
  index index.html index.php;

   }

  location  ~ \.php$ {
   fastcgi_pass  127.0.0.0:9000;
   fastcgi_param  SCRIPT_FILENAME  $document_root$fastcgi_script_name;
   include  fastcgi_params;
  }
}


[root@web01 /usr/local/etc]#curl -H "Host:blog.huhao.com"  10.0.0.7
<html>
<head><title>403 Forbidden</title></head>
<body>
<center><h1>403 Forbidden</h1></center>
<hr><center>nginx/1.20.2</center>
</body>
</html>
- 数据库部分准备
#安装 运行
[root@web01 ~]# yum install mariadb-server -y

#开启mariadb
[root@web01 ~]#systemctl  start mariadb


[root@web01 ~]#systemctl  enable mariadb
Created symlink from /etc/systemd/system/multi-user.target.wants/mariadb.service to /usr/lib/systemd/system/mariadb.service.


#使用
#检查端口  306
#检查进程
[root@web01 ~]#ss -lntup|grep mysql
tcp    LISTEN     0      50        *:3306                  *:*                   users:(("mysqld",pid=2960,fd=14))

[root@web01 ~]#ps -ef |grep 3306
root       3033   2108  0 08:45 pts/1    00:00:00 grep --color=auto 3306

[root@web01 ~]#ps -ef |grep mysql
mysql      2795      1  0 08:42 ?        00:00:00 /bin/sh /usr/bin/mysqld_safe --basedir=/usr
mysql      2960   2795  0 08:42 ?        00:00:00 /usr/libexec/mysqld --basedir=/usr --datadir=/var/lib/mysql --plugin-dir=/usr/lib64/mysql/plugin --log-error=/var/log/mariadb/mariadb.log --pid-file=/var/run/mariadb/mariadb.pid --socket=/var/lib/mysql/mysql.sock
root       3035   2108  0 08:45 pts/1    00:00:00 grep --color=auto mysql


#进入mysql
[root@web01 ~]#mysql
Welcome to the MariaDB monitor.  Commands end with ; or \g.
Your MariaDB connection id is 2
Server version: 5.5.68-MariaDB MariaDB Server

Copyright (c) 2000, 2018, Oracle, MariaDB Corporation Ab and others.

Type 'help;' or '\h' for help. Type '\c' to clear the current input statement.

MariaDB [(none)]>   按ctrl+d 退出


#设置mysql密码
mysqladmin -u root  password 'huhao123'


#登录mysql系统
mysql -uroot -phuhao123   #密码不需要显示输入屏幕上,只是方便个人学习 (密码写在命令行  不推荐)

[root@web01 ~]#mysql -uroot -p    #密码使用交互式输入
Enter password:

#查看所有数据库
show databases;

#查看所有表
show tables from mysql ;

use mysql   #相当于cd
show tables;  #相当于ll


#查看表中数据
select user,host from mysql.user;
select 字段(列)  from 数据库,表
php
yum list | grep -i php
- php环境准备
## 使用第三方扩展源安装php7.1*
#不要安装如下rpm会导致失败
# rpm -Uvh https://dl.fedoraproject.org/pub/epel/epel-release-latest-7.noarch.rpm
# rpm -Uvh https://mirror.webtatic.com/yum/el7/webtatic-release.rpm
#在当前卸载已存在php
[root@web01 ~]# yum remove php-mysql-5.4 php php-fpm php-common
#安装php源
[root@web01 ~]# cat /etc/yum.repos.d/php.repo
[webtatic-php]
name = php Repository
baseurl = http://us-east.repo.webtatic.com/yum/el7/x86_64/
gpgcheck = 0
[root@web01 ~]# yum repolist
[root@web01 ~]# yum list | grep php7
#安装php软件包
[root@web01 ~]# yum -y install php71w php71w-cli php71w-common php71w-devel php71w-embedded php71w-gd php71w-mcrypt php71w-mbstring php71w-pdo php71w-xml php71w-fpm php71w-mysqlnd php71w-opcache php71w-pecl-memcached php71w-pecl-redis php71w-pecl-mongodb
#启动php-fpm ,并将其加入开机自启
[root@web01 ~]# systemctl start php-fpm
[root@web01 ~]# systemctl enable php-fpm
#查看端口
[root@web01 ~]# ss -lntup|grep php-fpm
#查看
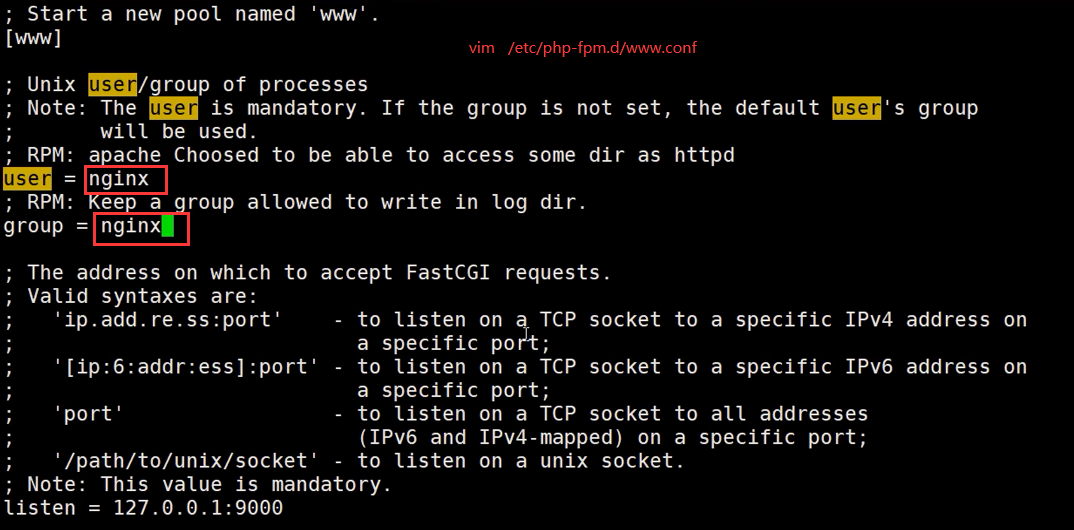
[root@web01 ~]# egrep -n '^user|^group' /etc/php-fpm.d/www.conf
#配置php-fpm用户与Nginx的运行用户保持一致
[root@web01 ~]# sed -i '/^user/c user = www' /etc/php-fpm.d/www.conf
[root@web01 ~]# sed -i '/^group/c group = www' /etc/php-fpm.d/www.conf
#改完配置后,重启php-fpm
[root@web01 ~]# systemctl start php-fpm
#再检查进程
[root@web01 ~]# ps -ef |grep php-fpm
测试1
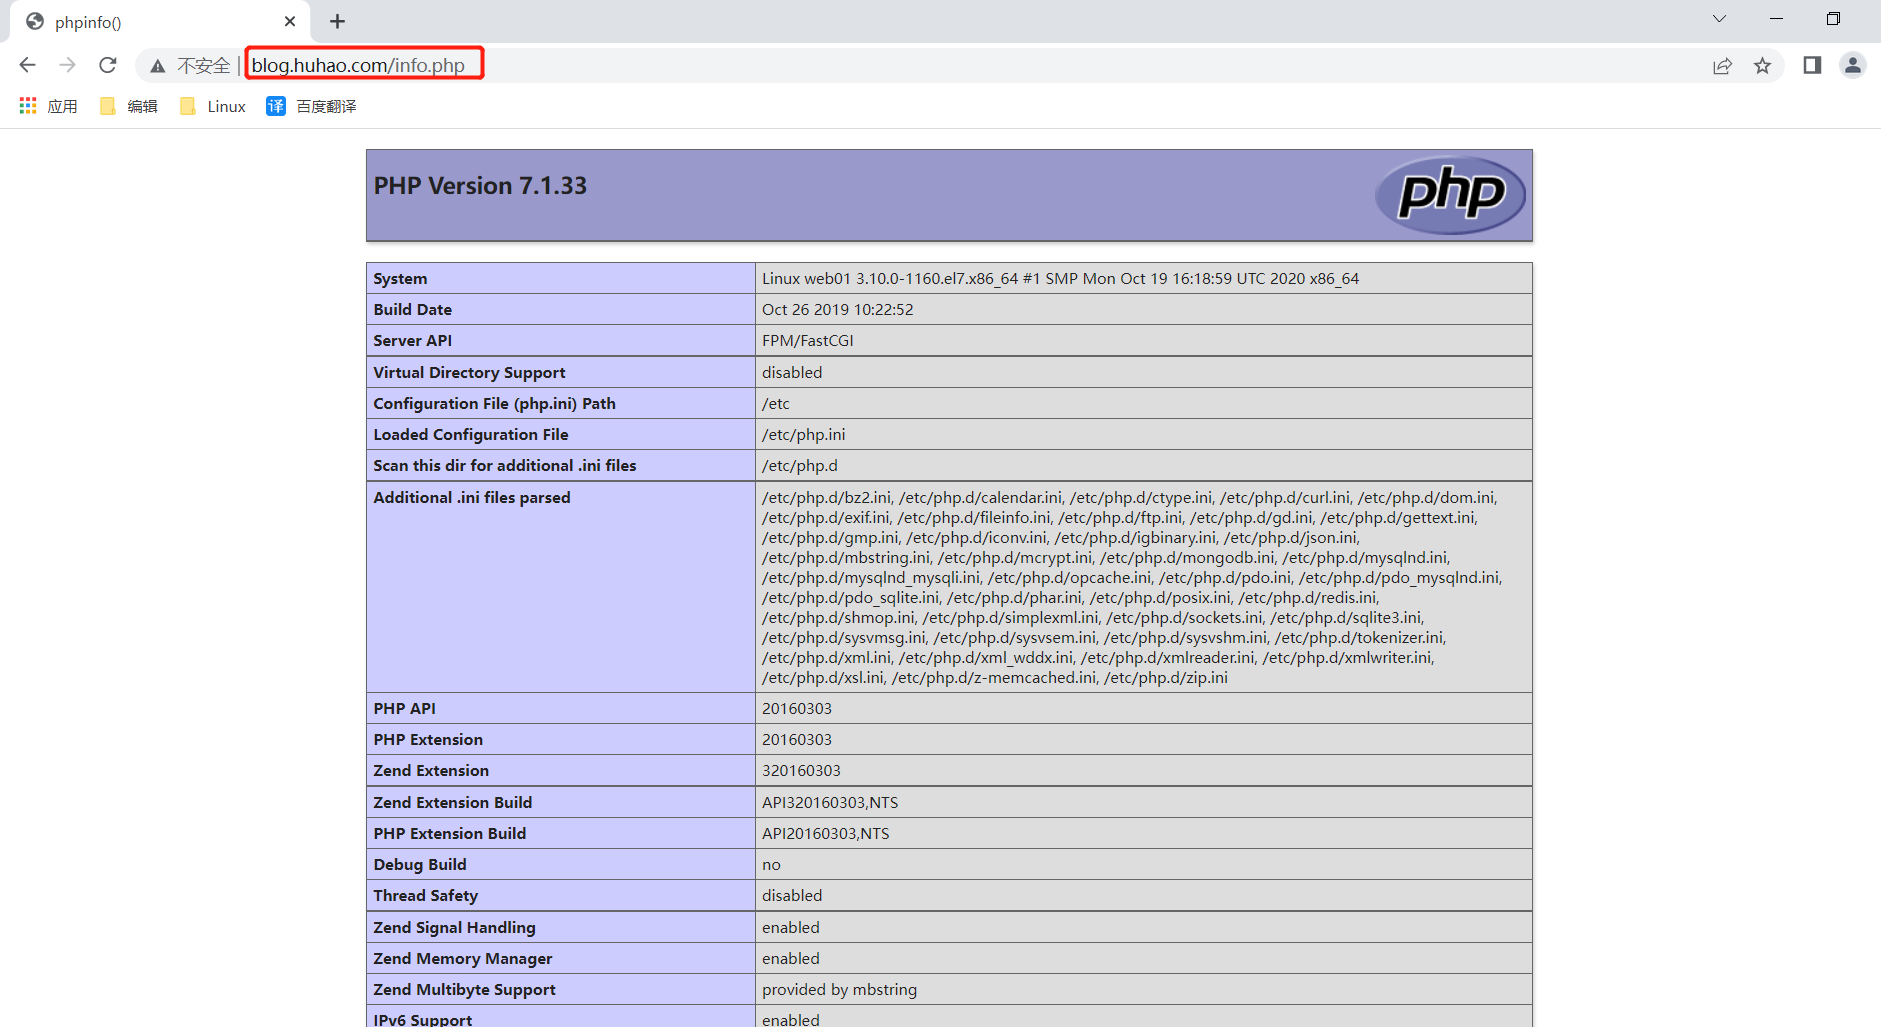
- 检查lnmp是否可用
# 1.nginx + php

vim /code/blog/info.php

[root@web01 ~]# cat /code/blog/info.php
<?php
phpinfo();
?>
- 浏览器访问 blog.huhao.com/info.php
检查结果展示
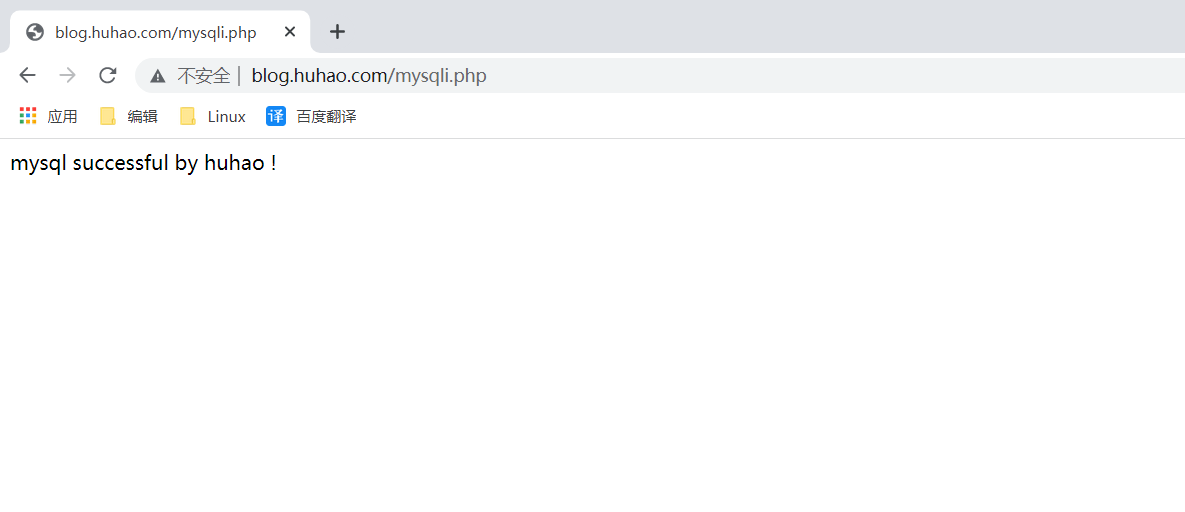
测试2
# 2.php +数据库是否连接

cat /code/blog/mysqli.php

<?php
//$link_id=mysqli_connect('主机名','用户','密码');
  $link_id=mysqli_connect('localhost','root','huhao123') or mysqli_error();
//$link_id=mysqli_connect('localhost','test','');
if($link_id){
   echo "mysql successful by huhao !";
}else{
   echo mysqli_error();
}
//这是php单行注释
/*这是php多行注释 */
?>
成功显示结果
小结
环境准备
- Linux
1.优化,yum源,selinux,防火墙…
- Nginx
1.静态自己处理
2.动态 通过 location ~ .php$ {fastcgi_pass 127.0.0.1:9000;…}
- MySQL(Mariadb)
- root密码
- 创建数据库
- PHP
- 配置php源
- 安装php71w
- php-fpm进程
- 检查
- Nginx +php phpinfo();
- php +mysq mysqli_connection 函数 通过用户和密码 通过php连接数据
- 上传代码
1.wordpress
2.wecenter
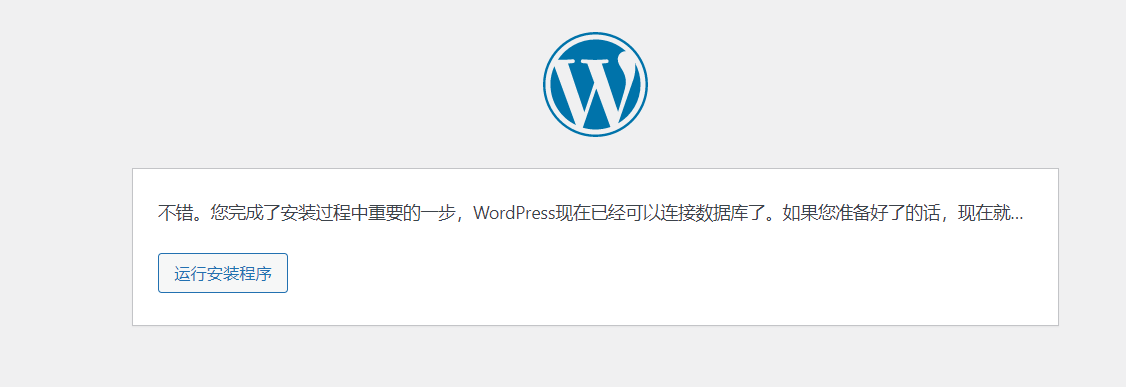
部署 wordpress流程
- 上传wordpress代码
mkdir /app/tools/

#1. 下载代码 并上传到站点目录
[root@web01~]# wget https://cn.wordpress.org/latest-zh_CN.zip

解压
unzip wordpress...zip

mv wordpress/* /code/blog/

#不提示
\mv wordpress/* /code/blog/

# 修改文件所有者
whown -R nginx.nginx /code/blog/
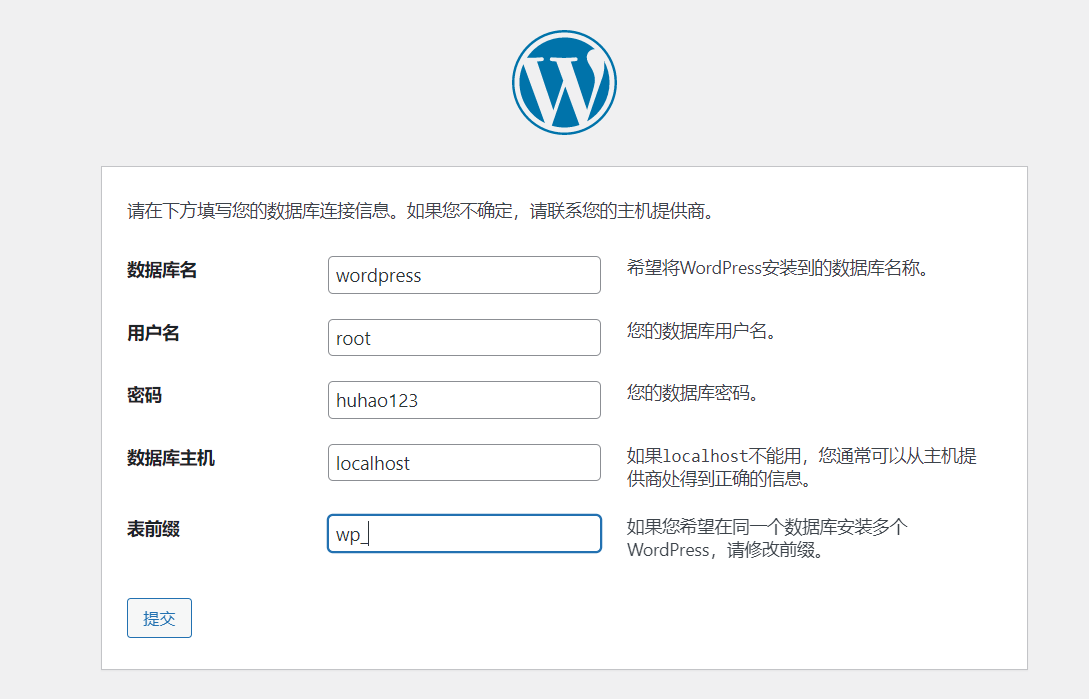
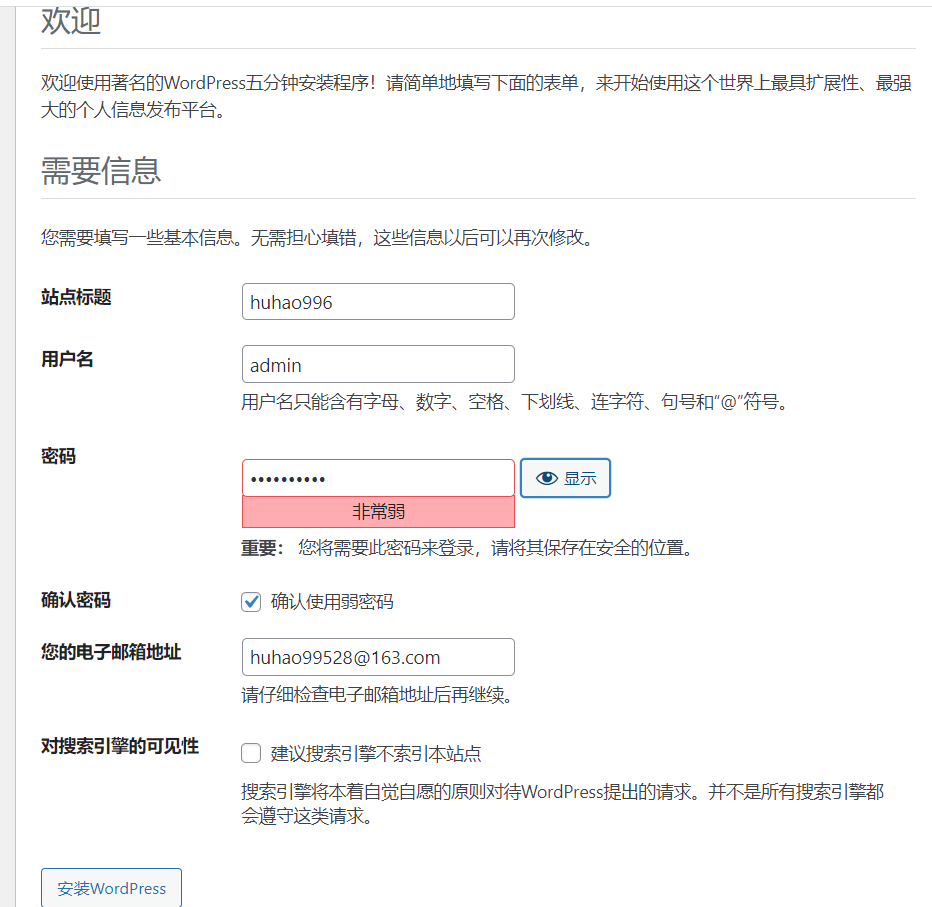
- web页面安装产品(配置代码中连接哪个数据库,用户名、密码)
数据库

mysql -uroot -phuhao123

#查看数据库表名
show databases;

#创建数据库
create database wordpress;

#查看表名数据
show tables from worepress ;


#删除数据库
#drop database  worepress;  #慎用
- 配置文件

- 输入数据库信息
- 输入站点信息
- 安装完成
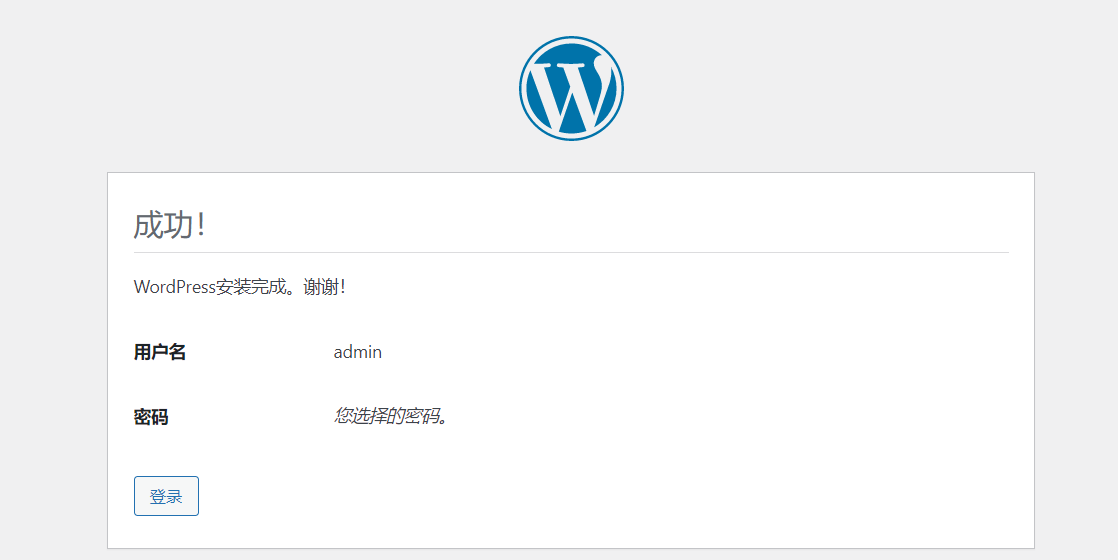
- 进入后台

展示网站主题


 1715
1715


 被折叠的 条评论
为什么被折叠?
被折叠的 条评论
为什么被折叠?
 到【灌水乐园】发言


