


目录
(1)上传nginx包,下载编译安装工具并解包到指定目录(tar 参数 tar包 - C 目录路径)
(2) 开始编译安装,每次编译后会出现一些包缺失报错,按照报的包名安装完成即可,安装好又继续编译
(2)安装MariaDB-client.x86_64和MariaDB-server.x86_64并启动mariadb
(3)到安装nginx目录下去修改nginx.conf文件,找到这部分内容并取消注释1,更改为时间html文件存放路径
到上面nginx配置文件指定的html目录中新建php文件,"phpinfo();"会显示php环境的相关信息
2.将wordpress中的所有文件移动到你nginx.conf中指定目录中
一.LNMP简介
1.含义
LNMP分贝指的是Linux、Nginx、Mysql、PHP首字母缩写,四者组合起来工作
2.工作原理
用户通过浏览器输入域名时首先访问的是nginx的web服务静态页面由nginx处理,“.php”的动态文件就会由nginx利用FastCGI(可伸缩、高速的在http服务器和脚本语言之间通信的接口,Linux下这个交口是socket,会把动态语言文件和http服务器分离开处理,让http服务器专心处理静态页面,自己将动态页面处理好返给http服务器)接口交给PHP引擎处理解析,若是还要读取数据库信息,则PHP又继续向mysql数据库发出请求,处理完成后再将数据返回给用户
二.部署LNMP环境
1.Nginx环境
(1)上传nginx包,下载编译安装工具并解包到指定目录(tar 参数 tar包 - C 目录路径)
[root@localhost src]# ll
total 1052
drwxr-xr-x 8 1001 1001 158 May 24 2022 nginx-1.22.0
-rw-r--r-- 1 root root 1073322 Aug 9 19:20 nginx-1.22.0.tar.gz
[root@localhost src]# cd nginx-1.22.0/
[root@localhost nginx-1.22.0]# yum install -y gcc gcc-c++ devel make
[root@localhost nginx-1.22.0]# ll
total 800
drwxr-xr-x 6 1001 1001 326 Aug 12 10:03 auto
-rw-r--r-- 1 1001 1001 317070 May 24 2022 CHANGES
-rw-r--r-- 1 1001 1001 484445 May 24 2022 CHANGES.ru
drwxr-xr-x 2 1001 1001 168 Aug 12 10:03 conf
-rwxr-xr-x 1 1001 1001 2590 May 24 2022 configure
drwxr-xr-x 4 1001 1001 72 Aug 12 10:03 contrib
drwxr-xr-x 2 1001 1001 40 Aug 12 10:03 html
-rw-r--r-- 1 1001 1001 1397 May 24 2022 LICENSE
drwxr-xr-x 2 1001 1001 21 Aug 12 10:03 man
-rw-r--r-- 1 1001 1001 49 May 24 2022 README
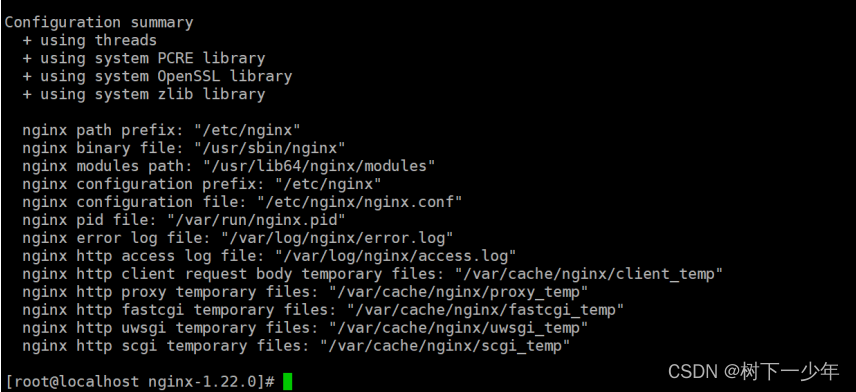
drwxr-xr-x 9 1001 1001 91 Aug 12 10:03 src(2) 开始编译安装,每次编译后会出现一些包缺失报错,按照报的包名安装完成即可,安装好又继续编译
[root@localhost nginx-1.22.0]# ./configure --prefix=/etc/nginx --sbin-path=/usr/sbin/nginx --modules-path=/usr/lib64/nginx/modules --conf-path=/etc/nginx/nginx.conf --error-log-path=/var/log/nginx/error.log --http-log-path=/var/log/nginx/access.log --pid-path=/var/run/nginx.pid --lock-path=/var/run/nginx.lock --http-client-body-temp-path=/var/cache/nginx/client_temp --http-proxy-temp-path=/var/cache/nginx/proxy_temp --http-fastcgi-temp-path=/var/cache/nginx/fastcgi_temp --http-uwsgi-temp-path=/var/cache/nginx/uwsgi_temp --http-scgi-temp-path=/var/cache/nginx/scgi_temp --user=nginx --group=nginx --with-compat --with-file-aio --with-threads --with-http_addition_module --with-http_auth_request_module --with-http_dav_module --with-http_flv_module --with-http_gunzip_module --with-http_gzip_static_module --with-http_mp4_module --with-http_random_index_module --with-http_realip_module --with-http_secure_link_module --with-http_slice_module --with-http_ssl_module --with-http_stub_status_module --with-http_sub_module --with-http_v2_module --with-mail --with-mail_ssl_module --with-stream --with-stream_realip_module --with-stream_ssl_module --with-stream_ssl_preread_module --with-cc-opt='-O2 -g -pipe -Wall -Wp,-D_FORTIFY_SOURCE=2 -fexceptions -fstack-protector-strong --param=ssp-buffer-size=4 -grecord-gcc-switches -m64 -mtune=generic -fPIC' --with-ld-opt='-Wl,-z,relro -Wl,-z,now -pie'

[root@localhost nginx-1.22.0]# yum install -y pcre-devel

[root@localhost nginx-1.22.0]# ./configure --prefix=/etc/nginx --sbin-path=/usr/sbin/nginx --modules-path=/usr/lib64/nginx/modules --conf-path=/etc/nginx/nginx.conf --error-log-path=/var/log/nginx/error.log --http-log-path=/var/log/nginx/access.log --pid-path=/var/run/nginx.pid --lock-path=/var/run/nginx.lock --http-client-body-temp-path=/var/cache/nginx/client_temp --http-proxy-temp-path=/var/cache/nginx/proxy_temp --http-fastcgi-temp-path=/var/cache/nginx/fastcgi_temp --http-uwsgi-temp-path=/var/cache/nginx/uwsgi_temp --http-scgi-temp-path=/var/cache/nginx/scgi_temp --user=nginx --group=nginx --with-compat --with-file-aio --with-threads --with-http_addition_module --with-http_auth_request_module --with-http_dav_module --with-http_flv_module --with-http_gunzip_module --with-http_gzip_static_module --with-http_mp4_module --with-http_random_index_module --with-http_realip_module --with-http_secure_link_module --with-http_slice_module --with-http_ssl_module --with-http_stub_status_module --with-http_sub_module --with-http_v2_module --with-mail --with-mail_ssl_module --with-stream --with-stream_realip_module --with-stream_ssl_module --with-stream_ssl_preread_module --with-cc-opt='-O2 -g -pipe -Wall -Wp,-D_FORTIFY_SOURCE=2 -fexceptions -fstack-protector-strong --param=ssp-buffer-size=4 -grecord-gcc-switches -m64 -mtune=generic -fPIC' --with-ld-opt='-Wl,-z,relro -Wl,-z,now -pie'

[root@localhost nginx-1.22.0]# yum install -y openssl-devel

[root@localhost nginx-1.22.0]# ./configure --prefix=/etc/nginx --sbin-path=/usr/sbin/nginx --modules-path=/usr/lib64/nginx/modules --conf-path=/etc/nginx/nginx.conf --error-log-path=/var/log/nginx/error.log --http-log-path=/var/log/nginx/access.log --pid-path=/var/run/nginx.pid --lock-path=/var/run/nginx.lock --http-client-body-temp-path=/var/cache/nginx/client_temp --http-proxy-temp-path=/var/cache/nginx/proxy_temp --http-fastcgi-temp-path=/var/cache/nginx/fastcgi_temp --http-uwsgi-temp-path=/var/cache/nginx/uwsgi_temp --http-scgi-temp-path=/var/cache/nginx/scgi_temp --user=nginx --group=nginx --with-compat --with-file-aio --with-threads --with-http_addition_module --with-http_auth_request_module --with-http_dav_module --with-http_flv_module --with-http_gunzip_module --with-http_gzip_static_module --with-http_mp4_module --with-http_random_index_module --with-http_realip_module --with-http_secure_link_module --with-http_slice_module --with-http_ssl_module --with-http_stub_status_module --with-http_sub_module --with-http_v2_module --with-mail --with-mail_ssl_module --with-stream --with-stream_realip_module --with-stream_ssl_module --with-stream_ssl_preread_module --with-cc-opt='-O2 -g -pipe -Wall -Wp,-D_FORTIFY_SOURCE=2 -fexceptions -fstack-protector-strong --param=ssp-buffer-size=4 -grecord-gcc-switches -m64 -mtune=generic -fPIC' --with-ld-opt='-Wl,-z,relro -Wl,-z,now -pie'
(3)直到出现这个界面就可以开始安装
[root@localhost nginx-1.22.0]# make
[root@localhost nginx-1.22.0]# make install
[root@localhost nginx-1.22.0]# nginx -v
nginx version: nginx/1.22.0
(4)配置nginx的service启动
[root@localhost ~]# whereis nginx
nginx: /usr/sbin/nginx /etc/nginx

[root@localhost ~]# vim /usr/lib/systemd/system/nginx.service
[Unit]
Description=nginx - high performance web server
Documentation=http://nginx.org/en/docs/
After=network.target remote-fs.target nss-lookup.target
[Service]
Type=forking
PIDFile=/run/nginx.pid
ExecStartPre=/usr/sbin/nginx -t -c /usr/local/src/nginx-1.22.0/conf/nginx.conf
ExecStart=/usr/sbin/nginx -c /usr/local/src/nginx-1.22.0/conf/nginx.conf
#填上面你的设备查到的目录以及你的nginx.conf的所在位置
ExecReload=/bin/kill -s HUP $MAINPID
ExecStop=/bin/kill -s QUIT $MAINPID
PrivateTmp=true
[Install]
WantedBy=multi-user.target

[root@localhost ~]# systemctl restart nginx.service
[root@localhost ~]# systemctl status nginx.service
● nginx.service - nginx - high performance web server
   Loaded: loaded (/usr/lib/systemd/system/nginx.service; disabled; vendor preset: disabled)
   Active: active (running) since Sat 2023-08-12 23:10:12 CST; 6s ago
     Docs: http://nginx.org/en/docs/
  Process: 19217 ExecStop=/bin/kill -s QUIT $MAINPID (code=exited, status=0/SUCCESS)
  Process: 19225 ExecStart=/usr/sbin/nginx -c /usr/local/src/nginx-1.22.0/conf/nginx.conf (code=exited, status=0/SUCCESS)
  Process: 19222 ExecStartPre=/usr/sbin/nginx -t -c /usr/local/src/nginx-1.22.0/conf/nginx.conf (code=exited, status=0/SUCCESS)
 Main PID: 19226 (nginx)
   CGroup: /system.slice/nginx.service
           ├─19226 nginx: master process /usr/sbin/nginx -c /usr/local/src/nginx-1.22.0/conf/nginx.conf
           └─19227 nginx: worker process

Aug 12 23:10:12 localhost.localdomain systemd[1]: Starting nginx - high performance web server...
Aug 12 23:10:12 localhost.localdomain nginx[19222]: nginx: the configuration file /usr/local/src/nginx-1.22.0/conf/nginx.conf syntax is ok
Aug 12 23:10:12 localhost.localdomain nginx[19222]: nginx: configuration file /usr/local/src/nginx-1.22.0/conf/nginx.conf test is successful
Aug 12 23:10:12 localhost.localdomain systemd[1]: Failed to parse PID from file /run/nginx.pid: Invalid argument
Aug 12 23:10:12 localhost.localdomain systemd[1]: Started nginx - high performance web server.
2.Mysql环境
我使用的是mariadb
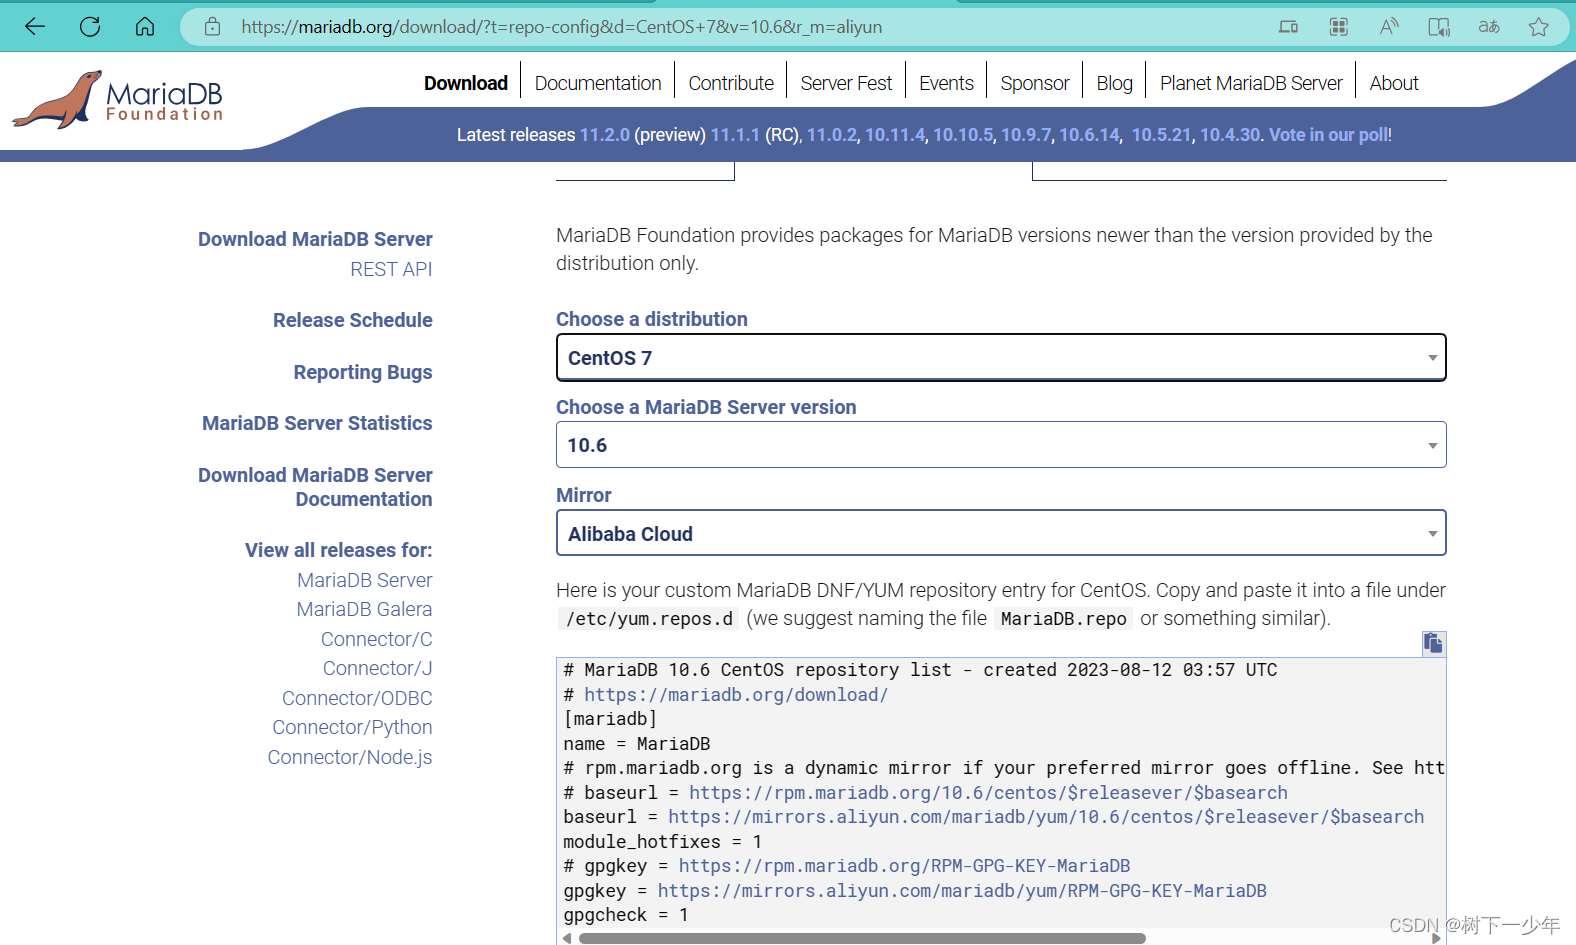
(1)如下新增yum库
[root@localhost yum.repos.d]# ll
total 8
-rw-r--r--. 1 root root  68 Jul 23 09:13 cdrom.repo
-rw-r--r--  1 root root 561 Aug 12 09:55 mariadb.repo

[root@localhost yum.repos.d]# vim mariadb.repo
# MariaDB 10.6 CentOS repository list - created 2023-08-12 01:54 UTC
# https://mariadb.org/download/
[mariadb]
name = MariaDB
# rpm.mariadb.org is a dynamic mirror if your preferred mirror goes offline. See https://mariadb.org/mirrorbits/ for details.
# baseurl = https://rpm.mariadb.org/10.6/centos/$releasever/$basearch
baseurl = https://mirrors.aliyun.com/mariadb/yum/10.6/centos/$releasever/$basearch
module_hotfixes = 1
# gpgkey = https://rpm.mariadb.org/RPM-GPG-KEY-MariaDB
gpgkey = https://mirrors.aliyun.com/mariadb/yum/RPM-GPG-KEY-MariaDB
gpgcheck = 1
(2)安装MariaDB-client.x86_64和MariaDB-server.x86_64并启动mariadb
[root@localhost yum.repos.d]# yum install -y MariaDB-client.x86_64 MariaDB-server.x86_64

[root@localhost yum.repos.d]# systemctl start mariadb

[root@localhost yum.repos.d]# systemctl status mariadb
● mariadb.service - MariaDB 10.6.14 database server
   Loaded: loaded (/usr/lib/systemd/system/mariadb.service; disabled; vendor preset: disabled)
  Drop-In: /etc/systemd/system/mariadb.service.d
           └─migrated-from-my.cnf-settings.conf
   Active: active (running) since Sat 2023-08-12 09:58:12 CST; 9s ago
     Docs: man:mariadbd(8)
           https://mariadb.com/kb/en/library/systemd/
  Process: 2759 ExecStartPost=/bin/sh -c systemctl unset-environment _WSREP_START_POSITION (code=exited, status=0/SUCCESS)
  Process: 2730 ExecStartPre=/bin/sh -c [ ! -e /usr/bin/galera_recovery ] && VAR= ||   VAR=`cd /usr/bin/..; /usr/bin/galera_recovery`; [ $? -eq 0 ]   && systemctl set-environment _WSREP_START_POSITION=$VAR || exit 1 (code=exited, status=0/SUCCESS)
  Process: 2728 ExecStartPre=/bin/sh -c systemctl unset-environment _WSREP_START_POSITION (code=exited, status=0/SUCCESS)
 Main PID: 2742 (mariadbd)
   Status: "Taking your SQL requests now..."
   CGroup: /system.slice/mariadb.service
           └─2742 /usr/sbin/mariadbd
Aug 12 09:58:12 localhost.localdomain mariadbd[2742]: 2023-08-12  9:58:12 0 [Note] InnoDB: File './ibtmp1' size is now 12 MB.
Aug 12 09:58:12 localhost.localdomain mariadbd[2742]: 2023-08-12  9:58:12 0 [Note] InnoDB: 10.6.14 started; log sequence number 41320; ...n id 14
Aug 12 09:58:12 localhost.localdomain mariadbd[2742]: 2023-08-12  9:58:12 0 [Note] InnoDB: Loading buffer pool(s) from /var/lib/mysql/i...er_pool
Aug 12 09:58:12 localhost.localdomain mariadbd[2742]: 2023-08-12  9:58:12 0 [Note] Plugin 'FEEDBACK' is disabled.
Aug 12 09:58:12 localhost.localdomain mariadbd[2742]: 2023-08-12  9:58:12 0 [Note] InnoDB: Buffer pool(s) load completed at 230812  9:58:12
Aug 12 09:58:12 localhost.localdomain mariadbd[2742]: 2023-08-12  9:58:12 0 [Note] Server socket created on IP: '0.0.0.0'.
Aug 12 09:58:12 localhost.localdomain mariadbd[2742]: 2023-08-12  9:58:12 0 [Note] Server socket created on IP: '::'.
Aug 12 09:58:12 localhost.localdomain mariadbd[2742]: 2023-08-12  9:58:12 0 [Note] /usr/sbin/mariadbd: ready for connections.
Aug 12 09:58:12 localhost.localdomain mariadbd[2742]: Version: '10.6.14-MariaDB'  socket: '/var/lib/mysql/mysql.sock'  port: 3306  MariaDB Server
Aug 12 09:58:12 localhost.localdomain systemd[1]: Started MariaDB 10.6.14 database server.
Hint: Some lines were ellipsized, use -l to show in full.
(3)设置数据库密码并登录
[root@localhost yum.repos.d]# mysql -uroot -p123456
Welcome to the MariaDB monitor.  Commands end with ; or \g.
Your MariaDB connection id is 7
Server version: 10.6.14-MariaDB MariaDB Server
Copyright (c) 2000, 2018, Oracle, MariaDB Corporation Ab and others.
Type 'help;' or '\h' for help. Type '\c' to clear the current input statement.

MariaDB [(none)]> show databases;
+--------------------+
| Database           |
+--------------------+
| information_schema |
| mysql              |
| performance_schema |
| sys                |
| test               |
+--------------------+

5 rows in set (0.001 sec)
3.PHP环境
(1)新增扩展源,安装PHP相关包
[root@localhost ~]# yum install epel-release
[root@localhost ~]# rpm -ivh http://rpms.famillecollet.com/enterprise/remi-release-7.rpm
[root@localhost ~]# yum --enablerepo=remi install php56-php php56-php-devel php56-php-fpm php56-php-gd php56-php-xml php56-php-sockets php56-php-session php56-php-snmp php56-php-mysql(2)启动php-fpm
[root@localhost conf]# find / -name php-fpm
/opt/remi/php56/root/etc/sysconfig/php-fpm
/opt/remi/php56/root/usr/sbin/php-fpm
/opt/remi/php56/root/var/log/php-fpm
/opt/remi/php56/root/var/run/php-fpm
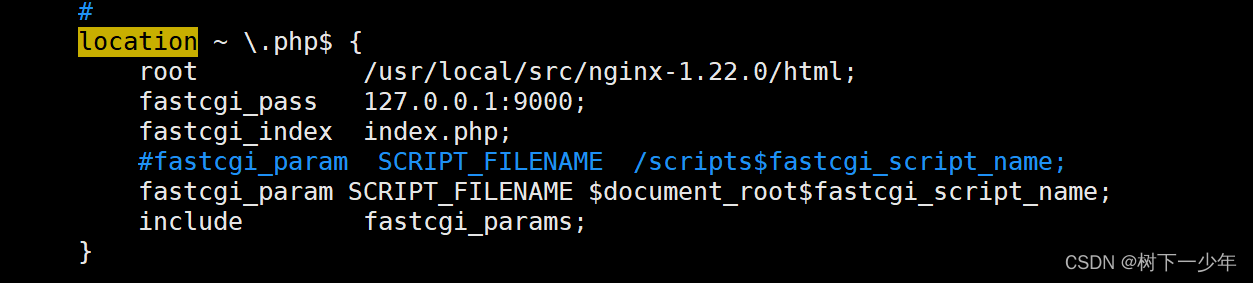
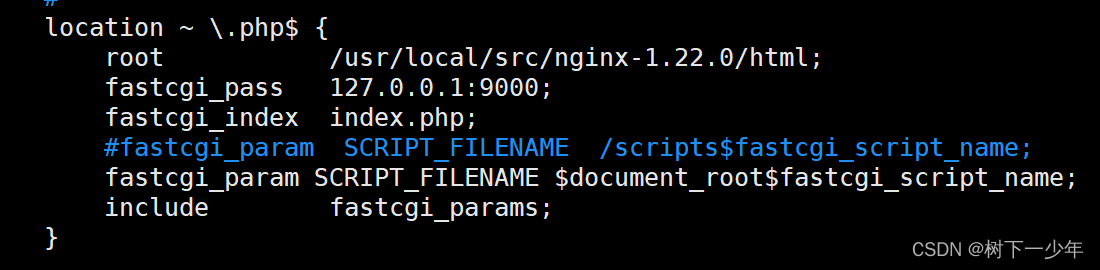
[root@localhost conf]# /opt/remi/php56/root/usr/sbin/php-fpm(3)到安装nginx目录下去修改nginx.conf文件,找到这部分内容并取消注释1,更改为时间html文件存放路径

[root@localhost ~]# cd /usr/local/src/nginx-1.22.0/conf/
[root@localhost conf]# vim nginx.conf
location ~ \.php$ {
            root           /usr/local/src/nginx-1.22.0/html;
            fastcgi_pass   127.0.0.1:9000;
            fastcgi_index  index.php;
            #fastcgi_param  SCRIPT_FILENAME  /scripts$fastcgi_script_name;
            fastcgi_param SCRIPT_FILENAME $document_root$fastcgi_script_name;
            include        fastcgi_params;
        }
注意报错1:
Aug 12 10:21:01 localhost.localdomain nginx[13328]: nginx: [emerg] getpwnam("nginx") failed解决1:
[root@localhost conf]# useradd -M -s /sbin/nologin nginx注意报错2:
Aug 12 10:22:29 localhost.localdomain nginx[13346]: nginx: [emerg] mkdir() "/var/cache/nginx/client_temp" failed (2: No such file or directory)解决2:
[root@localhost conf]# mkdir -pv /var/cache/nginx/client_temp
mkdir: created directory ‘/var/cache/nginx’
mkdir: created directory ‘/var/cache/nginx/client_temp’
(4)重启nginx
[root@localhost conf]# systemctl start nginx
[root@localhost conf]# systemctl status nginx
● nginx.service - nginx - high performance web server
   Loaded: loaded (/usr/lib/systemd/system/nginx.service; disabled; vendor preset: disabled)
   Active: active (running) since Sat 2023-08-12 10:23:57 CST; 6s ago
     Docs: http://nginx.org/en/docs/
  Process: 13361 ExecStart=/usr/sbin/nginx -c /usr/local/src/nginx-1.22.0/conf/nginx.conf (code=exited, status=0/SUCCESS)
  Process: 13358 ExecStartPre=/usr/sbin/nginx -t -c /usr/local/src/nginx-1.22.0/conf/nginx.conf (code=exited, status=0/SUCCESS)
 Main PID: 13362 (nginx)
   CGroup: /system.slice/nginx.service
           ├─13362 nginx: master process /usr/sbin/nginx -c /usr/local/src/nginx-1.22.0/conf/nginx.conf
           └─13363 nginx: worker process

Aug 12 10:23:57 localhost.localdomain systemd[1]: Starting nginx - high performance web server...
Aug 12 10:23:57 localhost.localdomain nginx[13358]: nginx: the configuration file /usr/local/src/nginx-1.22.0/conf/nginx.conf syntax is ok
Aug 12 10:23:57 localhost.localdomain nginx[13358]: nginx: configuration file /usr/local/src/nginx-1.22.0/conf/nginx.conf test is successful
Aug 12 10:23:57 localhost.localdomain systemd[1]: Started nginx - high performance web server.
三.简单测试LNMP环境
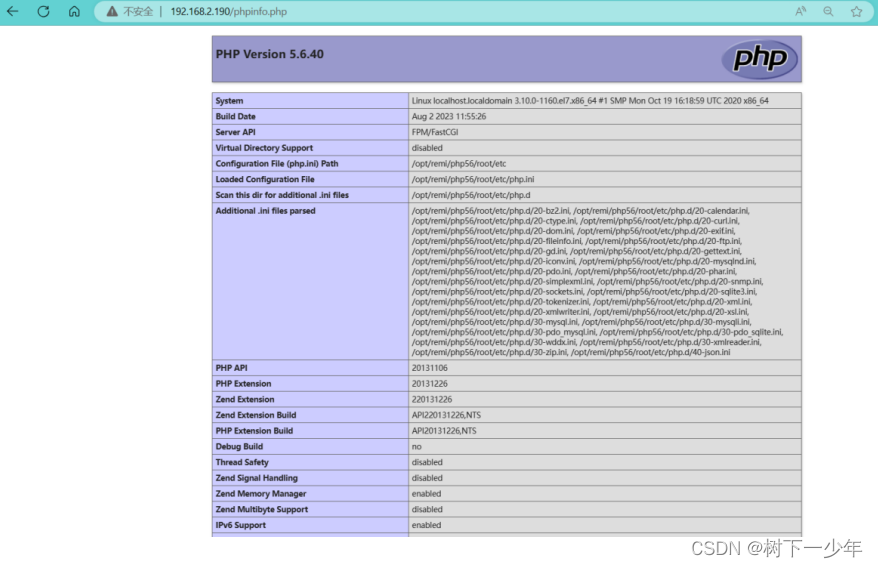
到上面nginx配置文件指定的html目录中新建php文件,"phpinfo();"会显示php环境的相关信息
[root@localhost html]# cat phpinfo.php
<?php
	phpinfo();
?>
[root@localhost html]#
四.搭建wordpress
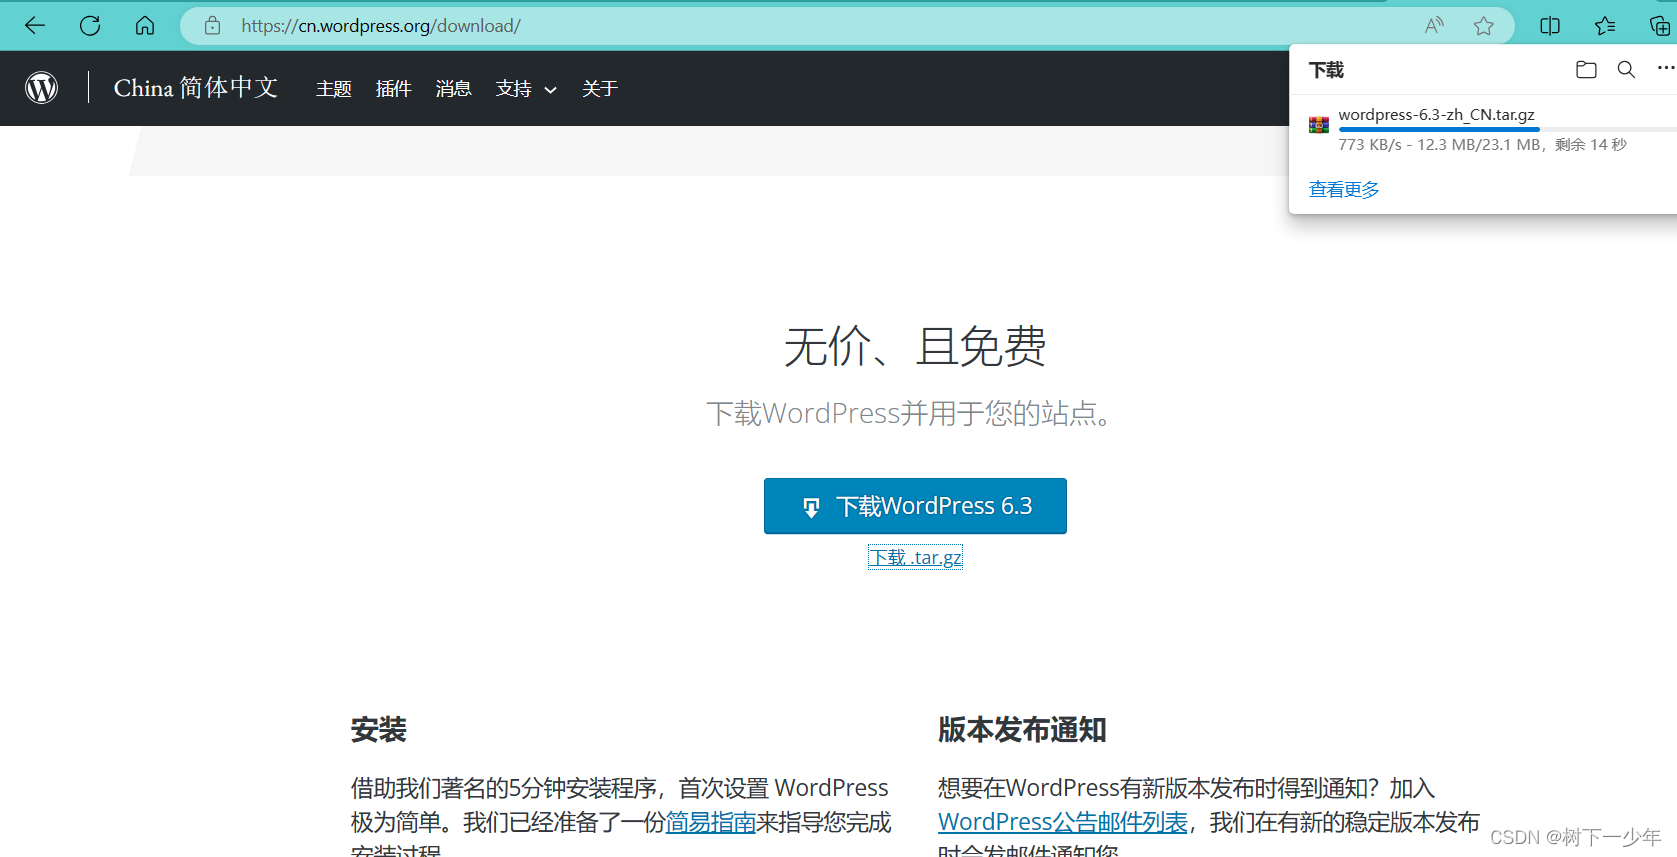
1.准备包
到官网下载tar.gz包,并上传到Linux上,也可以通过复制链接地址进行下载
链接:https://pan.baidu.com/s/1jTZlvPeL-pFbvvxfgv7LAQ
提取码:7icp
2.将wordpress中的所有文件移动到你nginx.conf中指定目录中
[root@localhost ~]# tar -zvxf wordpress-4.8-zh_CN.tar.gz
[root@localhost ~]# mv wordpress/* /usr/local/src/nginx-1.22.0/html/
[root@localhost html]# ll
total 200
-rwxr-xr-x  1 nginx  nginx       497 May 24  2022 50x.html
-rwxr-xr-x  1 nginx  nginx       615 May 24  2022 index.html
-rwxr-xr-x  1 nobody nfsnobody   418 Sep 25  2013 index.php
-rwxr-xr-x  1 nobody nfsnobody 19935 Jan  3  2017 license.txt
-rwxr-xr-x  1 root   root         21 Aug 12 10:31 phpinfo.php
-rwxr-xr-x  1 nobody nfsnobody  6956 Jul 23  2017 readme.html
-rwxr-xr-x  1 nobody nfsnobody  5447 Sep 28  2016 wp-activate.php
drwxr-xr-x  9 nobody nfsnobody  4096 Jul 23  2017 wp-admin
-rwxr-xr-x  1 nobody nfsnobody   364 Dec 19  2015 wp-blog-header.php
-rwxr-xr-x  1 nobody nfsnobody  1627 Aug 29  2016 wp-comments-post.php
-rwxr-xr-x  1 root   root       2910 Aug 12 21:22 wp-config.php
-rwxr-xr-x  1 nobody nfsnobody  2910 Aug 12 21:22 wp-config-sample.php
drwxr-xr-x  5 nobody nfsnobody    69 Jul 23  2017 wp-content
-rwxr-xr-x  1 nobody nfsnobody  3286 May 25  2015 wp-cron.php
drwxr-xr-x 18 nobody nfsnobody  8192 Jul 23  2017 wp-includes
-rwxr-xr-x  1 nobody nfsnobody  2422 Nov 21  2016 wp-links-opml.php
-rwxr-xr-x  1 nobody nfsnobody  3301 Oct 25  2016 wp-load.php
-rwxr-xr-x  1 nobody nfsnobody 34327 May 13  2017 wp-login.php
-rwxr-xr-x  1 nobody nfsnobody  8048 Jan 11  2017 wp-mail.php
-rwxr-xr-x  1 nobody nfsnobody 16200 Apr  7  2017 wp-settings.php
-rwxr-xr-x  1 nobody nfsnobody 29924 Jan 24  2017 wp-signup.php
-rwxr-xr-x  1 nobody nfsnobody  4513 Oct 15  2016 wp-trackback.php
-rwxr-xr-x  1 nobody nfsnobody  3065 Sep  1  2016 xmlrpc.php
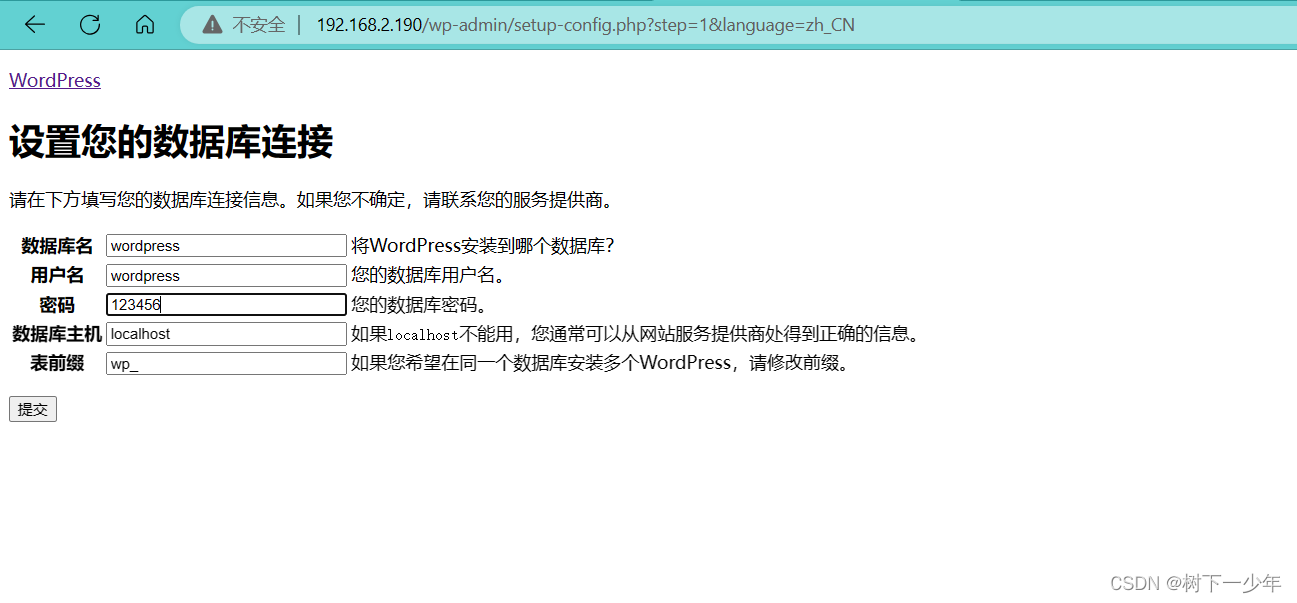
3.为wordpress配置数据库
[root@localhost ~]# mysql -uroot -p123456
Welcome to the MariaDB monitor.  Commands end with ; or \g.
Your MariaDB connection id is 8
Server version: 10.6.14-MariaDB MariaDB Server

Copyright (c) 2000, 2018, Oracle, MariaDB Corporation Ab and others.

Type 'help;' or '\h' for help. Type '\c' to clear the current input statement.

MariaDB [(none)]> create database wordpress default character set utf8;
Query OK, 1 row affected (0.001 sec)

MariaDB [(none)]> create user wordpress@localhost identified by "123456";
Query OK, 0 rows affected (0.002 sec)

MariaDB [(none)]> grant all privileges on *.* to wordpress@localhost;
Query OK, 0 rows affected (0.001 sec)

MariaDB [(none)]> flush privileges;
Query OK, 0 rows affected (0.001 sec)
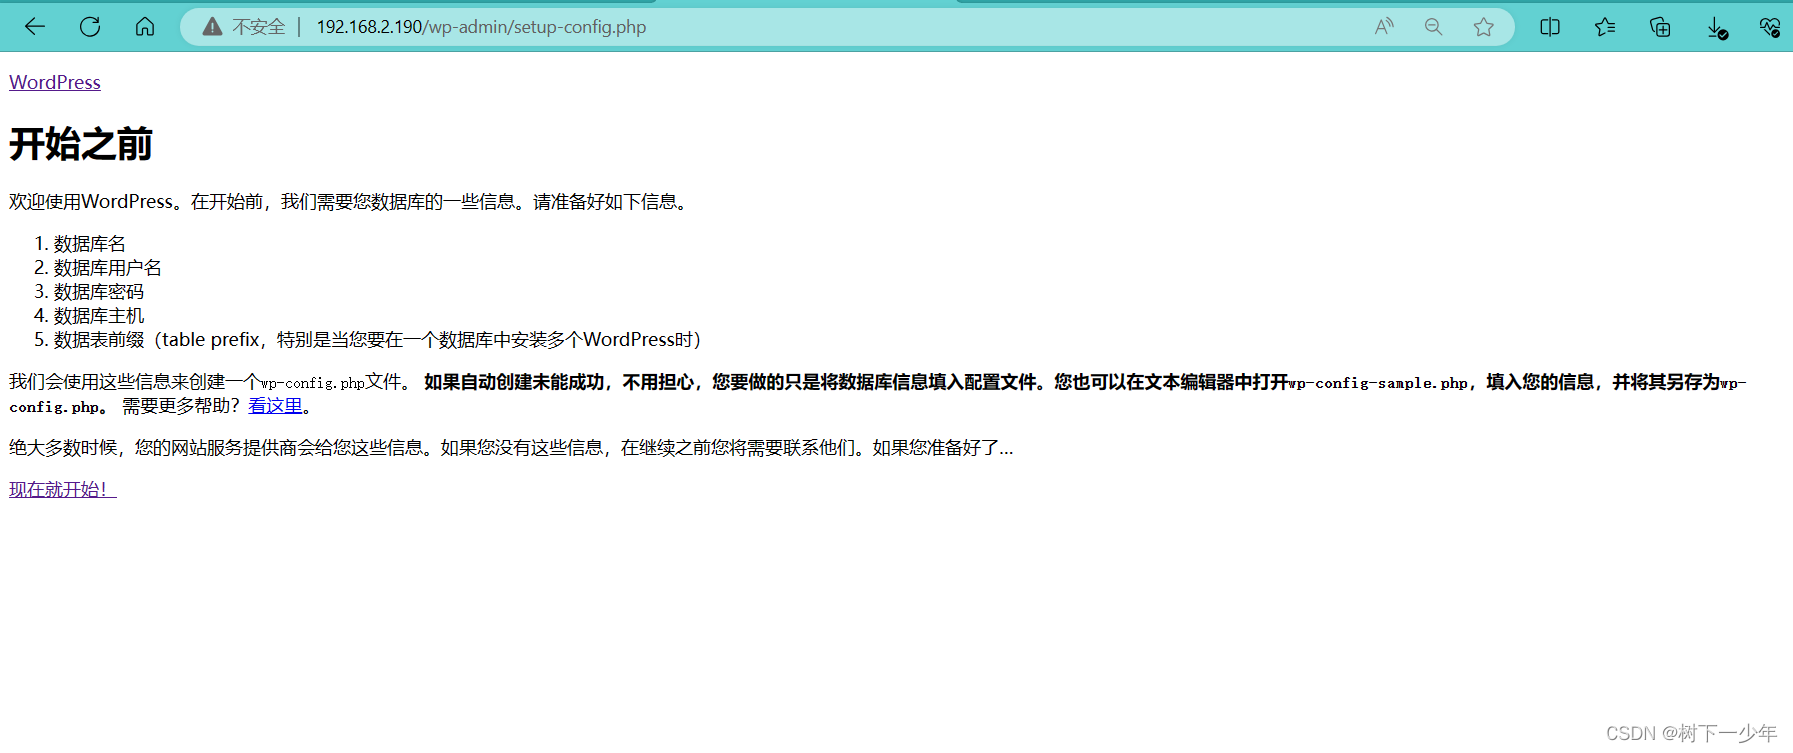
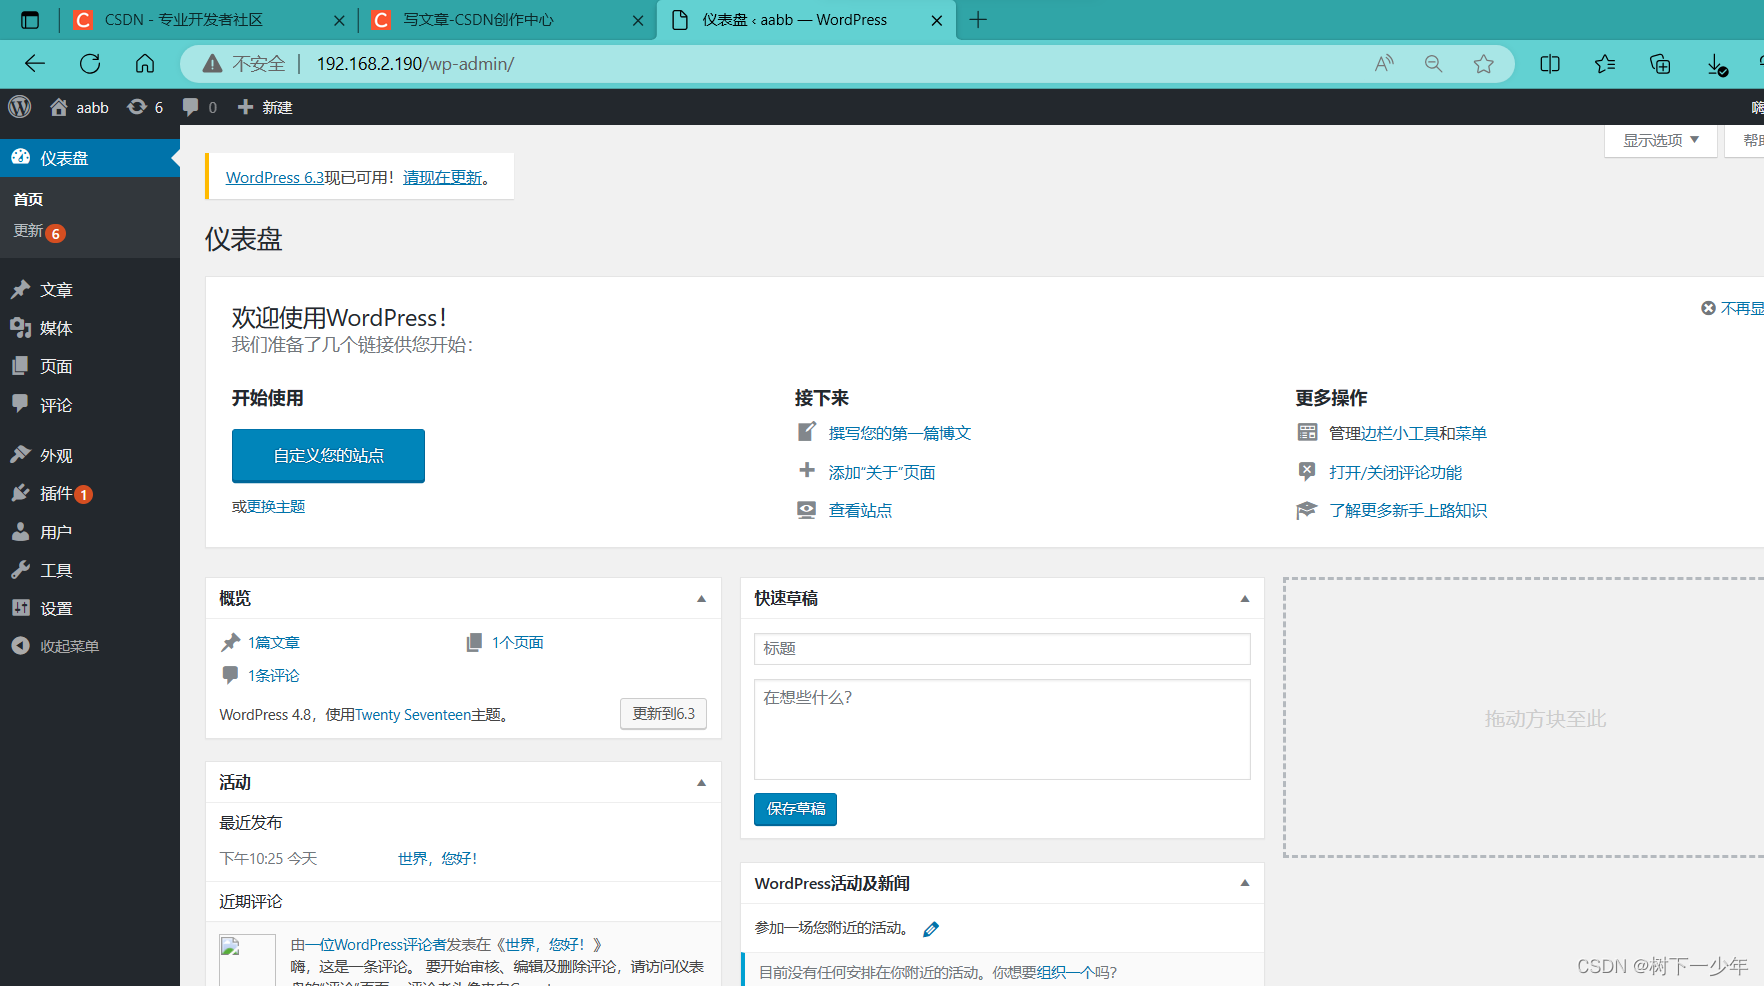
4.到浏览器进行注册
(1)刚开始可以用ip/wp-admin/index.php进行引导

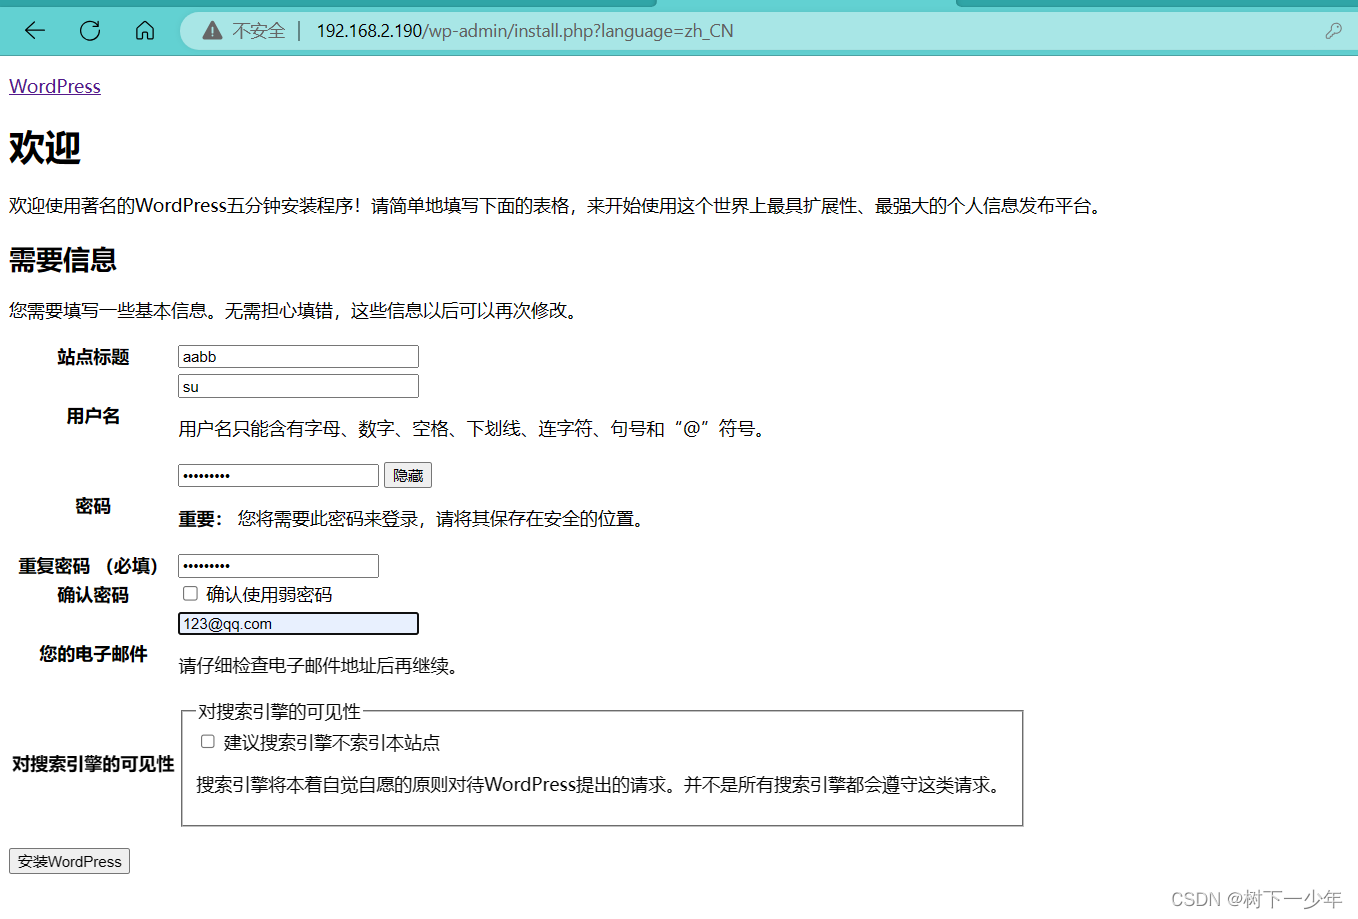
(2)跳转后填写信息
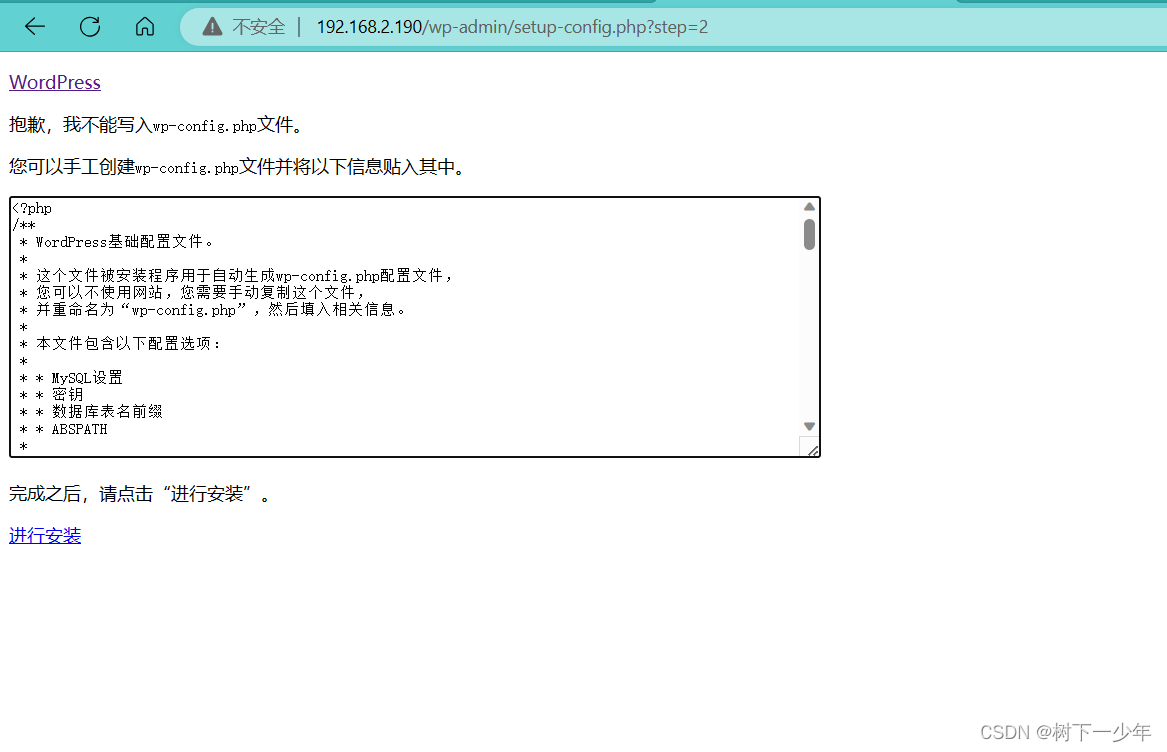
(3)弹出这个界面,就复制一份wp-config.php文件
主要是填写刚才创建的数据库信息DB_NAME,DB_USER,DB_PASSWORD,DB_HOST,点击进行安装
[root@localhost html]# cp wp-config-sample.php wp-config.php
[root@localhost html]# vim wp-config.php
<?php
/**
 * WordPress基础配置文件。
 *
 * 这个文件被安装程序用于自动生成wp-config.php配置文件,
 * 您可以不使用网站,您需要手动复制这个文件,
 * 并重命名为“wp-config.php”,然后填入相关信息。
 *
 * 本文件包含以下配置选项:
 *
 * * MySQL设置
 * * 密钥
 * * 数据库表名前缀
 * * ABSPATH
 *
 * @link https://codex.wordpress.org/zh-cn:%E7%BC%96%E8%BE%91_wp-config.php
 *
 * @package WordPress
 */

// ** MySQL 设置 - 具体信息来自您正在使用的主机 ** //
/** WordPress数据库的名称 */
define('DB_NAME', 'wordpress');

/** MySQL数据库用户名 */
define('DB_USER', 'wordpress');

/** MySQL数据库密码 */
define('DB_PASSWORD', '123456');

/** MySQL主机 */
define('DB_HOST', 'localhost');

/** 创建数据表时默认的文字编码 */
define('DB_CHARSET', 'utf8');

/** 数据库整理类型。如不确定请勿更改 */
define('DB_COLLATE', '');

/**#@+
 * 身份认证密钥与盐。
 *
 * 修改为任意独一无二的字串!
 * 或者直接访问{@link https://api.wordpress.org/secret-key/1.1/salt/
 * WordPress.org密钥生成服务}
 * 任何修改都会导致所有cookies失效,所有用户将必须重新登录。
 *
 * @since 2.6.0
 */
define('AUTH_KEY',         'put your unique phrase here');
define('SECURE_AUTH_KEY',  'put your unique phrase here');
define('LOGGED_IN_KEY',    'put your unique phrase here');
define('NONCE_KEY',        'put your unique phrase here');
define('AUTH_SALT',        'put your unique phrase here');
define('SECURE_AUTH_SALT', 'put your unique phrase here');
define('LOGGED_IN_SALT',   'put your unique phrase here');
define('NONCE_SALT',       'put your unique phrase here');

/**#@-*/

/**
 * WordPress数据表前缀。
 *
 * 如果您有在同一数据库内安装多个WordPress的需求,请为每个WordPress设置
 * 不同的数据表前缀。前缀名只能为数字、字母加下划线。
 */
$table_prefix  = 'wp_';

/**
 * 开发者专用:WordPress调试模式。
 *
 * 将这个值改为true,WordPress将显示所有用于开发的提示。
 * 强烈建议插件开发者在开发环境中启用WP_DEBUG。
 *
 * 要获取其他能用于调试的信息,请访问Codex。
 *
 * @link https://codex.wordpress.org/Debugging_in_WordPress
 */
define('WP_DEBUG', false);

/**
 * zh_CN本地化设置:启用ICP备案号显示
 *
 * 可在设置→常规中修改。
 * 如需禁用,请移除或注释掉本行。
 */
define('WP_ZH_CN_ICP_NUM', true);

/* 好了!请不要再继续编辑。请保存本文件。使用愉快! */

/** WordPress目录的绝对路径。 */
if ( !defined('ABSPATH') )
	define('ABSPATH', dirname(__FILE__) . '/');

/** 设置WordPress变量和包含文件。 */
require_once(ABSPATH . 'wp-settings.php');
(4)输入信息

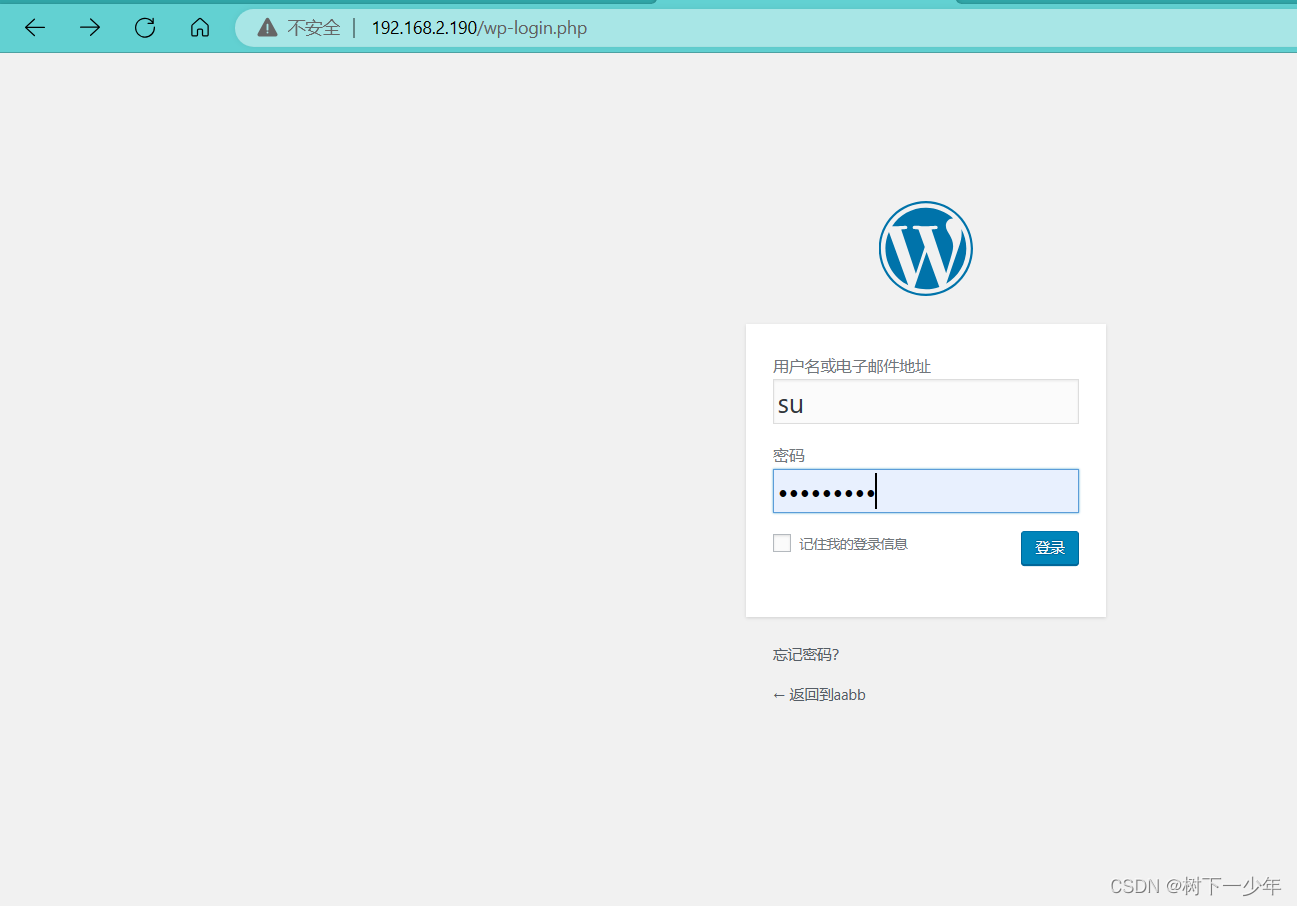
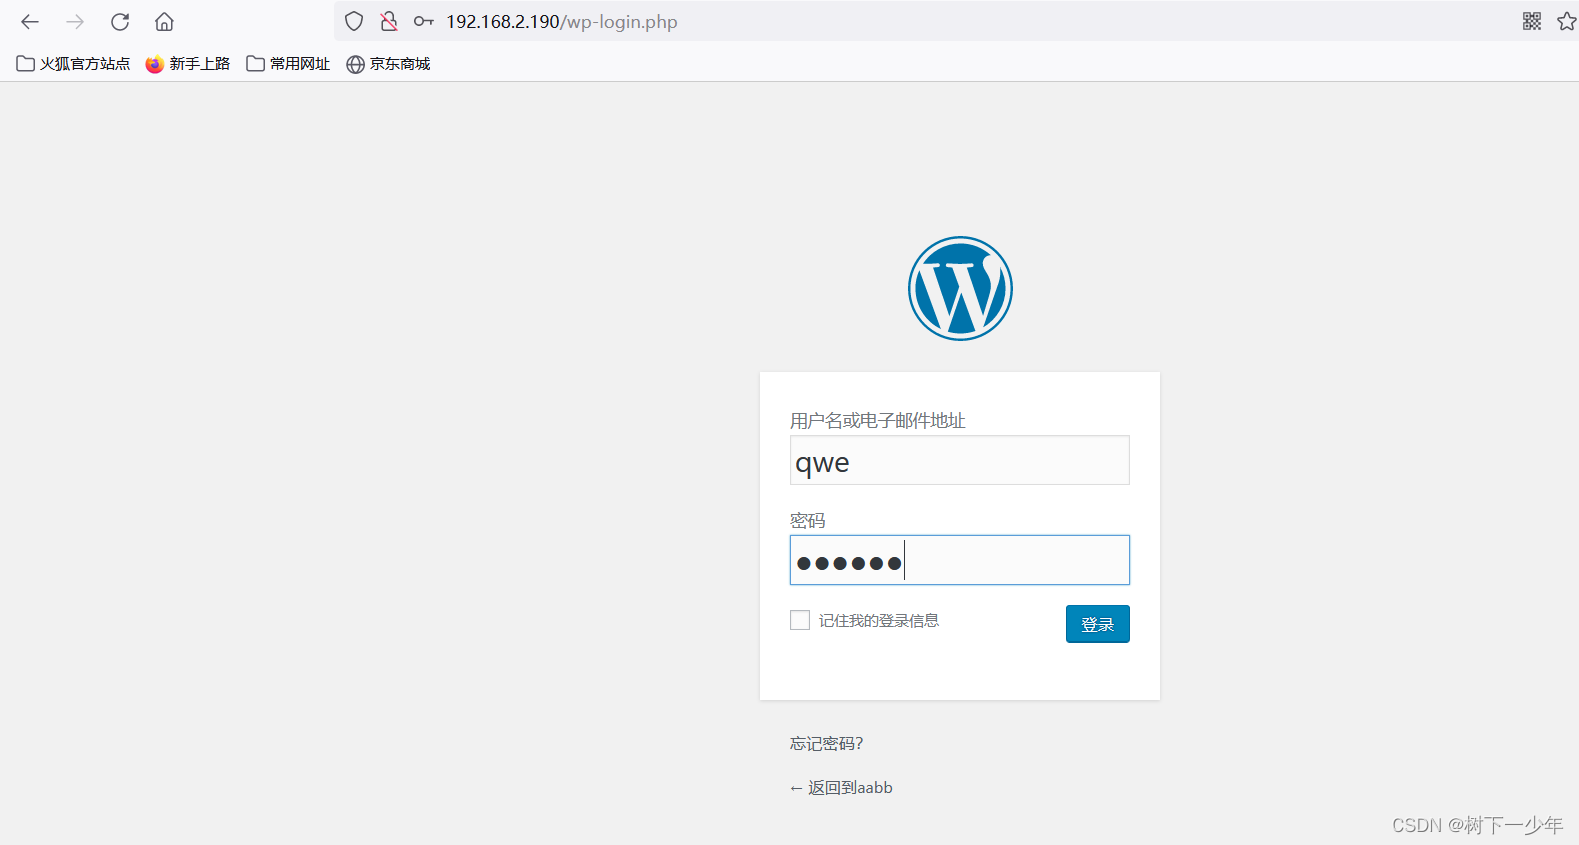
5.登录
6.登录后台报404解决
(1)方法1
我这里没有跳到后台而是跳回wp-admin并报404,直接通过IP/wp-admin也是报404
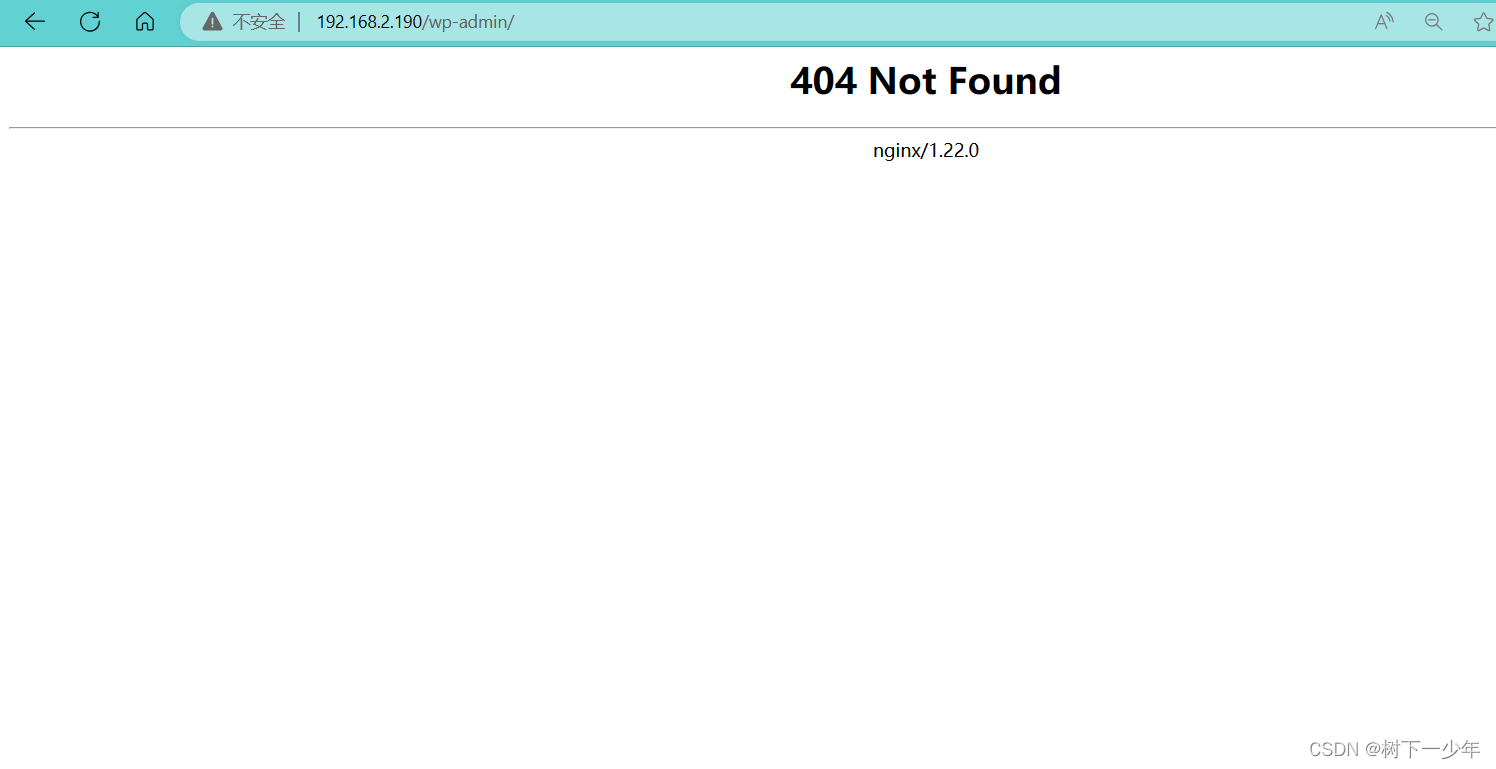
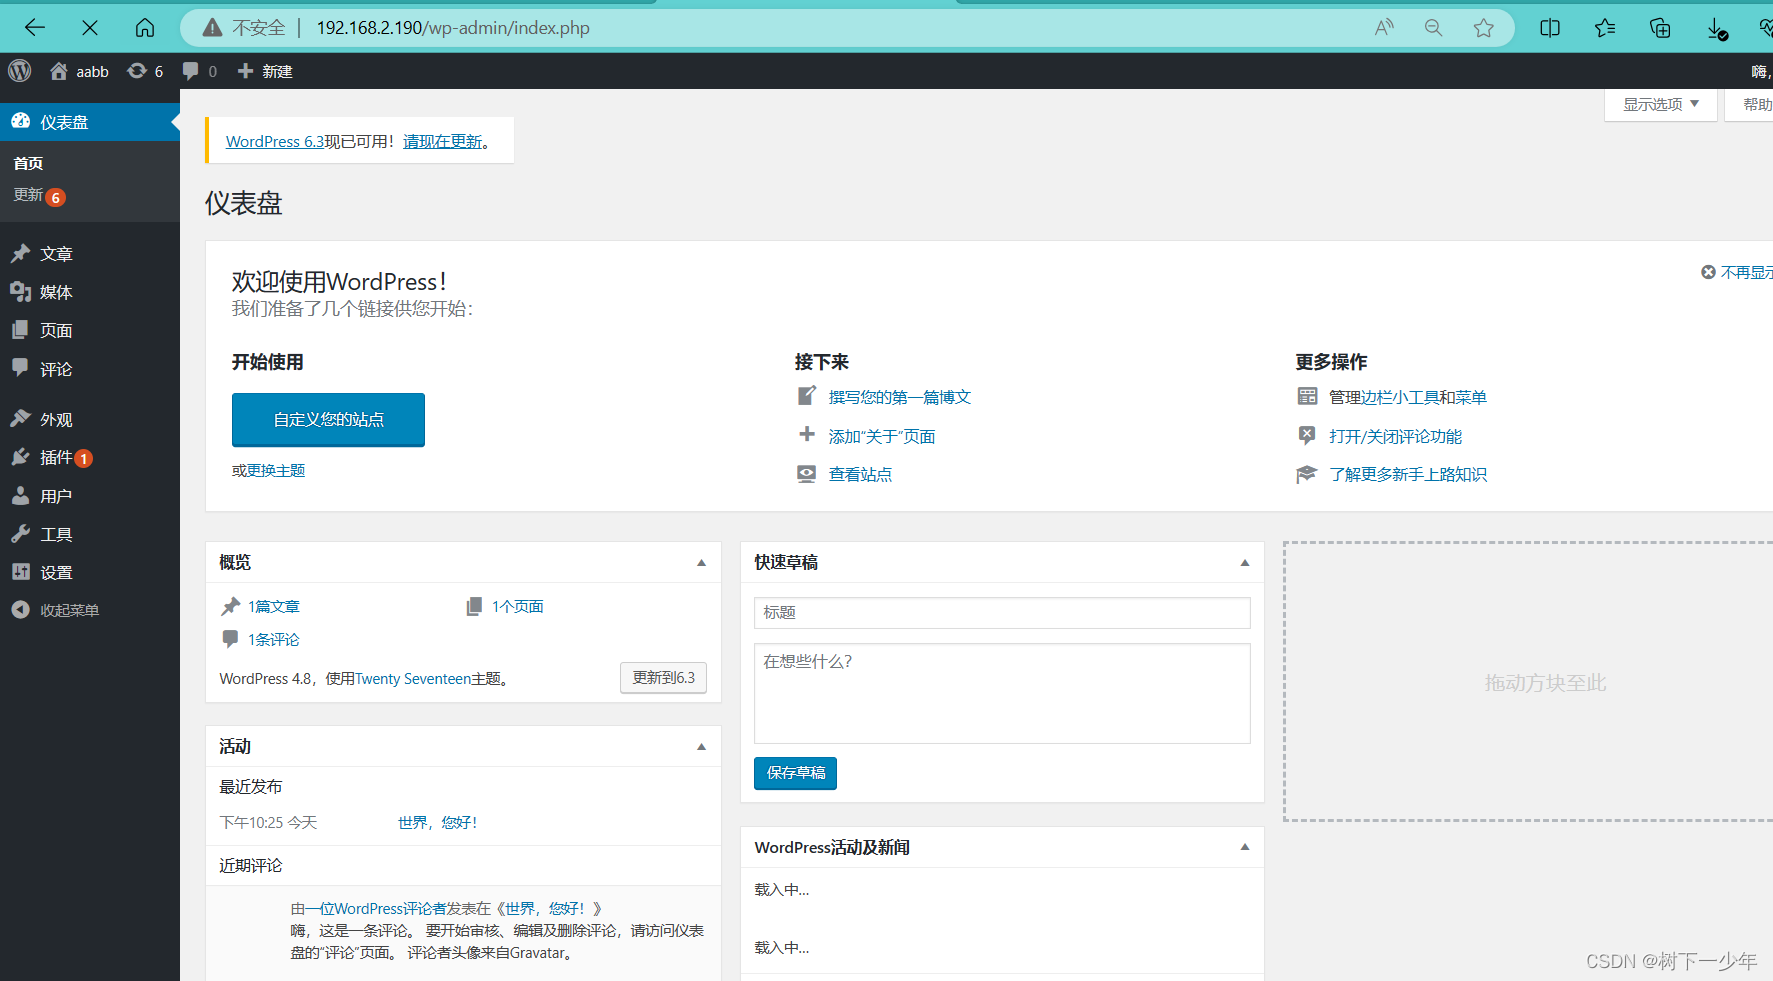
到这里其实我们的信息都已经注册好了,可以和第一步一样直接通过ip/wp-admin/index.php登录

(2)方法2
修改nginx.conf配置
[root@localhost conf]# vim nginx.conf 将这部分的工作目录更改到和php部分一直,并添加index.php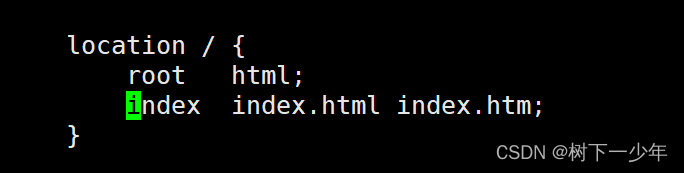
更改后的内容

重启nginx,通过ip/wp-admin进入后台

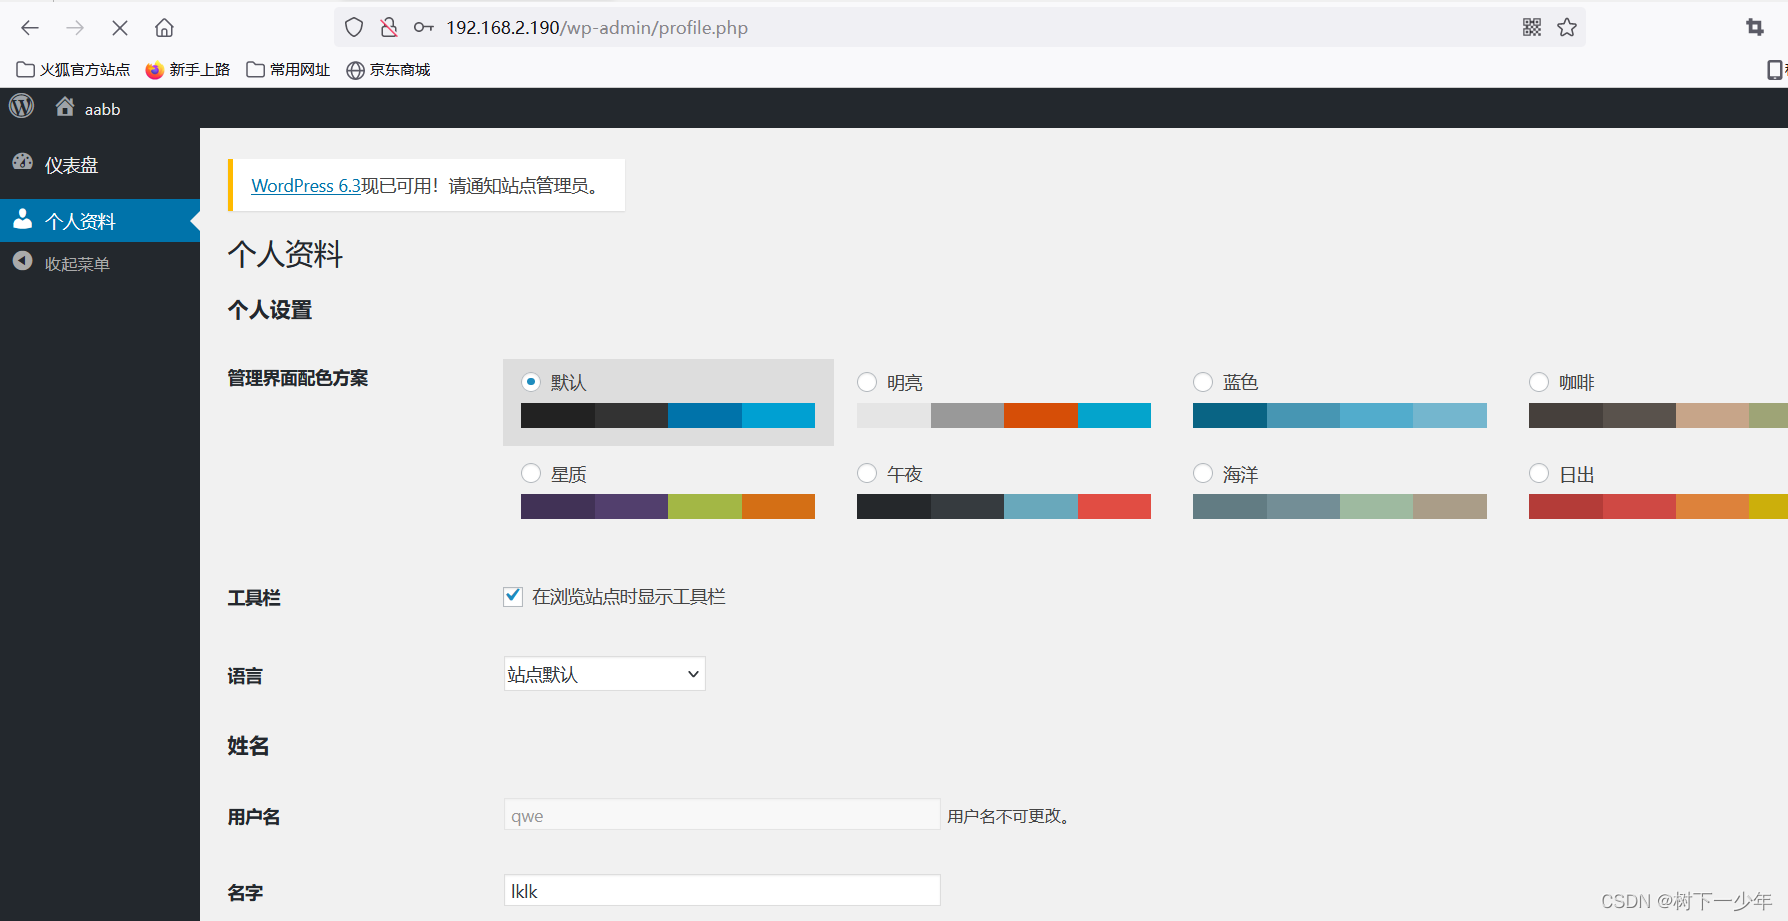
7.手动添加用户
(1)点击用户添加,输入相关信息

(2)邮箱会收到信息, 后续也可以使用这个账号登录 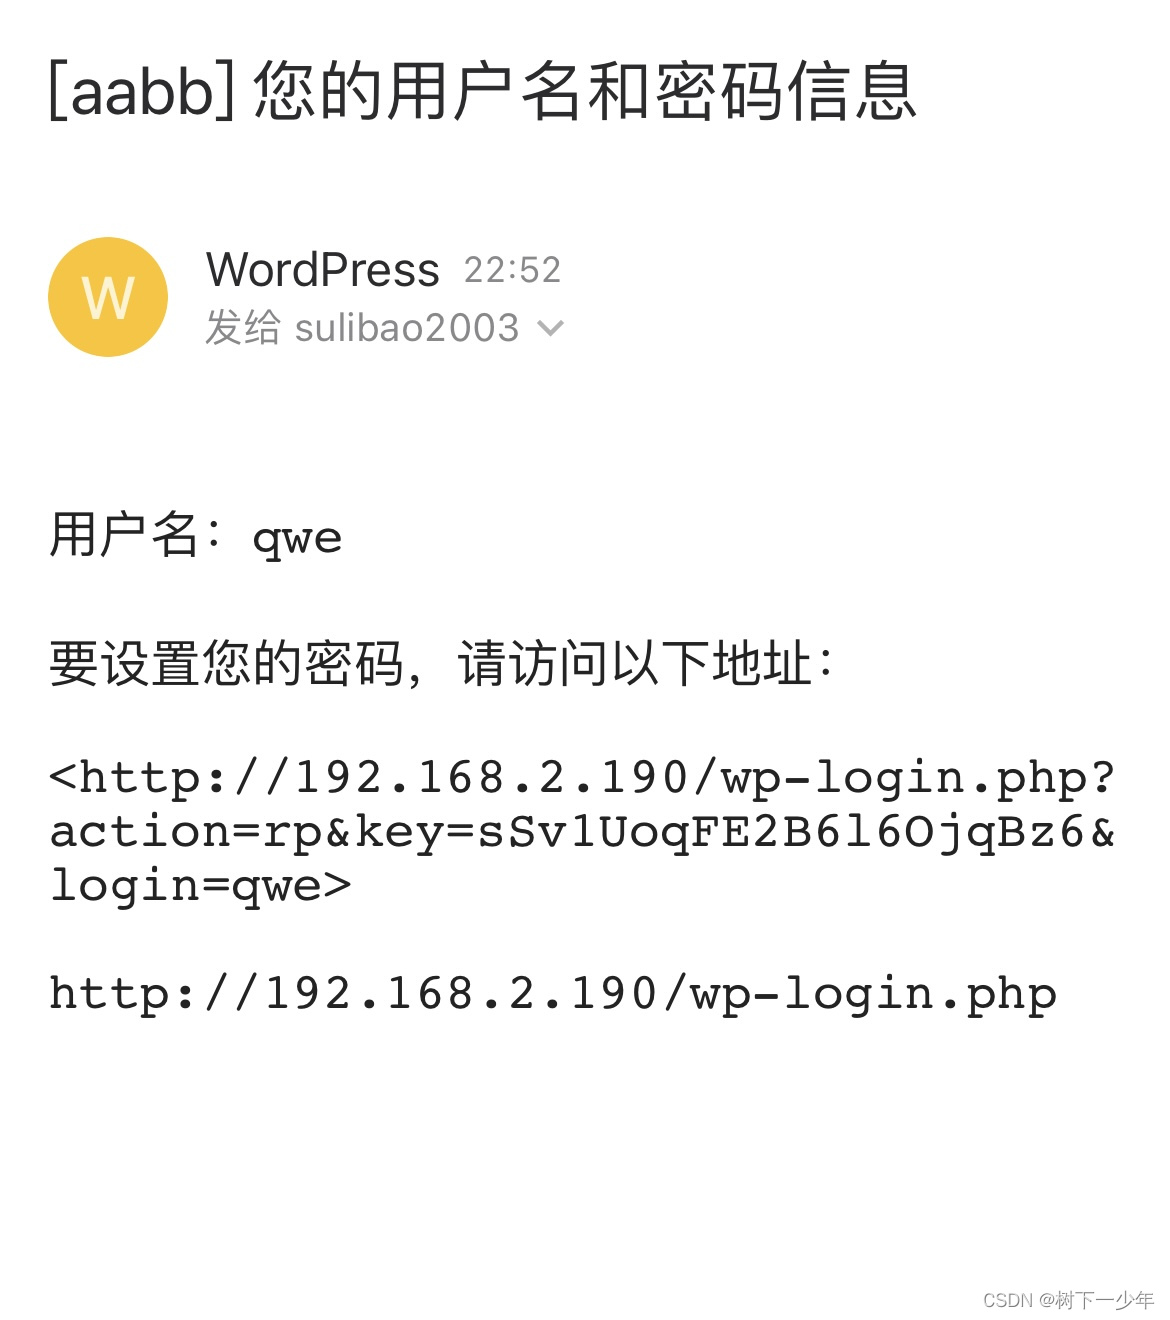
(3)查看数据库里是否有用户信息
Database changed
MariaDB [wordpress]> show tables;
+-----------------------+
| Tables_in_wordpress   |
+-----------------------+
| wp_commentmeta        |
| wp_comments           |
| wp_links              |
| wp_options            |
| wp_postmeta           |
| wp_posts              |
| wp_term_relationships |
| wp_term_taxonomy      |
| wp_termmeta           |
| wp_terms              |
| wp_usermeta           |
| wp_users              |
+-----------------------+
12 rows in set (0.000 sec)

MariaDB [wordpress]> select * from wp_users;
+----+------------+------------------------------------+---------------+---------------------+----------+---------------------+-----------------------------------------------+-------------+--------------+
| ID | user_login | user_pass                          | user_nicename | user_email          | user_url | user_registered     | user_activation_key                           | user_status | display_name |
+----+------------+------------------------------------+---------------+---------------------+----------+---------------------+-----------------------------------------------+-------------+--------------+
|  1 | su         | $P$BKXqDGFNyKlDuc5PhCWFz.rSw6i/mo0 | su            | 123@qq.com          |          | 2023-08-12 14:25:31 |                                               |           0 | su           |
|  2 | qwe        | $P$Be3x8/Et/cnjTymICFYPKqRpjsSjrD/ | qwe           | xxxxxxxx@163.comxxx |          | 2023-08-12 14:52:09 | 1691851929:$P$Bn49MnVV16FhF3a0Na0H32GvDRirDM1 |           0 | l, lklk      |
+----+------------+------------------------------------+---------------+---------------------+----------+---------------------+-----------------------------------------------+-------------+--------------+
2 rows in set (0.000 sec)


 3371
3371


 被折叠的 条评论
为什么被折叠?
被折叠的 条评论
为什么被折叠?
 到【灌水乐园】发言


