


针对Landsat5、Landsat7、Landsat8的热红外波段反演地表温度的代码,可以批量进行温度的反演,但需要有前期的一些准备,包括大气校正参数的获取、可见光波段的大气校正等,以及文件夹的准备、文件的规范命名等。
1、大气校正法的主要过程参考文档:ENVI下Landsat8大气校正法反演地表温度
2、可见光波段参照以上文档进行大气校正(但是根据覃志豪老师的论文,可见光波段不进行大气校正也可直接用于温度反演,因此在文件命名中有所区别)
3、文件夹准备及文件命名:
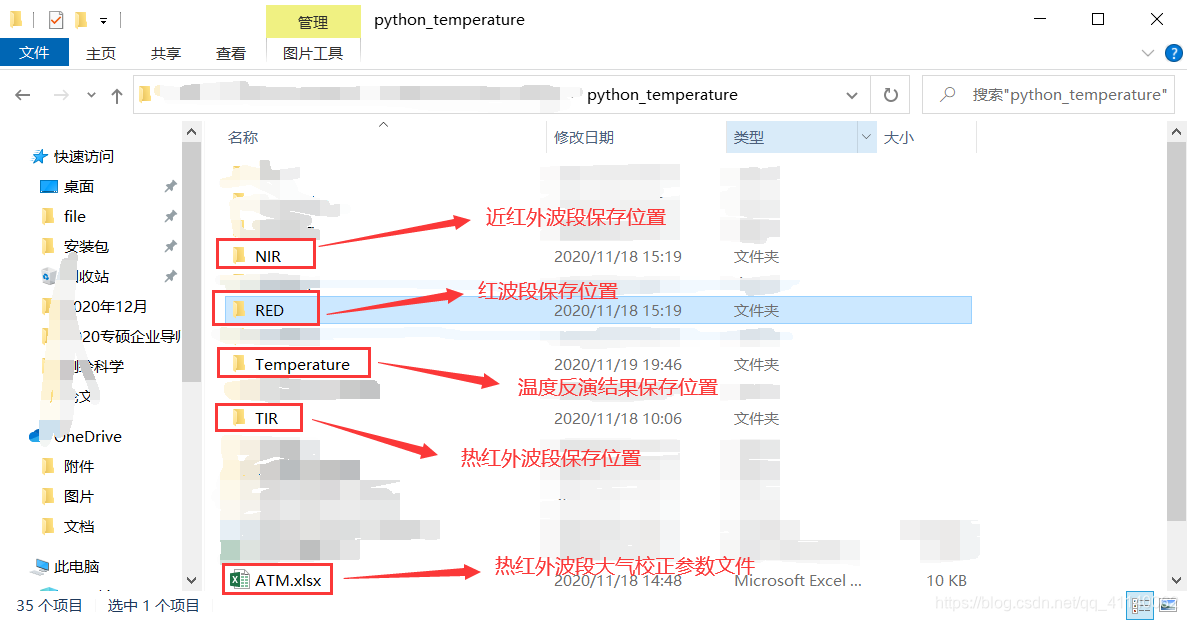
(1)近红外波段文件夹
注意如果是Landsat8的数据,开头必须是"LC08";Landsat7对应"LE07";Landsat5对应"LT05"
如果近红外波段通过ENVI做了大气校正,则最后的命名必须是"flaash",如果没有进行大气校正,则结尾不能是"flaash"
注意:如果不做大气校正,则直接把原始图像复制过来即可,不需要用ENVI做辐射定标,代码中会进行辐射定标

(2)红波段文件夹
注意如果是Landsat8的数据,开头必须是"LC08";Landsat7对应"LE07";Landsat5对应"LT05"
如果红波段通过ENVI做了大气校正,则最后的命名必须是"flaash",如果没有进行大气校正,则结尾不能是"flaash"
注意:如果不做大气校正,则直接把原始图像复制过来即可,不需要用ENVI做辐射定标,代码中会进行辐射定标

(3)热红外波段文件夹
从USGS下载的Landsat系列数据,解压后,将热红外波段直接复制过来,不需要重命名

(4)热红外波段大气校正参数的EXCEL文件
注意TIR这一列,需要跟热红外文件夹中热红外波段的命名一致(不需要尾缀)

4、具体代码
import numpy as np
from osgeo import gdal
import matplotlib.ticker as tic
import matplotlib.pyplot as plt
import imageio
import pandas as pd
import os
import copy
import datetime
# 程序开始运行时的时间
start_time = datetime.datetime.now()
# gdal库读取遥感影像数据
def image_open(img):
    data = gdal.Open(img)
    if data == 'None':
        print("图像无法读取")
    return data
FilePath = r"D:/file/novel coronavirus/Infrared remote sensing/python_temperature"
SavePath = FilePath + '/' + 'Temperature'
if not os.path.exists(SavePath):
    os.makedirs(SavePath)
# 将三个文件夹中的文件名称存入内存中,并按字符串顺序进行排序
Red_image = sorted(os.listdir(FilePath + "/" + "RED"))  # 红波段影像位置
NIR_image = sorted(os.listdir(FilePath + "/" + "NIR"))  # 近红波段影像位置
TIR_image = sorted(os.listdir(FilePath + "/" + "TIR"))  # 热红外波段影像位置
# 读取大气校正文件
# 将列的名称重命名
# 并用TIR这一列作为索引列
# excel中,TIR列为热红外波段的文件名(不含有.tif)
ATM = pd.read_excel("D:/file/novel coronavirus/Infrared remote sensing/python_temperature/ATM.xlsx",
                    names=['TIR', '大气上行辐射', '大气下行辐射', '大气透过率'], index_col='TIR')
ATM.head()
# 用来验证大气校正参数的读取
# a = ATM.at['LC08_L1TP_123039_20131120_20170428_01_T1_B10', '大气上行辐射']
# print(a)
# 判断语句来验证文件尾是不是tif文件,尽量保证每个文件夹里面除了tif文件之外没有其它文件,保证三个文件夹数据量一致
for i in range(len(TIR_image)):
    # 将红波段的影像文件名称存入第一列
    Red_for = os.path.splitext(Red_image[i])[0]
    # 文件尾缀存入第二列
    Red_end = os.path.splitext(Red_image[i])[1]
    NIR_for = os.path.splitext(NIR_image[i])[0]
    NIR_end = os.path.splitext(NIR_image[i])[1]
    TIR_for = os.path.splitext(TIR_image[i])[0]
    TIR_end = os.path.splitext(TIR_image[i])[1]
    # 获取Landsat数据名
    landsat_name = TIR_for.split('_')[0]
    # print(landsat_name)
    # 获取影像拍摄时间点,用来作为文件保存的命名
    savename = "/" + landsat_name + "_" + TIR_for.split('_')[3]
    # print(savename)
    if (Red_end.lower() == ".tif" and NIR_end.lower() == ".tif" and TIR_end.lower() == ".tif"):  # 注意影像的尾缀是大小写的问题
        RedImgPath = FilePath + "/" + "RED" + "/" + Red_image[i]
        NIRImgPath = FilePath + "/" + "NIR" + "/" + NIR_image[i]
        TIRImgPath = FilePath + "/" + "TIR" + "/" + TIR_image[i]
        # 读取数据
        # 先调用image_open函数打开影像
        # 然后用GetRasterBand()来获取波段
        # 然后用ReadAsArray()读取像素值,用此函数之前必须先获取波段
        # 可用ReadAsArray()函数设置读取像素值的数量及位置,将读取数据存放入矩阵中
        Reddata = image_open(RedImgPath)
        Redimg = Reddata.GetRasterBand(1).ReadAsArray().astype(np.float32)
        NIRdata = image_open(NIRImgPath)
        NIRimg = NIRdata.GetRasterBand(1).ReadAsArray().astype(np.float32)
        TIRdata = image_open(TIRImgPath)
        TIRimg = TIRdata.GetRasterBand(1).ReadAsArray().astype(np.float32)
        # 热红外波段辐射校正
        # landsat8有两个热红外波段,一般用第10波段,两个波段定标参数一样
        if landsat_name == 'LC08':
            # Landsat8红波段辐射定标参数
            gainRed = 0.010233
            offsetRed = -51.16713
            # Landsat8近红波段辐射定标参数
            gainNIR = 0.0062623
            offsetNIR = -31.31173
            # Landsat8热红外波段辐射定标参数
            gainTIR = 0.0003342
            offsetTIR = 0.1
            landsat8_end = TIR_for.split('_')[7]
            # Landsat8的两个热红外波段有效波长不同
            if landsat8_end == 'B10':
                # Landsat8第10波段有效波长
                lda = 10.904
            if landsat8_end == 'B11':
                # Landsat8第11波段有效波长
                lda = 12.003
        # Landsat7分为高增益与低增益波段,'1'为低增益波段,用于高温环境;'2'为高增益波段,用于常规条件
        if landsat_name == 'LE07':
            # Landsat7红波段辐射定标参数
            gainRed = 0.62165
            offsetRed = -5.62165
            # Landsat7近红波段辐射定标参数
            gainNIR = 0.63976
            offsetNIR = -5.73976
            # Landsat7热红外波段有效波长
            lda = 11.269
            # Landsat7热红外波段定标参数
            # 波段号保存在文件名称的第9个参数中
            landsat7_end = TIR_for.split('_')[-1]
            # Landsat7低增益波段辐射定标参数
            # 低增益波段适用于沙漠等温度较高的环境
            if landsat7_end == '1':
                gainTIR = 0.067087
                offsetTIR = -0.06709
            # Landsat7高增益波段辐射定标参数
            # 高增益波段适用于常规环境
            if landsat7_end == '2':
                gainTIR = 0.037205
                offsetTIR = 3.1628
        # Landsat5只有一个热红外波段
        if landsat_name == 'LT05':
            # Landsat5热红外波段有效波长
            lda = 11.457
            # Landsat5红波段辐射定标参数
            gainRed = 1.044
            offsetRed = -2.21398
            # Landsat5近红波段辐射定标参数
            gainNIR = 0.87602
            offsetNIR = -2.38602
            # Landsat5热红外波段辐射定标参数
            gainTIR = 0.055376
            offsetTIR = 1.18
        # print(gain)
        # print(offset)
        # 红波段辐射定标
        # 判断红波段是不是经过了ENVI的大气校正,因为红波段与近红外波段的处理过程应该一致,所以只用判断红波段即可
        red1 = Red_for.split('_')[-1]
        # 如果红波段与近红波段已经经过了ENVI的大气校正,则直接使用大气校正的结果作为处理的输入值,如果没有进行大气校正,则需要先用公式做辐射定标
        # 需要注意的是,ENVI大气校正处理结果的命名方式,应该以flaash结尾
        if ('flaash' in red1):
            Red_radiance = Redimg
            NIR_radiance = NIRimg
        elif not('flaash' in red1):
            Red_radiance = gainRed * Redimg + offsetRed
            # 近红波段辐射定标
            NIR_radiance = gainNIR * NIRimg + offsetNIR

        # 热红外波段辐射定标
        TIR_radiance = gainTIR * TIRimg + offsetTIR
        # 计算NDVI值
        # 忽略分母为0的情况
        np.seterr(divide='ignore', invalid='ignore')
        NDVI = (NIR_radiance - Red_radiance) / (NIR_radiance + Red_radiance)
        NDVI = NDVI.astype(np.float32)
        # 计算FVC值
        # 利用NDVI值来判断FVC值的计算方式
        # NDVI值大于0.7时认为是纯植被像元
        # NDVI值小于0.05时判断为裸土像元
        # NDVI值在0.05与0.7之间时判断为城市地表像元
        # 需要用深拷贝,不然会改变原来的数组内容
        FVC = copy.deepcopy(NDVI)
        FVC = (FVC - 0.05) / (0.7 - 0.05)
        FVC[NDVI > 0.7] = 1
        FVC[NDVI < 0.05] = 0
        # 计算地表比辐射率
        emissivity = copy.deepcopy(NDVI)
        # 注意在等号后面的式子中也加上条件,不然会出现维度问题
        # 同样用NDVI值进行判断
        # NDVI值大于等于0.7时为纯植被
        # NDVI值小于等于0时为水体
        # NDVI值在0到0.7之间时为城市地表
        emissivity[NDVI >= 0.7] = 0.9625 + 0.0614 * FVC[NDVI >= 0.7] - 0.0461 * (FVC[NDVI >= 0.7]) ** 2
        emissivity[NDVI < 0.7] = 0.9589 + 0.086 * FVC[NDVI < 0.7] - 0.0671 * (FVC[NDVI < 0.7]) ** 2
        emissivity[NDVI <= 0] = 0.995
        # 温度反演
        # 先做大气校正,从ATM表中提取出相应的参数,计算得到地表亮度温度
        up = ATM.at[TIR_for, '大气上行辐射']
        down = ATM.at[TIR_for, '大气下行辐射']
        trans = ATM.at[TIR_for, '大气透过率']
        # 计算出地表亮度温度
        BT = (TIR_radiance - up - trans * (1 - emissivity) * down) / (emissivity * trans)
        # 求出地表温度,并将单位转化为摄氏度
        Temperature = 14387.7 / (lda * np.log(119104000 / (BT * (lda ** 5)) + 1)) - 273.15
        Temperature = Temperature.astype(np.float32)
        # 输出数据
        gtiff_driver = gdal.GetDriverByName("GTiff")
        out_ds = gtiff_driver.Create(SavePath + savename + "T.tif",
                                     Temperature.shape[1], Temperature.shape[0], 1, gdal.GDT_Float32)
        # 设置输出数据坐标投影为原始影像的坐标投影
        out_ds.SetProjection(TIRdata.GetProjection())
        out_ds.SetGeoTransform(TIRdata.GetGeoTransform())
        out_band = out_ds.GetRasterBand(1)
        out_band.WriteArray(Temperature)
        out_band.FlushCache()
        # 输出比辐射率
        # emissivity_driver = gdal.GetDriverByName("GTiff")
        # out_e = emissivity_driver.Create(SavePath + savename + "E.tif",
        #                              emissivity.shape[1], emissivity.shape[0], 1, gdal.GDT_Float32)
        # out_e.SetProjection(TIRdata.GetProjection())
        # out_e.SetGeoTransform(TIRdata.GetGeoTransform())
        # out_band_e = out_e.GetRasterBand(1)
        # out_band_e.WriteArray(emissivity)
        # out_band_e.FlushCache()
        # 输出辐射亮度图
        # BT_driver = gdal.GetDriverByName("GTiff")
        # out_BT = BT_driver.Create(SavePath + savename + "BT.tif",
        #                              BT.shape[1], BT.shape[0], 1, gdal.GDT_Float32)
        # out_BT.SetProjection(TIRdata.GetProjection())
        # out_BT.SetGeoTransform(TIRdata.GetGeoTransform())
        # out_band_BT = out_BT.GetRasterBand(1)
        # out_band_BT.WriteArray(BT)
        # out_band_BT.FlushCache()
        # 处理完一张后显示
        print('Temperature Retrieval: {}, {}'.format(i+1, landsat_name + "_" + TIR_for.split('_')[3]))
# 程序结束运行时的时间
end_time = datetime.datetime.now()
# # 计算温度反演所用的时间运行的时间
# print('Temperature Retrieval Time: {}'.format(end_time - start_time))


 6418
6418

 被折叠的 条评论
为什么被折叠?
被折叠的 条评论
为什么被折叠?
 到【灌水乐园】发言


