


前言
在高德地图中,如果使用过导航就可以看到它的轨迹线做的非常漂亮,用openlayer能实现吗?是可以的,只是稍微复杂了一点点。

1. 轨迹线构成分析
我们来看看轨迹线是怎样组成的呢。
2. 使用openlayer实现类高德轨迹线
起点、终点、文字都可以使用openlayer自带的api实现,不复杂,这里就不讨论了。本次重点看下如何实现轨迹线的样式,以及在这个基础上实现箭头的动画效果。
2.1 如何实现一个高度定制的箭头
如果我们要封装实现一个通用的轨迹绘制方法,需要考虑到箭头的问题(大小、箭头的宽度、箭头的夹角、颜色可调),箭头不能使用普通的图片。在openlayer中样式类ol.style.Icon中有img属性可以传入HTMLCanvasElement,所以我们可以传入一个canvas对象,这样就简单了,我们可以根据传入的参数来定制这个箭头

第二个问题是我们如何计算出箭头的样式的各个顶点。我们可以根据箭头的宽高、夹角,使用反三角函数来依次计算出各个顶点。
/**
 * 获取航线右箭头
 * @param param
 * @returns {HTMLCanvasElement}
 */
function getRouteCanvasArrow(param) {
  let opt = Object.assign(
    {
      color: 'rgba(108,159,67,1)',
      lineWidth: 4,
      arrowHeight: 28,
      // 箭头夹角(度)
      angle: 110
    },
    param
  );

  if (opt.angle >= 180 || opt.angle <= 0) {
    throw new Error('箭头夹角取值范围为0-180');
  }

  const singleHeight = opt.arrowHeight / 2;
  // 计算出箭头宽度
  // 计算余切值
  const cotA = 1 / Math.tan((opt.angle * Math.PI) / 360);
  // 使用余切值计算相邻直角边, 箭头偏移宽度
  const offsetWidth = Math.ceil(cotA * singleHeight);
  const arrowWidth = offsetWidth + opt.lineWidth;

  const canvas = document.createElement('canvas');
  canvas.width = arrowWidth;
  canvas.height = opt.arrowHeight;
  let ctx = canvas.getContext('2d');
  ctx.fillStyle = opt.color;
  ctx.strokeStyle = opt.color;
  ctx.beginPath();
  ctx.lineTo(0, 0);
  ctx.lineTo(opt.lineWidth, 0);
  ctx.lineTo(arrowWidth, singleHeight);
  ctx.lineTo(opt.lineWidth, opt.arrowHeight);
  ctx.lineTo(0, opt.arrowHeight);
  ctx.lineTo(offsetWidth, singleHeight);
  ctx.closePath();
  ctx.fill();
  return canvas;
}
2.2 实现轨迹线样式
2.2.1 箭头间隔如何计算
我们可以使用ol.geom.LineString的getCoordinateAt方法来获取线上的点(参数取值范围0-1,0是起点,1是终点)。同时我们可以获取当前地图分辨率resolution,通过线的geometry的长度除以分辨率resulotion(lineGeom.getLength() / resolution ),可以得到线的总长度像素。假如我们需要箭头间隔是50个像素,我们只需要用线段的总长度除以50就知道需要几个箭头了,然后只需要循环计算出每个箭头的百分比(第几个箭头除以箭头总数),调用上面提到的ol.geom.LineString的getCoordinateAt方法获取箭头的位置。
2.2.2 如何实现箭头动画
在openlayer里可以监听图层的postcompose事件,在这个回调函数里可以从参数中拿到地图的framestate和vectorContext(vectorContext可以使用来绘制feature,性能比较高),如果要执行动画,只需要把framestate的animate属性设置为true即可(地图在绘制生命周期中自己会去判断,如果判断animate为true,就会使用requestAnimationFrame去执行map.render绘制下一帧,达到连续绘制形成动画的效果)。
如何让箭头像前进一样动起来呢,只需要在每次postcompose事件里,我们自己绘制时改变一下箭头的位置,让其向前移动一点点(比如说1个像素),就可以了。
2.2.3 封装绘制高德轨迹样式的函数
按照上面的思路,封装绘制函数,参数可以输入线的宽度,颜色,箭头样式,间隔,是否开启箭头动画等参数。除了必要参数,都可以使用默认参数,就可以绘制出来,使用起来比较方便。
import * as MapUtil from './MapUtil';
import _ from 'lodash';

// 用于判断feature是否存在
let routeUniqId = 0;
/**
 * 绘制类似高德、百度的轨迹样式
 * @param { String | ol.vector.Layer } param.lineLayer              【必填】图层名或图层对象
 * @param { WKTString | ol.geom.LineString } param.lineGeom         【必填】轨迹线
 * @param { String } param.theme                                    【选填】设置样式,可选值:gray(类似于走过的灰色)
 * @param { Array<Integer> } param.lineColor                        【选填】线颜色
 * @param { number } param.lineWidth                                【选填】线宽(px)
 * @param { Array<Integer> | boolean } param.borderColor            【选填】线边框颜色,为false时不绘制边框
 * @param { number } param.borderWidth                              【选填】线边框宽度(px)
 * @param { String | boolean } param.arrowColor                     【选填】箭头颜色(rgba字符串),为false时不绘制箭头
 * @param { number } param.arrowWidth                               【选填】箭头线宽度(px)
 * @param { number } param.arrowGap                                 【选填】箭头间距(px)
 * @param { boolean } param.arrowAnime                              【选填】是否开启箭头动画,默认否
 * @param { (feature: ol.Feature) => void } param.cb                【选填】回调函数
 */
function drawRouteLine(param) {
  let opt = Object.assign(
    {
      lineLayer: null,
      lineGeom: null,
      theme: false,
      lineColor: [0, 186, 107],
      lineWidth: 10,
      // 为false时不绘制边框
      borderColor: [4, 110, 74],
      borderWidth: 2,
      // 为false时不绘制箭头
      arrowColor: 'rgba(255, 255, 255, 1)',
      arrowWidth: 3,
      arrowGap: 100,
      // 箭头动画
      arrowAnime: false,
      cb: null
    },
    param
  );
  let lineLayer = _.isString(opt.lineLayer) ? MapUtil.getLayer(opt.lineLayer) : opt.lineLayer;
  let lineGeom = _.isString(opt.lineGeom) ? MapUtil.WKT.readGeometry(opt.lineGeom) : opt.lineGeom;

  // 1 预处理theme
  if (opt.theme === 'gray') {
    opt.lineColor = [154, 207, 197];
    opt.borderColor = [127, 174, 159];
  }

  // 2.1 线样式
  let bottomPathStyle;
  let upperPathStyle = new ol.style.Style({
    stroke: new ol.style.Stroke({
      color: opt.lineColor,
      width: opt.lineWidth
    })
  });

  // 2.2 获取canvas箭头
  let arrowCanvas = MapUtil.getRouteCanvasArrow({
    color: opt.arrowColor,
    lineWidth: opt.arrowWidth,
    arrowHeight: opt.lineWidth
  });

  // 2.3 获取箭头样式
  const createArrowStyle = function (resolution, offset, vectorContext) {
    let resStyles = [];
    let lineLength = lineGeom.getLength() / resolution;
    if (lineLength < 50) {
      return resStyles;
    }
    let numArr = Math.ceil(lineLength / opt.arrowGap);
    let points = [];
    for (let i = 0; i <= numArr; i++) {
      let fracPos = i / numArr + offset;
      if (fracPos > 1) fracPos -= 1;
      let pg = new ol.Feature({
        geometry: new ol.geom.Point(lineGeom.getCoordinateAt(fracPos))
      });
      points.push(pg);
    }

    //确定方向并绘制
    lineGeom.forEachSegment((start, end) => {
      let line = new ol.geom.LineString([start, end]);
      _.forEach(points, point => {
        let coord = point.getGeometry().getFirstCoordinate();
        let cPoint = line.getClosestPoint(coord);
        if (Math.abs(cPoint[0] - coord[0]) < 1 && Math.abs(cPoint[1] - coord[1]) < 1) {
          let dx = end[0] - start[0];
          let dy = end[1] - start[1];
          let rotation = Math.atan2(dy, dx);
          let arrowStyle = new ol.style.Style({
            image: new ol.style.Icon({
              img: arrowCanvas,
              anchor: [1, 0.5],
              rotateWithView: true,
              rotation: -rotation,
              imgSize: [arrowCanvas.width, arrowCanvas.height]
            })
          });
          if (vectorContext) {
            vectorContext.drawFeature(point, arrowStyle);
          } else {
            arrowStyle.setGeometry(point.getGeometry());
            resStyles.push(arrowStyle);
          }
        }
      });
    });

    return resStyles;
  };

  // 3.绘制线
  if (opt.borderColor) {
    bottomPathStyle = new ol.style.Style({
      stroke: new ol.style.Stroke({
        color: opt.borderColor,
        width: opt.lineWidth + 2 * opt.borderWidth
      })
    });
    MapUtil.drawVectorFeature(lineLayer, {
      geom: lineGeom,
      style: bottomPathStyle
    });
  }

  let uid = routeUniqId++;
  let styles = upperPathStyle;
  if (!opt.arrowAnime && opt.arrowColor) {
    styles = function (feature, resolution) {
      let lineLength = lineGeom.getLength() / resolution;
      let offset = opt.arrowGap / lineLength / 2;
      let res = createArrowStyle(resolution, offset);
      res.push(upperPathStyle);
      return res;
    };
  }
  let lf = MapUtil.drawVectorFeature(lineLayer, {
    geom: lineGeom,
    style: styles,
    kv: { _uid_: uid }
  });

  // 4 执行回调
  try {
    opt.cb && opt.cb(lf);
  } catch (e) {
    console.error(e);
  }

  // 5.1 绘制箭头动画
  if (!opt.arrowAnime || !opt.arrowColor) {
    return;
  }

  // 5.2 绘制箭头动画函数
  let offset = 0.01;
  const drawArrow = function (evt) {
    let features = MapUtil.getFeatureByFilter(lineLayer, f => f.get('_uid_') == uid);
    if (!features.length) {
      lineLayer.un('postcompose', drawArrow);
      return;
    }

    let resolution = evt.frameState.viewState.resolution;
    createArrowStyle(resolution, offset, evt.vectorContext);

    let lineLength = lineGeom.getLength() / resolution;
    offset = offset + 1.5 / lineLength;
    //复位
    if (offset >= 1) offset = 0.001;
    // 告诉地图执行动画
    evt.frameState.animate = true;
  };

  lineLayer.on('postcompose', drawArrow);
}
2.2.4 MapUtil工具
鉴于有些小伙伴想知道完整代码的,这里补充下使用的MapUtil,只是对openlayer一些方法做了简单封装,仅供参考(获取航行右箭头的方法getRouteCanvasArrow已经在2.1中贴出来了这里就不重复贴了)
import _ from 'lodash';
// 这里openlayers地图对象,就自己实现了
import mapInstance from './map';

/**
 * 绘制图层
 * @param layer 图层对象
 * @param object 必须包含geom字段
 */
export function drawVectorFeature(layer, object) {
  let geom;
  if (_.isString(object.geom)) {
    geom = new ol.format.WKT().readGeometry(object.geom, {
      dataProjection: 'EPSG:4326', // 设定数据使用的坐标系
      featureProjection: 'EPSG:3857' // 设定当前地图使用的feature的坐标系
    });
  } else {
    geom = object.geom;
  }
  let feature = new ol.Feature({
    geometry: geom
  });

  object.id && feature.setId(object.id);
  object.style && feature.setStyle(object.style);
  // kv值,调用set方法
  let obj = object.kv;
  if (obj) {
    Object.getOwnPropertyNames(obj).forEach(function (key) {
      feature.set(key, obj[key]);
    });
  }

  layer.getSource().addFeature(feature);

  return feature;
}

/**
 * 获取图层
 */
export function getLayer(title) {
  let _layer = new ol.layer.Vector({
    title: title,
    source: new ol.source.Vector()
  });
  // 将创建好的图层添加到地图中
  mapInstance.getMap().addLayer(_layer);
  return _layer;
}

/**
 * 根据图层名找图层,没有则创建
 * @param { String } title 【必填】 图层名
 */
export function getLayerByTitle(title) {
  let _layer,
    layerList = mapInstance.getMap().getLayers().getArray();

  _layer = _.filter(layerList, function (l) {
    return l.get('title') === title;
  });
  if (_layer && _layer.length) {
    return _layer[0];
  }
  return getLayer(title);
}

/**
 * 通过filter获取Feature
 * @param { String | ol.layer.Vector } _layer
 * @param { function } filter 携带一个feature参数
 * @returns
 */
export function getFeatureByFilter(_layer, filter) {
  let res = [];
  if (_.isString(_layer)) {
    _layer = getLayerByTitle(_layer);
  }
  let fs = _layer.getSource().getFeatures();
  fs.forEach(function (feature) {
    filter(feature) && res.push(feature);
  });
  return res;
}

/**
 * wkt包装类
 * 此类默认参数都是从4326->3857坐标系
 */
export const WKT = (function () {
  class WKTWrapper {
    constructor() {
      this.wkt = new ol.format.WKT();
      this.options = {
        dataProjection: 'EPSG:4326',
        featureProjection: 'EPSG:3857' // 设定当前地图使用的feature的坐标系
      };
    }
    readFeature(/*Document | Node | Object | string*/ wktStr) {
      return /*ol.Feature*/ this.wkt.readFeature(wktStr, this.options);
    }
    readFeatures(/*Document | Node | Object | string*/ wktStr) {
      return /*Array.<ol.Feature>*/ this.wkt.readFeatures(wktStr, this.options);
    }
    readGeometry(/*Document | Node | Object | string*/ wktStr) {
      return /*ol.geom.Geometry*/ this.wkt.readGeometry(wktStr, this.options);
    }
    writeFeature(/*ol.Feature*/ feature) {
      return /*WKT string*/ this.wkt.writeFeature(feature, this.options);
    }
    writeFeatures(/*Array.<ol.Feature>*/ feature) {
      return /*WKT string*/ this.wkt.writeFeatures(feature, this.options);
    }
    writeGeometry(/*ol.geom.Geometry*/ geometry) {
      return /*WKT string*/ this.wkt.writeGeometry(geometry, this.options);
    }
  }

  return new WKTWrapper();
})();
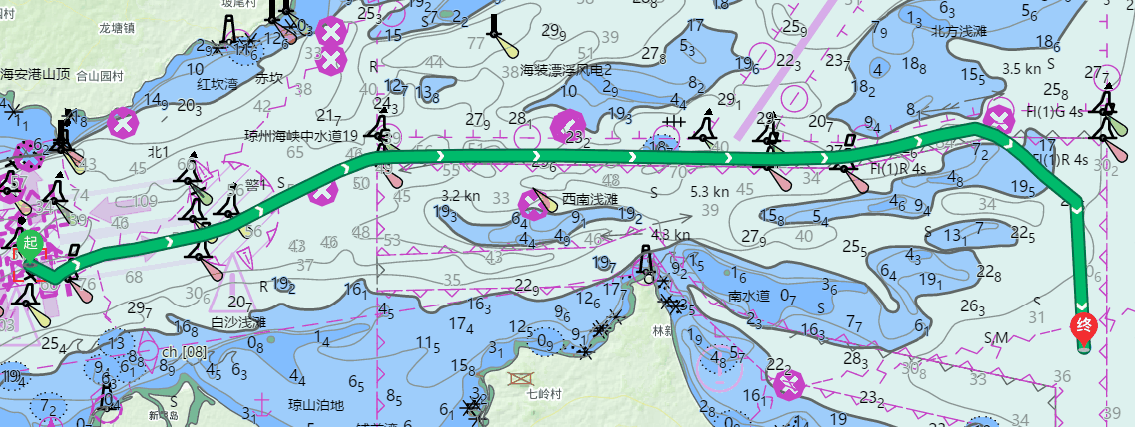
2.3 最终效果
使用封装的函数绘制出来的轨迹线,效果还是比较不错的。


 824
824

 被折叠的 条评论
为什么被折叠?
被折叠的 条评论
为什么被折叠?
 到【灌水乐园】发言


