


Spring注解
1、测试注解:
1.1、@Tsst:测试单元注解,可以不写main方法直接运行程序进行测试
2、创建Bean注解
2.1、@Component:spring中提供的一种普通注解,当不属于server,controller和repository层时使用@Component注解
2.2、 @Service:一般用在业务逻辑层(service层)
用于标注业务层组件,说白了就是加入你有一个用注解的方式把这个类注入到spring配置中
2.3、 @Controller:一般用在web层上
标识一个该类是Spring MVC controller处理器,用来创建处理http请求的对象.
2.4、 @Repository:一般用在dao层上
1、@Repository(value=“userDao”)
2、该注解是告诉Spring,让Spring创建一个名字叫“userDao”的UserDaoImpl实例。
3、一般用在public class UserDaoImpl implements UserDao上面,即用在实现Dao类接口的类上
注: @Component, @Controller, @Service, @Repository, 这几个注解不同于上面的注解,上面的注解都是将被依赖的bean注入进入,而这几个注解的作用都是生产bean, 这些注解都是注解在类上,将类注解成spring的bean工厂中一个一个的bean。@Controller, @Service, @Repository基本就是语义更加细化的@Component。
3、基于注解方式实现属性注入
3.1、 @AutoWired:根据属性类型进行自动装配
1、第一步 把 service 和 dao 对象创建,在 service 和 dao 类添加创建对象注解。
2、第二步 在 service 注入 dao 对象,在 service 类添加 dao 类型属性,在属性上面使用注解
3、用来装配bean,都可以写在字段上,或者方法上。
默认情况下必须要求依赖对象必须存在,如果要允许null值,可以设置它的required属性为false,例如:@Autowired(required=false)
3.2、 @Qualifer:根据属性名称进行注入
1、要与@AutoWired注解一起使用
2、当一个接口,有多个实现类且均已注入到spring容器中了,使用时@AutoWired是byType的,而这些实现类类型都相同,此时就需要使用@Qualifier明确指定使用那个实现类
3、一旦一个接口有多个实现,那么就需要每个特殊化识别并且在自动装载过程中使用@Qualifier和@Autowired一起使用来标明。
3.3、 @Resource:可以根据类型注入,可以根据名称注入
3.4、 @Value:普通类型注入
4、@Override
@Override是伪代码,表示重写。(当然不写@Override也可以),不过写上有如下好处:
1、可以当注释用,方便阅读;
2、编译器可以给你验证@Override下面的方法名是否是你父类中所有的,如果没有则报错。例如,你如果没写@Override,而你下面的方法名又写错了,这时你的编译器是可以编译通过的,因为编译器以为这个方法是你的子类中自己增加的方法。
5、 @Configuration注解
1、创建一个SpringConfig.java文件作为配置类,替代xml文件。
@Configuration //作为配置类,替代 xml 配置文件
@ComponentScan(basePackages = {"com.atguigu"})
public class SpringConfig {

}
2、@ComponentScan(basePackages = {“com.atguigu”}) 与@Configuration注解一起使用,替代xml文件中的开启扫描配置
3、此时不再使用
ApplicationContext context = new ClassPathXmlApplicationContext(bean.xml);
而是使用
ApplicationContext context = new AnnontionConfigApplicationContent(SpringConfig.class);
6、 @Cacheable
用来标记缓存查询。可用用于方法或者类中,当标记在一个方法上时表示该方法是支持缓存的,当标记在一个类上时则表示该类所有的方法都是支持缓存的。
7、@CacheEvict
用来标记要清空缓存的方法,当这个方法被调用后,即会清空缓存。@CacheEvict(value=”UserCache”)
8、JDK1.5之后内部提供的三个注解
   @Deprecated 意思是“废弃的,过时的”

   @Override 意思是“重写、覆盖”

   @SuppressWarnings 意思是“压缩警告”
9、AOP操作(Aspectj框架的注解)
9.1、@Aspect代表这个增强类要生成代理对象
注:语法结构: execution([权限修饰符] [返回类型] [类全路径] [方法名称] ([参数列表]) )
例如:
1、execution(* com.lin.spring5.aopanno.User.add(…)) //增强User的add方法,* 代表任意的权限修饰符,也可以使用public等权限修饰符替换
2、execution(* com.lin.spring5.aopanno.User.(…))//增强User的全部方法
1、execution( com.lin.spring5.aopanno. * . *(…)) //增强这个包下面所有类的所有方法
1、使用@Aspect注解之前需要开启增强类的生成代理对象命令,在开启spring注解扫描的xml文件中加上
<aop:aspectj-autoproxy></aop:aspectj-autoproxy>
2、@Before注解:前置通知,在需要增强的类的需要增强的方法之前执行的,即先执行@Before注解下的方法,再执行需要增强的方法
@Before(value=“* com.lin.spring5.aopanno.User.add(…)”)//value=9.1的注中的语法
3、@After注解:最终通知,是除了@AfterReturning注解以外最后执行的,执行后返回值,然后执行@AfterRunning注解,是倒数第二个执行的
@After(value=“* com.lin.spring5.aopanno.User.add(…)”)//value=9.1的注中的语法
4、@AfterReturning注解:后置通知(返回通知),是在返回结果之后执行,是五个通知注解中最后一个执行的,即在@After注解之后执行
@AfterReturning(value=“* com.lin.spring5.aopanno.User.add(…)”)
5、@AfterThrowing注解:异常通知,执行需要增强的方法时产生了异常,才会执行这个注解的方法
@AfterThrowing(value=“* com.lin.spring5.aopanno.User.add(…)”)
6、@Around注解:环绕通知,环绕之前执行是所有的第一个执行的,即在@Before注解执行之前执行,环绕之后执行是在,执行完需要增强的方法之后执行,即环绕之前和环绕之后执行的方法之间需要执行:1、@Before注解的方法。2、需要增强的方法
@Around(value=“* com.lin.spring5.aopanno.User.add(…)”)
@Around(value = "execution(* com.lin.spring5.aopanno.User.add(..))")
public void around(ProceedingJoinPoint proceedingJoinPoint) throws Throwable {
	System.out.println("环绕之前.........");
	//被增强的方法执行
	proceedingJoinPoint.proceed();
	System.out.println("环绕之后.........");
}
例子:
(1)在增强类的里面,在作为通知方法上面添加通知类型注解,使用切入点表达式配置
//增强的类
@Component
@Aspect //生成代理对象
public class UserProxy {
		//前置通知
		//@Before 注解表示作为前置通知
		@Before(value = "execution(* com.lin.spring5.aopanno.User.add(..))")
		public void before() {
				System.out.println("before.........");
		}

		//后置通知(返回通知)
		@AfterReturning(value = "execution(* com.lin.spring5.aopanno.User.add(..))")
		public void afterReturning() {
				System.out.println("afterReturning.........");
		}

		//最终通知
		@After(value = "execution(* com.lin.spring5.aopanno.User.add(..))")
		public void after() {
			System.out.println("after.........");
		}

		//异常通知
		@AfterThrowing(value = "execution(* com.lin.spring5.aopanno.User.add(..))")
		public void afterThrowing() {
			System.out.println("afterThrowing.........");
		}

		//环绕通知
		@Around(value = "execution(* com.lin.spring5.aopanno.User.add(..))")
		public void around(ProceedingJoinPoint proceedingJoinPoint) throws Throwable {
				System.out.println("环绕之前.........");
				//被增强的方法执行
				proceedingJoinPoint.proceed();
				System.out.println("环绕之后.........");
		}
}
需要增强的方法分中没有异常时输出结果顺序是:
1、@Around注解环绕通知的环绕之前执行语句:环绕之前.........
2、@Before注解的执行语句:before.........
3、需要增强的方法执行的语句:。。。。。。
4、@Around注解环绕通知的环绕之后执行的语句:环绕之后.........
5、@After注解最终通知的执行的语句:after.........
6、@AfterReturning注解执行的语句:afterReturning.........
此时@AfterThrowing注解的方法不执行

需要增强的方法分中有异常时输出结果顺序是:
1、@Around注解环绕通知的环绕之前执行语句:环绕之前.........
2、@Before注解的执行语句:before.........
3、@After注解最终通知的执行的语句:after.........
4、@AfterThrowing注解执行的语句:afterThrowing.........
此时:@Around的环绕后的执行语句、需要增强的方法的语句、@AfterReturning的执行语句都不执行
7、@Pointcut注解:相同切入点抽取
@Pointcut(value = "execution(* com.lin.spring5.aopanno.User.add(..))")
public void pointdemo() {

}
//前置通知
//@Before 注解表示作为前置通知
@Before(value = "pointdemo()")
public void before() {
		System.out.println("before.........");
}
8、@Order:有多个增强类多同一个方法进行增强,设置增强类优先级
(1)在增强类上面添加注解 @Order(数字类型值),数字类型值越小优先级越高,越先执行这个增强类
@Component
@Aspect
@Order(1)
public class PersonProxy
9、完全使用注解开发
(1)创建配置类,不需要创建 xml 配置文件
@Configuration   //声明这是配置类
@ComponentScan(basePackages = {"com.atguigu"})   //开启spring
@EnableAspectJAutoProxy(proxyTargetClass = true)  //开启Aspect生成代理对象
public class ConfigAop {
}
10、@Transactional
注意:
1、@Transactional可以加到类上面也可以加到方法上面,一般用在service层
创建事务管理器
<bean id="transactionManager"
class="org.springframework.jdbc.datasource.DataSourceTransactionManager">
		<!--注入数据源-->
		<property name="dataSource" ref="dataSource"></property>
</bean>
<tx:annotation-driven transactionmanager=“transactionManager”></tx:annotation-driven>
属性值解释
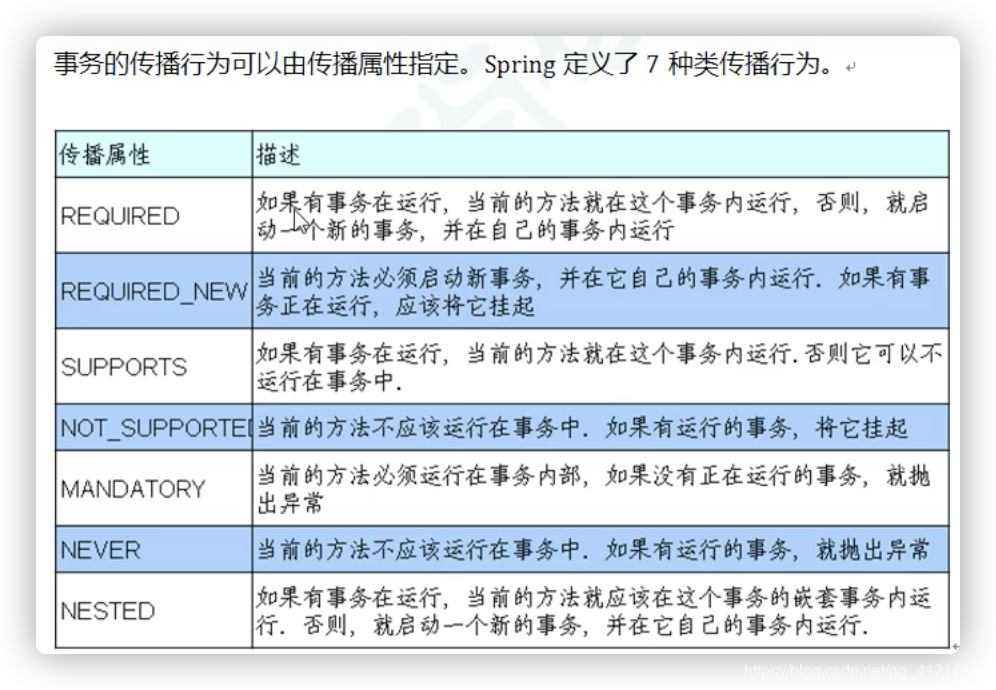
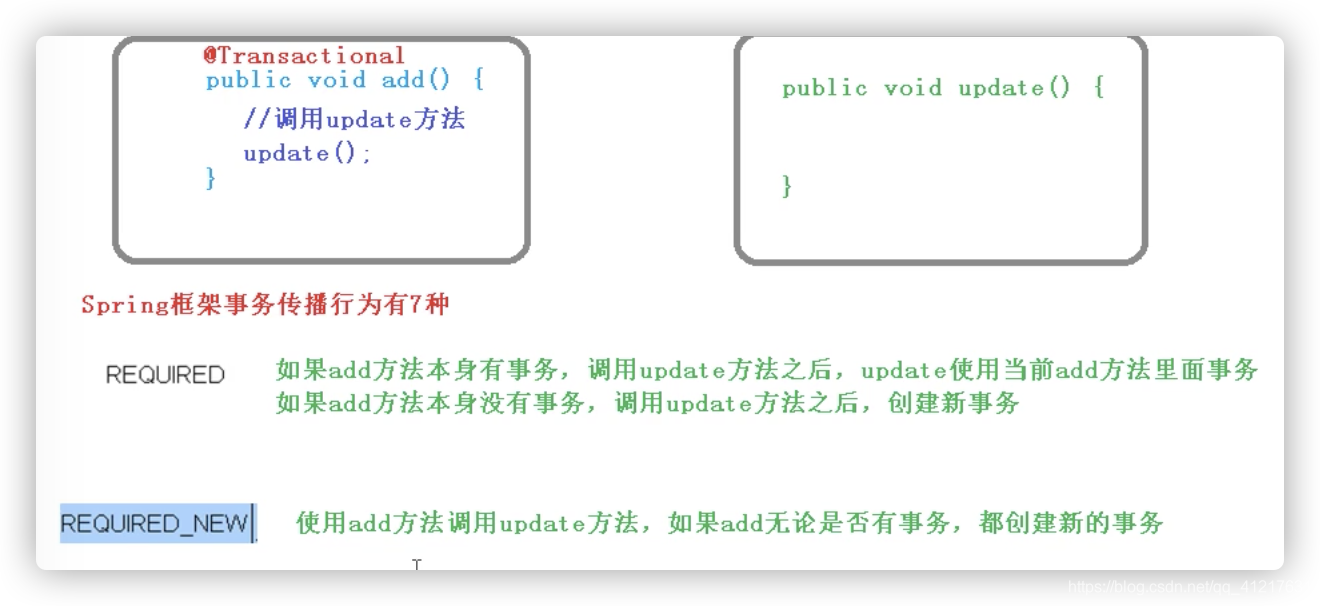
1、propagation:事务传播行为
@Transactional(propagation=Propagation.REQUIRED)
事务之间的调用,或者事务调用其他非事物方法称为事务的传播行为
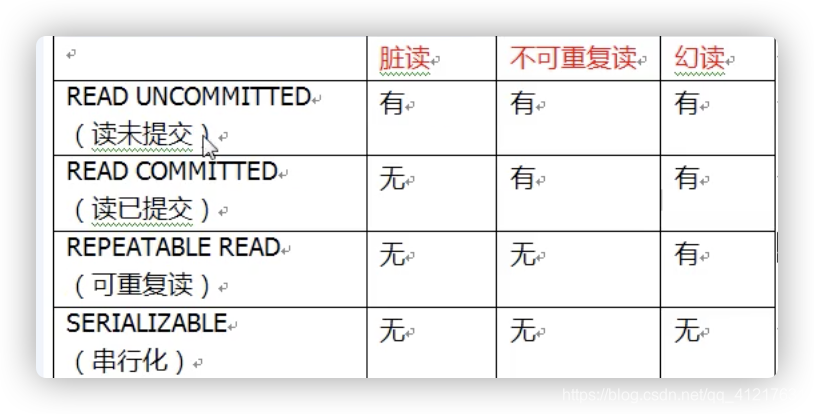
2、ioslation:事务隔离级别
@Transactional(ioslation=Ioslation.SERIALIZABLE)
(1)事务有特性成为隔离性,多事务操作之间不会产生影响。不考虑隔离性产生很多问题
(2)有三个读问题:脏读、不可重复读、虚(幻)读
(3)脏读:一个未提交事务读取到另一个未提交事务的数据(严重问题,不允许出现)
isolation是为了解决这三个问题而出现的
3、timeout:超时时间
@Transactional(timeout=10)
(1)事务需要在一定时间内进行提交,如果不提交进行回滚
(2)默认值是 -1 ,设置时间以秒单位进行计算
4、readOnly:是否只读
@Transactional(readOnly=true)
(1)读:查询操作,写:添加修改删除操作
(2)readOnly 默认值 false,表示可以查询,可以添加修改删除操作
(3)设置 readOnly 值是 true,设置成 true 之后,只能查询
5、rollbackFor:回滚
@Transactional(rollbackFo=NullPointerException)空指针时回滚
(1)设置出现哪些异常进行事务回滚
6、noRollbackFor:不回滚
@Transactional(noRollbackFo=NullPointerException)空指针时不回滚
(1)设置出现哪些异常不进行事务回滚
7、完全注解开启事务
1、创建配置类,使用配置类替代 xml 配置文件
@Configuration //配置类
@ComponentScan(basePackages = "com.atguigu") //组件扫描
@EnableTransactionManagement //开启事务
public class TxConfig {
//创建数据库连接池
	@Bean
	public DruidDataSource getDruidDataSource() {
		DruidDataSource dataSource = new DruidDataSource();
		dataSource.setDriverClassName("com.mysql.jdbc.Driver");
		dataSource.setUrl("jdbc:mysql:///user_db");
		dataSource.setUsername("root");
		dataSource.setPassword("root");
		return dataSource;
	}
	//创建 JdbcTemplate 对象
	@Bean
	public JdbcTemplate getJdbcTemplate(DataSource dataSource) {
		//到 ioc 容器中根据类型找到 dataSource
		JdbcTemplate jdbcTemplate = new JdbcTemplate();
		//注入 dataSource
		jdbcTemplate.setDataSource(dataSource);
		return jdbcTemplate;
	}
	//创建事务管理器
	@Bean
	public DataSourceTransactionManager getDataSourceTransactionManager(DataSource dataSource) {
		DataSourceTransactionManager transactionManager = new
		DataSourceTransactionManager();
		transactionManager.setDataSource(dataSource);
		return transactionManager;
		}
}
11、@Bean
1、Spring的@Bean注解用于告诉方法,产生一个Bean对象,然后这个Bean对象交给Spring管理。产生这个Bean对象的方法Spring只会调用一次,随后这个Spring将会将这个Bean对象放在自己的IOC容器中。
2、使用@Bean注解的好处就是能够动态获取一个Bean对象,能够根据环境不同得到不同的Bean对象。或者说将Spring和其他组件分离(其他组件不依赖Spring,但是又想Spring管理生成的bean)。
3、这种方法相当于在xml中配置bean标签,配置类相当于配置文件,方法名是bean的id。
12、@Nullable
Spring5 框架核心容器支持@Nullable 注解
(1)@Nullable 注解可以使用在方法上面,属性上面,参数上面,表示方法返回可以为空,属性值可以
为空,参数值可以为空
(2)注解用在方法上面,方法返回值可以为空
(3)注解使用在方法参数里面,方法参数可以为空
(4)注解使用在属性上面,属性值可以为空
13、@RunWith注解可以整合JUnit4版本
注意:引入单元测试的依赖包后,可以使用RunWith指定单元测试框架版本
@RunWith(SpringJUnit4ClassRunner.class) //单元测试框架JUnit4版本
@ContextConfiguration("classpath:bean1.xml") //加载配置文件
public class JTest4 {
	@Autowired
	private UserService userService;
	@Test
	public void test1() {
		userService.accountMoney();
	}
}
14、@ExtendWith注解可以整合JUnit5版本
@ExtendWith(SpringExtension.class)
@ContextConfiguration("classpath:bean1.xml")
public class JTest5 {
	@Autowired
	private UserService userService;
	@Test
	public void test1() {
		userService.accountMoney();
	}
}
15、@SpringJUnitConfig使用一个复合注解替代上面两个注解完成整合
@SpringJUnitConfig(locations = "classpath:bean1.xml")
public class JTest5 {
	@Autowired
	private UserService userService;
	@Test
	public void test1() {
		userService.accountMoney();
	}
}


 884
884


 被折叠的 条评论
为什么被折叠?
被折叠的 条评论
为什么被折叠?
 到【灌水乐园】发言


