


Openmmlab确实是个宝藏仓库,下面简要介绍windows下安装mmcv-full的过程。
参考mmcv的官方文档(https://github.com/open-mmlab/mmcv)
重要的是问题是 需要GPU cuda, pytorch 版本一致,与mmcv对应才行。
步骤如下:
1. 安装合适版本的cuda (此处不再介绍,自行百度):本博主的cuda是10.1
2. 安装torch, torchvision版本:建议torch 1.6.0以上,本文测试了 torch1.7.0和1.8.0,都没有问题。相应的whl预编译版本下载连接,注意匹配cuda的版本,以及python版本:
https://download.pytorch.org/whl/torch_stable.html3. 安装合适版本的mmcv-full, 如win_amd64版本,对应python 36,即可
https://download.openmmlab.com/mmcv/dist/cu101/torch1.8.0/index.html

4. 至此已成功安装,过程中如果遇到opencv-python安装失败的,请自行百度找到预编译whl文件安装。
5. 后续:安装 mmcls, mmseg,直接采用 pip install mmcls==0.23.0的方式即可。
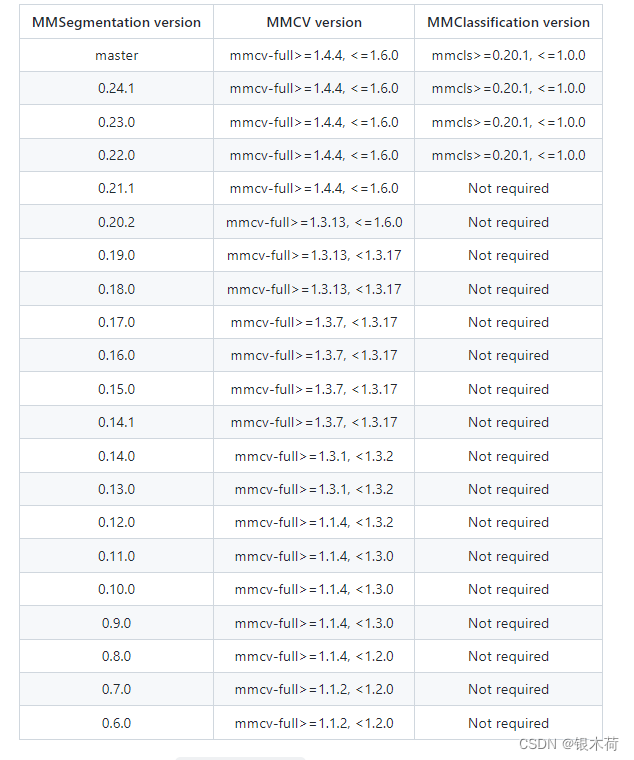
6.对于mmseg,需要注意mmcls的版本对应; 参考如下网址即可
mmsegmentation/get_started.md at master · open-mmlab/mmsegmentation · GitHub
7. 至此已全部安装成功。最后进入测试阶段。运行demo文件:
mmsegmentation/image_demo.py at master · open-mmlab/mmsegmentation · GitHub
可能会出现matplotlib报错的问题,降低其版本到 3.2.0即可:
pip install matplotlib==3.2.0


 221
221


 被折叠的 条评论
为什么被折叠?
被折叠的 条评论
为什么被折叠?
 到【灌水乐园】发言


