


1. 热帖排行
1.1 统计发生分数变化帖子
把一段时间内分数发生变化的帖子放入一个set
1.1.1 RedisKeyUtil
- 定义前缀
private static final String PREFIX_POST = "post";
- 添加方法统计帖子分数
// 帖子分数
public static String getPostScoreKey() {
    return PREFIX_POST + SPLIT + "score";
}
1.1.2 DiscussPostController
addDiscussPost新增帖子时做处理,把新增的帖子放入redis,不重复,无序,存入set
// 计算帖子分数
String redisKey = RedisKeyUtil.getPostScoreKey();
redisTemplate.opsForSet().add(redisKey, post.getId());
- 置顶不做处理,直接加到最上面
setWonderful加精做处理
// 计算帖子分数
String redisKey = RedisKeyUtil.getPostScoreKey();
redisTemplate.opsForSet().add(redisKey, id);
1.1.3 CommentController
addComment添加评论时做处理
// 计算帖子分数
String redisKey = RedisKeyUtil.getPostScoreKey();
redisTemplate.opsForSet().add(redisKey, discussPostId);
1.1.4 LikeController
处理逻辑同上
if(entityType == ENTITY_TYPE_POST) {
    // 计算帖子分数
    String redisKey = RedisKeyUtil.getPostScoreKey();
    redisTemplate.opsForSet().add(redisKey, postId);
}
1.2 定时任务
1.2.1 PostScoreRefreshJob
- 打日志,养成习惯
- 注入redis,DiscussPostService,LikeService,ElasticsearchService
- 声明静态常量牛客纪元
private static final Date epoch; - 重写execute
- 取到上一步存的rediskey
- 如果没有数据变化,打个日志任务取消
- 否则开始刷新前刷新后都记日志
- 遍历刷新
- 刷新方法
- 得到帖子id
- 如果帖子不在了打个日志
- 更新帖子分数,同步es搜索数据(在相应的Mapper和Config里添加响应方法)
public class PostScoreRefreshJob implements Job, CommunityConstant {
private static final Logger logger = LoggerFactory.getLogger(PostScoreRefreshJob.class);
@Autowired
private RedisTemplate redisTemplate;
@Autowired
private DiscussPostService discussPostService;
@Autowired
private LikeService likeService;
@Autowired
private ElasticsearchService elasticsearchService;
// 牛客纪元
private static final Date epoch;
static {
try {
epoch = new SimpleDateFormat("yyyy-MM-dd HH:mm:ss").parse("2014-08-01 00:00:00");
} catch (ParseException e) {
throw new RuntimeException("初始化牛客纪元失败!", e);
}
}
@Override
public void execute(JobExecutionContext context) throws JobExecutionException {
String redisKey = RedisKeyUtil.getPostScoreKey();
BoundSetOperations operations = redisTemplate.boundSetOps(redisKey);
if (operations.size() == 0) {
logger.info("[任务取消] 没有需要刷新的帖子!");
return;
}
logger.info("[任务开始] 正在刷新帖子分数: " + operations.size());
while (operations.size() > 0) {
this.refresh((Integer) operations.pop());
}
logger.info("[任务结束] 帖子分数刷新完毕!");
}
private void refresh(int postId) {
DiscussPost post = discussPostService.findDiscussPostById(postId);
if (post == null) {
logger.error("该帖子不存在: id = " + postId);
return;
}
// 是否精华
boolean wonderful = post.getStatus() == 1;
// 评论数量
int commentCount = post.getCommentCount();
// 点赞数量
long likeCount = likeService.findEntityLikeCount(ENTITY_TYPE_POST, postId);
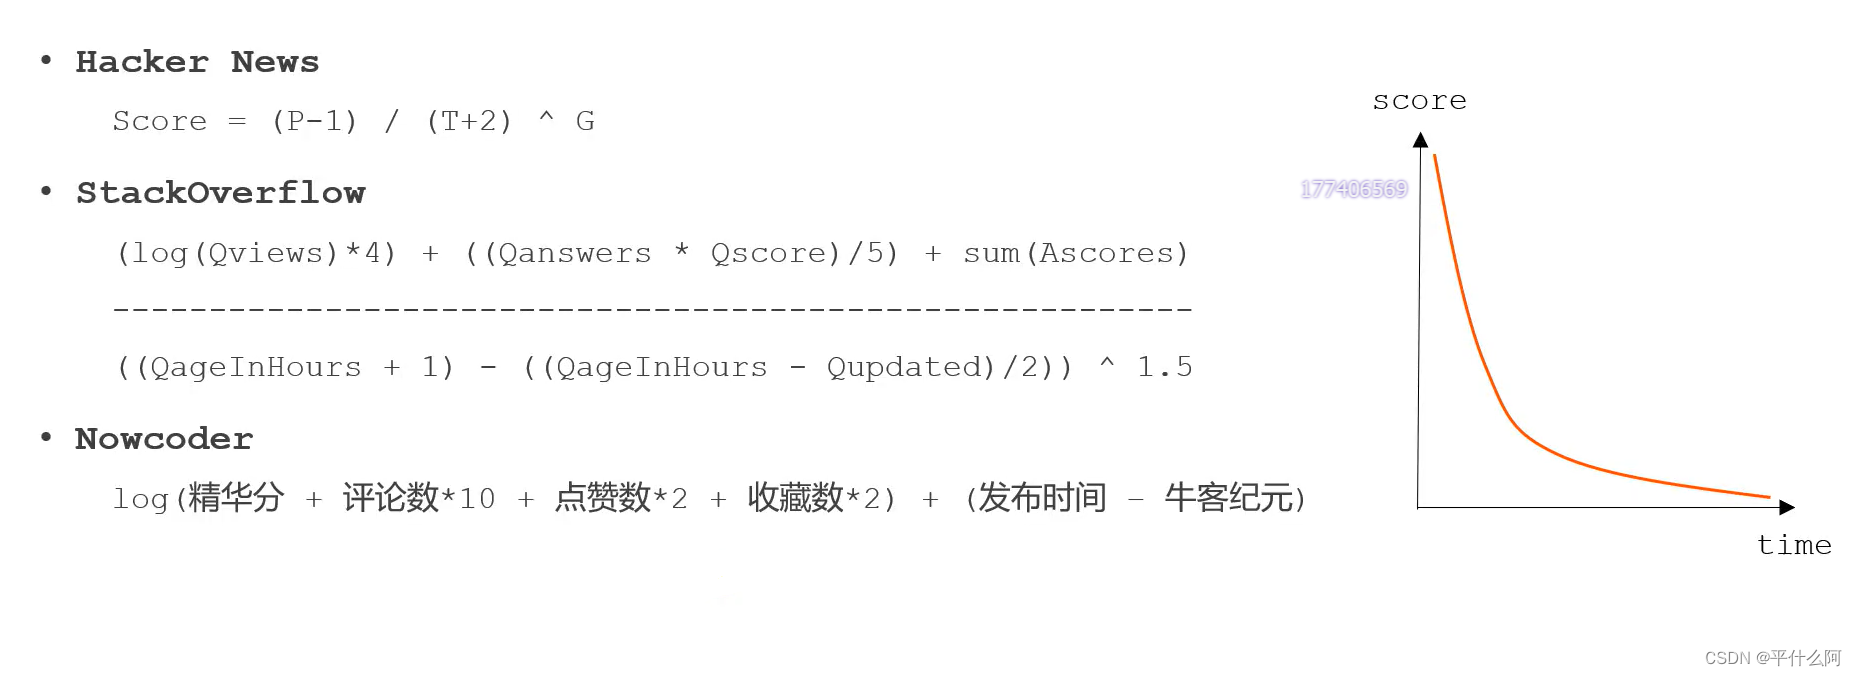
// 计算权重
double w = (wonderful ? 75 : 0) + commentCount * 10 + likeCount * 2;
// 分数 = 帖子权重 + 距离天数
double score = Math.log10(Math.max(w, 1))
+ (post.getCreateTime().getTime() - epoch.getTime()) / (1000 * 3600 * 24);
// 更新帖子分数
discussPostService.updateScore(postId, score);
// 同步搜索数据
post.setScore(score);
elasticsearchService.saveDiscussPost(post);
}
}
1.2.2 QuartzConfig
- JobDetailFactoryBean
- SimpleTriggerFactoryBean
// 刷新帖子分数任务
@Bean
public JobDetailFactoryBean postScoreRefreshJobDetail() {
    JobDetailFactoryBean factoryBean = new JobDetailFactoryBean();
    factoryBean.setJobClass(PostScoreRefreshJob.class);
    factoryBean.setName("postScoreRefreshJob");
    factoryBean.setGroup("communityJobGroup");
    factoryBean.setDurability(true);
    factoryBean.setRequestsRecovery(true);
    return factoryBean;
}

@Bean
public SimpleTriggerFactoryBean postScoreRefreshTrigger(JobDetail postScoreRefreshJobDetail) {
    SimpleTriggerFactoryBean factoryBean = new SimpleTriggerFactoryBean();
    factoryBean.setJobDetail(postScoreRefreshJobDetail);
    factoryBean.setName("postScoreRefreshTrigger");
    factoryBean.setGroup("communityTriggerGroup");
    factoryBean.setRepeatInterval(1000 * 60 * 5);
    factoryBean.setJobDataMap(new JobDataMap());
    return factoryBean;
}
1.3 页面展现
1.3.1 DiscussPostMapper
添加参数 orderMode,默认值是0按照原先的排,如果1就按照热度排
List<DiscussPost> selectDiscussPosts(int userId, int offset, int limit, int orderMode);
1.3.2 discusspost-mapper.xml
完成下面修改后通过finduse把用到这个方法的地方都改一下
<select id="selectDiscussPosts" resultType="DiscussPost">
    select <include refid="selectFields"></include>
    from discuss_post
    where status != 2
    <if test="userId!=0">
        and user_id = #{userId}
    </if>
    <if test="orderMode==0">
        order by type desc, create_time desc
    </if>
    <if test="orderMode==1">
        order by type desc, score desc, create_time desc
    </if>
    limit #{offset}, #{limit}
</select>
1.3.3 HomeController
- 添加参数ordermode
- 第一次访问,还没有值,所以需要默认参数是0
- 在路径上拼上参数
page.setPath("/index?orderMode=" + orderMode); - 最后ordermode再装到模板,模板要用
@RequestMapping(path = "/index", method = RequestMethod.GET)
public String getIndexPage(Model model, Page page,
                           @RequestParam(name = "orderMode", defaultValue = "0") int orderMode) {
    // 方法调用钱,SpringMVC会自动实例化Model和Page,并将Page注入Model.
    // 所以,在thymeleaf中可以直接访问Page对象中的数据.
    page.setRows(discussPostService.findDiscussPostRows(0));
    page.setPath("/index?orderMode=" + orderMode);

    List<DiscussPost> list = discussPostService
            .findDiscussPosts(0, page.getOffset(), page.getLimit(), orderMode);
    List<Map<String, Object>> discussPosts = new ArrayList<>();
    if (list != null) {
        for (DiscussPost post : list) {
            Map<String, Object> map = new HashMap<>();
            map.put("post", post);
            User user = userService.findUserById(post.getUserId());
            map.put("user", user);

            long likeCount = likeService.findEntityLikeCount(ENTITY_TYPE_POST, post.getId());
            map.put("likeCount", likeCount);

            discussPosts.add(map);
        }
    }
    model.addAttribute("discussPosts", discussPosts);
    model.addAttribute("orderMode", orderMode);

    return "/index";
}
1.3.4 index.html
- 修改超链接
th:href="@{/index(orderMode=0)}" - 动态显示页签
th:class="|nav-link ${orderMode==0?'active':''}|"
<!-- 筛选条件 -->
<ul class="nav nav-tabs mb-3">
	<li class="nav-item">
		<a th:class="|nav-link ${orderMode==0?'active':''}|" th:href="@{/index(orderMode=0)}">最新</a>
	</li>
	<li class="nav-item">
		<a th:class="|nav-link ${orderMode==1?'active':''}|" th:href="@{/index(orderMode=1)}">最热</a>
	</li>
</ul>
2. 生成长图
2.1 固定命令调用
package com.nowcoder.community;
import java.io.IOException;
public class WkTests {
public static void main(String[] args) {
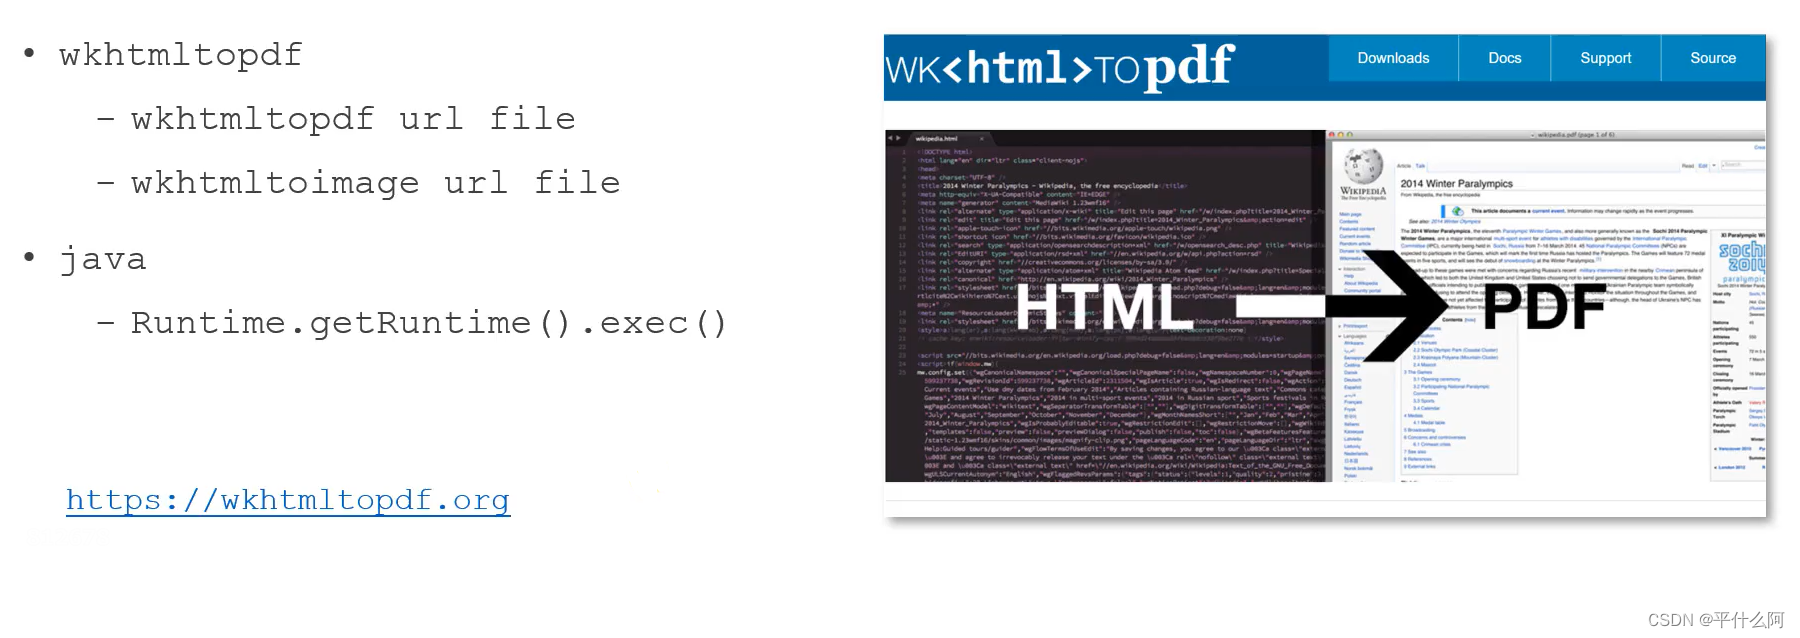
String cmd = "d:/work/wkhtmltopdf/bin/wkhtmltoimage --quality 75 https://www.nowcoder.com d:/work/data/wk-images/3.png";
try {
Runtime.getRuntime().exec(cmd);
System.out.println("ok.");
} catch (IOException e) {
e.printStackTrace();
}
}
}
2.2 application.properties
配置文件定义命令和存放目录
# wk
wk.image.command=d:/work/wkhtmltopdf/bin/wkhtmltoimage
wk.image.storage=d:/work/data/wk-images
2.3 WkConfig
在服务启动时检查目录是否存在否则创建
package com.nowcoder.community.config;


import org.slf4j.Logger;
import org.slf4j.LoggerFactory;
import org.springframework.beans.factory.annotation.Value;
import org.springframework.context.annotation.Configuration;

import javax.annotation.PostConstruct;
import java.io.File;

@Configuration
public class WkConfig {

    private static final Logger logger = LoggerFactory.getLogger(WkConfig.class);

    @Value("${wk.image.storage}")
    private String wkImageStorage;

    @PostConstruct
    public void init() {
        // 创建WK图片目录
        File file = new File(wkImageStorage);
        if (!file.exists()) {
            file.mkdir();
            logger.info("创建WK图片目录: " + wkImageStorage);
        }
    }

}
2.4 模拟开发分享功能
2.4.1 ShareController.share
- logger
- 异步方式,注入kafka生产者
- 注入域名项目访问名,图片存放位置,
- share方法
- 传入参数为路径
- 文件名UUID随机生成
- 构建一个event,异步生成长图
- 返回访问路径
@RequestMapping(path = "/share", method = RequestMethod.GET)
@ResponseBody
public String share(String htmlUrl) {
    // 文件名
    String fileName = CommunityUtil.generateUUID();

    // 异步生成长图
    Event event = new Event()
            .setTopic(TOPIC_SHARE)
            .setData("htmlUrl", htmlUrl)
            .setData("fileName", fileName)
            .setData("suffix", ".png");
    eventProducer.fireEvent(event);

    // 返回访问路径
    map.put("shareUrl", domain + contextPath + "/share/image/" + fileName);

    return CommunityUtil.getJSONString(0, null, map);
}
2.4.2 EventConsumer
// 消费分享事件
@KafkaListener(topics = TOPIC_SHARE)
public void handleShareMessage(ConsumerRecord record) {
    if (record == null || record.value() == null) {
        logger.error("消息的内容为空!");
        return;
    }

    Event event = JSONObject.parseObject(record.value().toString(), Event.class);
    if (event == null) {
        logger.error("消息格式错误!");
        return;
    }

    String htmlUrl = (String) event.getData().get("htmlUrl");
    String fileName = (String) event.getData().get("fileName");
    String suffix = (String) event.getData().get("suffix");

    String cmd = wkImageCommand + " --quality 75 "
            + htmlUrl + " " + wkImageStorage + "/" + fileName + suffix;
    try {
        Runtime.getRuntime().exec(cmd);
        logger.info("生成长图成功: " + cmd);
    } catch (IOException e) {
        logger.error("生成长图失败: " + e.getMessage());
    }

    // 启用定时器,监视该图片,一旦生成了,则上传至七牛云.
    UploadTask task = new UploadTask(fileName, suffix);
    Future future = taskScheduler.scheduleAtFixedRate(task, 500);
    task.setFuture(future);
}
2.4.3 ShareController.getShareImage
// 废弃
// 获取长图
@RequestMapping(path = "/share/image/{fileName}", method = RequestMethod.GET)
public void getShareImage(@PathVariable("fileName") String fileName, HttpServletResponse response) {
    if (StringUtils.isBlank(fileName)) {
        throw new IllegalArgumentException("文件名不能为空!");
    }

    response.setContentType("image/png");
    File file = new File(wkImageStorage + "/" + fileName + ".png");
    try {
        OutputStream os = response.getOutputStream();
        FileInputStream fis = new FileInputStream(file);
        byte[] buffer = new byte[1024];
        int b = 0;
        while ((b = fis.read(buffer)) != -1) {
            os.write(buffer, 0, b);
        }
    } catch (IOException e) {
        logger.error("获取长图失败: " + e.getMessage());
    }
}
3. 将文件上传至云服务器
3.1 引入依赖
<dependency>
	<groupId>com.qiniu</groupId>
	<artifactId>qiniu-java-sdk</artifactId>
	<version>7.2.23</version>
</dependency>
3.2 配置
- 密钥
- 空间名字
# qiniu
qiniu.key.access=6RA-Uus95ZT_1znMrCMD8BpqfjT-K7OKmQTfKB48
qiniu.key.secret=kPNnLFz2_tzztKUVpSLm0lYngtuHWyIq5LzTmLIL
qiniu.bucket.header.name=community_header
quniu.bucket.header.url=http://pvghrij81.bkt.clouddn.com
qiniu.bucket.share.name=community_share
qiniu.bucket.share.url=http://pvghvvuzm.bkt.clouddn.com
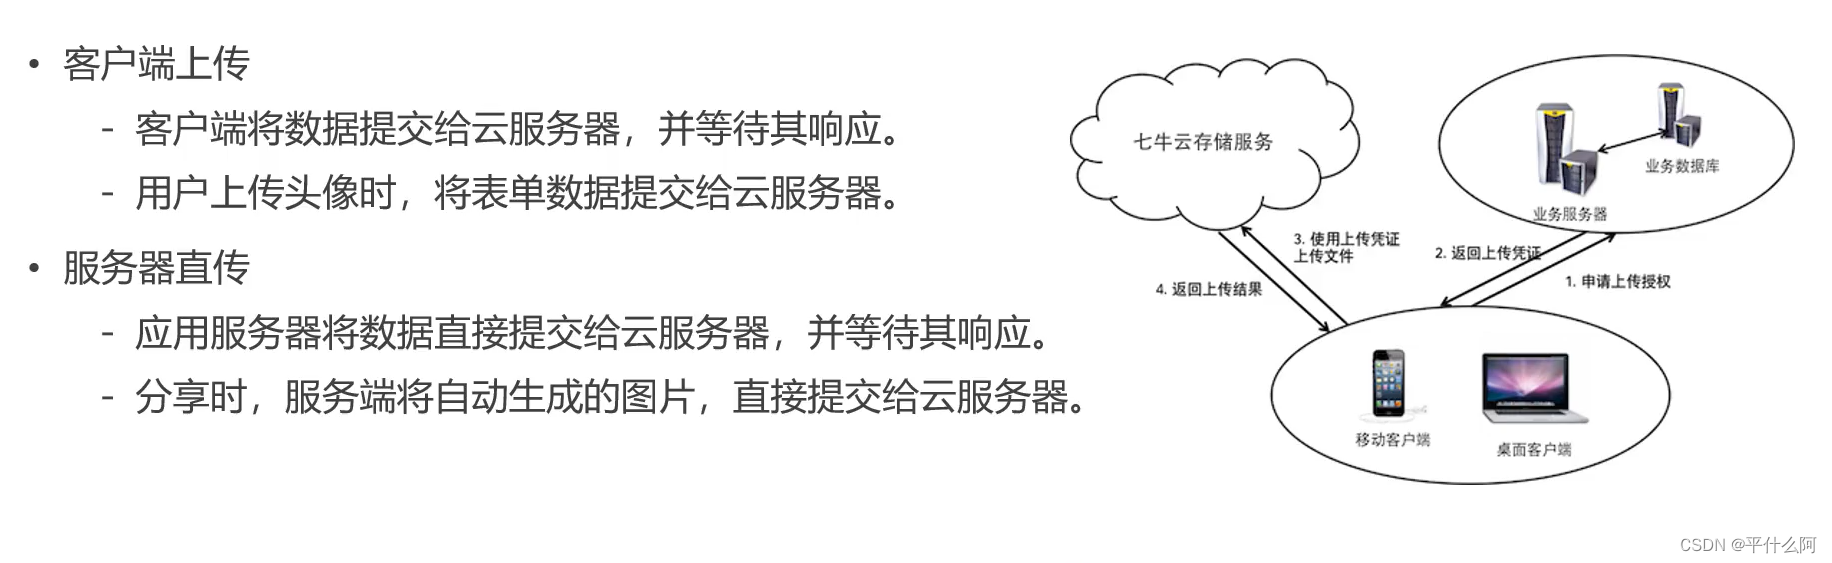
3.3 客户端上传:上传头像
3.3.1 UserController
- 注入属性
- 废弃原有
uploadHeader和getHeader方法 getSettingPage- 上传文件名称
- 设置响应信息,存入
StringMap对象 - 生成上传凭证
- 数据存入
model
updateHeaderUrl,更新头像路径
@Value("${qiniu.key.access}")
private String accessKey;

@Value("${qiniu.key.secret}")
private String secretKey;

@Value("${qiniu.bucket.header.name}")
private String headerBucketName;

@Value("${quniu.bucket.header.url}")
private String headerBucketUrl;

@LoginRequired
@RequestMapping(path = "/setting", method = RequestMethod.GET)
public String getSettingPage(Model model) {
    // 上传文件名称
    String fileName = CommunityUtil.generateUUID();
    // 设置响应信息
    StringMap policy = new StringMap();
    policy.put("returnBody", CommunityUtil.getJSONString(0));
    // 生成上传凭证
    Auth auth = Auth.create(accessKey, secretKey);
    String uploadToken = auth.uploadToken(headerBucketName, fileName, 3600, policy);

    model.addAttribute("uploadToken", uploadToken);
    model.addAttribute("fileName", fileName);

    return "/site/setting";
}

// 更新头像路径
@RequestMapping(path = "/header/url", method = RequestMethod.POST)
@ResponseBody
public String updateHeaderUrl(String fileName) {
    if (StringUtils.isBlank(fileName)) {
        return CommunityUtil.getJSONString(1, "文件名不能为空!");
    }

    String url = headerBucketUrl + "/" + fileName;
    userService.updateHeader(hostHolder.getUser().getId(), url);

    return CommunityUtil.getJSONString(0);
}
3.3.2 setting.html
- 为了提交js添加id
id="uploadForm" - 补充两个hidden,
uploadToken和fileName
<!--上传到七牛云-->
<form class="mt-5" id="uploadForm">
	<div class="form-group row mt-4">
		<label for="head-image" class="col-sm-2 col-form-label text-right">选择头像:</label>
		<div class="col-sm-10">
			<div class="custom-file">
				<input type="hidden" name="token" th:value="${uploadToken}">
				<input type="hidden" name="key" th:value="${fileName}">
				<input type="file" class="custom-file-input" id="head-image" name="file" lang="es" required="">
				<label class="custom-file-label" for="head-image" data-browse="文件">选择一张图片</label>
				<div class="invalid-feedback">
					该账号不存在!
				</div>
			</div>
		</div>
	</div>
	<div class="form-group row mt-4">
		<div class="col-sm-2"></div>
		<div class="col-sm-10 text-center">
			<button type="submit" class="btn btn-info text-white form-control">立即上传</button>
		</div>
	</div>
</form>

<script th:src="@{/js/setting.js}"></script>
3.3.3 setting.js
- 页面加载完后给form定义事件,点击按钮触发
upload upload()最后return false,事件到此为止upload()使用$.ajax()功能完全- url
- 提交方式post
processData: false不转成字符串contentType: false- data封装表单对象
$(function(){
    $("#uploadForm").submit(upload);
});

function upload() {
    $.ajax({
        url: "http://upload-z1.qiniup.com",
        method: "post",
        processData: false,
        contentType: false,
        data: new FormData($("#uploadForm")[0]),
        success: function(data) {
            if(data && data.code == 0) {
                // 更新头像访问路径
                $.post(
                    CONTEXT_PATH + "/user/header/url",
                    {"fileName":$("input[name='key']").val()},
                    function(data) {
                        data = $.parseJSON(data);
                        if(data.code == 0) {
                            window.location.reload();
                        } else {
                            alert(data.msg);
                        }
                    }
                );
            } else {
                alert("上传失败!");
            }
        }
    });
    return false;
}
3.4 服务端直传:上传分享图片
3.4.1 ShareController
访问路径更改
@Value("${qiniu.bucket.share.url}")
private String shareBucketUrl;

@RequestMapping(path = "/share", method = RequestMethod.GET)
@ResponseBody
public String share(String htmlUrl) {
    // 文件名
    String fileName = CommunityUtil.generateUUID();

    // 异步生成长图
    Event event = new Event()
            .setTopic(TOPIC_SHARE)
            .setData("htmlUrl", htmlUrl)
            .setData("fileName", fileName)
            .setData("suffix", ".png");
    eventProducer.fireEvent(event);

    // 返回访问路径
    Map<String, Object> map = new HashMap<>();
//        map.put("shareUrl", domain + contextPath + "/share/image/" + fileName);
    map.put("shareUrl", shareBucketUrl + "/" + fileName);

    return CommunityUtil.getJSONString(0, null, map);
}
3.4.2 handleShareMessage
启用定时器,监视该图片,一旦生成了,则上传至七牛云.
UploadTask方法:
- 启动任务的返回值
Future可以用来停止 - 超时或超次数就失败
// 消费分享事件
@KafkaListener(topics = TOPIC_SHARE)
public void handleShareMessage(ConsumerRecord record) {
    if (record == null || record.value() == null) {
        logger.error("消息的内容为空!");
        return;
    }

    Event event = JSONObject.parseObject(record.value().toString(), Event.class);
    if (event == null) {
        logger.error("消息格式错误!");
        return;
    }

    String htmlUrl = (String) event.getData().get("htmlUrl");
    String fileName = (String) event.getData().get("fileName");
    String suffix = (String) event.getData().get("suffix");

    String cmd = wkImageCommand + " --quality 75 "
            + htmlUrl + " " + wkImageStorage + "/" + fileName + suffix;
    try {
        Runtime.getRuntime().exec(cmd);
        logger.info("生成长图成功: " + cmd);
    } catch (IOException e) {
        logger.error("生成长图失败: " + e.getMessage());
    }

    // 启用定时器,监视该图片,一旦生成了,则上传至七牛云.
    UploadTask task = new UploadTask(fileName, suffix);
    Future future = taskScheduler.scheduleAtFixedRate(task, 500);
    task.setFuture(future);
}


class UploadTask implements Runnable {
    // 文件名称
    private String fileName;
    // 文件后缀
    private String suffix;
    // 启动任务的返回值
    private Future future;
    // 开始时间
    private long startTime;
    // 上传次数
    private int uploadTimes;

    public UploadTask(String fileName, String suffix) {
        this.fileName = fileName;
        this.suffix = suffix;
        this.startTime = System.currentTimeMillis();
    }

    public void setFuture(Future future) {
        this.future = future;
    }

    @Override
    public void run() {
        // 生成失败
        if (System.currentTimeMillis() - startTime > 30000) {
            logger.error("执行时间过长,终止任务:" + fileName);
            future.cancel(true);
            return;
        }
        // 上传失败
        if (uploadTimes >= 3) {
            logger.error("上传次数过多,终止任务:" + fileName);
            future.cancel(true);
            return;
        }

        String path = wkImageStorage + "/" + fileName + suffix;
        File file = new File(path);
        if (file.exists()) {
            logger.info(String.format("开始第%d次上传[%s].", ++uploadTimes, fileName));
            // 设置响应信息
            StringMap policy = new StringMap();
            policy.put("returnBody", CommunityUtil.getJSONString(0));
            // 生成上传凭证
            Auth auth = Auth.create(accessKey, secretKey);
            String uploadToken = auth.uploadToken(shareBucketName, fileName, 3600, policy);
            // 指定上传机房
            UploadManager manager = new UploadManager(new Configuration(Zone.zone1()));
            try {
                // 开始上传图片
                Response response = manager.put(
                        path, fileName, uploadToken, null, "image/" + suffix, false);
                // 处理响应结果
                JSONObject json = JSONObject.parseObject(response.bodyString());
                if (json == null || json.get("code") == null || !json.get("code").toString().equals("0")) {
                    logger.info(String.format("第%d次上传失败[%s].", uploadTimes, fileName));
                } else {
                    logger.info(String.format("第%d次上传成功[%s].", uploadTimes, fileName));
                    future.cancel(true);
                }
            } catch (QiniuException e) {
                logger.info(String.format("第%d次上传失败[%s].", uploadTimes, fileName));
            }
        } else {
            logger.info("等待图片生成[" + fileName + "].");
        }
    }
}
4. 性能优化
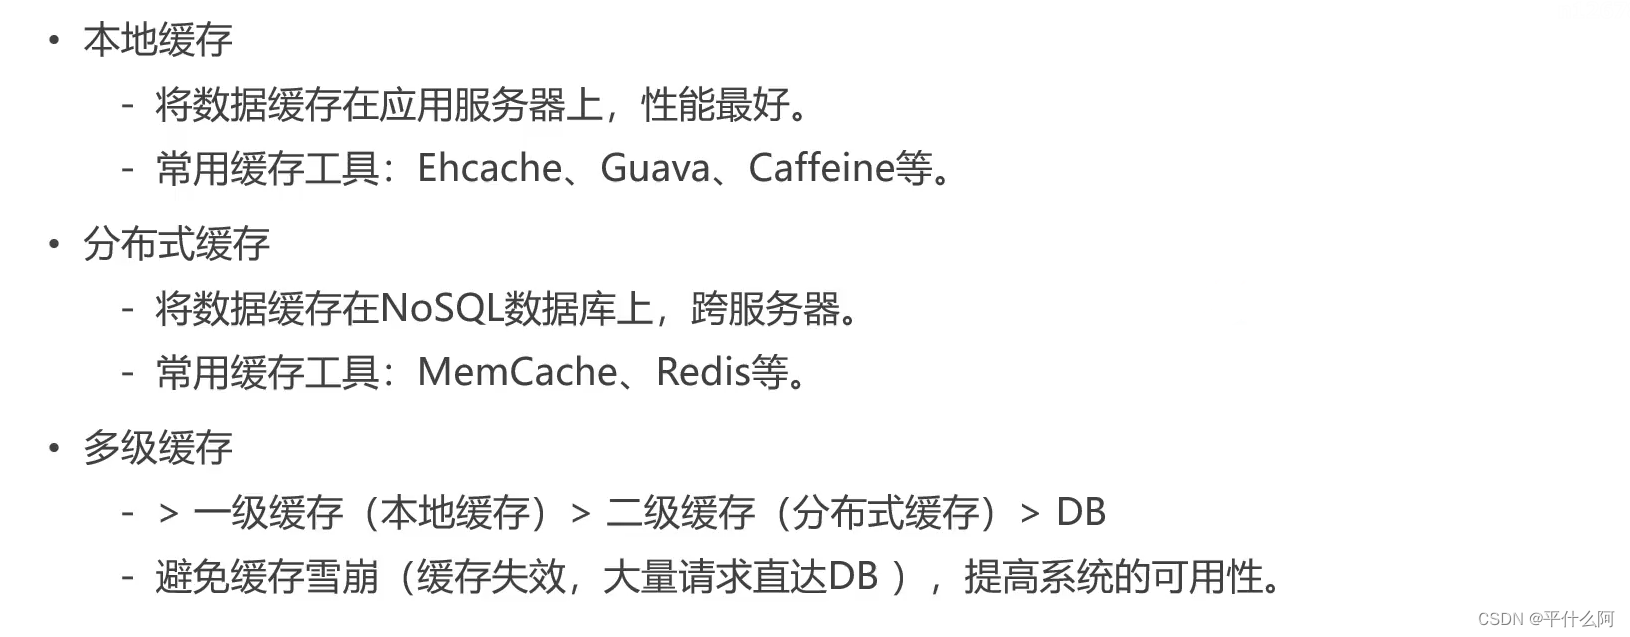
4.1 本地缓存和分布式缓存
本地缓存性能最好
分布式缓存比本地缓存性能低一点,主要是因为网络开销上
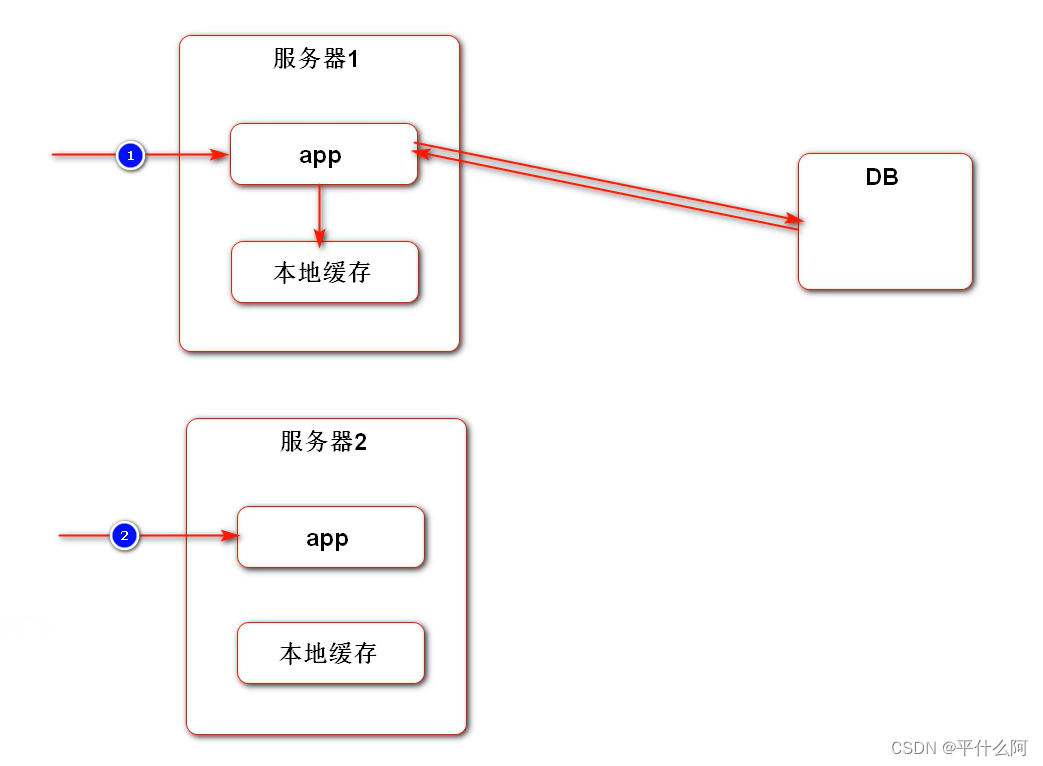
使用本地缓存,如果存的时用户信息相关数据,如果app从缓存中取用户相关数据没有,就无法登录。如果时热门帖子等信息,使用本地缓存没事,用户和数据本身不是有强关联可以本地缓存。
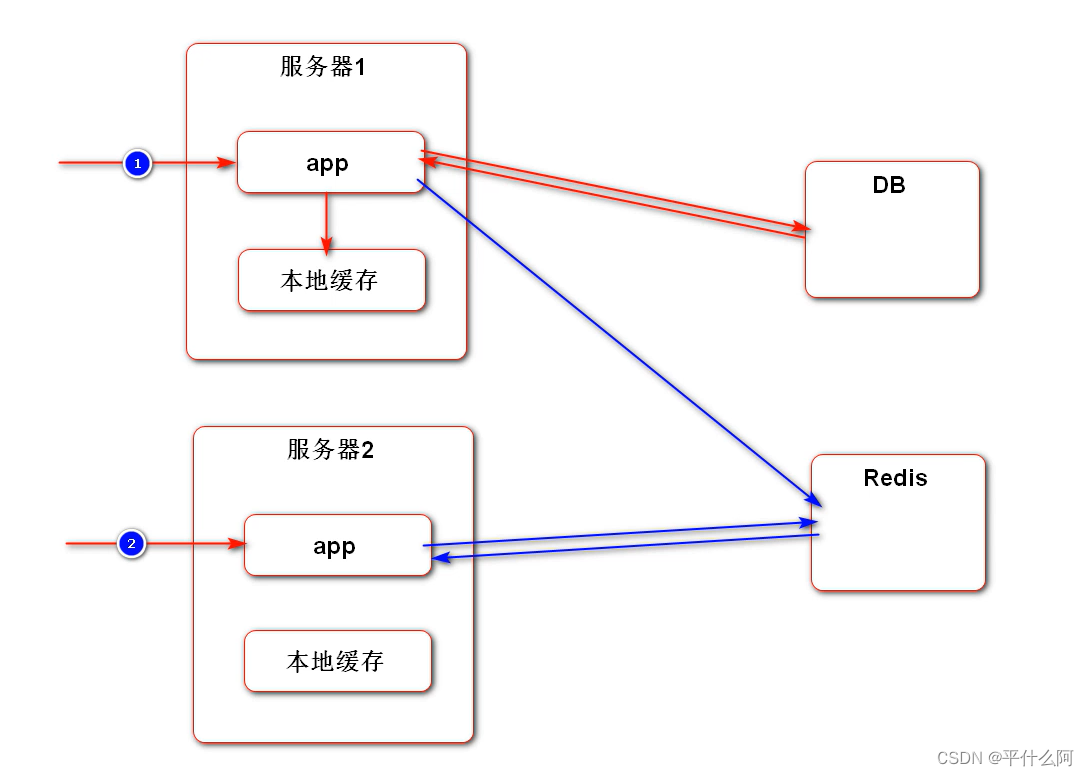
使用redis进行缓存就没有这种情况。redis可以跨服务器
4.2 多级缓存
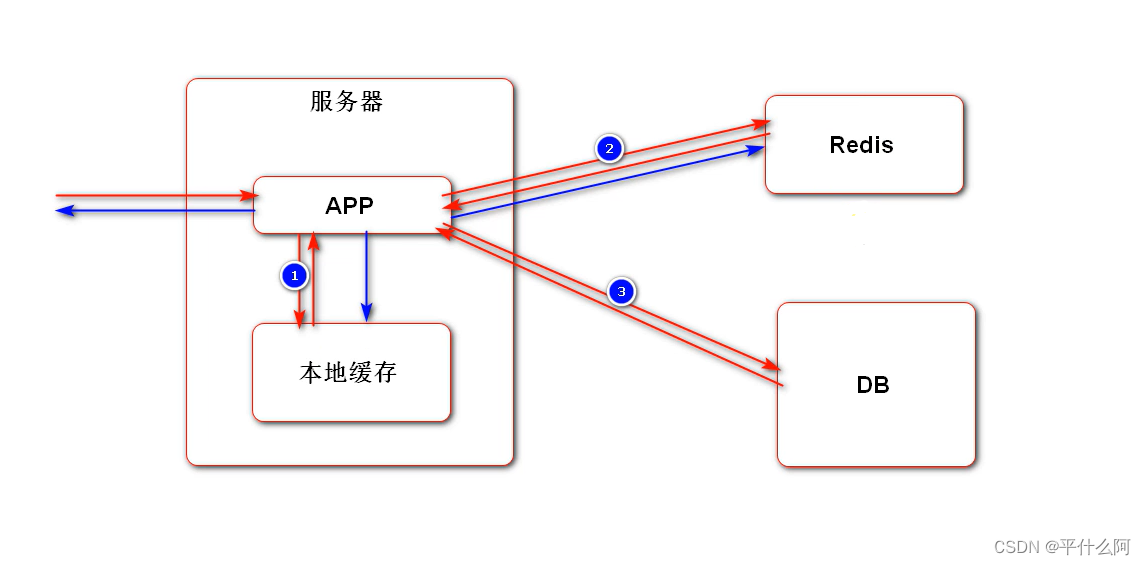
4.3 优化热门帖子列表
spring整合缓存用一个缓存管理器管理所有缓存,不合适,不如单独使用一个缓存
4.3.1 pom.xml
<dependency>
	<groupId>com.github.ben-manes.caffeine</groupId>
	<artifactId>caffeine</artifactId>
	<version>2.7.0</version>
</dependency>
4.3.2 application.properties
max-size:缓存空间缓存数量expire-seconds:过期时间,数据变化淘汰不合适,因为缓存的是一整页,有一个变了都淘汰不合适
# caffeine
caffeine.posts.max-size=15
caffeine.posts.expire-seconds=180
4.3.4 DiscussPostService
- 注入日志和参数
LoadingCache:同步缓存,AsyncLoadingCache:异步缓存- 声明帖子列表缓存和帖子总数缓存
- 初始化缓存
.newBuilder()初始化.maximumSize最大缓存数.expireAfterWrite过期时间new CacheLoader接口的匿名实现load是缓存中没有的查询方法- 如果key或长为0抛异常
- 切割参数得到两个数据
- (可以先访问redis,如果redis没有再访问数据库)
- 使用
discussPostMapper中的查询方法查询
- 修改方法
findDiscussPosts,如果是第一页且按热度排行就调取咖啡因缓存 - 修改方法
findDiscussPostRows,如果首页访问就调取咖啡因
@PostConstruct
public void init() {
    // 初始化帖子列表缓存
    postListCache = Caffeine.newBuilder()
            .maximumSize(maxSize)
            .expireAfterWrite(expireSeconds, TimeUnit.SECONDS)
            .build(new CacheLoader<String, List<DiscussPost>>() {
                @Nullable
                @Override
                public List<DiscussPost> load(@NonNull String key) throws Exception {
                    if (key == null || key.length() == 0) {
                        throw new IllegalArgumentException("参数错误!");
                    }

                    String[] params = key.split(":");
                    if (params == null || params.length != 2) {
                        throw new IllegalArgumentException("参数错误!");
                    }

                    int offset = Integer.valueOf(params[0]);
                    int limit = Integer.valueOf(params[1]);

                    // 二级缓存: Redis -> mysql

                    logger.debug("load post list from DB.");
                    return discussPostMapper.selectDiscussPosts(0, offset, limit, 1);
                }
            });
    // 初始化帖子总数缓存
    postRowsCache = Caffeine.newBuilder()
            .maximumSize(maxSize)
            .expireAfterWrite(expireSeconds, TimeUnit.SECONDS)
            .build(new CacheLoader<Integer, Integer>() {
                @Nullable
                @Override
                public Integer load(@NonNull Integer key) throws Exception {
                    logger.debug("load post rows from DB.");
                    return discussPostMapper.selectDiscussPostRows(key);
                }
            });
}
4.3.5 CaffeineTests
- 放30万条数据进数据库,方便压力测试
- 三次访问热门帖子列表,应该只打印一次日志
@RunWith(SpringRunner.class)
@SpringBootTest
@ContextConfiguration(classes = CommunityApplication.class)
public class CaffeineTests {

    @Autowired
    private DiscussPostService postService;

    @Test
    public void initDataForTest() {
        for (int i = 0; i < 300000; i++) {
            DiscussPost post = new DiscussPost();
            post.setUserId(111);
            post.setTitle("互联网求职暖春计划");
            post.setContent("今年的就业形势,确实不容乐观。过了个年,仿佛跳水一般,整个讨论区哀鸿遍野!19届真的没人要了吗?!18届被优化真的没有出路了吗?!大家的“哀嚎”与“悲惨遭遇”牵动了每日潜伏于讨论区的牛客小哥哥小姐姐们的心,于是牛客决定:是时候为大家做点什么了!为了帮助大家度过“寒冬”,牛客网特别联合60+家企业,开启互联网求职暖春计划,面向18届&19届,拯救0 offer!");
            post.setCreateTime(new Date());
            post.setScore(Math.random() * 2000);
            postService.addDiscussPost(post);
        }
    }

    @Test
    public void testCache() {
        System.out.println(postService.findDiscussPosts(0, 0, 10, 1));
        System.out.println(postService.findDiscussPosts(0, 0, 10, 1));
        System.out.println(postService.findDiscussPosts(0, 0, 10, 1));
        System.out.println(postService.findDiscussPosts(0, 0, 10, 0));
    }

}
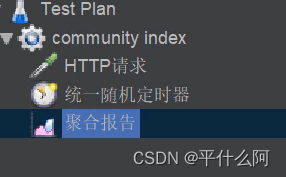
4.3.6 jmeter压力测试


 371
371


 被折叠的 条评论
为什么被折叠?
被折叠的 条评论
为什么被折叠?
 到【灌水乐园】发言


