


目录
一 概述
webrtc中的neteq事实上是一种自适应抗网络抖动的技术。因为网络延迟的复杂变化导致包到达时间间隔有很大的变化,举个例子就是可能500ms没有包到达,然后500毫秒的包一起到达,这时候如果没有缓冲区做平滑处理,听感会很差。简单来说就是增加延时消除抖动。消除抖动最简单的办法,其实就是缓冲区足够大就行,早起其实是固定缓冲区大小,或者取历史抖动最大值,但是这样的后果就是即使网络很好,延时也会很大。所以neteq的算法中心就是让缓冲区大小自适应网络抖动,当网络抖动大,缓冲区增大,网络抖动小,缓冲区减小。其实问题的难点就在于怎么预测网络抖动。所以neteq里面的主要内容可以概括为:
(1) 预测网络抖动
(2)对不同的网络抖动,采取不同的信号处理算法来增加听感。
这里只介绍neteq是怎么预测网络抖动,以及采取的策略。不涉及信号处理算法。这些专业的算法每一个都可以单独开一篇博客讲述。以后有时间可以研究一下。
关于老版本neteq概述,可以参考下面的博客,五篇很详细。
webRTC中音频相关的netEQ(一):概述 - davidtym - 博客园
还有一篇硕士论文,讲的非常详细,建议细读。
neteq这里分为插包,以及取包播放两个方面来讲述。插包是网络包到达时,将包放入缓冲区,这个过程涉及到网络抖动估计。取包是扬声器拉数据,从缓冲区取包,这里涉及到了当前的播放策略(正常,加速,减速,丢包补偿。。)
以下代码是基于webrtcmaster分支的提交 9ae0c1c348e34c20d38da4ec28c5c5f7e81db7a2。提交时间为2021.08.26
二 插包
2.1 插包整体流程
neteq_impl.cc:
int NetEqImpl::InsertPacketInternal(const RTPHeader& rtp_header,
rtc::ArrayView<const uint8_t> payload) {
if (payload.empty()) {
RTC_LOG_F(LS_ERROR) << "payload is empty";
return kInvalidPointer;
}
Timestamp receive_time = clock_->CurrentTime();
stats_->ReceivedPacket();
PacketList packet_list;
//这里只插入一个包,之所以用链表存,是因为后面会将包分割
// Insert packet in a packet list.
packet_list.push_back([&rtp_header, &payload, &receive_time] {
// Convert to Packet.
Packet packet;
packet.payload_type = rtp_header.payloadType;
packet.sequence_number = rtp_header.sequenceNumber;
packet.timestamp = rtp_header.timestamp;
packet.payload.SetData(payload.data(), payload.size());
packet.packet_info = RtpPacketInfo(rtp_header, receive_time);
// Waiting time will be set upon inserting the packet in the buffer.
RTC_DCHECK(!packet.waiting_time);
return packet;
}());
bool update_sample_rate_and_channels = first_packet_;
if (update_sample_rate_and_channels) {
// Reset timestamp scaling.
timestamp_scaler_->Reset();
}
// rtp包的timestamp是以采样点个数为单位的,所以如果采样率变化,对应到时间戳需要转换
// 这里看ToInternal源码其实不太明白(为什么同一个包的clock_rate 跟采样率会对不上)
if (!decoder_database_->IsRed(rtp_header.payloadType)) {
// Scale timestamp to internal domain (only for some codecs).
timestamp_scaler_->ToInternal(&packet_list);
}
//待会下面可能会拆包,先记下首包的信息
// Store these for later use, since the first packet may very well disappear
// before we need these values.
uint32_t main_timestamp = packet_list.front().timestamp;
uint8_t main_payload_type = packet_list.front().payload_type;
uint16_t main_sequence_number = packet_list.front().sequence_number;
// Reinitialize NetEq if it's needed (changed SSRC or first call).
if (update_sample_rate_and_channels) {
// Note: `first_packet_` will be cleared further down in this method, once
// the packet has been successfully inserted into the packet buffer.
// Flush the packet buffer and DTMF buffer.
packet_buffer_->Flush(stats_.get());
dtmf_buffer_->Flush();
// Update audio buffer timestamp.
sync_buffer_->IncreaseEndTimestamp(main_timestamp - timestamp_);
// Update codecs.
timestamp_ = main_timestamp;
}
//检测是否开启了NACK
if (nack_enabled_) {
RTC_DCHECK(nack_);
if (update_sample_rate_and_channels) {
nack_->Reset();
}
nack_->UpdateLastReceivedPacket(main_sequence_number, main_timestamp);
}
// 如果是RED包,会进行拆包,RED是一种封装,具体格式可以参考
// https://blog.jianchihu.net/webrtc-research-redundant-rtp-payload-fec.html
// 这种封装的包会有主包,然后后面跟着一堆冗余包,这个函数就是把这个RED包拆成一个个的包,然后插入
// 队列
// Check for RED payload type, and separate payloads into several packets.
if (decoder_database_->IsRed(rtp_header.payloadType)) {
if (!red_payload_splitter_->SplitRed(&packet_list)) {
return kRedundancySplitError;
}
// Only accept a few RED payloads of the same type as the main data,
// DTMF events and CNG.
red_payload_splitter_->CheckRedPayloads(&packet_list, *decoder_database_);
if (packet_list.empty()) {
return kRedundancySplitError;
}
}
// Check payload types.
if (decoder_database_->CheckPayloadTypes(packet_list) ==
DecoderDatabase::kDecoderNotFound) {
return kUnknownRtpPayloadType;
}
RTC_DCHECK(!packet_list.empty());
// 因为首包变了,需要重新更新时间戳等信息
// Update main_timestamp, if new packets appear in the list
// after RED splitting.
if (decoder_database_->IsRed(rtp_header.payloadType)) {
timestamp_scaler_->ToInternal(&packet_list);
main_timestamp = packet_list.front().timestamp;
main_payload_type = packet_list.front().payload_type;
main_sequence_number = packet_list.front().sequence_number;
}
// 删掉DTMF包,给state发个消息
// Process DTMF payloads. Cycle through the list of packets, and pick out any
// DTMF payloads found.
PacketList::iterator it = packet_list.begin();
while (it != packet_list.end()) {
const Packet& current_packet = (*it);
RTC_DCHECK(!current_packet.payload.empty());
if (decoder_database_->IsDtmf(current_packet.payload_type)) {
DtmfEvent event;
int ret = DtmfBuffer::ParseEvent(current_packet.timestamp,
current_packet.payload.data(),
current_packet.payload.size(), &event);
if (ret != DtmfBuffer::kOK) {
return kDtmfParsingError;
}
if (dtmf_buffer_->InsertEvent(event) != DtmfBuffer::kOK) {
return kDtmfInsertError;
}
it = packet_list.erase(it);
} else {
++it;
}
}
// 遍历包,将CN包,DTX这些特殊包做一些分析处理,插入到parsed_packet_list
PacketList parsed_packet_list;
bool is_dtx = false;
while (!packet_list.empty()) {
Packet& packet = packet_list.front();
const DecoderDatabase::DecoderInfo* info =
decoder_database_->GetDecoderInfo(packet.payload_type);
if (!info) {
RTC_LOG(LS_WARNING) << "SplitAudio unknown payload type";
return kUnknownRtpPayloadType;
}
if (info->IsComfortNoise()) {
// Carry comfort noise packets along.
parsed_packet_list.splice(parsed_packet_list.end(), packet_list,
packet_list.begin());
} else {
const auto sequence_number = packet.sequence_number;
const auto payload_type = packet.payload_type;
const Packet::Priority original_priority = packet.priority;
const auto& packet_info = packet.packet_info;
auto packet_from_result = [&](AudioDecoder::ParseResult& result) {
Packet new_packet;
new_packet.sequence_number = sequence_number;
new_packet.payload_type = payload_type;
new_packet.timestamp = result.timestamp;
new_packet.priority.codec_level = result.priority;
new_packet.priority.red_level = original_priority.red_level;
new_packet.packet_info = packet_info;
new_packet.frame = std::move(result.frame);
return new_packet;
};
std::vector<AudioDecoder::ParseResult> results =
info->GetDecoder()->ParsePayload(std::move(packet.payload),
packet.timestamp);
if (results.empty()) {
packet_list.pop_front();
} else {
bool first = true;
for (auto& result : results) {
RTC_DCHECK(result.frame);
RTC_DCHECK_GE(result.priority, 0);
is_dtx = is_dtx || result.frame->IsDtxPacket();
if (first) {
// Re-use the node and move it to parsed_packet_list.
packet_list.front() = packet_from_result(result);
parsed_packet_list.splice(parsed_packet_list.end(), packet_list,
packet_list.begin());
first = false;
} else {
parsed_packet_list.push_back(packet_from_result(result));
}
}
}
}
}
// Calculate the number of primary (non-FEC/RED) packets.
const size_t number_of_primary_packets = std::count_if(
parsed_packet_list.begin(), parsed_packet_list.end(),
[](const Packet& in) { return in.priority.codec_level == 0; });
if (number_of_primary_packets < parsed_packet_list.size()) {
stats_->SecondaryPacketsReceived(parsed_packet_list.size() -
number_of_primary_packets);
}
// 将所有包都插入PacketBuffer,并根据返回值做一些处理(主要是看PacketBuffer有没有因为目标延时
// 或者编码发生变化而丢数据)
// Insert packets in buffer.
const int target_level_ms = controller_->TargetLevelMs();
const int ret = packet_buffer_->InsertPacketList(
&parsed_packet_list, *decoder_database_, ¤t_rtp_payload_type_,
¤t_cng_rtp_payload_type_, stats_.get(), decoder_frame_length_,
last_output_sample_rate_hz_, target_level_ms);
bool buffer_flush_occured = false;
if (ret == PacketBuffer::kFlushed) {
// Reset DSP timestamp etc. if packet buffer flushed.
new_codec_ = true;
update_sample_rate_and_channels = true;
buffer_flush_occured = true;
} else if (ret == PacketBuffer::kPartialFlush) {
// Forward sync buffer timestamp
timestamp_ = packet_buffer_->PeekNextPacket()->timestamp;
sync_buffer_->IncreaseEndTimestamp(timestamp_ -
sync_buffer_->end_timestamp());
buffer_flush_occured = true;
} else if (ret != PacketBuffer::kOK) {
return kOtherError;
}
if (first_packet_) {
first_packet_ = false;
// Update the codec on the next GetAudio call.
new_codec_ = true;
}
if (current_rtp_payload_type_) {
RTC_DCHECK(decoder_database_->GetDecoderInfo(*current_rtp_payload_type_))
<< "Payload type " << static_cast<int>(*current_rtp_payload_type_)
<< " is unknown where it shouldn't be";
}
// 这里update_sample_rate_and_channels为TRUE只要两种情况,一种是首包刚来,还有一种是上面插
// 包返回值返回了kFlush.这个返回值意味着PacketBuffer插入新包之前发生了一次清空操作。并且这个
// 触发条件是因为这次来的特殊包(CN包或者DTMF,具体可看插入包的代码)跟上次的特殊包编码格式不一样
// 此时需要更新解码器以及解码信息
if (update_sample_rate_and_channels && !packet_buffer_->Empty()) {
// We do not use `current_rtp_payload_type_` to |set payload_type|, but
// get the next RTP header from `packet_buffer_` to obtain the payload type.
// The reason for it is the following corner case. If NetEq receives a
// CNG packet with a sample rate different than the current CNG then it
// flushes its buffer, assuming send codec must have been changed. However,
// payload type of the hypothetically new send codec is not known.
const Packet* next_packet = packet_buffer_->PeekNextPacket();
RTC_DCHECK(next_packet);
const int payload_type = next_packet->payload_type;
size_t channels = 1;
if (!decoder_database_->IsComfortNoise(payload_type)) {
AudioDecoder* decoder = decoder_database_->GetDecoder(payload_type);
RTC_DCHECK(decoder); // Payloads are already checked to be valid.
channels = decoder->Channels();
}
const DecoderDatabase::DecoderInfo* decoder_info =
decoder_database_->GetDecoderInfo(payload_type);
RTC_DCHECK(decoder_info);
if (decoder_info->SampleRateHz() != fs_hz_ ||
channels != algorithm_buffer_->Channels()) {
SetSampleRateAndChannels(decoder_info->SampleRateHz(), channels);
}
if (nack_enabled_) {
RTC_DCHECK(nack_);
// Update the sample rate even if the rate is not new, because of Reset().
nack_->UpdateSampleRate(fs_hz_);
}
}
const DecoderDatabase::DecoderInfo* dec_info =
decoder_database_->GetDecoderInfo(main_payload_type);
RTC_DCHECK(dec_info); // Already checked that the payload type is known.
// 更新NetEqController的信息
NetEqController::PacketArrivedInfo info;
info.is_cng_or_dtmf = dec_info->IsComfortNoise() || dec_info->IsDtmf();
info.packet_length_samples =
number_of_primary_packets * decoder_frame_length_;
info.main_timestamp = main_timestamp;
info.main_sequence_number = main_sequence_number;
info.is_dtx = is_dtx;
info.buffer_flush = buffer_flush_occured;
const bool should_update_stats = !new_codec_;
//更新optbufferlevel
auto relative_delay =
controller_->PacketArrived(fs_hz_, should_update_stats, info);
if (relative_delay) {
stats_->RelativePacketArrivalDelay(relative_delay.value());
}
return 0;
}
- 将包插入到packetlist(好像这个packetlist只有这一个包),检查包是否是冗余包(Red包),如果是,需要转换时间戳(包里时间是以采样点为单位,当编码采样率与包里面标识的clockrate不同的时候,需要做转换,这块不明白为什么一个包里面记录的采样率为什么会不同,还需要额外转换)
- 检测是否首包,需要做一些初始化跟重置操作
- 是否开了NACK,开了的话更新nack
- 检测是否是冗余包(red包),如果是,切割包(与冗余包的存储方式有关),检测切割完的paketlist里面的包,只留下(CNG DTMF 以及除了这两种类型以外的第一个不同的包的类型 )这三种类型包
- 如果此时packet_list有包,将更新主时钟为第一个包的时钟
- 遍历packetlist,将DTMF包全部删掉,并将事件插入dtmfBuffer。
- 遍历packetlist,将所有包打入parse_packet_list
- 将所有的包都插入PacketBuffer。并检查插入buffer的返回值
- KFlush PacketBuffer全部清空,此时将update_sample_rate_and_channels 置TRUE
- KPartialFlush 清空部分PacketBuffer(跟target_level_ms还有一些门限值有关), 此时将时间戳更新为buffer第一个包的时间戳
- 更新optBufferLevel
2.2 插包缓冲区:
PacketBuffer:
PacketBuffer主要是存储解码前的包,主要函数就是插包,代码如下:
int PacketBuffer::InsertPacketList(
    PacketList* packet_list,
    const DecoderDatabase& decoder_database,
    absl::optional<uint8_t>* current_rtp_payload_type,
    absl::optional<uint8_t>* current_cng_rtp_payload_type,
    StatisticsCalculator* stats,
    size_t last_decoded_length,
    size_t sample_rate,
    int target_level_ms) {
  RTC_DCHECK(stats);
  bool flushed = false;
  for (auto& packet : *packet_list) {
    if (decoder_database.IsComfortNoise(packet.payload_type)) {
      if (*current_cng_rtp_payload_type &&
          **current_cng_rtp_payload_type != packet.payload_type) {
        // New CNG payload type implies new codec type.
        *current_rtp_payload_type = absl::nullopt;
        Flush(stats);
        flushed = true;
      }
      *current_cng_rtp_payload_type = packet.payload_type;
    } else if (!decoder_database.IsDtmf(packet.payload_type)) {
      // This must be speech.
 if ((*current_rtp_payload_type &&
           **current_rtp_payload_type != packet.payload_type) ||
          (*current_cng_rtp_payload_type &&
           !EqualSampleRates(packet.payload_type,
                             **current_cng_rtp_payload_type,
                             decoder_database))) {
        *current_cng_rtp_payload_type = absl::nullopt;
        Flush(stats);
        flushed = true;
      }
      *current_rtp_payload_type = packet.payload_type;
    }
    int return_val =
        InsertPacket(std::move(packet), stats, last_decoded_length, sample_rate,
                     target_level_ms, decoder_database);
    if (return_val == kFlushed) {
      // The buffer flushed, but this is not an error. We can still continue.
      flushed = true;
    } else if (return_val != kOK) {
      // An error occurred. Delete remaining packets in list and return.
      packet_list->clear();
      return return_val;
    }
  }
  packet_list->clear();
  return flushed ? kFlushed : kOK;
}
这段代码主要就是当收到CN包或者DTMF包并且上次的这种包编码类型与这次不同,需要清空buffer(这一段不太明白)。然后将包插入队列。
单个包插入队列的函数如下:
int PacketBuffer::InsertPacket(Packet&& packet,
                               StatisticsCalculator* stats,
                               size_t last_decoded_length,
                               size_t sample_rate,
                               int target_level_ms,
                               const DecoderDatabase& decoder_database) {
  if (packet.empty()) {
    RTC_LOG(LS_WARNING) << "InsertPacket invalid packet";
    return kInvalidPacket;
  }

  RTC_DCHECK_GE(packet.priority.codec_level, 0);
  RTC_DCHECK_GE(packet.priority.red_level, 0);

  int return_val = kOK;

  packet.waiting_time = tick_timer_->GetNewStopwatch();

  // Perform a smart flush if the buffer size exceeds a multiple of the target
  // level.
  const size_t span_threshold =
      smart_flushing_config_
          ? smart_flushing_config_->target_level_multiplier *
                std::max(smart_flushing_config_->target_level_threshold_ms,
                         target_level_ms) *
                sample_rate / 1000
          : 0;
  const bool smart_flush =
      smart_flushing_config_.has_value() &&
      GetSpanSamples(last_decoded_length, sample_rate, true) >= span_threshold;
  if (buffer_.size() >= max_number_of_packets_ || smart_flush) {
    size_t buffer_size_before_flush = buffer_.size();
    if (smart_flushing_config_.has_value()) {
      // Flush down to the target level.
      PartialFlush(target_level_ms, sample_rate, last_decoded_length, stats);
      return_val = kPartialFlush;
    } else {
      // Buffer is full.
      Flush(stats);
      return_val = kFlushed;
    }
    RTC_LOG(LS_WARNING) << "Packet buffer flushed, "
                        << (buffer_size_before_flush - buffer_.size())
                        << " packets discarded.";
  }

  // Get an iterator pointing to the place in the buffer where the new packet
  // should be inserted. The list is searched from the back, since the most
  // likely case is that the new packet should be near the end of the list.
  PacketList::reverse_iterator rit = std::find_if(
      buffer_.rbegin(), buffer_.rend(), NewTimestampIsLarger(packet));

  // The new packet is to be inserted to the right of `rit`. If it has the same
  // timestamp as `rit`, which has a higher priority, do not insert the new
  // packet to list.
  if (rit != buffer_.rend() && packet.timestamp == rit->timestamp) {
    LogPacketDiscarded(packet.priority.codec_level, stats);
    return return_val;
  }

  // The new packet is to be inserted to the left of `it`. If it has the same
  // timestamp as `it`, which has a lower priority, replace `it` with the new
  // packet.
  PacketList::iterator it = rit.base();
  if (it != buffer_.end() && packet.timestamp == it->timestamp) {
    LogPacketDiscarded(it->priority.codec_level, stats);
    it = buffer_.erase(it);
  }
  buffer_.insert(it, std::move(packet));  // Insert the packet at that position.

  return return_val;
}
这段代码主要分为以下几步:
1. 确定是否需要丢弃包(如果buffer包个数大于nax_number_of_packets_或者buffer内数据跨度大于一定阈值(span_threshold))
2. 是丢弃部分包,还是全部丢弃
3. 找到第一个时间戳大于等于当前包的迭代器,将当钱包插入到它前面`
丢包策略如下:
void PacketBuffer::PartialFlush(int target_level_ms,
                                size_t sample_rate,
                                size_t last_decoded_length,
                                StatisticsCalculator* stats) {
  // Make sure that at least half the packet buffer capacity will be available
  // after the flush. This is done to avoid getting stuck if the target level is
  // very high.
  int target_level_samples =
      std::min(target_level_ms * sample_rate / 1000,
               max_number_of_packets_ * last_decoded_length / 2);
  // We should avoid flushing to very low levels.
  target_level_samples = std::max(
      target_level_samples, smart_flushing_config_->target_level_threshold_ms);
  while (GetSpanSamples(last_decoded_length, sample_rate, true) >
             static_cast<size_t>(target_level_samples) ||
         buffer_.size() > max_number_of_packets_ / 2) {
    LogPacketDiscarded(PeekNextPacket()->priority.codec_level, stats);
    buffer_.pop_front();
  }
}
大体意思就是丢弃包数量不能太大(以免后面网络延时变大没有东西播),也不能太小。具体就是要控制在(target_level_threshold_ms, max_number_of_packets_的一半)
2.3 网络抖动预测
2.3.1 整体流程
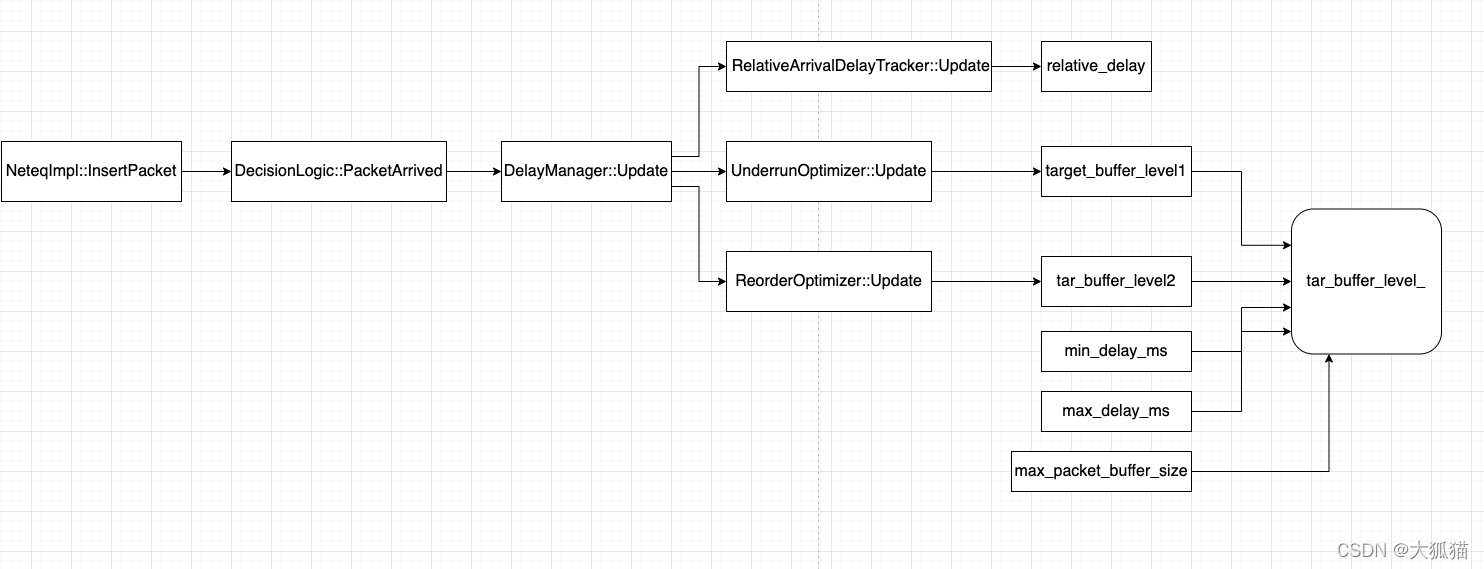
如上图所示,是算tar_buffer_level(网络抖动,老版本叫optBufferLevel)的调用流程:
- 将当前的包间隔,记为packet_gap,更新到RelativeArrivalDelayTracker,算出当前的抖动relative_delay
- 将当前的抖动relative_delay更新到UnderrunOptimizer,算出当前的估算的网络抖动target_buff_level1(就是老版本的那个95分位柱状图,不过新版去掉了峰值数组计算)
- 如果当前有乱序发生,将当前的抖动relative_delay更新到ReorderOptimizer,算出因乱序产生的抖动target_buffer_level2
- 通过算出来的target_buffer_level1 target_buffer_level2 还有设置的min_delay_ms, max_delay_ms, max_packet_buffer_size(就是插包的时候允许的最大包数量),算出最终的target_buffer_level
上面的第四步具体计算如下:
target_buffer_level = max(target_buffer_level1, target_buffer_level2)
target_buffer_level = max(tar_buffer_level, min_delay_ms)
target_buffer_level = min(target_buffer_level, max_delay_ms, 0.75 * max_packet_buffer_size)
下面详细说明relative_delay, target_buffer_level1, target_buffer_level2的详细计算过程。
2.3.2 relative_delay计算:
注: 老版本中的relative_delay就是当前的抖动
新版本的relative_delay实际上是一段时间内抖动的平滑值。它是在RelativeArrivalDelayTracker中计算的。RelativeArrivalDelayTracker维护2秒窗口(也就是最新的包的时间戳减去最老的包的时间戳不会超过2秒, 正常如果没有丢包,就会存200个包的信息),这个数组存着符合条件包的到达时刻的抖动。计算过程如下:
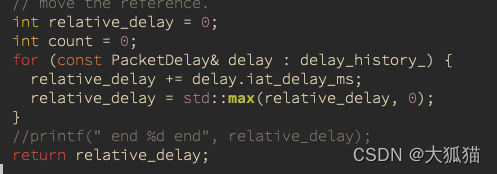
上图中delay_history_就是历史窗口数组, iat_delay_ms就是那个包到达时刻的抖动。
简而言之,就是求前累加和,只不过这个累加和的过程不能有负数,有负数重置零。我们来细细的体会一下这个简单的算法蕴含的意义,以及与和旧版本中直接把当前时刻抖动当成relative_delay有什么不同,造成了什么影响:
这个数组存的是2秒窗口内的包延迟,累加和表示的物理含义实际上衡量的是当前数据前一段窗口的整体延时,相当于数据做了平滑处理。窗口的整体延时是什么意思呢,实际上也就是一个buffer,也就是说这2秒数据如果对应的实际时间戳也是2秒,那么这2s窗口的整体延时就是0.如果2秒窗口对应的实际时间戳是2.2秒,那么整体延时0.2秒。如果2秒窗口对应的实际时间是1.8秒,那么整体延时按理是负数,但是代码里我们可以看到,负数被过滤了,实际上负数肯定会发生在前面项。
举个例子:
假设现在延时数组是这样的(单位是包个数): 3 2
这意思就是说这两个包延时和为5个包,在不丢包的情况下,假设瞬间网络变好,按理后面会连续来5个包,这个5个包的延时都是-1
最终序列是这样的:
3 2 -1 -1 -1 -1 -1
从这组数据我们来看看当窗口滑动的时候累加和有什么影响(假设3前面的累加和为0):
第一次滑动:* * * * * * * * * * ... 3 累加和 3
第二次滑动:* * * * * * * * * ... 3 2 累加和 5
第三次滑动:* * * * * * * * ... 3 2 -1 累加和 4
第四次滑动:* * * * * * * ... 3 2 -1 -1 累加和 3
第五次滑动:* * * * * * ... 3 2 -1 -1 -1 累加和 2
第五次滑动:* * * * * ... 3 2 -1 -1 -1 -1 累加和 1
第六次滑动:* * * * ... 3 2 -1 -1 -1 -1 -1 累加和 0
...
第N次滑动: -1 -1 -1 -1 -1 ... 累加和 *
在第N次滑动。这里我们可以看到前五项和是负数,负数就是这么来的,前面的大延时包被滑动窗口丢弃了
然后我们可以看到在原来的算法里,3 跟 2只贡献了坐标为3 和 2上的概率。但是在新的算法中 3 2 带来的影响是 3 5 4 3 2 1。在这里可以看到两点:
- 连续延时会累加(按理累加的情况应该不多见,因为一次延时后,按理会有一堆包跟着到来)
- 一个大的延时衰减速度会比以前慢,比如上面的例子 3 2 -1 -1 -1 -1 -1,在原来的算法中对柱状图的贡献是 3 2 0 0 0 0 0,现在却是 3 5 4 3 2 1,会慢慢衰减。这意味着新版在抖动延时变大时上升会更快,抖动延时降低时,下降相对变慢
2.3.3 target_buffer_level1计算:
neteq的具体的网络抖动计算是在histogram.cc,核心思想是维护一个柱状图,以下图为例说明:
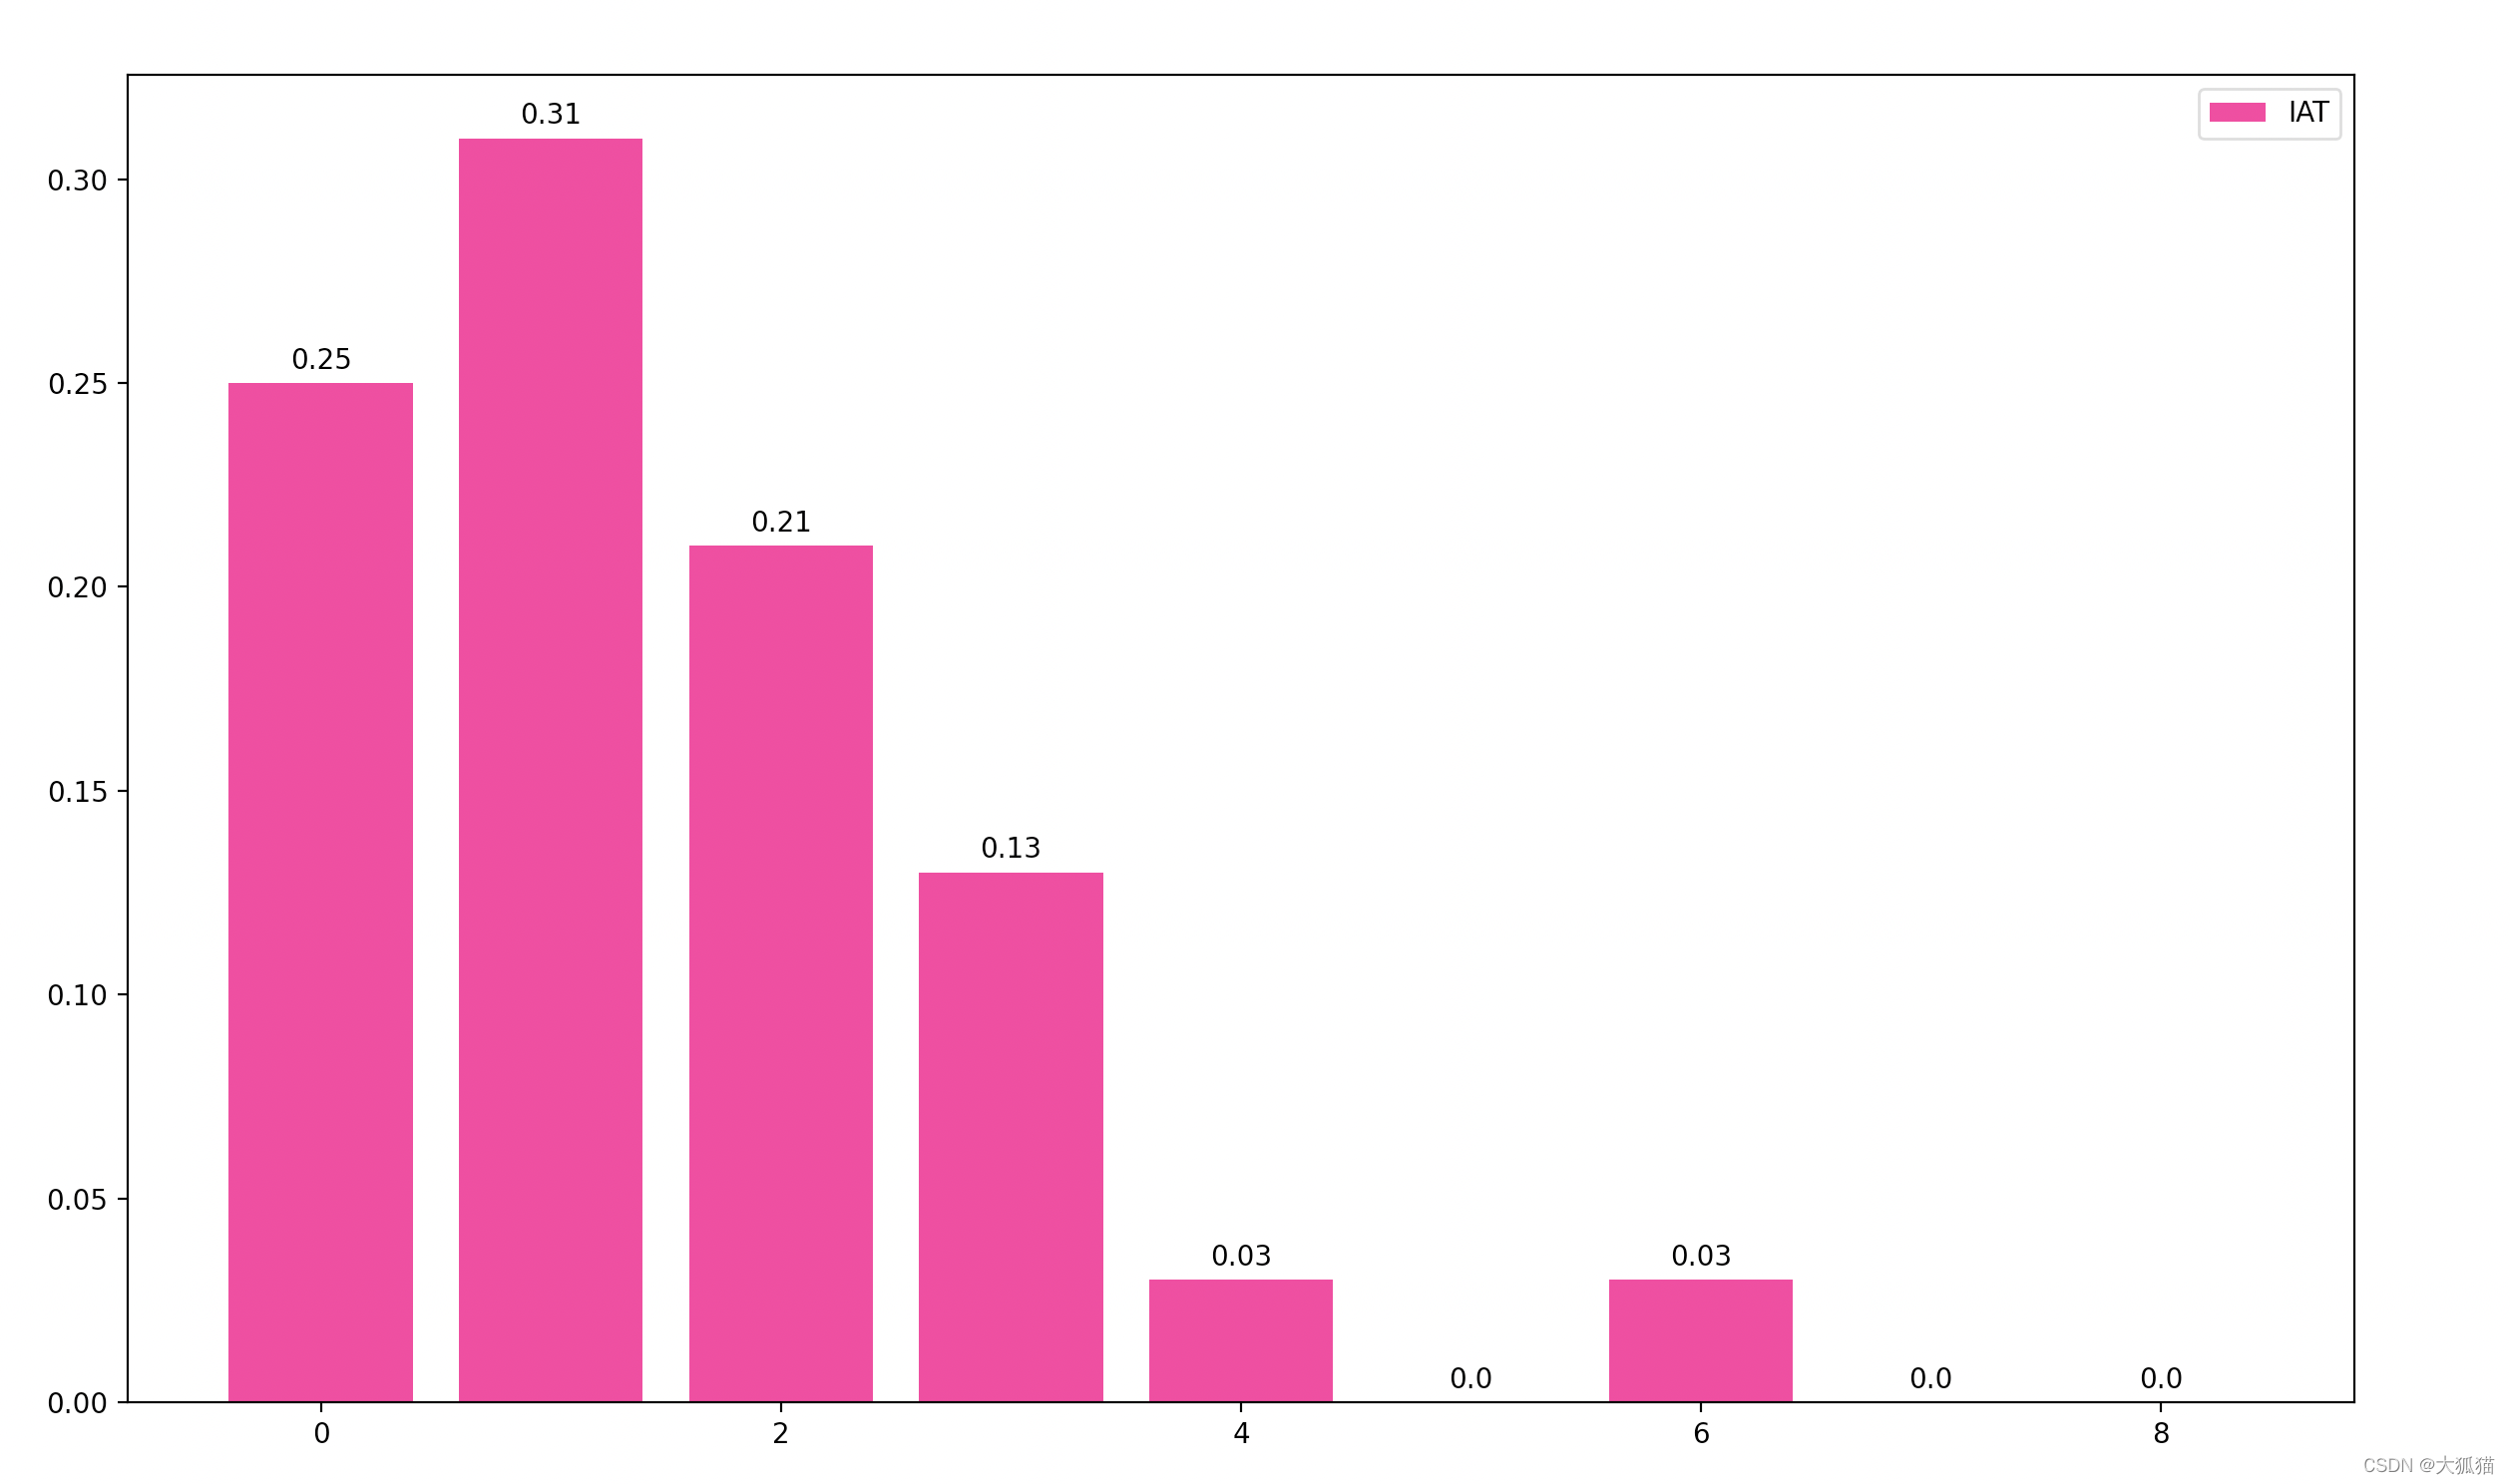
historam维护一个长度为64的数组,如上图所示,上图只画了数组的前八个桶里面的情况,横坐标对应的是上一步算出的relative_delay / 20(20是包长,所以横坐标单位是包个数)。每次到达一个包,就会增大当前relative_delay对应坐标的概率,比如当前的抖动间隔为5个包,那么5对应的值会变大,其他值会减小(保证64个桶概率和为1)。更新了直方图之后,求0-64前N项和大于等于某个阈值的第一个N,假设当前阈值为0.95(webrtc里面一般是0.95或者0.97),对应到上面的直方图,
Sum(6)= 0.25 + 0.31 + 0.21 + + 0.13 + 0.03 + 0.0 = 0.96
此时6个包,也就是120ms,就被估计为当前的网络抖动。
完整的计算步骤如下:
- 拿到relative_delay对应的横坐标,假设为time_iat
- 更新直方图, 将每个坐标对应的概率都乘上遗忘因子iatProbFact
- 更新time_iat对应的概率,将其概率增加1 - iatProbFact
- 更新遗忘因子, iatProbFact = 0.9993 * 0.25 + 0.75 * iatProbFact + 0.75 >> 15(一般都是这么算,但是也可以手动设置起始值,那样算法会略有不同)
- 微调数组每个坐标对应的值,使得和为1(其实2,3两步理论上已经使得概率和为1,但是由于数字的精度问题,可能会有一点点误差,需要修正一下)
- 统计前N项和小于阈值(0.95或0.97,可以自己设置)的最小N,这个N就是统计的网络抖动值
注:旧版本还有峰值统计,新版移除。
2.3.4 target_buffer_level2计算:
target_buffer_level2其实是计算由于乱序产生的抖动。先上代码:
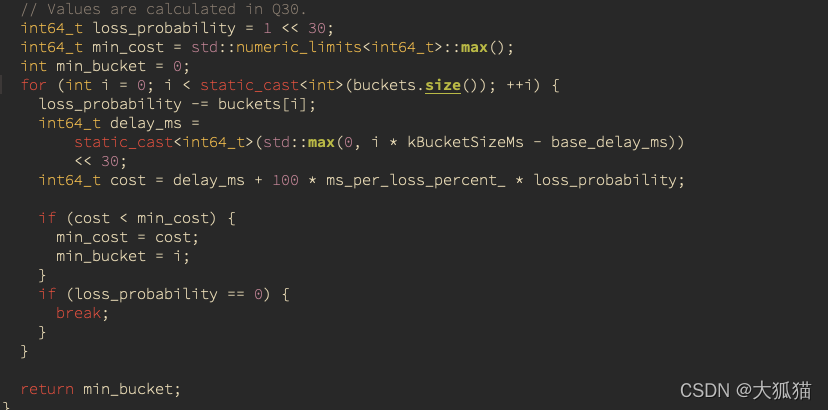 注:上面的计算都是Q30 (为了保证小数的精度,用整数模拟小数,Q30保证的精度是1 /(1 << 30), float 只有后面的23位表示小数部分,前面9位是符号位与指数位)
代码中base_delay_ms 是上面算出来的target_buffer_level1, buckets是乱序包延时数组,就是针对乱序包延时的柱状图,ms_per_loss_percent_实际上就是一个超参数。loss_probability实际上是∑prob(i ~ 64), 也就是当前index到最后的累加和
对着代码分析一下上面的算法:
- 当 i 小于等于当前的optBufferLevel,此时cost的计算中,delay_ms 一项一直为0,此时cost能够取到的最小值得index就是optBufferLevel对应的i。因为loss_probability是i的单调非递增函数。
- 当i大于当前的optBufferLevel,随着i越来越大,delay_ms在增大,而 loss_probability在减小。此时上面的式子可以转化如下:
cost(i) = kBucketSizeMs * (i - optBufferLevel) + loss_weight * loss_probabilty(i)
loss_weight = 100 * ms_per_loss_percent_
从公式可以看到,前面一项是递增函数,后面一项是递减函数,中间一定存在一个最小值,而这个最小值所在的位置,是由loss_weight决定的,loss_weight太小,那么就会完全被左边的式子主导,loss_weight太大,右边的式子的波动就会对值影响很大。所以我们可以通过loss_weight来控制整个公式对乱序包造成延时的敏感度
2.4 收敛时间分析
2.4.1 iatProbFact 收敛时间分析:
iatProbFact = 0.9993 * 1/4 + 3/4 * iatProbFact + 3/4 >> 15
忽略3/4 << 15这个很小的数,上式可化为:
An = (3/4)^n * A1 An = iatProbFact(n) - 0.9993
这是个等比数列, iatProbFact从0收敛到0.99大概需要16个包(满足0.75的n次方小于等于0.01的n)
2.4.2 上升沿与下降沿收敛时间分析
上升沿(网络抖动变大)与下降沿(网络抖动变小)的收敛时间分析。可以用webrtc的内置网络模拟工具,把参数画出来,观察收敛时间分析。也可以用数学方法作出大概分析。对推导不感兴趣的可以直接跳过这节,看下一节,也能看出收敛时间。
(1) 上升沿收敛时间
上升沿的严格分析比较难,因为上升的时候,通过上面的分析可以知道,每次来一个大的抖动N,在没有丢包的情况下,后面必然紧随着N个包连续到来,相当于N, N-1, N-2 ..... 0:不妨假设每次的抖动都是N,经过无限次循环,那么最后直方图是0-N的接近均匀分布。之所以是接近,因为每次一个循环。假设iatProbFact为A,那么0 - N的系数增量分别如下:
(1 - A) (1 - A)A (1 - A)A^2 .... (1 - A)^(N - 1)
经过m 次循环,设b = 1 + A^N + A^(2N) + .... + A^(mN)
(1 - A)* b (1 - A)A * b (1 - A)A^2 * b .... (1 - A)A^(N - 1) * b
假设m趋于无穷,此时b = 1 / 1 - A^N, 且这N项和为1
我们要求满足条件的M, 使得 (1 - A) * b * (1 + A + ... + A^(M-1)) > 0.95
推出下列式子:
(1 - A^M) / (1 - A^N) > 0.95 M N 均为整数。
在这个公式里,N越小,M就越接近N, N越大, M就越小于N。甚至在N < 20, M = N. 当N大到一定程度,分母近似等于1,此时分子M为确定值4253。不再变化。
假设m为有限值,此时 b = (1 - A^(mN)) / (1 - A^N):
由上面的推论可以知道, 20以内可以认为收敛到N 或者N-1就可以认为是收敛了。
假设收敛到N, 以N = 10举例:
可得:(1 - A)*A^(N - 1) * b > 0.05 解得: m = 9.8
也就是9.8个循环,一个循环为N, 也就是98个包可以收敛
如果认为收敛到N-1即为收敛,那么49个包就可以了。
由上面的推导可以看出,正常情况两秒内就可以收敛了。
注:上面的所有计算都是基于阈值等于0.95, 如果是0.97上升会更快。
(2)下降沿收敛时间
下降沿收敛推算相对简单。假设我们需要收敛到lo_delay,那么只需要大于lo_delay的所有概率和小于1 - fac_即可,设大于lo_delay的概率和为sum_hi_delay,那么可以得知sum_hi_delay取值范围为(0, 1)
sum_hi_delay * 0.9993^n < 1 - fac_prob
公式两边取以10为底对数(10为底对数好算),
n * lg0.9993 < lg(1 - fac_prob) - lg(prob_hi_delay)
当fac_prob = 0.95:上式化简为 n > 3286 * (0.3 + lg(10 * prob_hi_delay)) 这里prob_hi_delay = (0.05 ~ 1) 推出范围为0~4272
当fac_prob = 0.97:上式化简为 n > 3286 * (0.525 + lg(10 * prob_hi_delay)) 这里prob_hi_delay = (0.05 ~ 1) 推出范围为0~5011
2.4.3 模拟网络抖动观察参数变化
webrtc有内置网络模拟工具,我们可以直接调用单测,观察各个参数的变化。
在文件test/scenario/probing_test.cc,添加如下代码:
#include <chrono>
#include <ctime>
static uint64_t GetTimeNowInMs() {
  return std::chrono::duration_cast<std::chrono::milliseconds>(std::chrono::system_clock::now().time_since_epoch()).count();
}

TEST(ProbingTest, GoogCc) {
  Scenario s;
  const DataRate kStartRate = DataRate::KilobitsPerSec(50);
  const DataRate kHdRate = DataRate::KilobitsPerSec(3250);

  // Set up 3-layer simulcast.
  VideoStreamConfig video_config;
  video_config.encoder.codec =
      VideoStreamConfig::Encoder::Codec::kVideoCodecVP8;
  video_config.encoder.layers.spatial = 1;
  video_config.source.generator.width = 1280;
  video_config.source.generator.height = 720;

  CallClientConfig send_call_config;
  send_call_config.transport.rates.start_rate = kStartRate;
  send_call_config.transport.rates.max_rate = kHdRate * 2;
  auto* caller = s.CreateClient("caller", send_call_config);
  auto* callee = s.CreateClient("callee", CallClientConfig());
  auto send_net =
      s.CreateMutableSimulationNode([&](NetworkSimulationConfig* c) {
        c->bandwidth = DataRate::KilobitsPerSec(2000);
        c->delay = TimeDelta::Millis(delay_ms_update_arr_[0].second);
        c->delay_std_dev = TimeDelta::Millis(delay_ms_update_arr_[0].second * kNetJitterPercent / 100);
        c->loss_rate = kPacketLossRate;
      });

  auto route =
      s.CreateRoutes(caller, {send_net->node()}, callee,
                     {s.CreateSimulationNode(NetworkSimulationConfig())});
  auto* video_stream = s.CreateVideoStream(route->forward(), video_config);

  AudioStreamConfig audio_config;
  audio_config.encoder.allocate_bitrate = true;
  audio_config.encoder.min_rate = DataRate::KilobitsPerSec(50);
  audio_config.encoder.max_rate = DataRate::KilobitsPerSec(250);
  //audio_config.encoder.fixed_rate = DataRate::KilobitsPerSec(250);
  auto* audio_stream = s.CreateAudioStream(route->forward(), audio_config);

  video_stream->send()->UpdateActiveLayers({true});

  audio_stream->send();
  uint64_t time_now = GetTimeNowInMs();
  s.RunFor(TimeDelta::Millis(delay_ms_update_arr_[0].first));
  printf("============ run: %lld, %lld\n", GetTimeNowInMs() - time_now, 10 * 1000);
 for (size_t i = 1; i < delay_ms_update_arr_.size(); ++i) {
   send_net->UpdateConfig([&](NetworkSimulationConfig* c) {
       c->bandwidth = DataRate::KilobitsPerSec(2000);
       c->delay = TimeDelta::Millis(delay_ms_update_arr_[i].second);
       c->delay_std_dev = TimeDelta::Millis(delay_ms_update_arr_[i].second * kNetJitterPercent / 100);
        c->loss_rate = kPacketLossRate;
       });
   time_now = GetTimeNowInMs();
   s.RunFor(TimeDelta::Millis(delay_ms_update_arr_[i].first));
   printf("============ run: %lld, %lld\n", GetTimeNowInMs() - time_now, delay_ms_update_arr_[i].first);
 }
}
然后编译,执行可执行文件./test_support_unittests --gtest_filter='ProbingTest.GoogCc'
把关键参数(网络RTT, 当前的抖动, 预测的网络抖动)写入文件,画出图像如下。

从图中可以看出上升沿收敛确实很快,下降沿大概用了四千多个包
三 取包
3.1 整体流程
- 判断是否需要静音(当前packet_buffer_没包,并且没法再用expand生成包)
- 获取当前的运行策略,并根据策略决定从packet_buffer取几个包,或者生成CN包,放入链表
- 将第二步得到的链表进行解包,放入decode_buffer_
- 根据第二步得到的策略,对decode_buffer_数据进行处理,放入algorithm_buffer_
- 将algorithm_buffer_的数据放入sync_buffer_, 从sync_buffer_取数据去播放
3.2 决策
neteq为了使得当前的jitter_buffer大小接近预测值target_buffer_level, 有时候需要对播放的数据采取一些策略。总的来说,当网络变好,我们需要减小jitter_buffer大小,这时候我们会执行加速播放的策略,快点把jitter_buffer的数据播放完。当网络变差,需要增大jitter_buffer,这时候可能会做减速,补偿包,或者播放CN包。具体的状态转换图如下:
主流程有四种情况,分别对应下图中的四个颜色加深的部分:
CN包,没有包,当前有可用包(时间戳对的上的包),当前无可用包
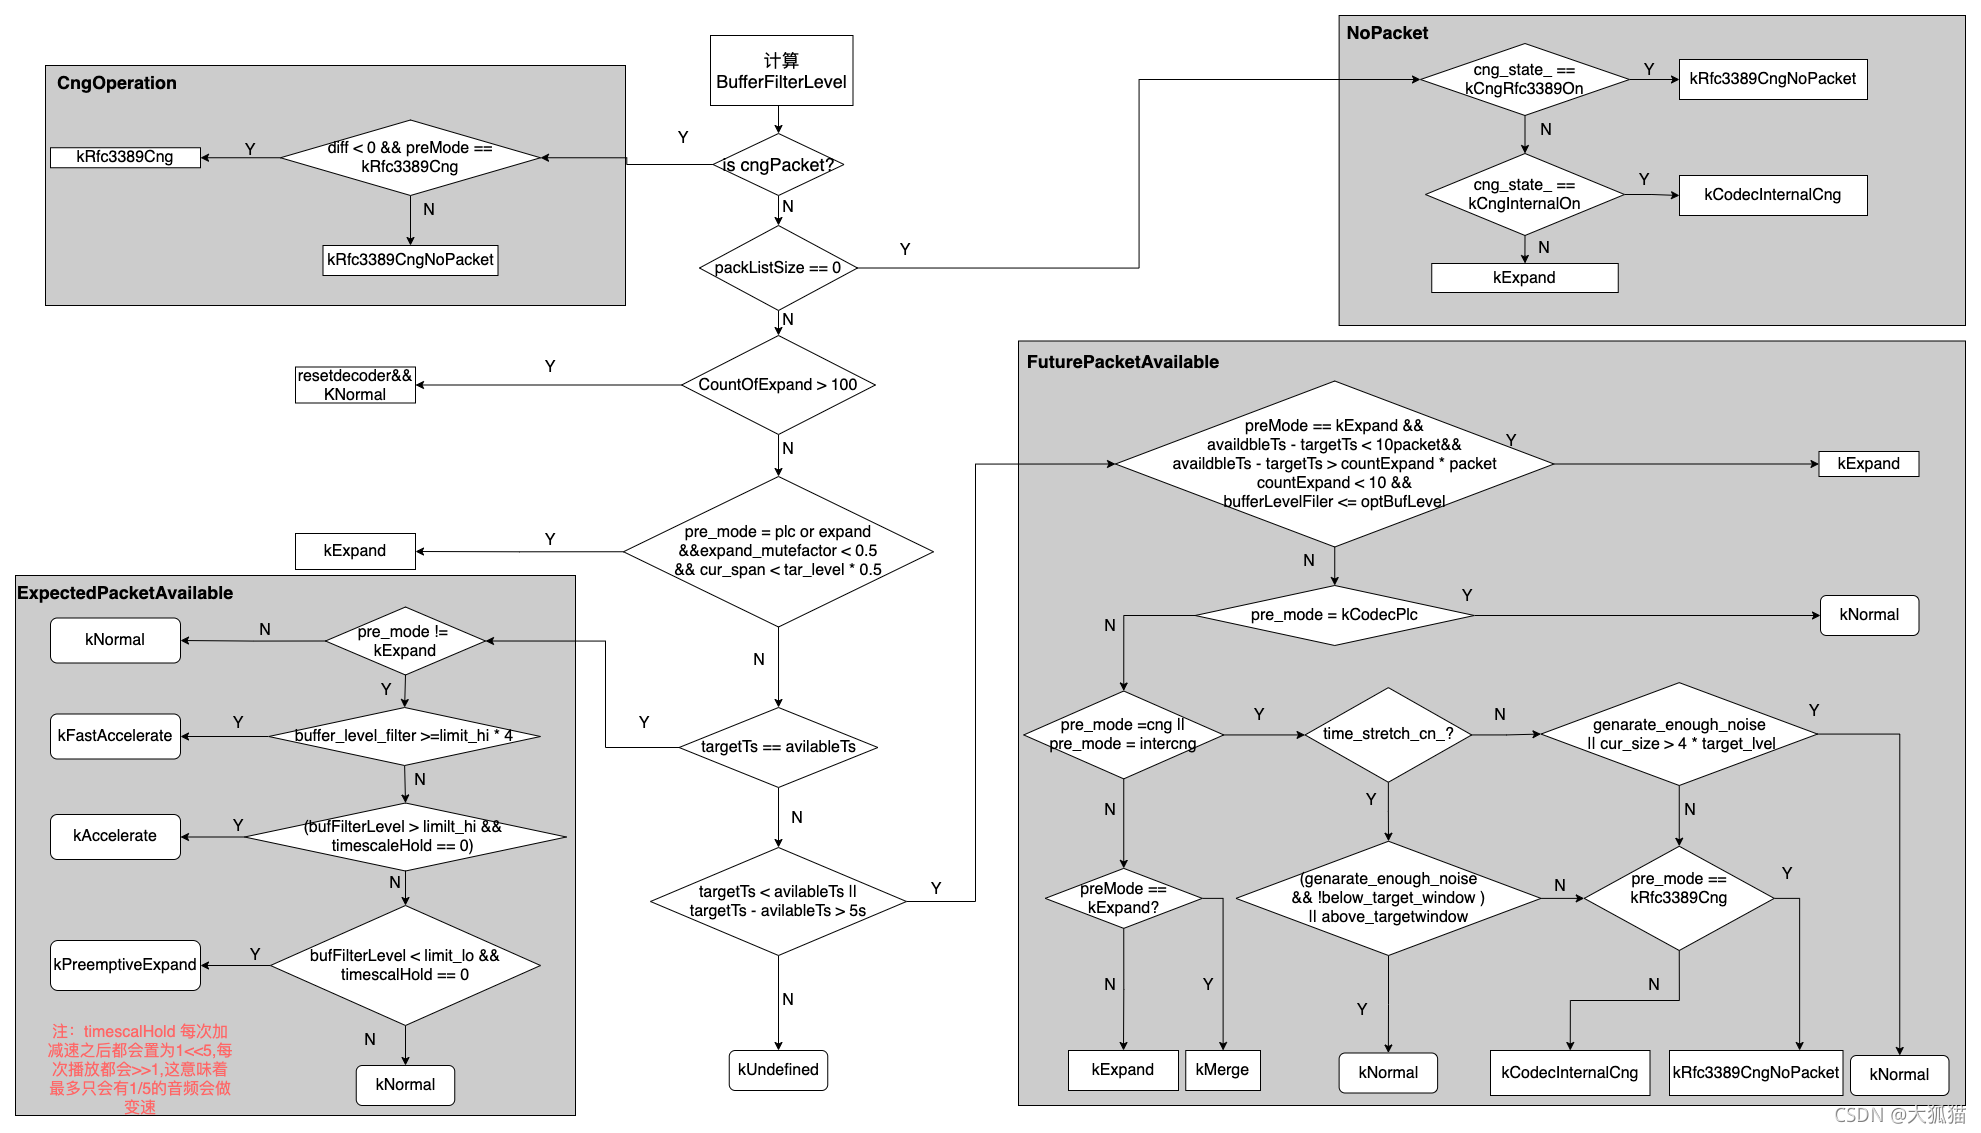
上图对应的具体代码位置:DecisionLogic::GetDecision(其实这个策略被拿出来后,在neteqImpl::GetDecision还有一系列条件判断)
上图中左下角其实就是正常情况下,加减速的条件。其中:
limit_lo = max(3/4 * target_buffer_level, target_buffer_level - 85)
limit_hi = max(target_buffer_level, limit_lo + 20)
buffer_level_filter = factor / 256 * buffer_level_filter + (1- factor) * jitter_buffer_sample_size
jitter_buffer_size 是指当前的jitterbuffer的数据量大小,就是还没播的数据量
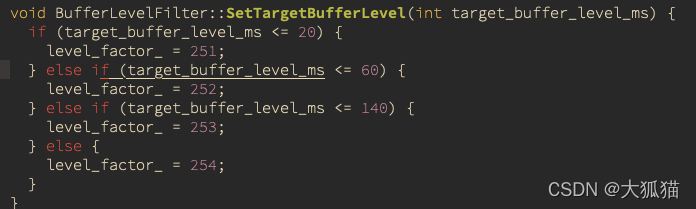
上式中有个平滑因子factor,他的大小跟当前的terget_buffer_level大小有关,target_buffer_level越大factor就越大,代码如下:
未完待续。。。


 554
554

 被折叠的 条评论
为什么被折叠?
被折叠的 条评论
为什么被折叠?
 到【灌水乐园】发言


