


前言
其实是在复习的过程中发现终端非常别扭,了解了一些大佬的使用方式后,尝试使用一个多平台的终端应用。

环境配置
之前在MAC上使用过的终端包括ZenTermLite和Item2,这次使用一个跨平台的终端WezTerm!
缺点就是自定义的地方太多了,需要一定的学习成本。
顺便记录一下对ZSH的插件配置。
Tabby
为啥不用Tabby?因为他传输过来的大文件连MD5都变了啊!我就带着宠物出门遛个弯,回来物种都变了!这合理吗?这不合理,所以才跟他说拜拜了。
WezTerm-Mac
介绍一下,我之所以选择这个跨平台应用就是因为他是我了解到的第二款跨平台终端应用。没错,理由就是这么简单。
需要说明一点,他没有快捷键提示,没有具体的功能选项按钮。
一切都要看英文文档来自定义和学习使用方式。
下载
下载源地址都是从github官网下载的,如果没有梯子,是有下载失败的可能。
除非你的梯子非常好用,可以选择命令行来下载。否则,还是建议用加速下载工具(例如:http://toolwa.com/github/),用下载压缩包的方式,可以直接得到可运行的APP程序。
brew install --verbose --debug --cask wez/wezterm/wezterm
下载地址:https://github.com/wez/wezterm/releases

image-20221117002306858
为了能够在命令行中运行wezterm命令,还需要修改.zshrc文件,赋予别名。
alias wezterm="/Users/keen/Applications/WezTerm.app/Contents/MacOS/wezterm"
配置
先双击打开这个应用,再用命令创建文件夹。
mkdir -p ~/.config/wezterm/
由于软件本身的高度可配置性,所以DIY程度非常大。为了达到让小伙伴开箱即食的目的,可以直接下载我附在文末的配置文件。
继续说基础配置,下载文件wezterm.lua,并且将之放到新生成的文件夹里,再用命令行赋予可执行权限。
chmod u+x ~/.config/wezterm/wezterm.lua
~/.config/wezterm/wezterm.lua主配置文件内容如下。
local wezterm = require 'wezterm'

local launch_menu = {}
local default_prog = {}
local set_environment_variables = {}

-- Using shell
if wezterm.target_triple == 'x86_64-pc-windows-msvc' then
    term = '' -- Set to empty so FZF works on windows
    table.insert(launch_menu, {
        label = 'PowerShell-NewWindow',
        args = {"C:\\Windows\\System32\\WindowsPowerShell\\v7.3\\7\\pwsh.exe"}
    })
    default_prog = {"C:\\Windows\\System32\\WindowsPowerShell\\v7.3\\7\\pwsh.exe"}
    require("key-bind-windows")
elseif wezterm.target_triple == 'x86_64-apple-darwin' then
    table.insert(launch_menu, {
        label = 'Zsh-NewWindow',
        args = {'/bin/zsh', '-l'}
    })
    default_prog = {'/bin/zsh', '-l'}
    require("key-bind-mac")
elseif wezterm.target_triple == 'aarch64-apple-darwin' then
    table.insert(launch_menu, {
        label = 'zsh',
        args = {'/opt/homebrew/bin/zsh', '-l'}
    })
    default_prog = {'/opt/homebrew/bin/zsh', '-l'}
end

-- Title

function basename(s)
    return string.gsub(s, '(.*[/\\])(.*)', '%2')
end

wezterm.on('format-tab-title', function(tab, tabs, panes, config, hover, max_width)
    local pane = tab.active_pane

    local index = ""
    if #tabs > 1 then
        index = string.format("%d: ", tab.tab_index + 1)
    end

    local process = basename(pane.foreground_process_name)

    return {{
        Text = ' ' .. index .. process .. ' '
    }}
end)

-- Initial startup
wezterm.on('gui-startup', function(cmd)
    local tab, pane, window = wezterm.mux.spawn_window(cmd or {})
    window:gui_window():maximize()
end)

local config = {
    check_for_updates = false,
    switch_to_last_active_tab_when_closing_tab = false,
    enable_scroll_bar = true,

    -- Window
    native_macos_fullscreen_mode = true,
    adjust_window_size_when_changing_font_size = true,
    window_background_opacity = 0.95, -- 如果设置为1.0会明显卡顿
    window_padding = {
        left = 5,
        right = 5,
        top = 5,
        bottom = 5
    },
    window_background_image_hsb = {
        brightness = 0.8,
        hue = 1.0,
        saturation = 1.0
    },
    window_close_confirmation = "NeverPrompt",

    -- Font
    font = wezterm.font_with_fallback({"JetBrains Mono"}),
    -- font_size = 22,

    -- Tab bar
    enable_tab_bar = true,
    hide_tab_bar_if_only_one_tab = false,
    show_tab_index_in_tab_bar = false,
    tab_max_width = 25,
    scrollback_lines = 99999,
    -- tab_bar_at_bottom = true,
    -- use_fancy_tab_bar = false,

    -- Keys
    disable_default_key_bindings = false,
    -- Allow using ^ with single key press.
    use_dead_keys = false,
    keys = keyBind(),

    -- 主题
    color_scheme = 'Builtin Solarized Light',
    colors = {
        -- 被选中的内容的背景色
        selection_bg = '#D0AB52'
    },

    inactive_pane_hsb = {
        hue = 1.0,
        saturation = 1.0,
        brightness = 1.0
    },

    mouse_bindings = { -- Paste on right-click
    {
        event = {
            Down = {
                streak = 1,
                button = 'Right'
            }
        },
        mods = 'NONE',
        action = wezterm.action {
            PasteFrom = 'Clipboard'
        }
    }, -- Change the default click behavior so that it only selects
    -- text and doesn't open hyperlinks
    {
        event = {
            Up = {
                streak = 1,
                button = 'Left'
            }
        },
        mods = 'NONE',
        action = wezterm.action {
            CompleteSelection = 'PrimarySelection'
        }
    }, -- CTRL-Click open hyperlinks
    {
        event = {
            Up = {
                streak = 1,
                button = 'Left'
            }
        },
        mods = 'CMD',
        action = 'OpenLinkAtMouseCursor'
    }},

    default_prog = default_prog,
    set_environment_variables = set_environment_variables,
    launch_menu = launch_menu
}
if wezterm.target_triple == 'x86_64-pc-windows-msvc' then
    config.font_size = 18
elseif wezterm.target_triple == 'x86_64-apple-darwin' then
    config.font_size = 20
end
return config
键盘绑定/Users/keen/.config/wezterm/key-bind-mac.lua内容如下。
local wezterm = require 'wezterm';
function keyBind()
    keys = { -- 清屏
    {
        key = 'k',
        mods = 'CMD',
        action = wezterm.action.Multiple {wezterm.action.ClearScrollback 'ScrollbackAndViewport',
                                          wezterm.action.SendKey {
            key = 'L',
            mods = 'CTRL'
        }}
    }, { -- 控制左右移动面板
        key = 'LeftArrow',
        mods = 'ALT',
        action = wezterm.action {
            ActivateTabRelative = -1
        }
    }, {
        key = 'RightArrow',
        mods = 'ALT',
        action = wezterm.action {
            ActivateTabRelative = 1
        }
    }, { -- 搜索
        key = 'f',
        mods = 'CMD',
        action = wezterm.action.Search {
            CaseInSensitiveString = '' -- 大小写不敏感
            -- CaseSensitiveString = ''-- 大小写敏感
        }
    }, { -- 关闭当前窗口
        key = 'w',
        mods = 'CMD',
        action = wezterm.action.CloseCurrentTab {
            confirm = true
        }
    }, { -- 展示启动器
        key = 'l',
        mods = 'CMD',
        action = wezterm.action.ShowLauncher
    }, { -- 新建窗口
        key = 'n',
        mods = 'CMD',
        action = wezterm.action.SpawnCommandInNewTab {
            label = 'Zsh-NewWindow',
            args = {'/bin/zsh', '-l'}
        }
    }, { -- 快速移动到行首行尾
        key = 'LeftArrow',
        mods = 'CMD',
        action = wezterm.action.SendKey {
            key = 'Home',
            mods = 'NONE'
        }
    }, {
        key = 'RightArrow',
        mods = 'CMD',
        action = wezterm.action.SendKey {
            key = 'End',
            mods = 'NONE'
        }
    }
}
    return keys
end
保存快捷键
echo $(wezterm show-keys) >> /Users/keen/Downloads/temp.md
Hyper
Hyper 是我找到的第三款跨平台的终端软件,通过强大的插件系统提供了非常丰富的自定义选项。
然后被伙伴说这个东西不好,是基于Electron做的。具体问他为啥不好又说不出来。
我只能给个大白眼,倒是也干脆放弃了这个应用。
下载
一开始我还以为自己的brew配置有问题呢,仔细扒拉了一下hyper.rb安装文件,没错就是只能从github下载!
brew search Hyper

brew install --verbose --debug --cask  hyper
Oh-my-zsh插件管理
在终端中执行以下命令,注意他是从github直接下载的!
sh -c "$(curl -fsSL https://raw.github.com/robbyrussell/oh-my-zsh/master/tools/install.sh)"
下载完成后,他会自动地覆盖~/.zshrc文件!
不过别担心,他会将以前的内容保存到.zshrc.pre-oh-my-zsh。
我先附上我现在所使用的配置。
# 引入oh-my-zsh
export ZSH="$HOME/.oh-my-zsh"
# 更多zsh主题可以查看 https://github.com/ohmyzsh/ohmyzsh/wiki/Themes
# 我这里置为空是为了使用starship主题
ZSH_THEME=""
# 插件,标准插件目录为 $ZSH/plugins/
# 用户自定义目录为 $ZSH_CUSTOM/plugins/
plugins=(
    zsh-autosuggestions
    zsh-syntax-highlighting
)
# 标记环境
export ARCHFLAGS="-arch x86_64"
# 运行zsh
source $ZSH/oh-my-zsh.sh

# 引入终端别名
alias wezterm="/Users/keen/Applications/WezTerm.app/Contents/MacOS/wezterm"
# alias zshconfig="mate ~/.zshrc"
# alias ohmyzsh="mate ~/.oh-my-zsh"

# 设置brew换源
export HOMEBREW_BREW_GIT_REMOTE="https://mirrors.ustc.edu.cn/brew.git"
export HOMEBREW_CORE_GIT_REMOTE="https://mirrors.ustc.edu.cn/homebrew-core.git"
export HOMEBREW_CASK_GIT_REMOTE="https://mirrors.ustc.edu.cn/homebrew-cask.git"
export HOMEBREW_BOTTLE_DOMAIN="https://mirrors.ustc.edu.cn/homebrew-bottles/"
export HOMEBREW_NO_AUTO_UPDATE=1
export HOMEBREW_CASK_OPTS="--appdir=~/Applications/"

# 启用starship主题
eval "$(starship init zsh)"
插件
zsh-autosuggestions
功能是补全提示,全网都在推荐的插件。在github仓库首页有演示视频,很容易理解。
需要单独下载,可以使用brew自动下载或者git手动下载。
我建议可以用工具从github的仓库地址下载到本地,然后让zsh管理生效。
git clone https://github.com/zsh-users/zsh-autosuggestions ${ZSH_CUSTOM:-~/.oh-my-zsh/custom}/plugins/zsh-autosuggestions

image-20221118140008969
如果你直接把文件复制到自定义目录,再在plugins字段里加上了插件名称,兴冲冲地重新加载了配置文件.zshrc,就会看到这样的警告。其实是还缺少一个操作,提示已经告诉我们两个解决办法了。
去掉相关文件夹的写权限
使用命令去掉相关文件夹的group和others分组的写权限。
我个人是比较建议这个样子的,既保留了安全检查功能又关掉了警告,成功加载自定义插件。
chmod 755 /Users/keen/.oh-my-zsh/custom/plugins/zsh-autosuggestions
设置变量ZSH_DISABLE_COMPFIX
# ~/.zshrc
ZSH_DISABLE_COMPFIX = true
最后重新加载了配置文件.zshrc就可以了!
zsh-syntax-highlighting
功能是高亮内容,也是一个全网都在推荐的插件。
git clone https://github.com/zsh-users/zsh-syntax-highlighting.git ${ZSH_CUSTOM:-~/.oh-my-zsh/custom}/plugins/zsh-syntax-highlighting
不要忘了最后去掉相关权限。
chmod 755 ${ZSH_CUSTOM:-~/.oh-my-zsh/custom}/plugins//zsh-syntax-highlighting
Starship主题
一开始,我还以为我找到了第四个跨平台终端,但是其实是个Shell通用的主题,效果还不错哦。
brew search starship

brew install --verbose --debug starship
在 ~/.zshrc 的最后,添加以下内容即可开始使用。
顺便说一句,默认设置非常酷!
# ~/.zshrc
eval "$(starship init zsh)"
但是如果真的很想要再DIY一个自己的主题,那么继续配置也是很方便的。配置文件如下。
MKDIR -p ~/.config && touch ~/.config/starship.toml
配置内容如下。
# Inserts a blank line between shell prompts
add_newline = true

# Customizing the prompt
format = """
$username\
$hostname\
$shlvl\
$singularity\
$kubernetes\
$directory\
$vcsh\
$git_branch\
$git_commit\
$git_state\
$git_metrics\
$git_status\
$hg_branch\
$docker_context\
$package\
$cmake\
$cobol\
$dart\
$deno\
$dotnet\
$elixir\
$elm\
$erlang\
$golang\
$helm\
$java\
$julia\
$kotlin\
$lua\
$nim\
$nodejs\
$ocaml\
$perl\
$php\
$pulumi\
$purescript\
$python\
$rlang\
$red\
$ruby\
$rust\
$scala\
$swift\
$terraform\
$vlang\
$vagrant\
$zig\
$nix_shell\
$conda\
$memory_usage\
$aws\
$gcloud\
$openstack\
$azure\
$env_var\
$crystal\
$custom\
$sudo\
$cmd_duration\
$line_break\
$jobs\
$battery\
$time\
$status\
$shell\
[$character](bold green)"""

# Configure if and how the time is shown
[time]
disabled = false
time_format = "%T"
format = "🕙[$time ](bold blue)"

[sudo]
disabled = false
style = "bold green"
symbol = "💪"
format = "[<SUDO>$symbol]($style)"
有关每个选项的详细信息在官方文档中进行了详细说明。
测速
运行如下命令。
for i in $(seq 1 5); do /usr/bin/time /bin/zsh -i -c exit; done
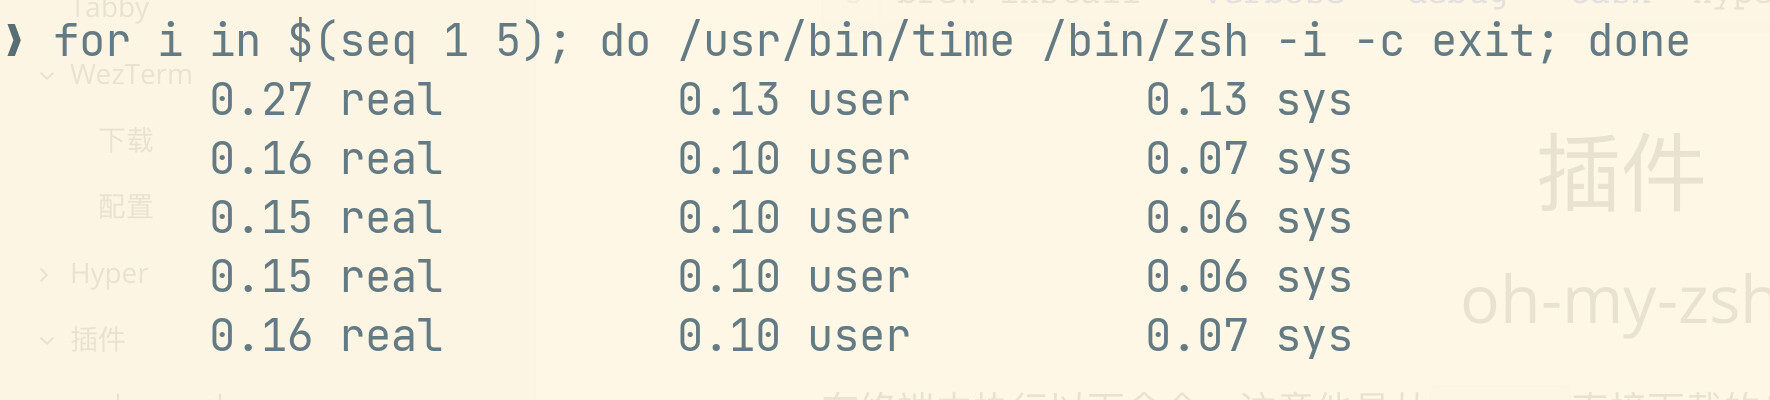
image-20221118132104208
如果觉得非常卡顿了的话,就可以参考文末的速度优化文章。
WezTerm-Win
下载
我是先调试好了Mac系统的,然后才来重新配置Win系统。
首先下载WezTerm,将压缩包下载下来后重新解压到指定文件路径。
下载地址:https://github.com/wez/wezterm/releases
第二步,下载PowerShell,要求版本高于5.1,也就是说不能用自带的版本,必须要重新下载。
下载地址:https://github.com/PowerShell/PowerShell/releases/download/v7.3.0/PowerShell-7.3.0-win-x64.msi
第三步,下载主题starship。
下载地址:https://github.com/starship/starship/releases/download/v1.11.0/starship-i686-pc-windows-msvc.msi
WezTerm配置
注意,当系统不一致的时候,打开的shell工具也是不一样的。
C:\Users\Administrator\.config\wezterm\wezterm.lua主配置文件内容如下。
-- Using shell
if wezterm.target_triple == 'x86_64-pc-windows-msvc' then
    term = '' -- Set to empty so FZF works on windows
    table.insert(launch_menu, {
        label = 'PowerShell-NewWindow',
        args = { "C:\\Windows\\System32\\WindowsPowerShell\\v7.3\\7\\pwsh.exe" }
    })
    default_prog = { "C:\\Windows\\System32\\WindowsPowerShell\\v7.3\\7\\pwsh.exe" }
    require("key-bind-windows")
elseif wezterm.target_triple == 'x86_64-apple-darwin' then
    table.insert(launch_menu, {
        label = 'Zsh-NewWindow',
        args = { '/bin/zsh', '-l' }
    })
    default_prog = { '/bin/zsh', '-l' }
    require("key-bind-mac")
elseif wezterm.target_triple == 'aarch64-apple-darwin' then
    table.insert(launch_menu, {
        label = 'zsh',
        args = {'/opt/homebrew/bin/zsh', '-l'}
    })
    default_prog = {'/opt/homebrew/bin/zsh', '-l'}
end
C:\Users\Administrator\.config\wezterm\key-bind-windows.lua配置文件内容如下。
local wezterm = require 'wezterm';
function keyBind()
    keys = {
        { -- 清屏
            key = 'k',
            mods = 'ALT',
            action = wezterm.action.Multiple {
                wezterm.action.ClearScrollback 'ScrollbackAndViewport',
                wezterm.action.SendKey { key = 'L', mods = 'CTRL' },
            },
        },
        { -- 复制和结束任务
            key = 'c',
            mods = 'CTRL',
            action = wezterm.action_callback(function(window, pane)
                local has_selection = window:get_selection_text_for_pane(pane) ~= ''
                if has_selection then
                    window:perform_action(
                        act.CopyTo 'ClipboardAndPrimarySelection',
                        pane
                    )

                    window:perform_action(act.ClearSelection, pane)
                else
                    window:perform_action(
                        act.SendKey { key = 'c', mods = 'CTRL' },
                        pane
                    )
                end
            end),
        },
        { -- 关闭当前窗口
            key = 'w',
            mods = 'CTRL',
            action = wezterm.action.CloseCurrentTab { confirm = true },
        },
        { -- 控制左右移动面板
            key = 'LeftArrow',
            mods = 'ALT',
            action = wezterm.action {
                ActivateTabRelative = -1
            }
        }, {
            key = 'RightArrow',
            mods = 'ALT',
            action = wezterm.action {
                ActivateTabRelative = 1
            }
        }, { -- 展示启动器
            key = 'l',
            mods = 'ALT',
            action = wezterm.action.ShowLauncher
        }, { -- 新建窗口
            key = 'n',
            mods = 'ALT',
            action = wezterm.action.SpawnCommandInNewTab {
                label = 'PowerShell-NewWindow',
                args = { 'C:\\Windows\\System32\\WindowsPowerShell\\v1.0\\powershell.exe', '-NoLogo' }
            },
        },
    }
    return keys
end
保存快捷键
使用命令将快捷键保存到文件.
echo $(wezterm show-keys) >> C:\\Users\\Administrator\\Desktop\\1.xls
PowerShell 配置
然后安装以下模块。
Install-Module posh-git -Scope CurrentUser # posh-git
Install-Module oh-my-posh -Scope CurrentUser -RequiredVersion 2.0.496 # oh-my-posh
编辑文件 $Profile,这个文件类似于 ~/.zshrc,会在 PowerShell 启动的时候自动执行,因此我们在这个文件中加载我们所需的模块,设置相关主题。
在 Windows 上运行命令打开配置文件。
notepad.exe $Profile
在里面添加以下内容。
Import-Module posh-git # 引入 posh-git
Import-Module oh-my-posh # 引入 oh-my-posh

Invoke-Expression (&starship init powershell) # 引入Starship

#Set-Theme Paradox # 设置主题为 Paradox

Set-PSReadLineOption -PredictionSource History # 设置预测文本来源为历史记录

Set-PSReadlineKeyHandler -Key Tab -Function Complete # 设置 Tab 键补全
Set-PSReadLineKeyHandler -Key "Ctrl+d" -Function MenuComplete # 设置 Ctrl+d 为菜单补全和 Intellisense
Set-PSReadLineKeyHandler -Key "Ctrl+z" -Function Undo # 设置 Ctrl+z 为撤销
Set-PSReadLineKeyHandler -Key UpArrow -ScriptBlock {
[Microsoft.PowerShell.PSConsoleReadLine]::HistorySearchBackward()
[Microsoft.PowerShell.PSConsoleReadLine]::EndOfLine()
}
Set-PSReadLineKeyHandler -Key DownArrow -ScriptBlock {
[Microsoft.PowerShell.PSConsoleReadLine]::HistorySearchForward()
[Microsoft.PowerShell.PSConsoleReadLine]::EndOfLine()
}
设置好后保存,重启 PowerShell 加载配置。
starship配置
可以参考上文,不再赘述。
可能有用的经验
在安装的过程中,也遇到了这样的报错。
Install-Module:
Unable to resolve package source 'https://www.powershellgallery.com/api/v2'
网上大佬的解决方案是这样的。
第一步,先去看看DNS解析。
Invoke-WebRequest 'https://www.powershellgallery.com/api/v2' -Verbose
如果在这里就报错了,那么就可以根据报错信息进行解决。比如说我这里就是
Invoke-WebRequest : The underlying connection was closed: Could not establish trust relationship for the SSL/TLS secure channel. At line:1 char:1
解决方法是强制让系统使用TLS1.2
[Net.ServicePointManager]::SecurityProtocol = [Net.SecurityProtocolType]::tls12
如果查找模块名称正确,那么就证明可行了。
Get-Module -Name oh-my-posh -Listavailable
再有可能遇到的情况便是,在安装模块时,可能会提示无法访问PSGallery,此时运行命令。
Get-PSRepository
命令执行后获得InstallationPolicy是untrusted。

img
有可能是因为.net4中没有启用额外的加密协议,才会导致访问PSGallery失败。此时需要向.net4的注册表添加安全协议生效的项目。
Set-ItemProperty -Path 'HKLM:\SOFTWARE\Wow6432Node\Microsoft\.NetFramework\v4.0.30319' -Name 'SchUseStrongCrypto' -Value '1' -Type DWord

Set-ItemProperty -Path 'HKLM:\SOFTWARE\Microsoft\.NetFramework\v4.0.30319' -Name 'SchUseStrongCrypto' -Value '1' -Type DWord
最后执行命令使其信任即可。
Set-PSRepository -Name PSGallery -InstallationPolicy trusted
备份
以前觉得,有自己的文章就可以了。后来一次又一次地配置,实在是觉得麻烦,于是将自己做好的配置整理出来保存到网上作为备份。

forever_share
感谢
感谢现在的好奇,为了能成为更好的自己。
配置文件wezterm.lua


 4965
4965


 被折叠的 条评论
为什么被折叠?
被折叠的 条评论
为什么被折叠?
 到【灌水乐园】发言


