


1.安装vue-router
终端输入 :
npm install vue-router --save
安装完成后package.json中会多出vue-router的版本信息

2.搭建路由基本框架
1.src 目录下 新建 router 目录 ,router下新建index.js文件

//配置路由的相关信息
import VueRouter from "vue-router";
import Vue from 'vue'

//1.通过Vue.use(插件) ,安装插件
Vue.use(VueRouter)

//2.创建VueRouter对象

const routes = [

]

const router = new VueRouter({
  //配置路由和组件之间的关系
  routes
})

//3.将router对象传入到Vue实例中
//导出router
export default router
2.main.js文件下添加路由

import Vue from 'vue'
import App from './App.vue'
// @ 代表在 src 目录下找
import router from "@/router";

Vue.config.productionTip = false

new Vue({
  render: h => h(App),
  router
}).$mount('#app')
3.使用路由
1.components目录下新建两个vue文件
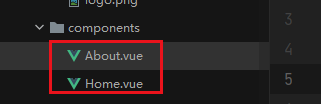
About.vue
<template>
  <div>
    <h2>我是about</h2>
    <p>我是about内容</p>
  </div>
</template>

<script>
export default {
name: "About"
}
</script>

<style scoped>

</style>
Home.vue
<template>
  <div>
    <h2>我是首页</h2>
    <p>我是首页内容</p>
  </div>
</template>

<script>
export default {
name: "Home"
}
</script>

<style scoped>

</style>
2.然后我们去到app.vue文件

<template>
  <div id="app">
    <router-link to="/home">首页</router-link>|
    <router-link to="/about">关于</router-link>
    <router-view></router-view>
<!--
  <router-view></router-view>
   相当于占位符,当指定页面渲染出来的时候 就会替代这个标签
-->
  </div>
</template>
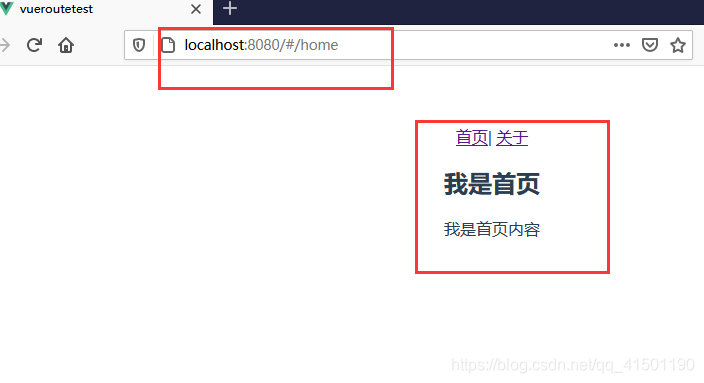
3.现在我们去测试一下
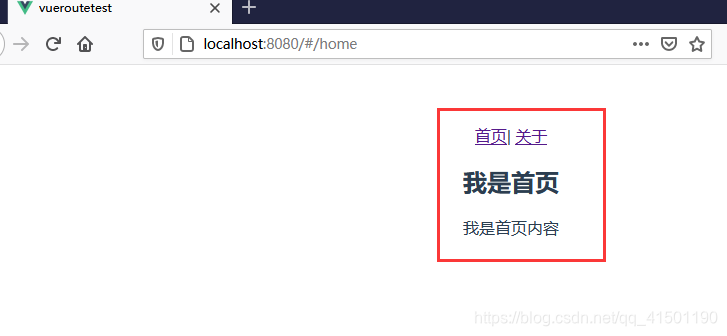
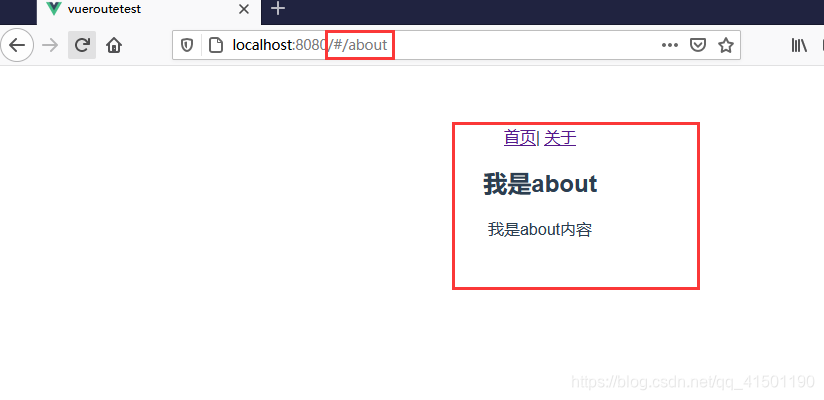
能正常显示了
4.但是有一个问题:页面刚加载的时候显示空白,并没有默认值
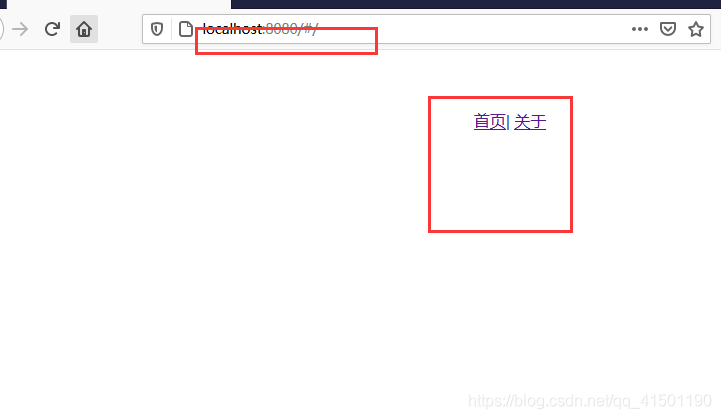
现在我们给它加上,让它默认显示首页
router目录下 index.js文件中
//2.创建VueRouter对象
const routes = [
  {
    path: '',
    //重定向
    redirect: '/home'
  },
  {
    //访问路径
    path: '/home',
    component: Home
  },
  {
    path: '/about',
    component: About
  }
]
我们添加了下面这些代码,空路径时重定向到/home
{
    path: '',
    //重定向
    redirect: '/home'
  }
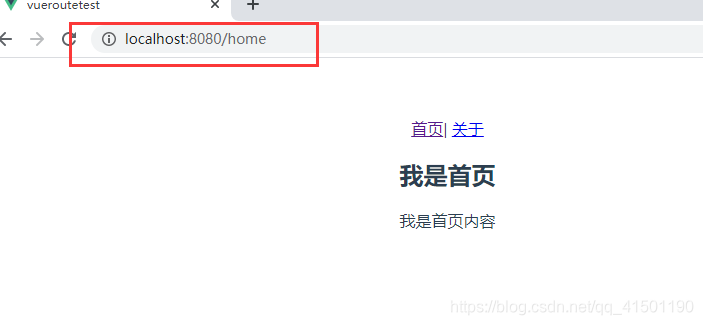
5.如何去掉浏览器url中不美观的#号
只需要改变url无刷新改变页面的方式就行了,默认时是hash方式,现在改为history
const router = new VueRouter({
  //配置路由和组件之间的关系
  routes,
  //改变模式,默认使用hash 浏览器url上会有一个#号,history没有
  mode: 'history'
})
route-link标签的属性详解
"router-link"属性
1.":to" 属 性
相当于a标签中的"herf"属性,后面跟跳转链接所用
<router-link :to="/home">Home</router-link>
<!-- 渲染结果 -->
<a href="/home">Home</a>
2.“replace” 属 性
replace在routre-link标签中添加后,页面切换时不会留下历史记录
<router-link :to="/home" replace></router-link>
3.“tag” 属 性
具有tag属性的router-link会被渲染成相应的标签
<router-link :to="/home" tag="li">Home</router-link>
<!-- 渲染结果 -->
<li>Home</li>
此时页面的li同样会起到a链接跳转的结果,vue会自动为其绑定点击事件,并跳转页面
4.“active-class” 属 性
这个属性是设置激活链接时class属性,也就是当前页面所有与当前地址所匹配的的链接都会被添加class属性
<router-link :to="/home" active-class="u-link--Active">Home</router-link>
active-class属性的默认值是router-link-active,所以如果没有设置,就会被渲染为这个class
可以在router.js里面设置
const router = new VueRouter({
  mode: 'hash',
  linkActiveClass: 'u-link--Active', // 这是链接激活时的class
})
5.“exact” 属 性
开启router-link的严格模式
<router-link :to="/" exact>home</router-link>
使用代码点击跳转路由
使用button标签 代替 router-link标签
	<button @click="homeBtnClick">首页</button> |
    <button @click="aboutBtnClick">关于</button>
添加两个方法
methods: {
    homeBtnClick(){
      console.log('homeClick');
      //没有浏览记录
      //this.$router.replace('/home');

      //有浏览记录,不加上时间戳 当点击同一页面控制台时会报错
      this.$router.push('/home?date'+Date.now());
    },
    aboutBtnClick(){
      console.log('aboutClick');
      this.$router.push('/about')

    }
  }
路由获取参数
新建User.vue文件
<template>
  <div>
    <h2>我是用户界面</h2>
    <p>我是用户信息,嘿嘿嘿</p>
    <h2>{{userId}}</h2>
<!--  直接获取参数  -->
    <h2>{{$route.params.userid}}</h2>
    </div>
</template>

<script>
export default {
  name: "User",
  computed:{
    userId(){
      //$route :拿到处于活跃状态的路由
      console.log(this.$route);
      return this.$route.params.userid
    }
  }
}
</script>

<style scoped>

</style>
index.js文件中添加User.vue的路由信息
  {
    //restful风格,后面加上参数
    path: '/user/:userid',
    component: User
  }
最后使用
<router-link :to="/user/+userid" tag="button">用户</router-link>
动态路由的懒加载
为什么需要懒加载?
像vue这种单页面应用,如果没有应用懒加载,运用webpack打包后的文件将会异常的大,造成进入首页时,需要加载的内容过多,时间过长,会出啊先长时间的白屏,即使做了loading也是不利于用户体验,而运用懒加载则可以将页面进行划分,需要的时候加载页面,可以有效的分担首页所承担的加载压力,减少首页加载用时
没有使用懒加载时 webpack打包项目,所有js代码都会放在两个js文件里
不管用不用得到都会加载
而使用懒加载后,js代码就被分成多个文件,实现按需加载

懒加载的方式

推荐使用第三种方式
const Home = () => import('@/components/Home')
const About = () => import('@/components/About')
const User = () => import('@/components/User')

const routes = [
  {
    path: '',
    //重定向
    redirect: '/home'
  },
  {
    //访问路径
    path: '/home',
    component: Home
  },
  {
    path: '/about',
    component: About
  },
  {
    //restful风格,后面加上参数
    path: '/user/:userid',
    component: User
  }
]
嵌套路由
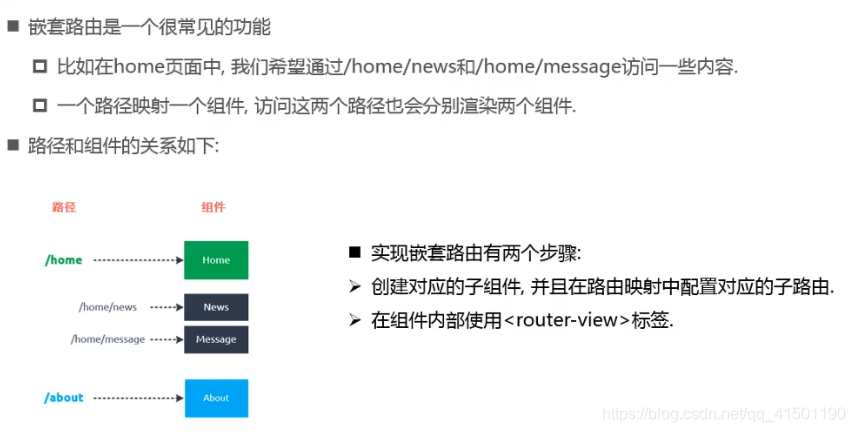
1.首先我们新建HomeMessage.vue 和 HomeNews.vue 用于在home页面显示
HomeMessage.vue
<template>
  <div>
    <ul>
      <li>消息1</li>
      <li>消息2</li>
      <li>消息3</li>
      <li>消息4</li>
    </ul>
  </div>
</template>

<script>
export default {
name: "HomeMessage"
}
</script>

<style scoped>

</style>
HomeNews.vue
<template>
  <div>
    <ul>
      <li>新闻1</li>
      <li>新闻2</li>
      <li>新闻3</li>
      <li>新闻4</li>
    </ul>
  </div>
</template>

<script>
export default {
name: "HomeNews"
}
</script>

<style scoped>

</style>
2.在index.js 中 ,home页面所属的路由 中 注册子路由
{
    //访问路径
    path: '/home',
    component: Home,
    children: [
      {
        //home默认显示news页面
        path: '/home',
        redirect: 'news'
      },
      {
        path: 'news',
        component: HomeNews
      },
      {
        path: 'message',
        component: HomeMessage
      }
    ]
  },
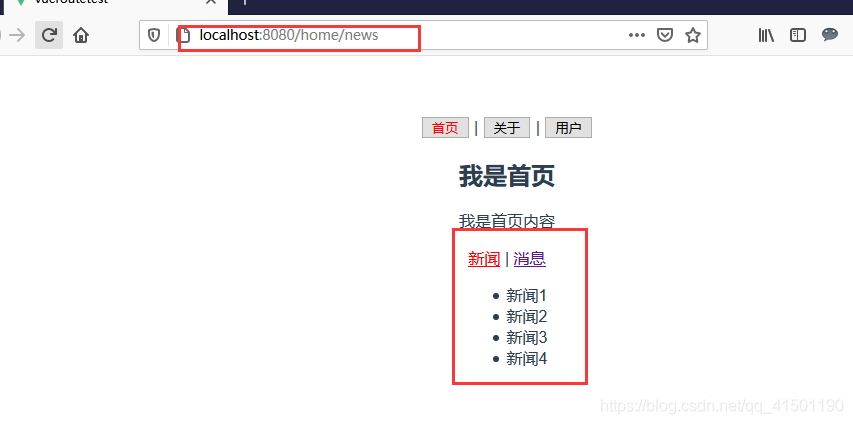
3.在home路由对应的Home.vue文件中添加子路由的router-view标签
<template>
  <div>
    <h2>我是首页</h2>
    <p>我是首页内容</p>

    <router-link to="/home/news">新闻</router-link> |
    <router-link to="/home/message">消息</router-link>
    <router-view></router-view>
  </div>
</template>
4.测试


 503
503


 被折叠的 条评论
为什么被折叠?
被折叠的 条评论
为什么被折叠?
 到【灌水乐园】发言


