


文章目录
- 网络编程(含 UrlConnection 发送 HTTP 请求下载文件):https://blog.csdn.net/qq_41538097/article/details/118722718
- Apache HttpComponents 简单使用:https://blog.csdn.net/qq_41538097/article/details/123719298
- RestTemplate简单使用:https://blog.csdn.net/qq_41538097/article/details/123560238
- okhttp3简单使用:https://blog.csdn.net/qq_41538097/article/details/123677614
- HttpURLConnection 简单使用:https://blog.csdn.net/qq_41538097/article/details/123697432
URLConnection
- jdk 自带,调用接口传递参数比较麻烦
- 使用 UrlConnection 比直接使用 Socket 要简单的多,不用关心状态和线程治理。
- UrlConnection 基于Http协议,只是进行了封装,添加了一些额外规则(如头信息),本质上也是建立TCP连接,利用Socket实现连接和传输数据的,一般每次请求方法完成需要在 finally 里关闭连接。
Wireshark 抓包
由于 Wireshark 只能抓取通过网关的包,而本地搭建的服务器不经过网关,因此不能直接抓取,根据网上的 route add IP地址 mask 255.255.255.255 网关IP 添加路由之后仍不成功,最终选择安装 npcap-1.60 成功实现抓包
虽然我连的无线网,但需要选择有线的 Adapter for loopback traffic capture 抓取本地包

一、请求网络资源
    public void getUrl() {
        BufferedInputStream bufferedInputStream = null;
        BufferedOutputStream bufferedOutputStream = null;
        try {
            URL url = new URL("http://alifei05.cfp.cn/creative/vcg/veer/1600water/veer-121291824.jpg");
            URLConnection urlConnection = url.openConnection();
            urlConnection.setRequestProperty("User-Agent", "Mozilla/5.0 (Windows NT 10.0; Win64; x64) AppleWebKit/537.36 (KHTML, like Gecko) Chrome/99.0.4844.51 Safari/537.36");
            InputStream inputStream = urlConnection.getInputStream();
            bufferedInputStream = new BufferedInputStream(inputStream);
            bufferedOutputStream = new BufferedOutputStream(new FileOutputStream(new File("C:\Users\Administrator\Pictures\图标\1.jpg")));
            int len;
            byte[] bytes = new byte[1024];
            while ((len = bufferedInputStream.read(bytes)) != -1) {
                bufferedOutputStream.write(bytes, 0, len);
            }
        } catch (IOException e) {
            e.printStackTrace();
        } finally {
            try {
                bufferedOutputStream.flush();
                assert bufferedOutputStream != null;
                bufferedOutputStream.close();
                bufferedInputStream.close();
            } catch (IOException e) {
                e.printStackTrace();
            }
        }
    }
如上代码将 jpg 文件下载到了本地
二、带参数请求
封装打开连接方法
    public HttpURLConnection openConnection(URL url) throws IOException {
        URLConnection urlConnection = url.openConnection();
        if (!(urlConnection instanceof HttpURLConnection)) {
            throw new IllegalStateException("HttpURLConnection required for [" + url + "] but got: " + urlConnection);
        }
        return (HttpURLConnection) urlConnection;
    }
1、参数类型 application/x-www-form-urlencoded
application/x-www-form-urlencoded 默认的提交方式,同GET类似,将参数组装成Key-value方式,用&分隔,但数据存放在body中提交
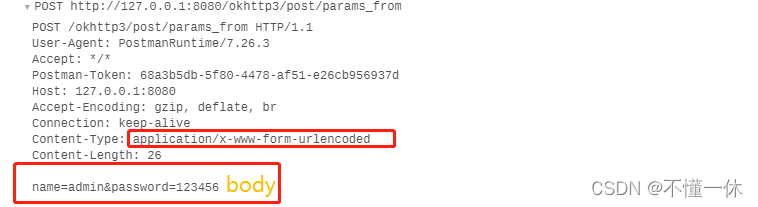
postman 看的不直观,使用 Wireshark 抓包查看

如上从 postman 可以看到 application/x-www-form-urlencoded 参数类型传递 body 只需要使用 & 拼接即可
public void getParamsFrom() throws IOException {
        String str = "http://127.0.0.1:8080/okhttp3/post/params_from";
        URL url = new URL(str);
        HttpURLConnection urlConnection = openConnection(url);
        urlConnection.setDoInput(true);
        urlConnection.setDoOutput(true);

        //设置请求方式
        urlConnection.setRequestMethod("POST");
        urlConnection.setUseCaches(false);
        urlConnection.setConnectTimeout(60 * 1000);g
        urlConnection.setReadTimeout(60 * 1000);

        //设置参数类型
        urlConnection.setRequestProperty("Content-Type", "application/x-www-form-urlencoded;");
        //保持连接
        urlConnection.setRequestProperty("Connection", "Keep-Alive");

        urlConnection.connect(); // 配置请求信息需要在连接直接配置 顺序不可颠倒

        OutputStream outputStream = urlConnection.getOutputStream();

        outputStream.write(("name=admin&" + "password=123456").getBytes());
        outputStream.flush();
        outputStream.close();

        StringBuilder stringBuilder = new StringBuilder();
        BufferedInputStream bufferedInputStream = new BufferedInputStream(urlConnection.getInputStream());
        byte[] bytes = new byte[1024];
        while (bufferedInputStream.read(bytes) != -1) {
            stringBuilder.append(new String(bytes));
        }
        log.info(stringBuilder.toString());
        bufferedInputStream.close();
    }
2、参数类型 Content-Type:multipart/form-data;
form 表单上传表单 Content-Type:application/x-www-form-urlencoded
如下图使用 postman 发送请求时 application/x-www-form-urlencoded 有文件和文本需要将 body 封装成如下形式
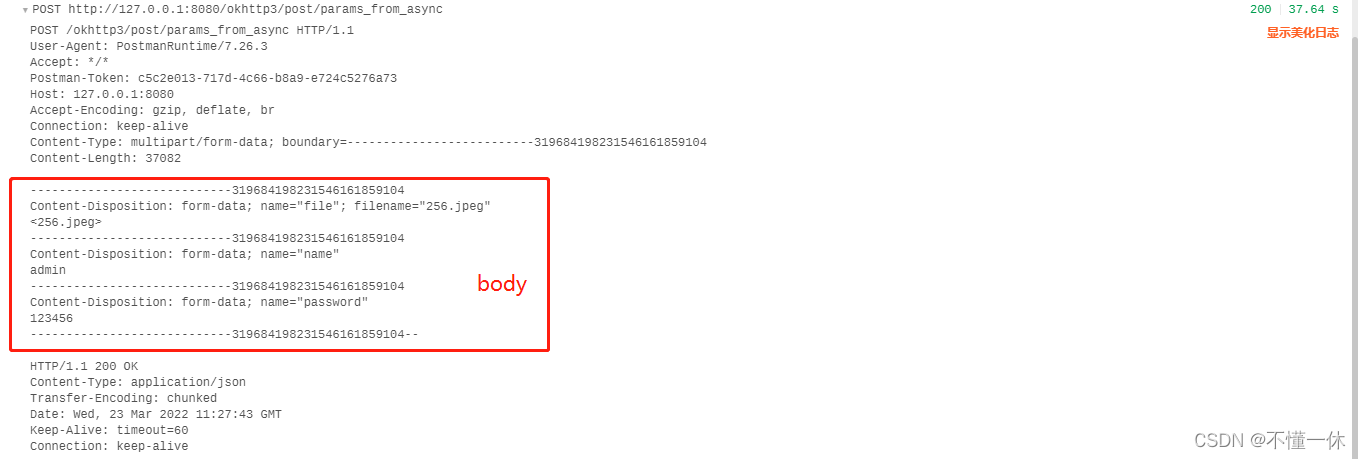
postman 看的不直观,使用 Wireshark 抓包查看

注意:boundary(分隔符),它是用来隔开提交的表单中不同部分的数据或者分割多个文件。在提交multipart/form-data请求时,设置Content_Type属性时,必须要同时指定所使用的boundary,否则上传过程中会报错,导致上传不成功。
public void getParamsFromFile() throws IOException {
        String dash = "--";
        String boundary = generateBoundary();
        String newLine = "\r\n";
        String str = "http://127.0.0.1:8080/okhttp3/post/params_from_async";
        URL url = new URL(str);
        HttpURLConnection urlConnection = openConnection(url);
        urlConnection.setDoInput(true);
        urlConnection.setDoOutput(true);

        //设置请求方式
        urlConnection.setRequestMethod("POST");
        urlConnection.setUseCaches(false);
        urlConnection.setConnectTimeout(60 * 1000);
        urlConnection.setReadTimeout(60 * 1000);

        //设置参数类型
        urlConnection.setRequestProperty("Content-Type", "multipart/form-data; boundary=" + boundary);
        //保持连接
        urlConnection.setRequestProperty("Connection", "Keep-Alive");

        urlConnection.connect(); // 配置请求信息需要在连接直接配置 顺序不可颠倒
        OutputStream outputStream = urlConnection.getOutputStream();
        File file = new File(System.getProperty("user.dir") + "/file" + "/1.jpg");
        String formDataKey = "name";
        String formData = "admin";
        String formTextData = dash + boundary + newLine +
                "Content-Disposition: form-data; name=\"" + formDataKey + "\"" + newLine +
                "Content-Type: text/plain; charset=utf-8" + newLine +
                newLine +// important !
                formData + newLine +
                dash + boundary + newLine;
        outputStream.write(formTextData.getBytes());
        BufferedInputStream bufferedInputStream = new BufferedInputStream(new FileInputStream(file));
        // file data
        String fileKey = "file";
        String fileContentType = "image/jpeg";

        String fileHeader = "Content-Disposition: form-data; name=\"" + fileKey + "\"; filename=\"" + file.getName() + "\"" + newLine +
                "Content-Type:" + fileContentType + newLine +
                // 可以不写,有默认值
                "Content-Transfer-Encoding: binary" + newLine +
                newLine;// important !
        outputStream.write(fileHeader.getBytes());

        int len;
        byte[] bytes = new byte[1024];
        while ((len = bufferedInputStream.read(bytes)) != -1) {
            outputStream.write(bytes, 0, len);
        }
        outputStream.write((newLine + dash + boundary + dash + newLine).getBytes());
        outputStream.flush();
        outputStream.close();
        bufferedInputStream.close();

        StringBuilder stringBuilder = new StringBuilder();
        BufferedInputStream bufferedInputStream1 = new BufferedInputStream(urlConnection.getInputStream());
        while (bufferedInputStream1.read(bytes) != -1) {
            stringBuilder.append(new String(bytes));
        }
        log.info(stringBuilder.toString());
    }
    // 生成 boundary
    private String generateBoundary() {
        return "--------------------------" +
                UUID.randomUUID().toString().replace("-", "");
    }
3、HTTP头中的Content-Transfer-Encoding
不同于Content-Type,这个域不是必须的。不过,仅仅定义一种Content-Transfer-Encoding也是不可以的。在有效地传输巨大的二进制数据和便于阅读的编码数据之间要有一个折中。所以,至少要有两种编码格式:易读的,和稠密的(高压缩率的)。
Content-Transfer-Encoding支持以下数据格式:BASE64, QUOTED-PRINTABLE, 8BIT, 7BIT, BINARY, X-TOKEN。这些值是大小写不敏感的。
当不设置Content-Transfer-Encoding的时候,默认就是7BIT。7BIT的含义是所有的数据以ASC-II格式的格式编码,8BIT则可能包含非ASCII字符。BINARY可能不止包含非ASCII字符,还可能不是一个短行(超过1000字符)。
上述代码有很多地方需要优化,只是做简单的测试,正式开发需要进行二次封装,文章借鉴了其他博客,目前参考的博客链接找不到了,如有侵权联系删除。


 918
918


 到【灌水乐园】发言


