


Spring概念:
spring在开发中的角色就是用来管理对象的创建和其他框架的,简单的来说,spring就是将已有的技术变得更加简便优秀。
spring遵循的是车轮理论,就是现有的技术就不在进行开发了,只需要拿来进行整合,变得更加完善就好。但是随着spring越做越好,也开始替代了一些其他的技术。
学习spring的主要三个内容:
a)IoC/DI: 控制反转/依赖注入:IoC就是创建对象本来是程序员的任务,现在将创建对象的任务交给Spring并且由Spring对其进行控制,就是控制反转,DI:就是通过setter方法,对对象进行赋值。
b)AoP:面向切面编程
c)声明式事务

spring的核心组件便是中间的core container,包含了对框架最基本的支撑
Beans:对对象管理所依赖的jar包。
Core:Spring的核心包
Context:Spring容器上下文的对象。
SpEL:Spring表达式语言。
环境配置:
1:这四个对应了spring的4个jar包:

还需要导入![]()
这个包被core所依赖,如果没有导入这个包,运行时便会报错。
ps:jar包的存放路径
这个lib包需要存放在项目的lib文件夹下。并且进行引入。


2:配置文件:applicationContext
然后需要新建xml文件,这个xml文件的位置最好是放在src的根目录下,命名无要求,但是按照规范需要命名为 applicationContext.xml,新建的办法。这个必须是在导包之后才能看见这个文件格式。

新建的xml文件会有如下内容:
<?xml version="1.0" encoding="UTF-8"?>
<!--
    xmlns: xml namespace, 当前配置文件默认使用哪个命名空间
    xmlns:xsi xml schema instance, schema约束规范的提供者
    xsi:schemaLocation schema约束文件的地址, 值的表示方式为: key:value
        key是一个标识
        value是xsd文件的url地址
-->
<beans xmlns="http://www.springframework.org/schema/beans"
       xmlns:xsi="http://www.w3.org/2001/XMLSchema-instance"
       xsi:schemaLocation="http://www.springframework.org/schema/beans
        http://www.springframework.org/schema/beans/spring-beans.xsd">
</beans>
成功之后,我们开始通过spring通过调用无参的构造器创建一个对象,首先需要在xml文件中管理对象。
Spring创建对象的几种方式
- 通过构造器创建对象
- 无参构造器. 默认Spring会使用无参构造器创建对象
- 有参构造器. 可以在<bean>下通过<constructor-arg>标签指定使用有参构造器创建对象. 属性介绍:
- index: 索引, 从0开始, 表示参数的索引位置
- name: 名称, 表示参数的名称
- type: 类型, 表示参数的类型
- value: 赋值. 当值是简单类型时可以使用. 基本类型, 包装类型, String, resource, class
- ref: (reference)赋值. 当值为非简单类型时使用, 表示需要引用一个<bean>.
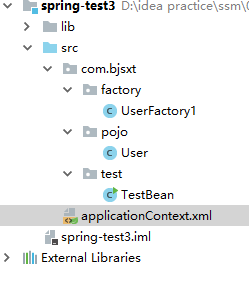
Test1:创建一个无参的对象:
1.文件目录:

2.applicationContext中的文件配置
<?xml version="1.0" encoding="UTF-8"?>
<beans xmlns="http://www.springframework.org/schema/beans"
       xmlns:xsi="http://www.w3.org/2001/XMLSchema-instance"
       xsi:schemaLocation="http://www.springframework.org/schema/beans http://www.springframework.org/schema/beans/spring-beans.xsd">
    <bean id="user" class="com.bjsxt.pojo.User"></bean>
</beans>
3:User类下面有,直接拿来复制就好了 (Test2中)
4:测试类中:
public class TestBean {
    public static void main(String[] args) {
//        Spring容器最基本的接口就是beanFactory,它有一个子接口就是ApplicationContext,找到当前配置的xml文件
        ApplicationContext context=new ClassPathXmlApplicationContext("classpath:applicationContext.xml");
//       通过配置的引号内容就可以找到bean中的id
        User user = context.getBean("user", User.class);
        System.out.println(user);
    }
}
这样便能够创建一个无参数的构造方法。
Test2:
创建一个有参数的构造方法
修改配置文件 applicationContext文件
<?xml version="1.0" encoding="UTF-8"?>
<beans xmlns="http://www.springframework.org/schema/beans"
       xmlns:xsi="http://www.w3.org/2001/XMLSchema-instance"
       xsi:schemaLocation="http://www.springframework.org/schema/beans http://www.springframework.org/schema/beans/spring-beans.xsd">
    <bean id="user" class="com.bjsxt.pojo.User">
        <!--参数,name是对应的参数 index是对应的构造方法的第几个索引 value是值-->
        <constructor-arg name="name" index="0" type="java.lang.String" value="ok"></constructor-arg>
        <constructor-arg name="age" index="1" type="java.lang.Integer" value="22"></constructor-arg>
    </bean>
</beans>User类展示(主要是看user类的带参的构造方法的位置和applicationContext对应的索引):
package com.bjsxt.pojo;

import java.io.Serializable;

public class User implements Serializable {
    private String name;
    private Integer age;

    public User() {
    }

    public User(String name, Integer age) {
        this.name = name;
        this.age = age;
    }

    public String getName() {
        return name;
    }

    public void setName(String name) {
        this.name = name;
    }

    public int getAge() {
        return age;
    }

    public void setAge(int age) {
        this.age = age;
    }

    @Override
    public String toString() {
        return "User{" +
                "name='" + name + '\'' +
                ", age='" + age + '\'' +
                '}';
    }
}
测试类不变:
package com.bjsxt.test;

import com.bjsxt.pojo.User;
import org.springframework.context.ApplicationContext;
import org.springframework.context.support.ClassPathXmlApplicationContext;

public class TestBean {
    public static void main(String[] args) {
//        Spring容器最基本的接口就是beanFactory,它有一个子接口就是ApplicationContext,找到当前配置的xml文件
        ApplicationContext context=new ClassPathXmlApplicationContext("classpath:applicationContext.xml");
//       通过配置的引号内容就可以找到bean中的id
        User user = context.getBean("user", User.class);
        System.out.println(user);
    }
}
结果展示:
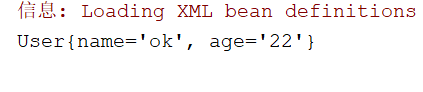
test3:
使用静态工厂创建一个对象:
1.新建一个工厂类:
package com.bjsxt.factory;

import com.bjsxt.pojo.User;

public class UserFactory1 {
    public UserFactory1() {
        System.out.println("工厂创建了");
    }

    public static User getInstance(){
        return new User("呵呵",1);
    }
}
2.修改applicationContext文件。使用静态工厂的方式进行创建:
<?xml version="1.0" encoding="UTF-8"?>
<beans xmlns="http://www.springframework.org/schema/beans"
       xmlns:xsi="http://www.w3.org/2001/XMLSchema-instance"
       xsi:schemaLocation="http://www.springframework.org/schema/beans http://www.springframework.org/schema/beans/spring-beans.xsd">
    <bean id="user" class="com.bjsxt.factory.UserFactory1" factory-method="getInstance" ></bean>
</beans>
3.User类的位置和文件基本不变,直接运行测试类即可,
运行结果:

Test4:使用动态工厂创建一个带参的对象:
1:文件目录如下:
User类不变,测试类不变。

2 . 工厂类: 和之前的工厂类相比去掉static即可
package com.bjsxt.factory;

import com.bjsxt.pojo.User;

public class UserFactory1 {
    public UserFactory1() {
        System.out.println("工厂创建了");
    }

    public  User getInstance(){
        return new User("呵呵",1);
    }
}
3.修改applicationContext.xml文件即可
<?xml version="1.0" encoding="UTF-8"?>
<beans xmlns="http://www.springframework.org/schema/beans"
       xmlns:xsi="http://www.w3.org/2001/XMLSchema-instance"
       xsi:schemaLocation="http://www.springframework.org/schema/beans http://www.springframework.org/schema/beans/spring-beans.xsd">
    <bean id="factory" class="com.bjsxt.factory.UserFactory1" ></bean>
    <bean id="user" factory-bean="factory" factory-method="getInstance"></bean>
</beans>
4.直接运行测试类。便能够得到一个带参的对象
运行结果:

DI注入通过Setter对对象进行赋值,可以说DI注入是IoC反转的一部分。
对几种不同类型赋值的方式:
<beans xmlns="http://www.springframework.org/schema/beans"
       xmlns:xsi="http://www.w3.org/2001/XMLSchema-instance"
       xsi:schemaLocation="http://www.springframework.org/schema/beans
        http://www.springframework.org/schema/beans/spring-beans.xsd">
    <bean class="java.util.Date" id="birthday" />
    <bean class="com.bjsxt.pojo.Address" id="addr">
        <property name="city" value="广州" />
    </bean>
    <bean class="com.bjsxt.pojo.Card" id="card">
        <property name="num" value="187236187236" />
        <property name="balance" value="1000" />
    </bean>
    <bean id="user" class="com.bjsxt.pojo.User">
        <!--Properties类型-->
        <property name="info">
            <props>
                <prop key="driver">com.mysql.jdbc.Driver</prop>
                <prop key="username">root</prop>
            </props>
        </property>
        <!--Map集合-->
        <property name="cardMap">
            <map>
                <entry key="建行">
                    <bean class="com.bjsxt.pojo.Card">
                        <property name="num" value="18273618273" />
                        <property name="balance" value="200" />
                    </bean>
                </entry>
                <entry>
                    <key>
                        <value>农行</value>
                    </key>
                    <ref bean="card" />
                </entry>
            </map>
        </property>
        <!--Set集合-->
        <property name="cards">
            <set>
                <bean class="com.bjsxt.pojo.Card">
                    <property name="num" value="762318923781" />
                    <property name="balance">
                        <value>1</value>
                    </property>
                </bean>
                <ref bean="card" />
            </set>
        </property>
        <!--List集合-->
        <property name="addrs">
            <list>
                <bean class="com.bjsxt.pojo.Address">
                    <property name="city" value="上海" />
                </bean>
                <ref bean="addr" />
            </list>
        </property>
        <!--自定义对象类型-->
        <property name="address">
            <bean class="com.bjsxt.pojo.Address">
                <property name="city" value="北京" />
            </bean>
        </property>
        <!--数组类型-->
        <property name="hob">
            <array>
                <value>吃饭</value>
                <value>睡觉</value>
                <value>打豆豆</value>
            </array>
        </property>
        <!--Date-->
        <!--<property name="birthday" ref="birthday" />-->
        <!--<property name="birthday">
            <ref bean="birthday" />
        </property>-->
        <property name="birthday">
            <bean class="java.util.Date" />
        </property>
        <!--String-->
        <property name="name" value="张三丰" />
        <!--包装类型: Integer-->
        <property name="age">
            <value>20</value>
        </property>
        <!--基本数据类型: int-->
        <property name="id" value="110" />
    </bean>
</beans>


 304
304


 被折叠的 条评论
为什么被折叠?
被折叠的 条评论
为什么被折叠?
 到【灌水乐园】发言


