


代码见:https://gitlab.com/qiaochongqc/react_base.git
一、创建虚拟dom
ReactDOM.render(虚拟dom,要渲染的节点)
<body>
    <div id="test"></div>
    <!-- 引入react核心库 -->
    <script src="../js/react.development.js"></script>
    <!-- 引入react-dom,用于支持操作dom -->
    <script src="../js/react-dom.development.js"></script>
    <!-- 引入babel,用于将jsx转为js -->
    <script src="../js/babel.min.js"></script>
    <!-- 这里用 babel 意思是:使用jsx语法,而不是js语法 -->
    <script type="text/babel">
      // 1、创建虚拟dom
      // jsx 中,这里不需要加引号,因为不是字符串,而是节点
      let VDOM = <h1>hello react</h1>
      // 2、渲染虚拟dom到页面
      ReactDOM.render(VDOM, document.getElementById("test"))
    </script>
</body>
二、虚拟dom的两种创建方式
法一:js (不需要引入babel.min.js转换文件)
React.createElement("标签名", 属性对象,”标签内容“)
<body>
    <div id="test"></div>
    <!-- 引入react核心库 -->
    <script src="../js/react.development.js"></script>
    <!-- 引入react-dom,用于支持操作dom -->
    <script src="../js/react-dom.development.js"></script>
    <script type="text/javascript">
      // 1、创建虚拟dom
      // createElement 是react中创建节点的方法,接受3个参数:1、标签名(字符串),2、属性(对象),3、标签内容(字符串)
      // 如果要创建嵌套的节点,需要将内容 3 替换为 createElement 创建的节点
      // 以上是js创建虚拟节点的方法,而jsx只需要按照 html 方式,将节点罗列
      // let VDOM = React.createElement("h1", { id: "react" }, "hello react");
      let VDOM = React.createElement("h1", { id: "react" }, React.createElement("span", { class: "title" }, "hello react"));
      // 2、渲染虚拟dom到页面
      ReactDOM.render(VDOM, document.getElementById("test"))
    </script>
</body>
法二:jsx
ReactDOM.render(虚拟DOM, 目标节点)
<body>
    <div id="test"></div>
    <!-- 引入react核心库 -->
    <script src="../js/react.development.js"></script>
    <!-- 引入react-dom,用于支持操作dom -->
    <script src="../js/react-dom.development.js"></script>
    <!-- 引入babel,用于将jsx转为js -->
    <script src="../js/babel.min.js"></script>
    <!-- 这里用 babel 意思是:使用jsx语法,而不是js语法 -->
    <script type="text/babel">
      // 1、创建虚拟dom
      // jsx 中,这里不需要加引号,因为不是字符串,而是节点
      let VDOM = (
        <h1 id="react">
          <span className="title">hello react</span>
        </h1>
      )
      // 2、渲染虚拟dom到页面
      ReactDOM.render(VDOM, document.getElementById("test"))
    </script>
</body>
jsx 创建虚拟dom,其实是 js 创建虚拟dom的语法糖,内部使用的仍然是 js 语法。
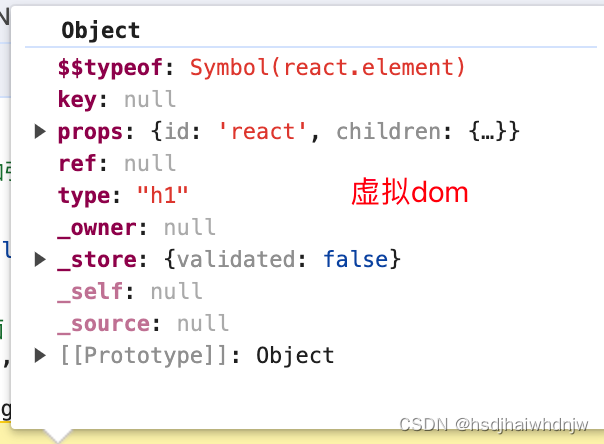
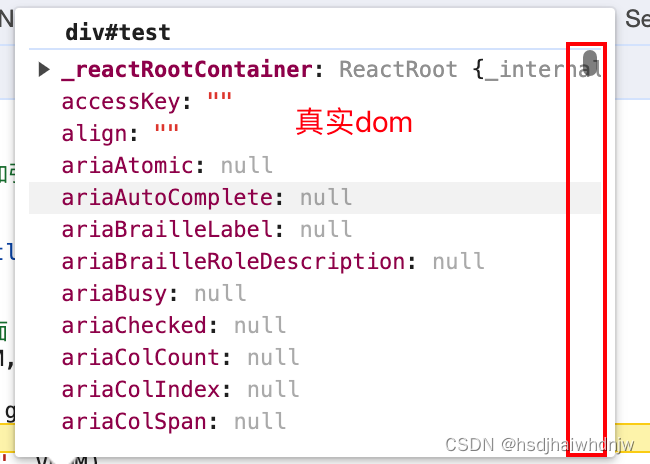
关于虚拟 DOM
- 本质上是 Object 类型的对象(一般对象)
- 虚拟 DOM 比较“轻”(属性较少),真实 DOM 比较“重”,因为虚拟 DOM 是 React 内部在用,无需真实 DOM 上那么多的属性。
- 虚拟 DOM 最终会被 React 转化为真实 DOM,呈现在页面上。
- 虚拟 DOM 和真实 DOM 数据如下图:
三、jsx 语法规则
- 定义虚拟 DOM 时,不要用引号
- 标签中混入 js 表达式时,要用 {}
- 样式的类名不要用 class,要用 className
- 内联样式,要用 style={{key:value}} 的形式去写,key用小驼峰
- 只能有一个根标签
- 标签必须闭合
- 标签首字母位小写时,浏览器会将标签转换为 html 同名元素,如 html 中没有该标签对应的同名元素,则报错
- 标签首字母位大写时,react 就去渲染对应的组件,若组件没有定义,就会报错
<body>
 <style>
   .title {
     background-color: aqua;
     width: 400px;
   }
 </style>
 <div id="test"></div>
 <!-- 引入react核心库 -->
 <script src="../js/react.development.js"></script>
 <!-- 引入react-dom,用于支持操作dom -->
 <script src="../js/react-dom.development.js"></script>
 <!-- 引入babel,用于将jsx转为js -->
 <script src="../js/babel.min.js"></script>
 <!-- 这里用 babel 意思是:使用jsx语法,而不是js语法 -->
 <script type="text/babel">
   let myId = "react",
     myContent="hello react";
   let VDOM = (
     <div>
       <h1 className="title" id={myId}>
         <span style={{fontSize: "40px", color: "red"}}>{myContent}</span>
       </h1>
       <h1 className="title" id={`${myId}-copy`}>
         <span style={{fontSize: "40px", color: "red"}}>{myContent}</span>
       </h1>
     </div>
   )
   ReactDOM.render(VDOM, document.getElementById("test"))
 </script>
</body>
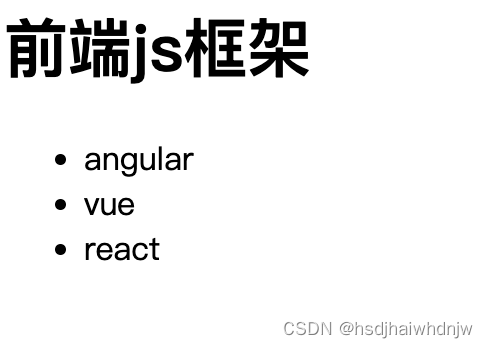
jsx 练习
<body>
  <div id="test"></div>
  <script src="../js/react.development.js"></script>
  <script src="../js/react-dom.development.js"></script>
  <script src="../js/babel.min.js"></script>
  <script type="text/babel">
    let arr = ["angular","vue","react"]
    let VDOM = (
      <div>
        <h1>前端js框架</h1>
        <ul>
          {
            arr.map((item, index) => {
              return <li key={index}>{item}</li>
            })
          }
        </ul>
      </div>
    )
    ReactDOM.render(VDOM, document.getElementById("test"))
  </script>
</body>
注意区分:js 语句(代码)与 js表达式
- 表达式:一个表达式会产生一个值,可以放在任何一个需要值的地方(可以用变量接受)
- 下面这些都是表达式
(1)a(变量)
(2)a+b
(3)func(1)
(4)arr.map()
(5)function test () {}
- 下面这些都是表达式
- 语句(代码)
- 下面这些都是语句(代码)
(1)if () {}
(2)for () {}
(3)switch () {}
- 下面这些都是语句(代码)
四、组件与模块
1、模块
- 理解:向外提供特定功能的 js 程序,一般是一个 js 文件
- 为什么要拆成模块:随着业务逻辑增加,代码越来越复杂
- 作用:复用 js ,简化 js 的编写,提高运行效率
2、组件
- 理解:用来实现局部功能效果的代码和资源的集合(html/css/js/image等)
- 为什么:一个页面的功能更复杂
- 作用:复用编码,简化项目代码,提高运行效率
3、模块化
当应用的js都以模块来编写,这个应用就是一个模块化的应用
4、组件话
当应用是以多组件的方式实现,这个应用就是一个组件化的应用
五、函数式组件(适用于简单组件的定义)
新版本(18.2.0)渲染虚拟 DOM 的方法做了如下修改
ReactDOM.createRoot(document.getElementById("root"))
  .render(
    <div>123</div>
  )
- 定义函数,函数内部返回dom节点
- 函数名首字母要大写,在react中,标签首字母大写表示是组件,小写则匹配对应的html标签
- 使用
ReactDOM.render(<MyComponent />, document.getElementById("test"))将函数组件渲染到页面上- React 解析组件标签,找到 MyComponent 组件
- 发现组件是使用函数定义的,随后调用该函数,将返回的虚拟DOM转为真实DON,随后呈现到页面中
- 也可使用
ReactDOM.render(MyComponent(), document.getElementById("test"))将组件渲染到页面上
<body>
  <div id="test"></div>
  <script src="../js/react.development.js"></script>
  <script src="../js/react-dom.development.js"></script>
  <script src="../js/babel.min.js"></script>
  <script type="text/babel">
    // 1、创建函数式组件(首字母必须大写)
    function MyComponent () {
      console.log(this) // 这里的 this 是 undefined ,因为 babel 将jsx编译为js后,开启了严格模式
      return <h1>使用函数定义的组件(适用于简单组件的定义)</h1>
    }
    // 2、渲染组件到页面(有两种写法)
    //    2.1 使用组件标签(首字母要大写,小写的话会默认匹配html标签),React 内部发现是函数式组件,会自动调用该函数
    //    2.2 直接调用函数方法
    // ReactDOM.render(<MyComponent />, document.getElementById("test"))
    ReactDOM.render(MyComponent(), document.getElementById("test"))
    /*
      执行 ReactDOM.render(<MyComponent />, document.getElementById("test"))后发生了什么?
        1、React 解析组件标签,找到 MyComponent 组件
        2、发现组件是使用函数定义的,随后调用该函数,将返回的虚拟DOM转为真实DON,随后呈现到页面中
    */
  </script>
</body>
六、类式组件(适用于复杂组件的定义)
新版本(18.2.0)渲染虚拟 DOM 的方法做了如下修改
ReactDOM.createRoot(document.getElementById("root"))
  .render(
    <div>123</div>
  )
复习 ES6 的 class:
- 类中的构造器 constructor 不是必须写的,要对实例进行一些初始化的操作,如添加指定属性时在写
- 如果 A 类继承 B 类,且 A 类中写了构造器,那么 A 类构造器中的 super 是必须要调用的
- 类中所定义的方法,都是放在了类的原型对象上,供实例去使用
  <script>
    class Person {
      constructor(name, age) {
        this.name = name;
        this.age = age;
      }
      sperak() {
        console.log(`我叫${this.name}, 今年${this.age}岁`)
      }
    }
    // Student 类继承 Person 类
    class Student extends Person {
      constructor(name, age, grade) {
        super(name, age)
        this.grade = grade;
      }
      // 子类、父类具有同名方法时,子类会覆盖父类
      sperak() {
        console.log(`我叫${this.name}, 今年${this.age}岁,上${this.grade}年级`)
      }
    }
    let p1 = new Person("张三", 18)
    let s1 = new Student("李四", 16, "高一")
    console.log(p1)
    console.log(s1)
    p1.sperak()	//我叫张三, 今年18岁
    s1.sperak()	//我叫李四, 今年16岁,上高一年级
  </script>
创建类式组件
- 创建一个类,该类继承于 React.Component 类
- 类中必须要定义 render 方法,方法里面要 return 出需要的节点
- 通过
ReactDOM.render(<MyComponent />, document.getElementById("test"))方法将类式组件渲染到页面- 1、React 解析组件标签,找到 MyComponent 组件
- 2、发现组件是使用类定义的,随后 new 出来该类的实例,并通过该实例调用到原型上的 render 方法
- 3、将 render 返回到虚拟DOM转化为真实DOM,随后呈现在页面中
<body>
  <div id="test"></div>
  <script src="../js/react.development.js"></script>
  <script src="../js/react-dom.development.js"></script>
  <script src="../js/babel.min.js"></script>
  <script type="text/babel">
    // 1、创建类式组件
    class MyComponent extends React.Component {
      render() {
        // render 是放在哪里的? --- MyComponent 的原型对象上,供实例使用
        // render 中的 this 是谁? --- MyComponent 的实例对象 《===》 MyComponent组件实例对象
        return <h1>使用类定义的组件(适用于复杂组件的定义)</h1>
      }
    }
    // 2、渲染组件到页面上
    ReactDOM.render(<MyComponent />, document.getElementById("test"))
    /*
      执行 ReactDOM.render(<MyComponent />, document.getElementById("test")) 后,发生了什么?
        1、React 解析组件标签,找到 MyComponent 组件
        2、发现组件是使用类定义的,随后 new 出来该类的实例,并通过该实例调用到原型上的 render 方法
        3、将 render 返回到虚拟DOM转化为真实DOM,随后呈现在页面中
    */
  </script>
</body>
七、react 组件实例三大对象 state、props、ref
1、state
1)理解
- state 是组件对象最重要的属性,值是对象(可以包含多个key-value的组合)
- 组件被称为“状态机”,通过更新组件的 state 来更新对应的页面显示(重新渲染组件,通过 render 函数)
2)注意:
- 组件中的 render 方法中的 this 是组件实例对象
- 组件自定义的方法中 this 是 undefined,如何解决?
a、强制绑定 this:通过函数对象的 bind()this.changeWeather = this.change.bind(this)
b、剪头函数 - 状态数据,不能直接修改或更新,要使用
this.setState({isHot: !isHot})
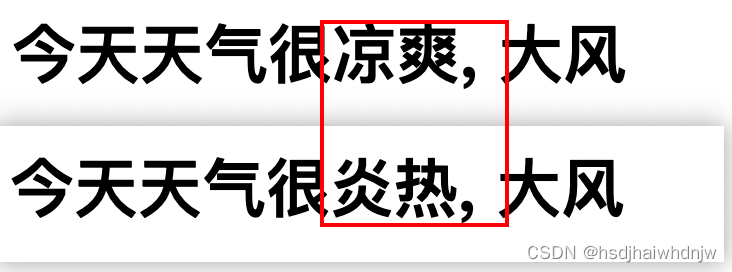
案例:点击文字,切换状态
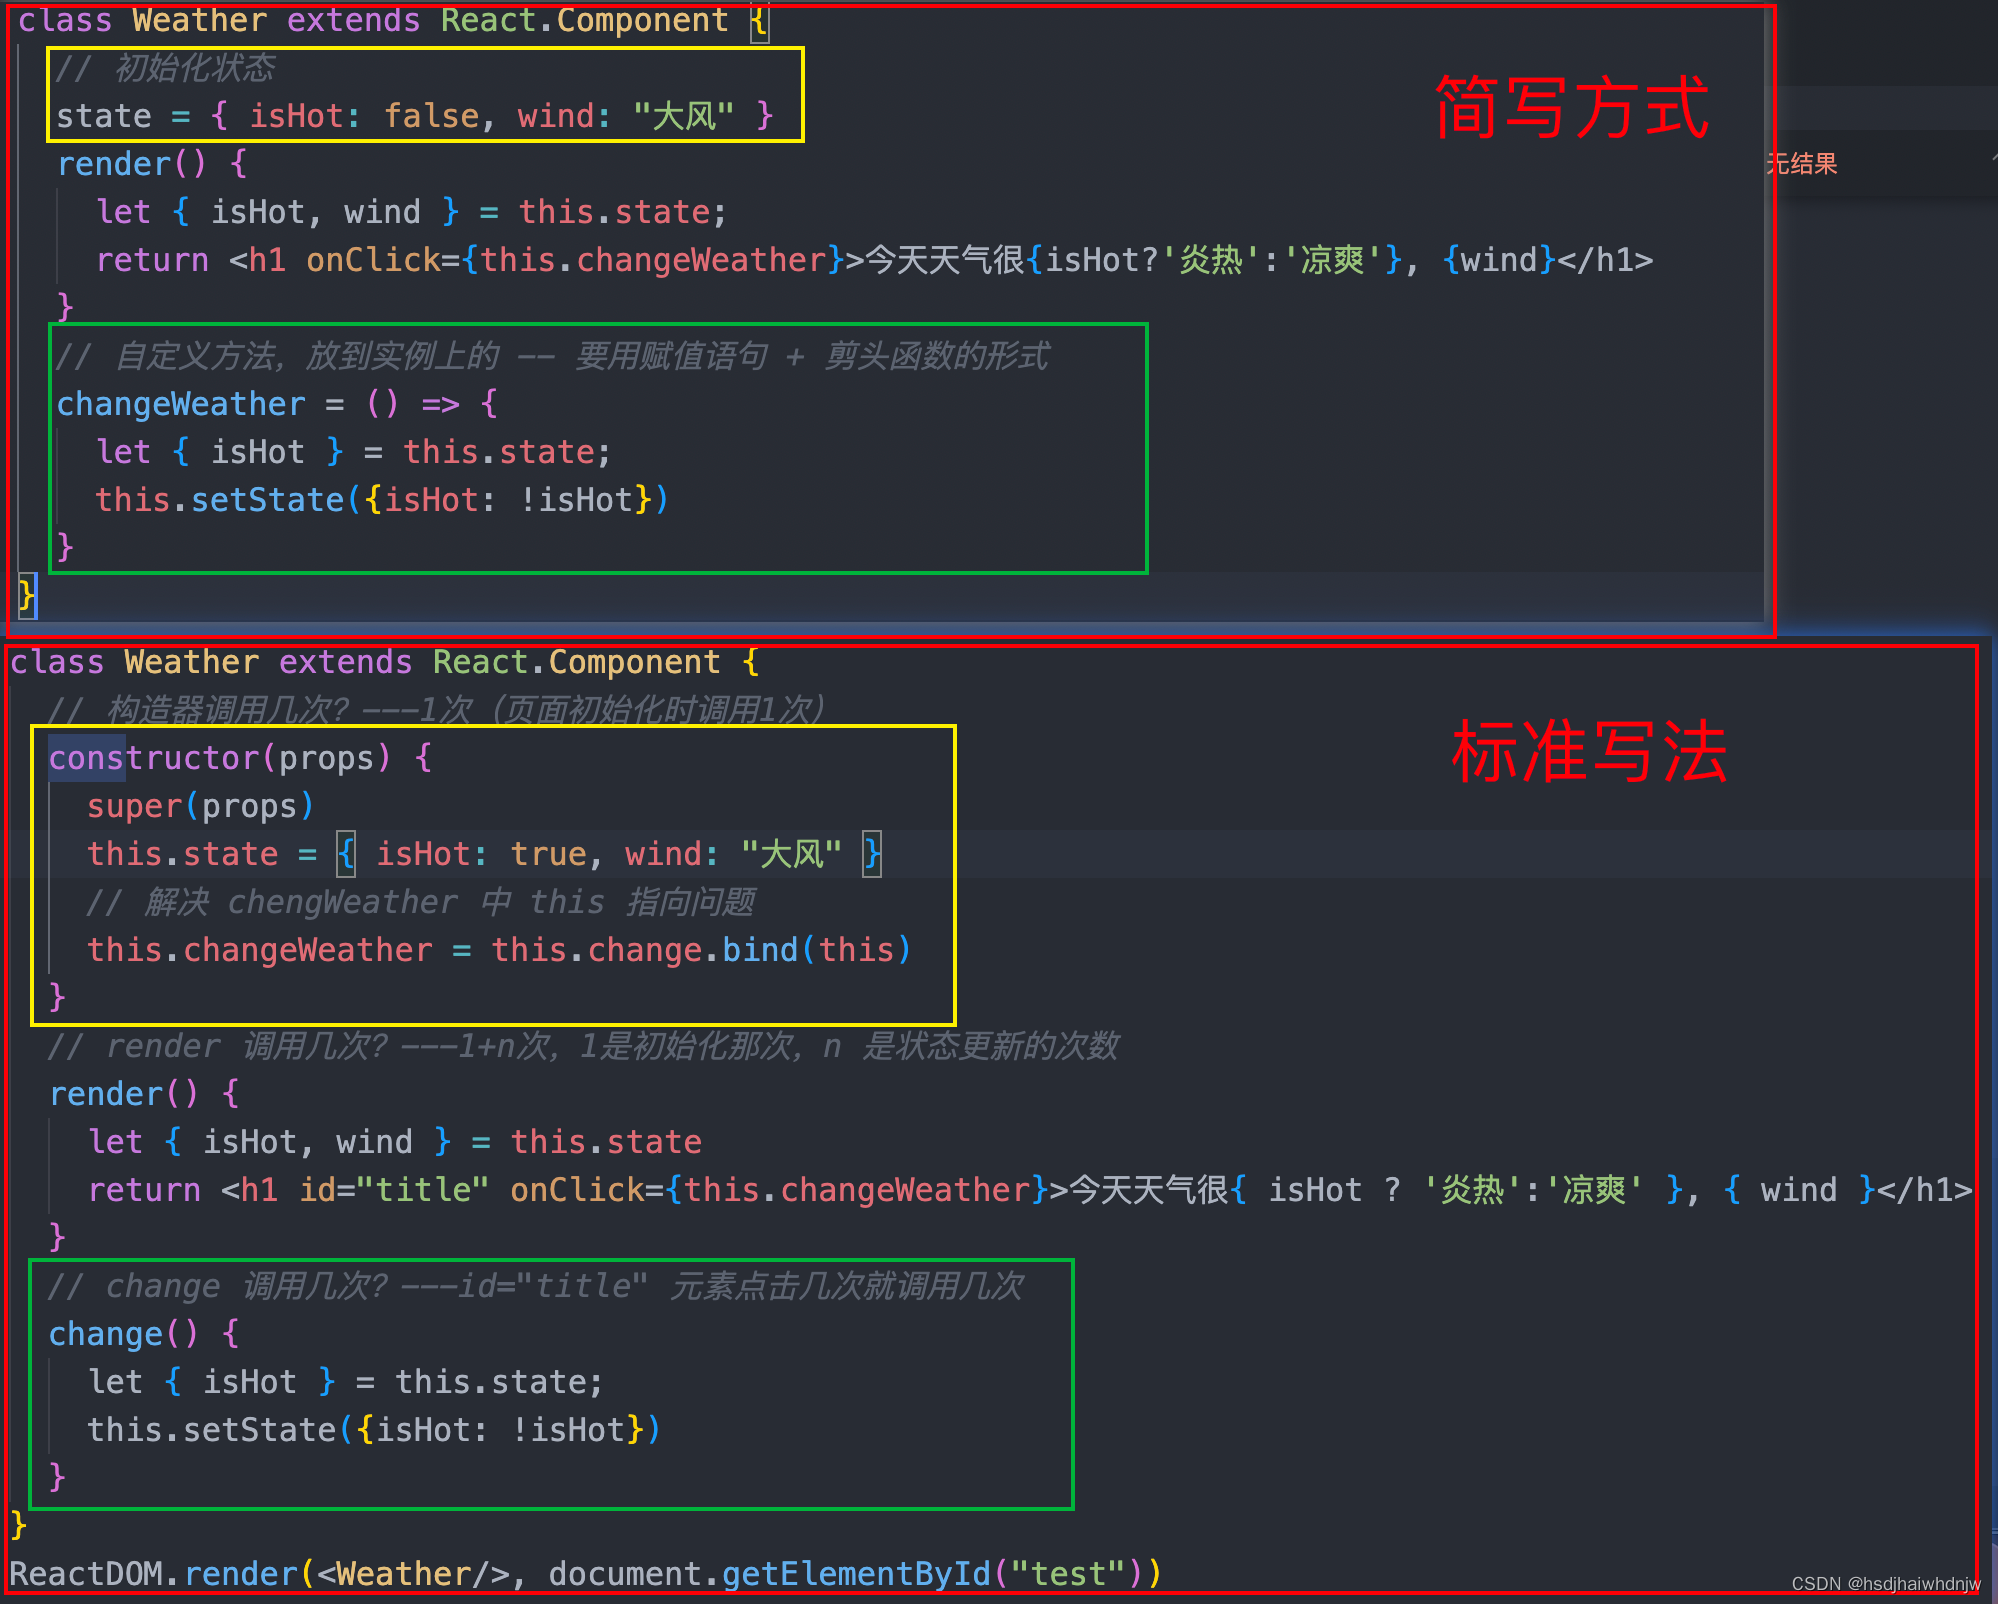
标准写法:
<body>
  <div id="test"></div>
  <script src="../js/react.development.js"></script>
  <script src="../js/react-dom.development.js"></script>
  <script src="../js/babel.min.js"></script>
  <script type="text/babel">
    class Weather extends React.Component {
      // 构造器调用几次?---1次(页面初始化时调用1次)
      constructor(props) {
        super(props)
        this.state = {
          isHot: true,
          wind: "大风"
        }
        // 解决 chengWeather 中 this 指向问题
        // 这里也可以用 this.change = this.change.bind(this),render方法中用 onClick={this.change}
        // 说明:上面赋值语句右边的 change 方法是挂到 Weather 的原型对象上的,等号左边的 change 是挂到 实例对象上的,
        // 点击的时候,其实是实例对象调用change,因为实例对象上有 change ,所以会执行 实例对象上的change而不是原型对象上的change
        this.changeWeather = this.change.bind(this)
      }
      // render 调用几次?---1+n次,1是初始化那次,n 是状态更新的次数
      render() {
        let { isHot, wind } = this.state
        // return <h1 id="title" onClick={this.change}>今天天气很{ this.state.isHot ? '炎热':'凉爽' }</h1>
        return <h1 id="title" onClick={this.changeWeather}>今天天气很{ isHot ? '炎热':'凉爽' }, { wind }</h1>
      }
      // change 调用几次?---id="title" 元素点击几次就调用几次
      change() {
        // change 放在哪里? --- Weather 的原型对象上,供实例使用
        // <h1 id="title" onClick={this.change}>今天天气很{ this.state.isHot ? '炎热':'凉爽' }</h1>
        // 上一行中 由于 change 是作为 onClick 的回调,所以 change 不是通过实例调用的,是直接调用,
        // 又由于类中的方法默认开启了局部的严格模式,所以 change 中的 this 为 undefined。
        // 要解决这个问题,需要在构造函数中,通过 bind 重新指定 this ==》this.changeWeather = this.change.bind(this)
        // 意思是,将 change 中的 this 指向实例对象,并将这个方法赋值给 实例对象的 changeWeather 属性上面
        // 最后在 render 方法中为节点绑定事件时,使用 changeWeather ,这样在点击节点时,changeWeather 里面拿到的 this 就是实例对象
        // console.log(this)
        let { isHot } = this.state;
        // !!!注意:状态必须通过 setState 进行更新,页面才会更新,且这里是合并(不影响其他键值对),不是直接替换 state 对象
        this.setState({isHot: !isHot})

        // !!!注意:状态(state)不能直接(赋值)更改,直接更改,页面不会更新,下面这行代码就是直接更改,数据会被修改,但是页面不会重新渲染
        // this.state.isHot = !this.state.isHot;
        // console.log(this.state.isHot)
      }
    }
    ReactDOM.render(<Weather/>, document.getElementById("test"))

    // 1、绑定事件:addEventListener
    // document.getElementById("title").addEventListener("click", () => {
    //   alert("123")
    // })

    // 2、绑定事件:onclick
    // document.getElementById("title").onclick = () => {
    //   alert("456")
    // }

    // 3、绑定事件:行内 onClick
    // 注:元素上必须要用小驼峰 onClick,而不能用 onclick,值为函数,所以要用 {demo}
    //    方法加括号的话,意思是将 demo 函数调用的返回值,赋值给onClick 作为回调,
    //    也就是会在初始化时执行1次,后续点击无效,所以这里不能加括号
    //    这里区别于 vue,vue 中,加括号表示要传值
    // function change () {
    //   alert("789")
    // }
  </script>
</body>
简写:
<body>
  <div id="test"></div>
  <script src="../js/react.development.js"></script>
  <script src="../js/react-dom.development.js"></script>
  <script src="../js/babel.min.js"></script>
  <script type="text/babel">
    class Weather extends React.Component {
      // 初始化状态
      state = { isHot: false, wind: "大风" }
      render() {
        let { isHot, wind } = this.state;
        return <h1 onClick={this.changeWeather}>今天天气很{isHot?'炎热':'凉爽'}, {wind}</h1>
      }
      // 自定义方法,放到实例上的 -- 要用赋值语句 + 剪头函数的形式
      changeWeather = () => {
      	// 剪头函数里的this指向定义函数时的this
        let { isHot } = this.state;
        this.setState({isHot: !isHot})
      }
    }
    ReactDOM.render(<Weather />, document.getElementById("test"))
  </script>
</body>
简写方式与标准写法对比:
2、props
- 每个组件对象都会有 props 属性
- 组件标签的所有属性都保存在 props 中
作用:
- 通过标签属性从组件外向组件内传递变化的数据
- 注意:组件内部不要修改 props 数据
1)基本使用
- 在使用组件标签时,以属性的形式传入,会以对象键值对的形式,在 render 方法中 this(实例对象)上面的 props 中获取到。
- 组件标签上要传对象时,可以使用
{...obj},react 内部会将对象中的键值对展开,以key=value的形式当到标签上
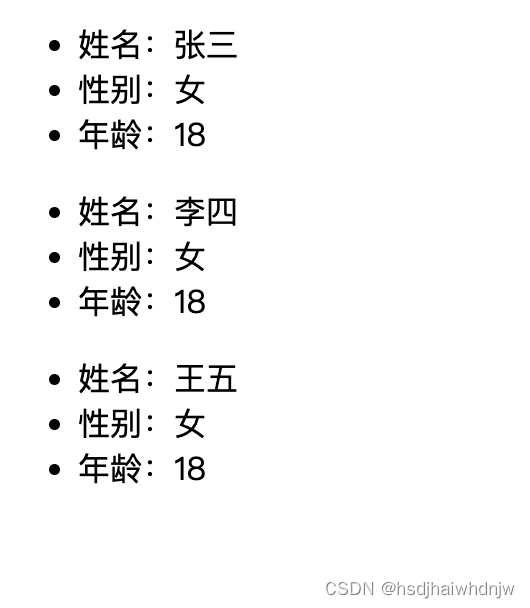
案例:
<body>
  <div id="test1"></div>
  <div id="test2"></div>
  <div id="test3"></div>
  <script src="../js/react.development.js"></script>
  <script src="../js/react-dom.development.js"></script>
  <script src="../js/babel.min.js"></script>
  <script type="text/babel">
    class Person extends React.Component {
      render() {
        console.log(this) // Person 的实例对象
        let { name, age, sex } = this.props;
        return (
          <ul>
            <li>姓名:{ name }</li>
            <li>性别:{ sex }</li>
            <li>年龄:{ age }</li>
          </ul>
        )
      }
    }

    ReactDOM.render(<Person name="张三" sex="女" age="18"/>, document.getElementById("test1"))
    let p = { name: "李四", sex: "女", age: "18" }
    ReactDOM.render(<Person name={p.name} sex={p.sex} age={p.sex}/>, document.getElementById("test2"))
    // 这里的 { ...p } 是由 jsx 和 react 处理的,会将对象 p 里的键值对拆开分别以键值对的形式放到标签上面,
    // 是上面一行代码的语法糖
    ReactDOM.render(<Person { ...p }/>, document.getElementById("test2"))
    ReactDOM.render(<Person name="王五" sex="女" age="18"/>, document.getElementById("test3"))
  </script>
</body>
2)对属性进行限制
有两种写法,可以使用 Person.xxx方式,也可以在类里面使用 static关键字实现。
// 法一:
// 对标签属性进行类型、必要性的限制
// PropTypes 是文件 prop-types.js 提供的
Person.propTypes = {
	name: PropTypes.string.isRequired
}
// 指定默认标签属性值
Person.defaultProps = {
	sex: "未知",
}

// 法二:
class Person extends React.Component {
	static propTypes = {}
	static defaultProps = {}
}
Person.propTypes对标签属性进行类型、必要性的限制- 定义对组件的类上面有 propTypes 属性,值为对象
- 旧版本的 React 上面挂载了 PropTypes ,新版react要另外引入 prop-types.js,该文件提供了全局的 PropTypes
Person.defaultProps指定默认标签属性值
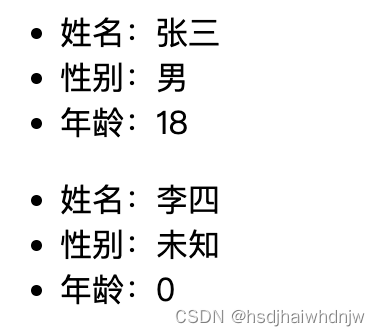
案例
<body>
  <div id="test1"></div>
  <div id="test2"></div>
  <div id="test3"></div>
  <script src="../js/react.development.js"></script>
  <script src="../js/react-dom.development.js"></script>
  <script src="../js/babel.min.js"></script>
  <script src="../js/prop-types.js"></script>
  <script type="text/babel">
    class Person extends React.Component {
      // 对标签属性进行类型、必要性的限制
      // PropTypes 是文件 prop-types.js 提供的
      // static 标记为静态属性,只能通过类去访问,不能通过实例对象访问
      static propTypes = {
        name: PropTypes.string.isRequired, // 限制name为必传,且类型为字符串
        sex: PropTypes.string, //限制sex为字符串
        age: PropTypes.number, //限制age为数值
        speak: PropTypes.func
      }
      // 指定默认标签属性值
      static defaultProps = {
        sex: "未知",  // sex 默认值为 未知
        age: 0  // age 默认值为 0
      }

      render() {
        let { name, sex, age } = this.props;
        return (
          <ul>
            <li>姓名:{ name }</li>
            <li>性别:{ sex }</li>
            <li>年龄:{ age }</li>
          </ul>
        )
      }
    }

    // 对标签属性进行类型、必要性的限制
    // PropTypes 是文件 prop-types.js 提供的
    // 这里 propTypes、defaultProps 是静态属性,只能通过类去访问,无法通过实例访问,也可以在定义类的时候通过 static 增加类的静态属性
    // Person.propTypes = {
    //   name: PropTypes.string.isRequired, // 限制name为必传,且类型为字符串
    //   sex: PropTypes.string, //限制sex为字符串
    //   age: PropTypes.number, //限制age为数值
    //   speak: PropTypes.func
    // }
    // // 指定默认标签属性值
    // Person.defaultProps = {
    //   sex: "未知",  // sex 默认值为 未知
    //   age: 0  // age 默认值为 0
    // }

    ReactDOM.render(<Person name="张三" sex="男" age={18}/>, document.getElementById("test1"))
    let p = { name: "李四" }
    ReactDOM.render(<Person {...p} speak={speak}/>, document.getElementById("test2"))

    function speak () {
      console.log("123")
    }
  </script>
</body>
构造器(constructor)和props
- 如果构造器不接受 props,或者 super 方法不传递 pros,在构造器里就不能通过 this.props 获取数据,此时 this.props 值为 undefined
- 如果构造器里正常接受 props ,super 正常传递 props,那么 this.props 可以拿到实例传过来的对象
- 其实这里影响不大,因为不管接不接受 props,都不影响页面的显示, super 不传递 props 的话,可以直接使用 constructor 接受到的 props 代替 this.props
class Person extends React.Component {
	// 构造器是否接受 props,是否传递给 super,取决于:是否希望在构造器中通过 this 访问 props
   constructor(props) {
      super(props)
      console.log(this.props)
    }
}
函数式组件中的 props
注:三大属性state、props、refs中,只有props可以使用在函数式组件中,其他两个只能在类式组件中使用。
案例:
<body>
  <div id="test1"></div>
  <div id="test2"></div>
  <div id="test3"></div>
  <script src="../js/react.development.js"></script>
  <script src="../js/react-dom.development.js"></script>
  <script src="../js/babel.min.js"></script>
  <script src="../js/prop-types.js"></script>
  <script type="text/babel">
    // 函数式组件中,函数接受一个参数,这个参数是组件标签里的属性键值对组成的对象
    function Person (props) {
      let { name, age, sex } = props;
      return (
        <ul>
          <li>姓名:{ name }</li>
          <li>性别:{ sex }</li>
          <li>年龄:{ age }</li>
        </ul>
      )
    }

    // 对标签属性进行类型、必要性的限制
    // PropTypes 是文件 prop-types.js 提供的
    // 这里 propTypes、defaultProps 是静态属性,只能通过类去访问,无法通过实例访问,也可以在定义类的时候通过 static 增加类的静态属性
    Person.propTypes = {
      name: PropTypes.string.isRequired, // 限制name为必传,且类型为字符串
      sex: PropTypes.string, //限制sex为字符串
      age: PropTypes.number, //限制age为数值
      speak: PropTypes.func
    }
    // 指定默认标签属性值
    Person.defaultProps = {
      sex: "未知",  // sex 默认值为 未知
      age: 0  // age 默认值为 0
    }

    ReactDOM.render(<Person name="张三" sex="男" age={18}/>, document.getElementById("test1"))
    let p = { name: "李四" }
    ReactDOM.render(<Person {...p} />, document.getElementById("test2"))

  </script>
</body>
3、refs
案例

1)字符串形式的 ref(因效率不高,新版本已将该写法移除)
- 节点上直接加上
ref="XXX"属性 - 类组件的实例对象上,有 refs 的属性,可以获取所有节点的 ref
<body>
<div id="test"></div>
<script src="../js/react.development.js"></script>
<script src="../js/react-dom.development.js"></script>
<script src="../js/babel.min.js"></script>
<script type="text/babel">
class Demo extends React.Component {
showData = () => {
alert(this.refs.input1.value)
}
showData2 = () => {
alert(this.refs.input2.value)
}
render() {
return (
<div>
<input ref="input1" type="text" placeholder="点击按钮弹出输入框内容"/>
<button onClick={this.showData}>点击按钮弹出左侧内容</button>
<input onBlur={this.showData2} ref="input2" type="text" placeholder="失去焦点弹出输入框内容" />
</div>
)
}
}
ReactDOM.render(<Demo/>, document.getElementById("test"))
</script>
</body>
2)回调形式的 ref
- 节点中,利用
ref={ (currentNode) => { this.XXX = currentNode }}将节点 currentNode(当前节点) 放到实例对象的 XXX 上面。(页面初始化的时候 react 会调用一次 ref 的回调,回调里面有参数,是当前节点。)
<body>
<div id="test"></div>
<script src="../js/react.development.js"></script>
<script src="../js/react-dom.development.js"></script>
<script src="../js/babel.min.js"></script>
<script type="text/babel">
class Demo extends React.Component {
showData = () => {
alert(this.input1.value)
}
showData2 = () => {
alert(this.input2.value)
}
// 回调式 ref 有两种写法:
// 1、直接定义一个方法
// 2、内联方式写到 html 上(该方法,在更新过程中,会被调用两次,但对功能没有影响)
saveInput1 = (currentNode) => {
this.input1 = currentNode
}
render() {
return (
<div>
{/*<input ref={currentNode => this.input1 = currentNode} type="text" placeholder="点击按钮弹出输入框内容"/>*/}
<input ref={this.saveInput1} type="text" placeholder="点击按钮弹出输入框内容"/>
<button onClick={this.showData}>点击按钮弹出左侧内容</button>
<input onBlur={this.showData2} ref={currentNode => this.input2 = currentNode} type="text" placeholder="失去焦点弹出输入框内容" />
</div>
)
}
}
ReactDOM.render(<Demo/>, document.getElementById("test"))
</script>
</body>
注意:内联回调的调用次数问题
如果ref回调函数是一内联函数的方式定义的,在 更新 过程中它会被执行两次,第一次传入参数null,第二次传入参数 DOM 元素。这是因为在每次渲染时,会创建一个新的函数实例,所以 React 清空旧的 ref 并设置新的。大多数情况下它是无关紧要的。
如果不想要在更新过程中被调用两次,可以使用方法1,另外定义一个方法。
3)createRef
React.createRef调用后,可以返回一个容器,该容器可以存储被 ref 标识的节点,该容器时 “专人专用”的。
<body>
<div id="test"></div>
<script src="../js/react.development.js"></script>
<script src="../js/react-dom.development.js"></script>
<script src="../js/babel.min.js"></script>
<script type="text/babel">
class Demo extends React.Component {
input1Ref = React.createRef();
input2Ref = React.createRef();
showData = () => {
alert(this.input1Ref.current.value)
}
showData2 = () => {
alert(this.input2Ref.current.value)
}
render() {
return (
<div>
<input ref={this.input1Ref} type="text" placeholder="点击按钮弹出输入框内容"/>
<button onClick={this.showData}>点击按钮弹出左侧内容</button>
<input onBlur={this.showData2} ref={this.input2Ref} type="text" placeholder="失去焦点弹出输入框内容" />
</div>
)
}
}
ReactDOM.render(<Demo/>, document.getElementById("test"))
</script>
</body>
八、react中的事件处理
- 1、通过
onXxx属性指定事件处理函数(注意大小写)- React 使用的是自定义(合成)事件,而不是原生DOM事件 — 为了更好的兼容性
- React 中的事件是通过事件委托方式处理的(委托给组件最外层的元素) ---- 为了高效
- 2、通过 event.target 得到发生事件的 DOM 元素对象 ----- 不要过度使用ref
注意:
绑定事件参考 七、react 组件实例三大对象 state、props、ref ===》案例:点击文字,切换状态
绑定的事件分两种情况:传参、不传参
1、不需要参数:<div onClick="this.changeWeather"></div>
// 标准写法:
// 赋值语句作用:将change方法挂载到实例对象上,此时 changeWeather 中的this就是实例对象
this.changeWeather = this.change.bind(this)
change() {}	//react 类中的方法默认开启了局部的严格模式,所以方法中的 this 为 undefined,将无法修改实例的 state、props 等数据。
-----------------------------------------------
// 简写:
// 赋值方式` changeWeather = () => {}`,将事件挂载到类组件的实例上面
changeWeather = () => {}
2、需要传参:有两种绑定方式
(1)利用高阶函数和柯里化绑定方法
<div onClick="this.changeWeather('params')"></div> 这里 changeWeather 中必须要返回一个方法。
changeWeather = (params) {
	//这里必须返回一个方法,不反回方法的话,changeWeather 会在初始化时执行一次,后续不会执行
	return (event) => {
		// 这个方法是由 react 调用的
	}
}
(2)标签内通过剪头函数绑定事件
<div onClick="(event) => {this.changeWeather('params')}"></div>
changeWeather = () => {}
1、非控组件
不绑定变量,随用随取的组件,如:输入框、下拉框等
案例:
实现登录表单:显示用户名、密码,点击登录,弹出用户名、密码,不跳转页面。
<body>
  <div id="test"></div>

  <script src="../js/react.development.js"></script>
  <script src="../js/react-dom.development.js"></script>
  <script src="../js/babel.min.js"></script>
  <script type="text/babel">
    class Login extends React.Component {
      confirm = (event) => {
        // 阻止默认事件(此处禁止表单提交后跳转页面)
        event.preventDefault();
        let { usernameEl, passwordEl } = this;
        alert(`你输入的用户名是${usernameEl.value},密码是${passwordEl.value}`)
      }
      render() {
        return (
          <form action="http://www.baidu.com" onSubmit={this.confirm}>
            用户名:<input ref={el => this.usernameEl = el} type="text" name="username" />
            密码:<input ref={el => this.passwordEl = el} type="password" name="password" />
            <button>登录</button>
          </form>
        )
      }
    }
    ReactDOM.render(<Login />, document.getElementById("test"))
  </script>
</body>
2、受控组件
根据用户输入,维护状态的组件是受控组件。
案例:
实现登录表单:显示用户名、密码,点击登录,弹出用户名、密码,不跳转页面。
<body>
  <div id="test"></div>

  <script src="../js/react.development.js"></script>
  <script src="../js/react-dom.development.js"></script>
  <script src="../js/babel.min.js"></script>
  <script type="text/babel">
    class Login extends React.Component {
      // 初始化数据
      state = {
        username: "",
        password: ""
      }

      // 输入框内容更改,调用以下方法
      saveUsername = (event) => {
        this.setState({ username: event.target.value })
      }
      savePassword = (event) => {
        this.setState({ password: event.target.value })
      }
      confirm = (event) => {
        // 阻止默认事件(此处禁止表单提交后跳转页面)
        event.preventDefault();
        console.log(this)
        let { username, password } = this.state;
        alert(`你输入的用户名是${username},密码是${password}`)
      }
      render() {
        return (
          <form action="http://www.baidu.com" onSubmit={this.confirm}>
            用户名:<input onChange={this.saveUsername} type="text" name="username" />
            密码:<input onChange={this.savePassword} type="password" name="password" />
            <button>登录</button>
          </form>
        )
      }
    }
    ReactDOM.render(<Login />, document.getElementById("test"))
  </script>
</body>
九、补充高阶函数和函数的柯里化
1、实现上一条的受控组件功能
a.高阶函数柯里化实现
八、react中的事件处理 - >2、受控组件
中的案例可以利用高阶函数实现:
<body>
  <div id="test"></div>

  <script src="../js/react.development.js"></script>
  <script src="../js/react-dom.development.js"></script>
  <script src="../js/babel.min.js"></script>
  <script type="text/babel">
    class Login extends React.Component {
      state = {
        username: "",
        password: ""
      }
      // 符合高阶函数第2条的定义,所以 saveFormData 函数叫做高阶函数
      // 符合函数柯里化的定义,所以 saveFormData 函数也叫函数的柯里化
      saveFormData = (dateType) => {
        return (event) => {
          this.setState({ [dateType]: event.target.value })
        }
      }
      confitm = (event) => {
        event.preventDefault();
        const { username, password } = this.state;
        alert(`你输入的用户名是${username},密码是${password}`)
      }
      render() {
        return (
          <div>
            <form action="" onSubmit={this.confitm}>
              用户名:<input onChange={this.saveFormData("username")} type="text" name="user"/>
              密码:<input onChange={this.saveFormData("password")} type="password" name="password" />
              <button>登录</button>
            </form>
          </div>
        )
      }
    }
    ReactDOM.render(<Login/>, document.getElementById("test"))
  </script>
</body>
b.不用柯里化的另一种写法
组件标签中使用剪头函数,剪头函数中使用实例对象的方法,将需要的参数传出去。
<body>
  <div id="test"></div>

  <script src="../js/react.development.js"></script>
  <script src="../js/react-dom.development.js"></script>
  <script src="../js/babel.min.js"></script>
  <script type="text/babel">
    class Login extends React.Component {
      state = {
        username: "",
        password: ""
      }
      saveFormData = (dateType, event ) => {
        this.setState({ [dateType]: event.target.value })
      }
      confitm = (event) => {
        event.preventDefault();
        const { username, password } = this.state;
        alert(`你输入的用户名是${username},密码是${password}`)
      }
      render() {
        return (
          <div>
            <form action="" onSubmit={this.confitm}>
              用户名:<input onChange={event => this.saveFormData("username", event)} type="text" name="user"/>
              密码:<input onChange={event => this.saveFormData("password", event)} type="password" name="password" />
              <button>登录</button>
            </form>
          </div>
        )
      }
    }
    ReactDOM.render(<Login/>, document.getElementById("test"))
  </script>
</body>
十、react 生命周期
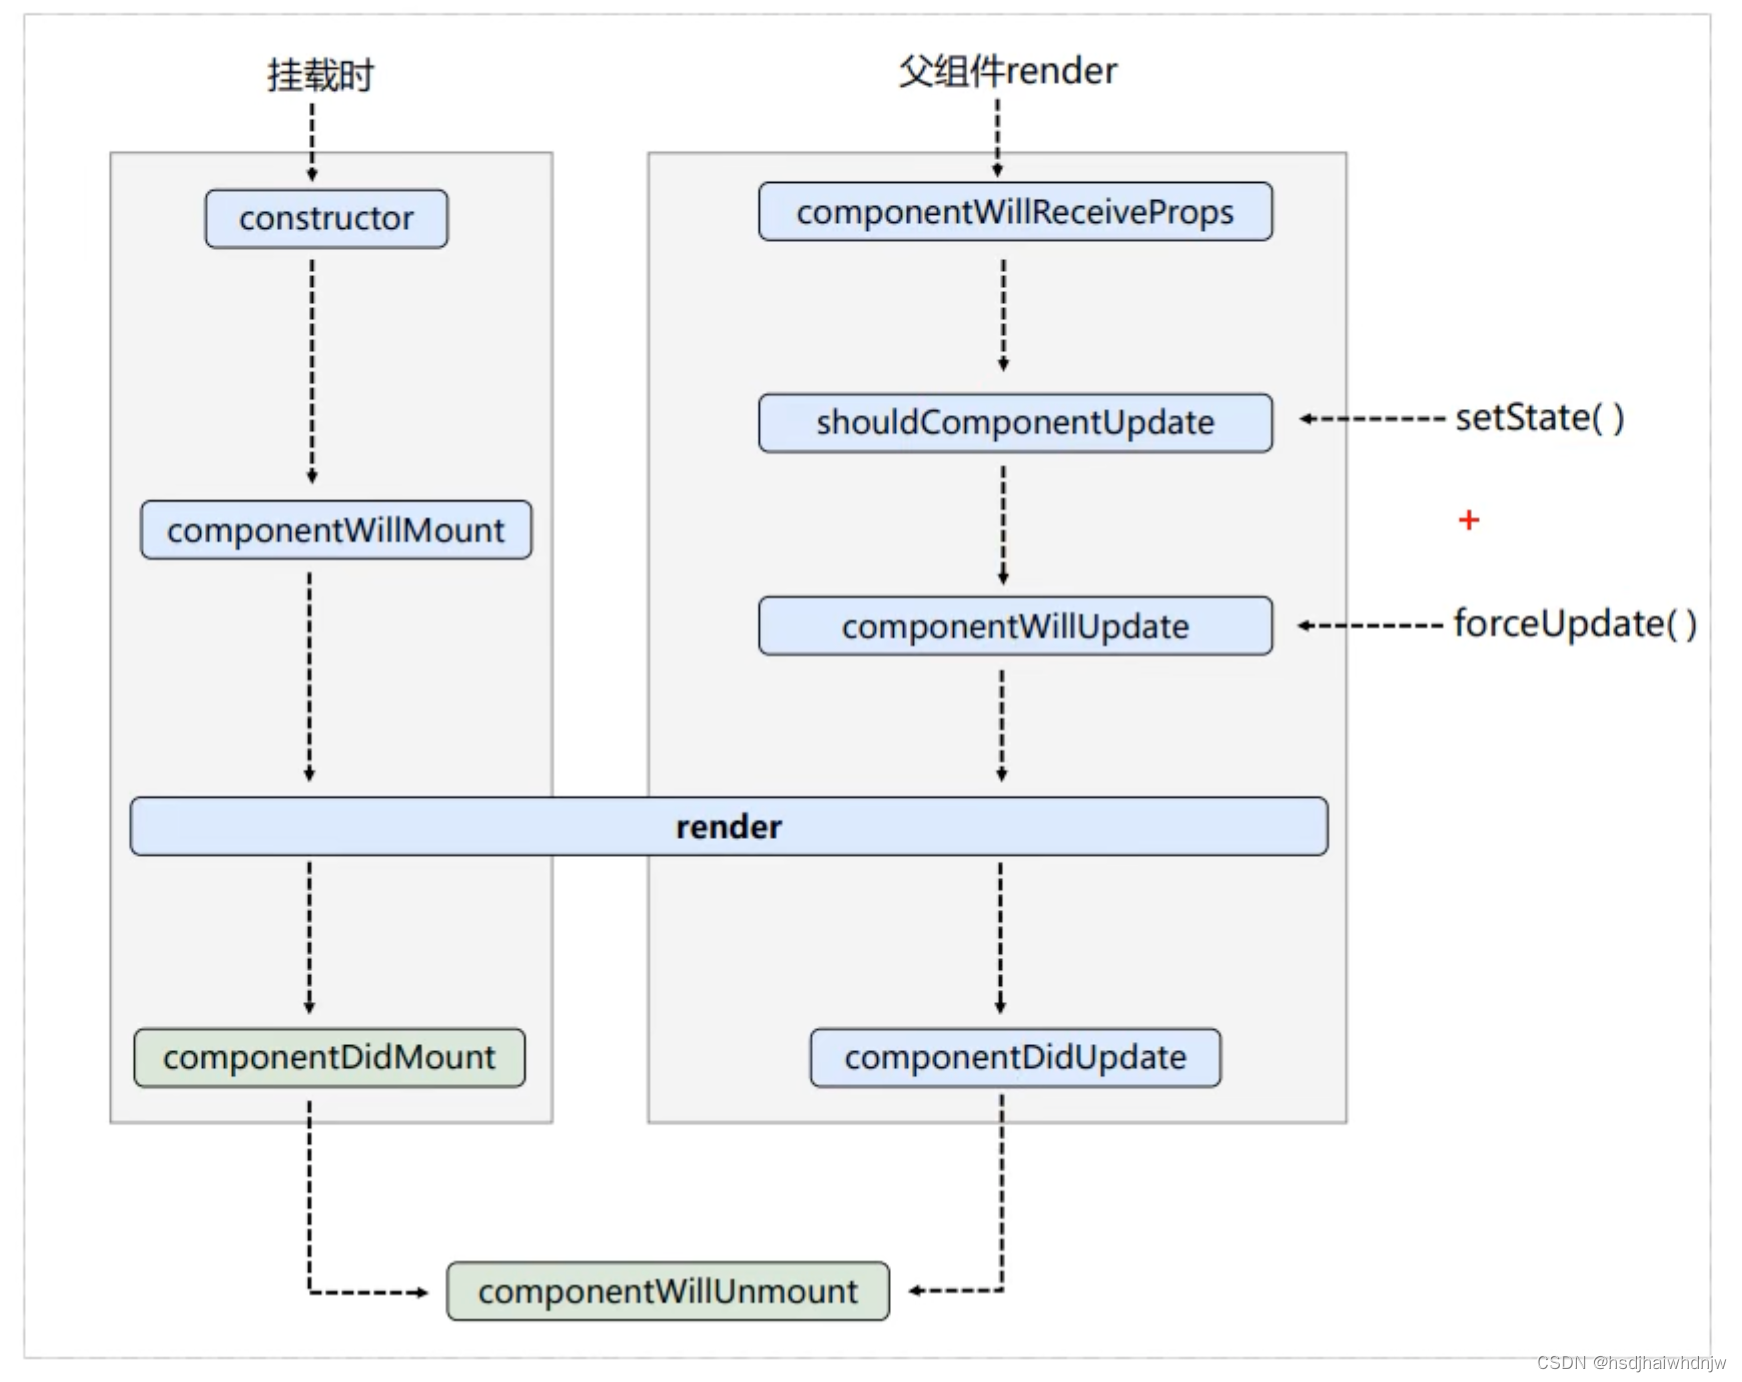
1、旧版本的生命周期
- 1、初始化阶段:由
ReactDOM.render()触发------初次渲染-
constructor()
-
componentWillMount()
-
render()
-
componentDidMount()===> 比较常用,一般做一些初始化的事:开启定时器、发送网络请求、订阅消息
-
- 2、更新阶段:由组件内部
this.setState()或者父组件render触发-
shouldComponentUpdate()
-
componentWillUpdate()
-
render()===> 必须会使用到的一个
-
componentDidUpdate()
-
- 3、卸载组件:由
ReactCOM.unmountComponentAtNode()触发-
componentWillUnmount()===》 比较常用,一般做一些收尾的事:关闭定时器、取消订阅消息
-
<body>
  <div id="test"></div>

  <script src="../js/react.development.js"></script>
  <script src="../js/react-dom.development.js"></script>
  <script src="../js/babel.min.js"></script>
  <script type="text/babel">
    class Count extends React.Component {
      // 初始化
      constructor(props) {
        super(props)
        this.state = {
          count: 0
        }
        console.log("Count---constructor")
      }

      add = () => {
        let { count } = this.state;
        this.setState({count: count+=1})
      }
      death = () => {
        ReactDOM.unmountComponentAtNode(document.getElementById("test"))
      }
      force = () => {
        this.forceUpdate()
      }


      // 组件将要挂载的钩子
      componentWillMount() {
        console.log("Count---componentWillMount")
      }
      // 组件挂载完毕的钩子
      componentDidMount() {
        console.log("Count---componentDidMount")
      }
      // 组件是否要更新的钩子
      // 不写该钩子,默认返回 true,要更新
      // 返回false,则不更新
      // 控制组件更新的阀门
      shouldComponentUpdate() {
        console.log("Count---shouldComponentUpdate")
        return true;
      }
      // 组件将要更新的钩子
      componentWillUpdate() {
        console.log("Count---componentWillUpdate")
      }
      // 组件更新完毕的钩子
      componentDidUpdate() {
        console.log("Count---componentDidUpdate")
      }
      // 组件将要卸载掉狗子
      componentWillUnmount() {
        console.log("Count---componentWillUnmount")
      }

      render() {
        console.log("Count---render")

        return (
          <div>
            <h1>当前求和为{this.state.count}</h1>
            <button onClick={this.add}>点击+1</button>
            <button onClick={this.death}>卸载组件</button>
            <button onClick={this.force}>强制更新组件</button>
          </div>
        )
      }
    }

    // ReactDOM.render(<Count/>, document.getElementById("test"))

    class A extends React.Component {
      state = {
        carname: "奔驰"
      }
      changeCar = () => {
        this.setState({ carname: "宝马" })
      }
      render() {
        return (
          <div>
            <h1>这是A组件</h1>
            <button onClick={this.changeCar}>点击切换A组件的信息</button>
            <B carname={this.state.carname} />
          </div>
        )
      }
    }

    class B extends React.Component {
      // 组件将要接收新的 props 钩子
      componentWillReceiveProps() {
        console.log("B---componentWillReciveProps")
      }
      // 控制组件更新的阀门
      shouldComponentUpdate() {
        console.log("B---shouldComponentUpdate")
        return true;
      }
      // 组件将要更新的钩子
      componentWillUpdate() {
        console.log("B---componentWillUpdate")
      }
      // 组件更新完毕的钩子
      componentDidUpdate() {
        console.log("B---componentDidUpdate")
      }

      render() {
        console.log("B---render")
        return (
          <div>
            <h1>这是B组件,接收到A组件的信息是{this.props.carname}</h1>
          </div>
        )
      }
    }

    ReactDOM.render(<A/>, document.getElementById("test"))
  </script>
</body>
2、新版本的生命周期
- 1、初始化阶段:由
ReactDOM.render()—初次渲染-
constructor()
-
getDerivedStateFromProps
-
render()
-
componentDidMount()===》比较常用,一般在这个钩子里做一些初始化的事情:开启定时器、发送网络请求、订阅消息
-
- 2、更新阶段:由组件内部的
this.setState()或父组件重新render触发-
getDerivedStateFromProps()
-
shouldComponentUpdate()
-
render()===》必须会用到的回调
-
getSnapshotBeforeUpdate
-
componentDidUpdate()
-
- 3、卸载组件:由组件
ReactDOM.unmountComponentAtNode()触发-
componentWillUnmount()===》比较常用,一般在这个钩子里做一些收尾的事情:关闭定时器、取消订阅消息。
-
3、新旧生命周期对比:
- 新的生命周期废弃了三个钩子:componentWillMount、componentWillUpdate、componentWillReceiveProps,17.0.1 版本中,需要这三个周期名称前要加
UNSAFE_,最新版本已经移除。 - 新增了两个新的钩子:getDerivedStateFromProps、getSnapshotBeforeUpdate
getDerivedStateFromProps():从 props 里获取派生的 state。很少使用。
· 1、方法里有两个参数,一个是 props 一个是 state。
· 2、这里必须要有返回值,默认返回 对象或者 null,若返回的对象会被写进到 state 里面,如有重名 key,则会覆盖,对该 key 的值做任何修改都无效;返回 null 则对 state 没有任何影响getSnapshotBeforeUpdate():获取更新前的快照。这里必须要 return,return 的数据,可以从componentDidUpdate回调的第三个参数去接收。感觉类似于 vue 的beforeUpdate,只是多了一个 return。
<body>
  <div id="test"></div>

  <script src="../js/17.0.1/react.development.js"></script>
  <script src="../js/17.0.1/react-dom.development.js"></script>
  <!-- <script src="https://cdn.bootcdn.net/ajax/libs/react/17.0.1/umd/react.development.js"></script>
  <script src="https://cdn.bootcdn.net/ajax/libs/react-dom/17.0.1/umd/react-dom.development.js"></script> -->
  <script src="../js/babel.min.js"></script>
  <script type="text/babel">
    class Count extends React.Component {
      // 初始化
      constructor(props) {
        super(props)
        this.state = {
          count: 0
        }
        console.log("Count---constructor")
      }

      add = () => {
        let { count } = this.state;
        this.setState({count: count+=1})
      }
      death = () => {
        ReactDOM.unmountComponentAtNode(document.getElementById("test"))
      }
      force = () => {
        this.forceUpdate()
      }

      // 从 props 里获取派生的 state
      // 若state的值在任何时候都取决于 props ,那么可以使用 getDerivedStateFromProps,在 constructor 中也可以实现
      // 该方法不常使用
      static getDerivedStateFromProps(props, state) {
        console.log("Count---getDerivedStateFromProps",props,state)
        // getDerivedStateFromProps 方法里有两个参数,一个是 props 一个是 state
        // 这里必须要有返回值,默认返回 对象或者 null,
        //    若返回的对象会被写进到 state 里面,如有重名 key,则会覆盖,对该 key 的值做任何修改都无效
        //    返回 null 则对 state 没有任何影响
        // return {count:200}
        // return {name:"count"}
        // return props
        return null
      }
      // 在更新之前获取快照
      getSnapshotBeforeUpdate() {
        console.log("Count---getSnapshotBeforeUpdate")
        return null
      }
      // 组件挂载完毕的钩子
      componentDidMount() {
        // 如果 getDerivedStateFromProps 方法里返回state额外的键值对,从这里开始,可以在 state 中查到这些额外的键值对
        console.log("Count---componentDidMount",this.state)
      }
      // 组件是否要更新的钩子
      // 不写该钩子,默认返回 true,要更新
      // 返回false,则不更新
      // 控制组件更新的阀门
      shouldComponentUpdate() {
        console.log("Count---shouldComponentUpdate")
        return true;
      }
      // 组件更新完毕的钩子
      componentDidUpdate(preProps, preState, getSnapshotBeforeUpdateParams) {
        // 这个方法里面,前两个参数分别是更新之前的 prop、state,
        // 最后一个参数是 getSnapshotBeforeUpdate 方法里面 return 的数据
        console.log("Count---componentDidUpdate",preProps, preState)
      }
      // 组件将要卸载掉狗子
      componentWillUnmount() {
        console.log("Count---componentWillUnmount")
      }

      render() {
        console.log("Count---render")

        return (
          <div>
            <h1>当前求和为{this.state.count}</h1>
            <button onClick={this.add}>点击+1</button>
            <button onClick={this.death}>卸载组件</button>
            <button onClick={this.force}>强制更新组件</button>
          </div>
        )
      }
    }

    ReactDOM.render(<Count count={300}/>, document.getElementById("test"))

  </script>
</body>
getSnapshotBeforeUpdate的列表滚动案例
<body>
  <style>
    .news_list {
      width: 100px;
      height: 150px;
      background: yellowgreen;
      overflow-y: auto;
    }
    .new {
      height: 30px;
    }
  </style>
  <div id="test"></div>

  <script src="../js/17.0.1/react.development.js"></script>
  <script src="../js/17.0.1/react-dom.development.js"></script>
  <script src="../js/babel.min.js"></script>
  <script type="text/babel">
    class NewsList extends React.Component {
      state = {newsArr: []}
      componentDidMount() {
        setInterval(() => {
          let { newsArr } = this.state,
            item = `新闻${newsArr.length+1}`;
          this.setState({ newsArr: [item,...newsArr] })
        }, 1000)
      }
      // 获取更新前的快照
      getSnapshotBeforeUpdate() {
        return this.refs.newsList.scrollHeight;
      }
      componentDidUpdate(preProps, preState, height) {
        // 这个方法里面,前两个参数分别是更新之前的 prop、state,
        // 最后一个参数是 getSnapshotBeforeUpdate 方法里面 return 的数据
        this.refs.newsList.scrollTop += this.refs.newsList.scrollHeight - height
      }
      render() {
        return (
          <div ref="newsList" className="news_list">
            {
              this.state.newsArr.map((item, index) => {
                return <div key={index} className="new">{item}</div>
              })
            }
          </div>
        )
      }
    }
    ReactDOM.render(<NewsList />, document.getElementById("test"))
  </script>
</body>

4、重要的钩子
1、render:初始化渲染或更新渲染调用
2、componentDidMount:做一些初始化工作,如开启监听,发送ajax请求
3、componentWillUnmount:做一些收尾工作,如清理定时器
5、即将废弃的钩子
1、componentWillMount
2、componentWillReceiveProps
3、componentWillUpdate
现在使用会出现警告,后面版本需要加上 UNSAFE_ 前缀才能使用,以后可能会被彻底废弃,不建议使用。


 4306
4306


 被折叠的 条评论
为什么被折叠?
被折叠的 条评论
为什么被折叠?
 到【灌水乐园】发言


