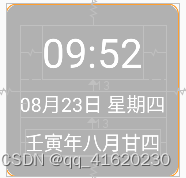
在项目中右键创建widget后,我们需要一个service控制刷新。
效果图:


class WidgetsService : Service() {

    companion object {
        const val TAG = "WidgetsServiceTAG"

        fun start(ids: String, context: Context) {
            val intent = Intent(context, WidgetsService::class.java)
            intent.putExtra("widgetIds", ids)
            if (Build.VERSION.SDK_INT >= Build.VERSION_CODES.O) {
                Log.e(TAG, "start: yyyyy")
                context.startForegroundService(intent)
            } else {
                Log.e(TAG, "start: nnnnn")
                context.startService(intent)
            }
        }
    }

    /**
     * 1是竖屏2是横屏
     */
    override fun onConfigurationChanged(newConfig: Configuration) {
        super.onConfigurationChanged(newConfig)
        Log.d(TAG, "onConfigurationChanged: ${newConfig.orientation}")
//        if (SpUtils.getBoolean("suspension_switch", false)) {
//            SuspensionFragment.newInstance().resetDisplay(newConfig.orientation)
//        }

    }

    private var widgetId: String? = null

    private var timer: Timer? = null
    override fun onCreate() {
        super.onCreate()

        timer = Timer()
        timer?.schedule(object : TimerTask() {
            override fun run() {
                updateWidgets()
            }
        }, 0, 1000)
        startNotificationForeground()
    }

    override fun onStartCommand(intent: Intent?, flags: Int, startId: Int): Int {
        Log.e(TAG, "onStartCommand: ${intent?.getStringExtra("widgetIds")}")
        widgetId = intent?.getStringExtra("widgetIds")
        return super.onStartCommand(intent, flags, startId)
    }

    override fun onBind(intent: Intent?): IBinder? = null


    /**
     * @describe: 前台通知
     * @date: 2022/7/5 09:47
     **/
    private fun startNotificationForeground() {
        if (Build.VERSION.SDK_INT >= Build.VERSION_CODES.O) {
            val channelId = "WidgetService"
            val manager = getSystemService(NOTIFICATION_SERVICE) as NotificationManager
            val channel = NotificationChannel(channelId, "主服务", NotificationManager.IMPORTANCE_HIGH)
            channel.enableLights(false) //设置提示灯
            channel.lightColor = Color.RED //设置提示灯颜色
            channel.setShowBadge(true) //显示logo
            channel.description = "widgets_daycare" //设置描述
            channel.lockscreenVisibility =
                Notification.VISIBILITY_SECRET //设置锁屏可见 VISIBILITY_PUBLIC=可见
            manager.createNotificationChannel(channel)
            val notification: Notification = Notification.Builder(this)
                .setChannelId(channelId)
                .setAutoCancel(false)
                .setContentText("建议保留该通知,以保证小组件功能正常使用~") //内容
                .setWhen(System.currentTimeMillis())
                .setSmallIcon(R.mipmap.ic_launcher)
            //小图标一定需要设置,否则会报错(如果不设置它启动服务前台化不会报错,但是你会发现这个通知不会启动),如果是普通通知,不设置必然报错
//                .setLargeIcon(BitmapFactory.decodeResource(resources, R.drawable.ic_open_page))
                .build()

            startForeground(
                333,
                notification
            ) //服务前台化只能使用startForeground()方法,不能使用 notificationManager.notify(1,notification); 这个只是启动通知使用的,使用这个方法你只需要等待几秒就会发现报错了


        }
    }


    /**
     * @describe: 更新组件
     * @date: 2022/7/5 11:04
     **/
    private fun updateWidgets() {
        GlobalScope.launch(Dispatchers.Default) {
            try {
                updateColorSmallWidget()
                updateFlipWidget()
            } catch (ex: Exception) {
            }
        }
    }

    /**
     * @describe: 更新彩色180*180组件
     * @date: 2022/7/6 15:44
     **/
    private fun updateColorSmallWidget() {
        val appWidgetManager = getSystemService(Context.APPWIDGET_SERVICE) as AppWidgetManager
        val srcId = loadIconPref(this)
        val contentView = LayoutInflater.from(this)
            .inflate(R.layout.activity_contracted_widget, null)
        val widgetInfo = SuspensionUtil().getWidgetInfo()?.get(0)
        contentView.findViewById<TextClock>(R.id.tv_hour).format12Hour = "hh:mm"
        contentView.findViewById<TextClock>(R.id.tv_hour).format24Hour = "hh:mm"
        contentView.findViewById<TextClock>(R.id.tv_week).format12Hour = "MM月dd日 EEEE"
        contentView.findViewById<TextClock>(R.id.tv_week).format24Hour = "MM月dd日 EEEE"
        contentView.findViewById<TextView>(R.id.tv_lunar).text = ChinaDate.getCurrentLunarDate3()
        widgetInfo?.textColor?.let {
            contentView.findViewById<TextClock>(R.id.tv_hour).setTextColor(
                it
            )
        }
        widgetInfo?.textColor?.let {
            contentView.findViewById<TextClock>(R.id.tv_week).setTextColor(
                it
            )
        }
        widgetInfo?.textColor?.let {
            contentView.findViewById<TextView>(R.id.tv_lunar).setTextColor(
                it
            )
        }

        if (widgetInfo?.aboardColor != null && widgetInfo?.aboardColor != -1) {
            val drawable = SuspensionUtil().gradientDrawable(this, widgetInfo?.aboardColor)
            contentView.findViewById<ImageView>(R.id.image_aboard).setImageDrawable(drawable)
        }

        contentView.findViewById<RoundedImageView>(R.id.image_view).setImageResource(srcId)
        /**
         * 设置显示的组件尺寸
         */
        val view = layoutView(
            contentView,
            DpOrPxUtils.dip2px(this, 180f),
            DpOrPxUtils.dip2px(this, 180f)
        )

        val contentBitmap = createContentBitmap(view)

        // Construct the RemoteViews object
        val views = RemoteViews(this.packageName, R.layout.new_app_widget)
        views.setImageViewBitmap(R.id.iv_bg, contentBitmap)

        // Instruct the widget manager to update the widget
        val componentName = ComponentName(
            App.instance,
            ContractedWidget::class.java
        )
        appWidgetManager.updateAppWidget(componentName, views)
    }

    /**
     * @describe: 更新彩色180*180组件
     * @date: 2022/7/6 15:44
     **/
    private fun updateFlipWidget() {
        val appWidgetManager = getSystemService(Context.APPWIDGET_SERVICE) as AppWidgetManager
        val srcId = loadIconPref(this)
        val contentView = LayoutInflater.from(this)
            .inflate(R.layout.activity_flip_widget, null)
        val widgetInfo = SuspensionUtil().getWidgetInfo()?.get(0)
        contentView.findViewById<TextClock>(R.id.tv_week).format12Hour = "MM月dd日 EEEE"
        contentView.findViewById<TextClock>(R.id.tv_week).format24Hour = "MM月dd日 EEEE"
        widgetInfo?.textColor?.let {
            contentView.findViewById<TextClock>(R.id.tv_week).setTextColor(
                it
            )
        }
        widgetInfo?.textColor?.let {
            contentView.findViewById<FlipLayout>(R.id.bit_flip_hour).setFLipTextColor(it)
            contentView.findViewById<FlipLayout>(R.id.bit_flip_minute).setFLipTextColor(it)
            contentView.findViewById<TextView>(R.id.dian1).setTextColor(it)
        }

        val tvCurrentHourTime: FlipLayout = contentView.findViewById<FlipLayout>(R.id.bit_flip_hour)
        val tvCurrentMinTime: FlipLayout =
            contentView.findViewById<FlipLayout>(R.id.bit_flip_minute)

        if (android.text.format.DateFormat.is24HourFormat(this)) {
            tvCurrentHourTime.flip(DateUtils.getHour(), 24, TimeTAG.hour)
        } else {
            tvCurrentHourTime.flip(DateUtils.getHour(), 12, TimeTAG.hour)
        }
        tvCurrentMinTime.flip(DateUtils.getMinute(), 60, TimeTAG.min)

        if (widgetInfo?.aboardColor != null && widgetInfo?.aboardColor != -1) {
            val drawable = SuspensionUtil().gradientDrawable(this, widgetInfo?.aboardColor)
            contentView.findViewById<ImageView>(R.id.image_aboard).setImageDrawable(drawable)
        }

        contentView.findViewById<RoundedImageView>(R.id.image_view).setImageResource(srcId)
        /**
         * 设置显示的组件尺寸
         */
        val view = layoutView(
            contentView,
            DpOrPxUtils.dip2px(this, 180f),
            DpOrPxUtils.dip2px(this, 180f)
        )

        val contentBitmap = createContentBitmap(view)

        // Construct the RemoteViews object
        val views = RemoteViews(this.packageName, R.layout.flip_widget)
        views.setImageViewBitmap(R.id.iv_flip_bg, contentBitmap)

        // Instruct the widget manager to update the widget
        val componentName = ComponentName(
            App.instance,
            FlipWidget::class.java
        )
        appWidgetManager.updateAppWidget(componentName, views)
    }


    /**
     *  渲染view
     */
    private fun layoutView(view: View, widgetWidth: Int, widgetHeight: Int): View {
        val metric = DisplayMetrics()
        val windowManager =
            view.context.applicationContext.getSystemService(Context.WINDOW_SERVICE) as WindowManager
        windowManager.defaultDisplay.getRealMetrics(metric)
        val measuredW = View.MeasureSpec.makeMeasureSpec(widgetWidth, View.MeasureSpec.AT_MOST)
        val measuredH = View.MeasureSpec.makeMeasureSpec(widgetHeight, View.MeasureSpec.AT_MOST)
        view.measure(measuredW, measuredH)
        view.layout(0, 0, widgetWidth, widgetHeight)
        return view
    }

    /**
     * 设置点击按钮对应的PendingIntent
     * @param context
     * @param buttonShowId
     * @return
     */
    private fun getPendingIntent(
        context: Context,
        buttonShowId: String,
        cls: Class<*>
    ): PendingIntent {
        val intent = Intent()
        intent.setClass(context, cls)
        intent.action = Intent.CATEGORY_ALTERNATIVE
        intent.putExtra("receive", buttonShowId)
        return PendingIntent.getBroadcast(context, 0, intent, 0)
    }

    override fun onDestroy() {
        super.onDestroy()
        if (timer != null) {
            timer?.cancel()
            timer = null
        }
        Log.d(TAG, "onDestroy: 1112222")
    }
}

private const val PREFS_NAME = "com.example.appwidget.AppWidget"
private const val PREF_ICON_KEY = "appwidget_icon"
internal fun loadIconPref(context: Context): Int {
    val prefs = context.getSharedPreferences(PREFS_NAME, 0)
    val widgetInfo = SuspensionUtil().getWidgetInfo()

    return prefs.getInt(
        PREF_ICON_KEY,
        CommonUtil.getResourceId(context, widgetInfo?.get(0)?.bgName)
    )
}

/**
 * 创建内容bitmap
 */
internal fun createContentBitmap(view: View): Bitmap {
    //创建画布bitmap
    val bitmap =
        Bitmap.createBitmap(view.width, view.height, Bitmap.Config.ARGB_8888)
    //val bitmap =
    //            Bitmap.createBitmap(DpOrPxUtils.dip2px(this,180f),DpOrPxUtils.dip2px(this,180f), Bitmap.Config.ARGB_8888)
    val canvas = Canvas(bitmap)
    //使控件可以进行缓存
    view.isDrawingCacheEnabled = true
    //复制获取的 Bitmap
    val drawingCache = Bitmap.createBitmap(view.drawingCache)
    //关闭视图的缓存
    view.isDrawingCacheEnabled = false
    //画内容
    canvas.drawBitmap(drawingCache, 0f, 0f, null)
    return bitmap
}


 2032
2032


 被折叠的 条评论
为什么被折叠?


