


本文是 Android Widget(小部件) 系列的第一篇,主要是对 Android widget (小部件)基本原理、开发流程、以及常见问题做了简单的介绍。
本系列的目的是通过对Android 小部件的梳理,了解小部件刷新流程、恢复流程、以及系统发生变化时,小部件是如何适配的,解决在开发小部件过程中遇到的问题。系列文章大部份来自源码的解读,内容非常多,也非常容易遗忘,因此记录分享。
系列文章
Android Widget 基础介绍以及常见问题
安卓小部件刷新源码解析一非列表
安卓小部件(APPWidget)刷新源码解析一列表
#一、Android Widget 原理常见问题
##1、小部件是什么?

App widgets are miniature application views that can be embedded in other applications (such as the home screen) and receive periodic updates。
通俗解释:一个能够定期刷新并且加到其他应用上的微型视图。
官网
##2、小部件的运行机制是什么?
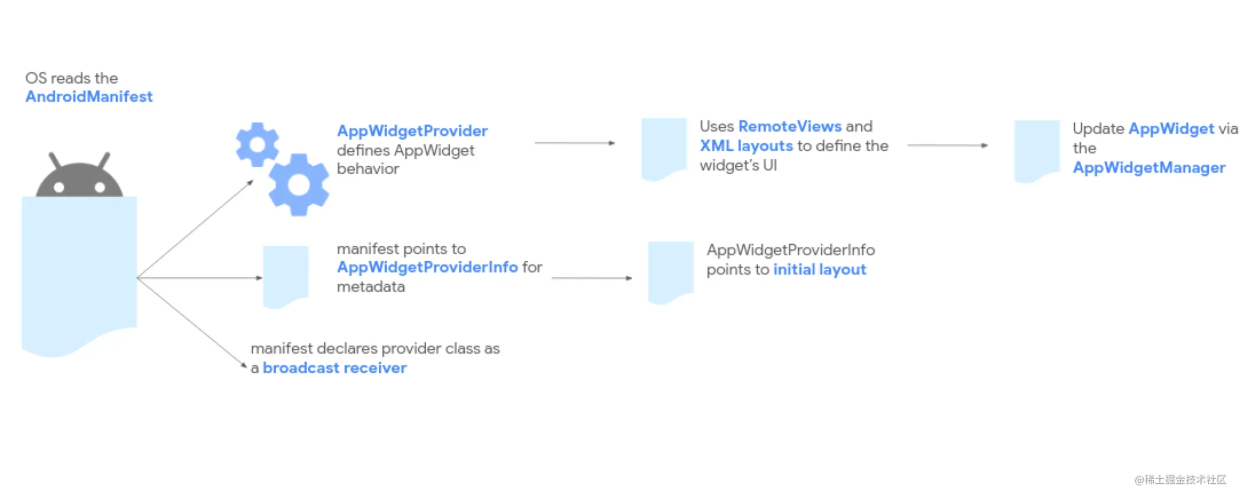
- 通过 AppWidgetProvider 定义小部件的行为
- 通过 RemoteView 和布局文件定义小部件的UI
- 通过AppWidgetManager 更新视图
- 在manifeset 里注册 AppWidgetProvider(继承于广播),设置监听的action以及配置文件
##3、RemoteView如何工作?
RemoteView 继承于Parcelable,可在进程间传递。RemoteView 会将每一个设置的行为转换成相应的Action。在Host 测时再将Action 翻译成对应的行为。
##4、小部件运行在什么进程?
小部件的运行逻辑需要分为三部分:AppWidgetProvider 中的逻辑运行在小部件所在应用进程。小部件查找以及权限校验的逻辑运行在system_process中。小部件渲染逻辑在host 进程中。
#二、开发中常见问题
##1、开发一个小部件有哪必要流程?
- 新建一个类继承AppWidgetProvider用于定义主要的逻辑和行为
public class ExampleAppWidgetProvider extends AppWidgetProvider {
    @Override
    public void onUpdate(Context context, AppWidgetManager appWidgetManager, int[] appWidgetIds) {
     // 更新逻辑
     }
}
- 新建一个配置文件描述AppWidgetProviderInfo 信息
<appwidget-provider xmlns:android="http://schemas.android.com/apk/res/android"
        android:minWidth="40dp" // 最小宽,用于计算横向网格数
        android:minHeight="40dp" // 最小高,用于计算纵向网格数
        android:updatePeriodMillis="86400000" // 刷新时间间隔,最小为30min
        android:previewImage="@drawable/preview" //定义预览图片
        android:initialLayout="@layout/example_appwidget" 定义初始化布局,remoteView 布局未加载结束前视图
        android:configure="com.example.android.ExampleAppWidgetConfigure" //定义设置页
        android:resizeMode="horizontal|vertical" //定义尺寸模式
        android:widgetCategory="home_screen">  //定义种类,有桌面、锁屏、输入法
    </appwidget-provider>
- 在AndroidManifest.xml 中注册
<receiver android:name="ExampleAppWidgetProvider" >
         // 监听更新的acion
        <intent-filter>
            <action android:name="android.appwidget.action.APPWIDGET_UPDATE" />
        </intent-filter>
        <meta-data android:name="android.appwidget.provider"
                   android:resource="@xml/example_appwidget_info" />
</receiver>
##2、如何设置minWidth 和 minHeight
minWidth 和 minHeight 主要用于计算横向和纵向所占格子数,不通厂商计算方式不同,但大概率都会符合谷歌规范规范
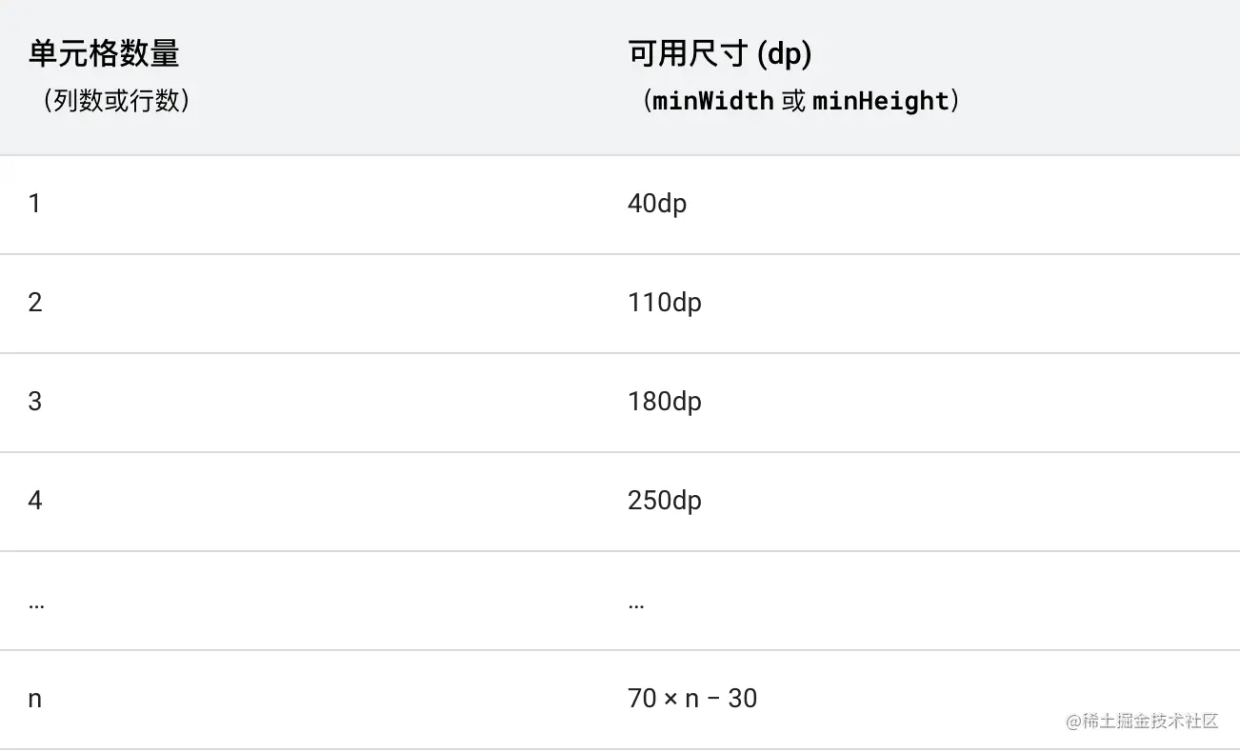
- 4*2 横向范围 250~320 纵向是110~180
- 2*2 横向范围110~180 纵向是110~180
3、如何AppWidgetProvider 如何更新小部件?
// appWidgetManager和widgetId 从 onUpdate 方法中获取
RemoteViews remoteViews = new RemoteViews(context.getPackageName(),
          R.layout.xxx);
appWidgetManager.updateAppWidget(widgetId, remoteViews);
##4、应用里如何更新小部件?
RemoteViews remoteViews = new RemoteViews(context.getPackageName(),R.layout.xxx);
AppWidgetManager appWidgetManager = AppWidgetManager.*getInstance*(context);
// NormalExampleWidgetProvider 为小部件组件名字,这里仅示例
ComponentName componentName = new ComponentName(context, NormalExampleWidgetProvider.class);
appWidgetManager.updateAppWidget(componentName, remoteViews);
5、如何设置点击事件?
// 生成PendingIntent
Intent intent = new Intent(context, ExampleActivity.class);
PendingIntent pendingIntent = PendingIntent.getActivity(context, 0, intent, PendingIntent.FLAG_UPDATE_CURRENT);
//生成 RemoteViews 关联 PendingIntent
RemoteViews views = new RemoteViews(context.getPackageName(), R.layout.appwidget_provider_layout);
views.setOnClickPendingIntent(R.id.button, pendingIntent);
// 关联 widget 和 RemoteViews
appWidgetManager.updateAppWidget(appWidgetId, views);
6、Widget 中 List 设置了setRemoteAdapter,第二次添加该小部件时,为什么没有调用onGetViewFactory ?
原因可能是RemoteViewsAdapter 复用,系统认为没有数据改变,导致没有回调onGetViewFactory,这个在google demo 也有说明。
- 原因分析
class AbsListView {
    public void setRemoteViewsAdapter(Intent intent, boolean isAsync) {
    // Ensure that we don't already have a RemoteViewsAdapter that is bound to an existing
    // service handling the specified intent.
    if (mRemoteAdapter != null) {
        Intent.FilterComparison fcNew = new Intent.FilterComparison(intent);
        Intent.FilterComparison fcOld = new Intent.FilterComparison(
                mRemoteAdapter.getRemoteViewsServiceIntent());
        // 比较两个是否
        if (fcNew.equals(fcOld)) {
            return;
        }
    }
    mDeferNotifyDataSetChanged = false;
    // Otherwise, create a new RemoteViewsAdapter for binding
    mRemoteAdapter = new RemoteViewsAdapter(getContext(), intent, this, isAsync);
    if (mRemoteAdapter.isDataReady()) {
        setAdapter(mRemoteAdapter);
    }
}
}
class Intent {
    public boolean equals(@Nullable Object obj) {
        if (obj instanceof FilterComparison) {
            Intent other = ((FilterComparison)obj).mIntent;
            return mIntent.filterEquals(other);
        }
        return false;
    }
    public boolean filterEquals(Intent other) {
        if (other == null) {
            return false;
        }
        if (!Objects.equals(this.mAction, other.mAction)) return false;
        if (!Objects.equals(this.mData, other.mData)) return false;
        if (!Objects.equals(this.mType, other.mType)) return false;
        if (!Objects.equals(this.mIdentifier, other.mIdentifier)) return false;
        if (!(this.hasPackageEquivalentComponent() && other.hasPackageEquivalentComponent())
                && !Objects.equals(this.mPackage, other.mPackage)) {
            return false;
        }
        if (!Objects.equals(this.mComponent, other.mComponent)) return false;
        if (!Objects.equals(this.mCategories, other.mCategories)) return false;
        return true;
    }
}
- 解决方案
// Here we setup the intent which points to the StackViewService which will
// provide the views for this collection.
Intent intent = new Intent(context, StackWidgetService.class);
intent.putExtra(AppWidgetManager.EXTRA_APPWIDGET_ID, appWidgetIds[i]);
// When intents are compared, the extras are ignored, so we need to embed the extras
// into the data so that the extras will not be ignored.
intent.setData(Uri.parse(intent.toUri(Intent.URI_INTENT_SCHEME)));
RemoteViews rv = new RemoteViews(context.getPackageName(), R.layout.widget_layout);
rv.setRemoteAdapter(appWidgetIds[i], R.id.stack_view, intent);
https://android.googlesource.com/platform/development/+/master/samples/StackWidget/src/com/example/android/stackwidget/StackWidgetProvider.java
到这里,Android Widget 基本使用以及常见问题就已经说完了。但使用中你可能会遇到各种各样的问题,而要解决问题,就需要你对相应的流程熟悉。因此才会有这一些列的文章。


 3550
3550


 被折叠的 条评论
为什么被折叠?
被折叠的 条评论
为什么被折叠?
 到【灌水乐园】发言


