


Java、springboot实现Gitee登录
Gitee实现第三方登录
1.1准备工作–申请Gitee授权
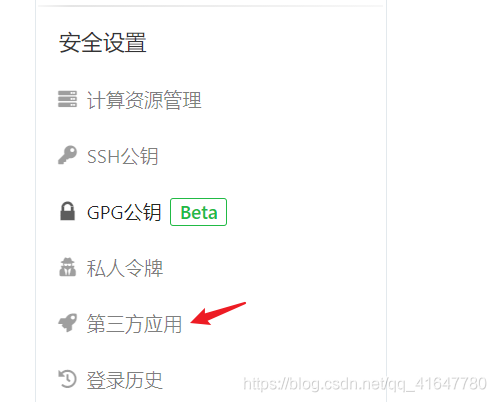
step1: 进入Gitee首页,点击进入”设置“,再点击进入”第三方应用“

step2: 点击页面右上方的 “创建应用”,填写资料

step3: 创建应用成功后,可以看到Gitee授予的 Client ID,Client Secret等信息【此时Gitee的授权工作已准备完毕!】

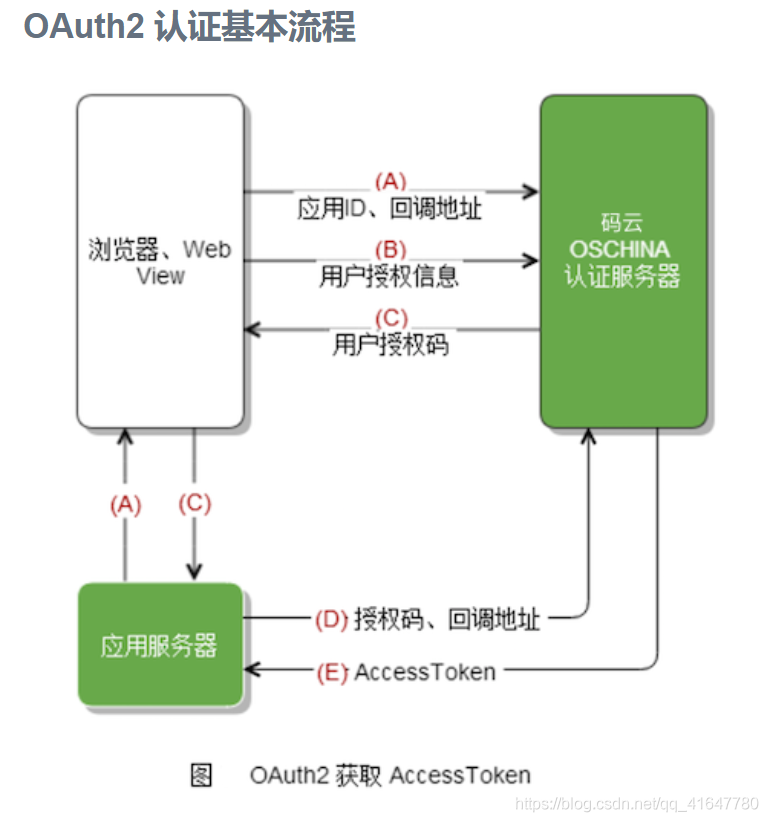
1.2 Gitee登录流程及原理
-
通过申请的应用ID–Client ID、回调地址等向 Gitee 服务器发起授权的请求
-
Gitee 认证服务器通过回调地址{redirect_uri}将 用户授权码 code 传递回来【传递到回调地址】
-
通过用户授权码 code 及应用ID等信息,再去 Gitee 服务器中获取用户的访问令牌(Access Token)
-
获取Access Token之后,根据这个token再去 Gitee 服务器中获取用户的 ID、name、email等信息【可以获取的信息字段如下】

1.3 Springboot整合Gitee登录
1、创建springboot项目
项目目录结构如下

2、导入依赖pom.xml、编写配置文件application.properties
<dependencies>
    <dependency>
        <groupId>org.springframework.boot</groupId>
        <artifactId>spring-boot-starter-thymeleaf</artifactId>
    </dependency>
    <dependency>
        <groupId>org.springframework.boot</groupId>
        <artifactId>spring-boot-starter-web</artifactId>
    </dependency>

    <dependency>
        <groupId>org.springframework.boot</groupId>
        <artifactId>spring-boot-starter-test</artifactId>
        <scope>test</scope>
    </dependency>

    <!--引入okhttp依赖-->
    <dependency>
        <groupId>com.squareup.okhttp3</groupId>
        <artifactId>okhttp</artifactId>
        <version>4.5.0</version>
    </dependency>
    <!--网络请求依赖-->
    <dependency>
        <groupId>org.apache.httpcomponents</groupId>
        <artifactId>httpclient</artifactId>
        <version>4.5.2</version>
    </dependency>
    <!--fastjson-->
    <dependency>
        <groupId>com.alibaba</groupId>
        <artifactId>fastjson</artifactId>
        <version>1.1.37</version>
    </dependency>
</dependencies>
application.properties配置文件
server.port=80
client_id=xxxx #填写对应应用id
client_secret=xxxx #用户密钥
redirect_uri=http://127.0.0.1/callback
3、index.html页面
通过GET请求这个地址去获取授权码,{client_id}、{redirect_uri} 填写自己的应用id和回调地址
https://gitee.com/oauth/authorize?client_id={client_id}&redirect_uri={redirect_uri}&response_type=code
<!DOCTYPE html>
<html lang="en" xmlns:th="http://www.thymeleaf.org">
<head>
    <meta charset="UTF-8">
    <title>index</title>
</head>
<body>
<a href="https://gitee.com/oauth/authorize?client_id={client_id}&redirect_uri={redirect_uri}&response_type=code&state=1">gitee登录</a>
<div>
    <p th:text="${name}"></p>
</div>
<div>
    <p th:text="${user.id}"></p>
</div>
</body>
</html>
4、controller控制器
IndexController
import org.springframework.stereotype.Controller;
import org.springframework.web.bind.annotation.RequestMapping;

@Controller
public class IndexController {
    @RequestMapping("/")
    public String index() {
        return "index";
    }
    @RequestMapping("/index")
    public String index2() {
        return "index";
    }
}
获取用户授权 AccessTokenController
import com.fly.giteelogin.Model.GiteeUser;
import com.fly.giteelogin.access_token.ProviderToken;
import com.fly.giteelogin.provider.GiteeProvider;
import org.springframework.beans.factory.annotation.Autowired;
import org.springframework.beans.factory.annotation.Value;
import org.springframework.stereotype.Controller;
import org.springframework.ui.Model;
import org.springframework.web.bind.annotation.GetMapping;
import org.springframework.web.bind.annotation.RequestParam;

@Controller
public class AccessTokenController {
    @Autowired
    private GiteeProvider giteeProvider;

    @Value("${client_id}")
    private String clientId;

    @Value("${redirect_uri}")
    private String redirectUri;

    @Value("${client_secret}")
    private String clientSecret;

    @GetMapping("/callback")
    public String callback(@RequestParam("code") String code,
                           @RequestParam("state") String state,
                           Model model) {
        //用户授权信息
        ProviderToken token = new ProviderToken();
        token.setClientId(clientId);
        token.setRedirectUri(redirectUri);
        token.setClientSecret(clientSecret);
        token.setCode(code);
        token.setState(state);
        //获取token和登录的用户信息
        String accessToken = giteeProvider.getGiteeToken(token);
        GiteeUser giteeUser = giteeProvider.getGiteeUser(accessToken);
        model.addAttribute("user", giteeUser);
        model.addAttribute("name", giteeUser.getName());
        System.out.println(giteeUser);
        return "index";
    }
}
5、model模型、封装应用授权请求的类
GiteeUser用户类
public class GiteeUser {
    private Integer id; //NOT NULL
    private String name; //NOT NULL
    private String email; //可能为空
    //get、set方法
}
封装应用授权请求的类ProviderToken
public class ProviderToken {
    private String clientId; //客户端id
    private String redirectUri; //登陆后后的回调地址
    private String clientSecret; //密钥
    private String code;
    private String state;
    //get、set方法
}
6、获取授权
import com.alibaba.fastjson.JSON;
import com.fly.giteelogin.Model.GiteeUser;
import com.fly.giteelogin.access_token.ProviderToken;
import okhttp3.*;
import org.springframework.stereotype.Component;
import java.util.Objects;

@Component
public class GiteeProvider {
    /**
     * 根据用户授权信息获取当前用户的 accessToken
     * 对用户进行授权,先创建一个GET请求,请求gitee中对应用户的访问令牌
     * @param providerToken 用户授权信息
     * @return 当前用户的 accessToken
     */
    public String getGiteeToken(ProviderToken providerToken) {
        //1. 创建http请求,构建请求体和请求url等,并向gitee发起请求
        MediaType mediaType = MediaType.get("application/json; charset=utf-8");
        OkHttpClient client = new OkHttpClient();
        RequestBody body = RequestBody.create(JSON.toJSONString(providerToken), mediaType);
        String url = "https://gitee.com/oauth/token?grant_type=authorization_code&code=" + providerToken.getCode()
                + "&client_id=" + providerToken.getClientId()
                + "&redirect_uri=" + providerToken.getRedirectUri()
                + "&client_secret=" + providerToken.getClientSecret();
        Request request = new Request.Builder()
                .url(url)
                .post(body)
                .build();

        //2. 获取gitee对应的响应消息,根据消息解析出用户的 access token
        try (Response response = client.newCall(request).execute()) {
            String tokenStr = Objects.requireNonNull(response.body()).string();
            String accessToken = tokenStr.split(",")[0].split(":")[1];
            accessToken = accessToken.substring(1, accessToken.length() - 1);
            //System.out.println("accessToken = " + accessToken);
            return accessToken;
        } catch (Exception e) {
            e.getStackTrace();
            //log.error("getAccessToken error,{}", accessTokenDTO, e);
        }
        return null;
    }

    /**
     * 根据用户的 access token 获取当前gitee用户的详细信息
     * @param accessToken 用户的访问令牌
     * @return gitee用户对象
     */
    public GiteeUser getGiteeUser(String accessToken) {
        //1. 构建http的GET请求,向gitee请求用户数据
        OkHttpClient client = new OkHttpClient();
        Request request = new Request.Builder()
                .url("https://gitee.com/api/v5/user?access_token=" + accessToken).build();

        //2. 获取gitee传回来的响应消息,根据消息解析出用户消息
        try {
            Response response = client.newCall(request).execute();
            //String string = response.body().string();
            String giteeUserStr = Objects.requireNonNull(response.body()).string();
            return JSON.parseObject(giteeUserStr, GiteeUser.class);
        } catch (Exception e) {
            //log.error("getGiteeUser error,{}", accessToken, e);
            e.getStackTrace();
        }
        return null;
    }
}
7、运行项目进行测试
浏览器输入:localhost 或 http://127.0.0.1/ ,点击gitee登录

gitee登录、可以页面看到获取到的用户信息


 458
458

 被折叠的 条评论
为什么被折叠?
被折叠的 条评论
为什么被折叠?
 到【灌水乐园】发言


