


1. 项目(Item)定位器
定位器项是管理声明性用户界面中项位置的容器项。定位器的行为方式与标准Qt小部件使用的布局管理器类似,只是它们本身也是容器。
定位器使许多项目在需要以常规布局排列时更容易处理它们。
Qt Quick Layouts还可用于在用户界面中排列Qt Quick items 。它们管理声明性用户界面上项目的位置和大小,非常适合可调整大小的用户界面。
注:熟悉QWidget的可能有疑惑,布局器和定位器有何区别,为啥QML里有定位器还有布局器?
QML里的定位器管理位置(x,y属性),而布局器还会管理项目宽高
2. 定位器
Qt Quick图形类型的基本集中提供了一组标准定位器:
| Column | 将其子项放置在列中 |
| Flow | 并排放置其子项,并根据需要进行包装 |
| Grid | 将其子项定位在网格形成中 |
| LayoutMirroring | 用于镜像布局行为的属性 |
| Positioner | 提供附加属性,这些属性包含有关项目在定位器中的位置的详细信息 |
| Row | 将其子项排成一行 |
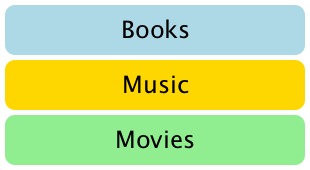
2.0 列项目
列项用于垂直排列项。下面的示例使用列项在由外部项定义的区域中排列三个矩形项。间距属性设置为在矩形之间包含少量空格。|
import QtQuick 2.0

Item {
    width: 310; height: 170

    Column {
        anchors.horizontalCenter: parent.horizontalCenter
        anchors.verticalCenter: parent.verticalCenter

        spacing: 5

        Rectangle { color: "lightblue"; radius: 10.0
                    width: 300; height: 50
                    Text { anchors.centerIn: parent
                           font.pointSize: 24; text: "Books" } }
        Rectangle { color: "gold"; radius: 10.0
                    width: 300; height: 50
                    Text { anchors.centerIn: parent
                           font.pointSize: 24; text: "Music" } }
        Rectangle { color: "lightgreen"; radius: 10.0
                    width: 300; height: 50
                    Text { anchors.centerIn: parent
                           font.pointSize: 24; text: "Movies" } }
    }
}
请注意,由于列直接从 Item 继承,因此如果需要,必须将任何背景色添加到父矩形中。
2.1 行项目
行项用于水平排列项。下面的示例使用 Row 项在由外部彩色矩形定义的区域中排列三个圆角矩形项。间距属性设置为在矩形之间包含少量空格。

我们确保父矩形足够大,以便在水平居中的 Row 项的边缘周围留出一些空间。
import QtQuick 2.0

Rectangle {
    width: 320; height: 110
    color: "#c0c0c0"

    Row {
        anchors.horizontalCenter: parent.horizontalCenter
        anchors.verticalCenter: parent.verticalCenter

        spacing: 5

        Rectangle { width: 100; height: 100; radius: 20.0
                    color: "#024c1c" }
        Rectangle { width: 100; height: 100; radius: 20.0
                    color: "#42a51c" }
        Rectangle { width: 100; height: 100; radius: 20.0
                    color: "white" }
    }
}
2.2 网格项
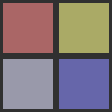
网格项用于将项放置在网格或表排列中。下面的示例使用 Grid 项在 2 x 2 网格中放置四个矩形项。与其他定位器一样,可以使用间距属性指定项目之间的间距。
import QtQuick 2.0

Rectangle {
    width: 112; height: 112
    color: "#303030"

    Grid {
        anchors.horizontalCenter: parent.horizontalCenter
        anchors.verticalCenter: parent.verticalCenter
        columns: 2
        spacing: 6

        Rectangle { color: "#aa6666"; width: 50; height: 50 }
        Rectangle { color: "#aaaa66"; width: 50; height: 50 }
        Rectangle { color: "#9999aa"; width: 50; height: 50 }
        Rectangle { color: "#6666aa"; width: 50; height: 50 }
    }
}
在项目之间插入的水平间距和垂直间距之间没有区别,因此必须在项目本身中添加任何额外的空间。
网格中的任何空单元格都必须通过在网格定义中的适当位置定义占位符项来创建。
2.3 流项目
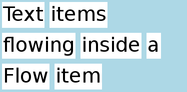
流项用于在页面上放置单词等项,其中包含非重叠项的行或列。
流项以与Grid项类似的方式排列项,项沿一个轴(短轴)排列,项沿另一个轴(长轴)彼此相邻排列。流动方向以及项目之间的间距由流动和间距属性控制。
下面的示例演示一个包含许多文本子项的流项。它们的排列方式与屏幕截图中显示的方式类似。
import QtQuick 2.0

Rectangle {
    color: "lightblue"
    width: 300; height: 200

    Flow {
        anchors.fill: parent
        anchors.margins: 4
        spacing: 10

        Text { text: "Text"; font.pixelSize: 40 }
        Text { text: "items"; font.pixelSize: 40 }
        Text { text: "flowing"; font.pixelSize: 40 }
        Text { text: "inside"; font.pixelSize: 40 }
        Text { text: "a"; font.pixelSize: 40 }
        Text { text: "Flow"; font.pixelSize: 40 }
        Text { text: "item"; font.pixelSize: 40 }
    }
}
网格定位器和流定位器之间的主要区别在于,当流中的项目在短轴上的空间不足时,它们将换行,并且如果项目没有统一的大小,则一行上的项目可能不会与另一行上的项目对齐。与网格项一样,对项之间和项行之间的间距没有独立的控制。
其他定位项目的方法
还有其他几种方法可以在用户界面中定位项目。除了直接指定其坐标的基本技术外,还可以相对于具有锚点的其他项进行定位,或者与QML数据模型(如对象模型)一起使用。


 2940
2940


 被折叠的 条评论
为什么被折叠?
被折叠的 条评论
为什么被折叠?
 到【灌水乐园】发言


