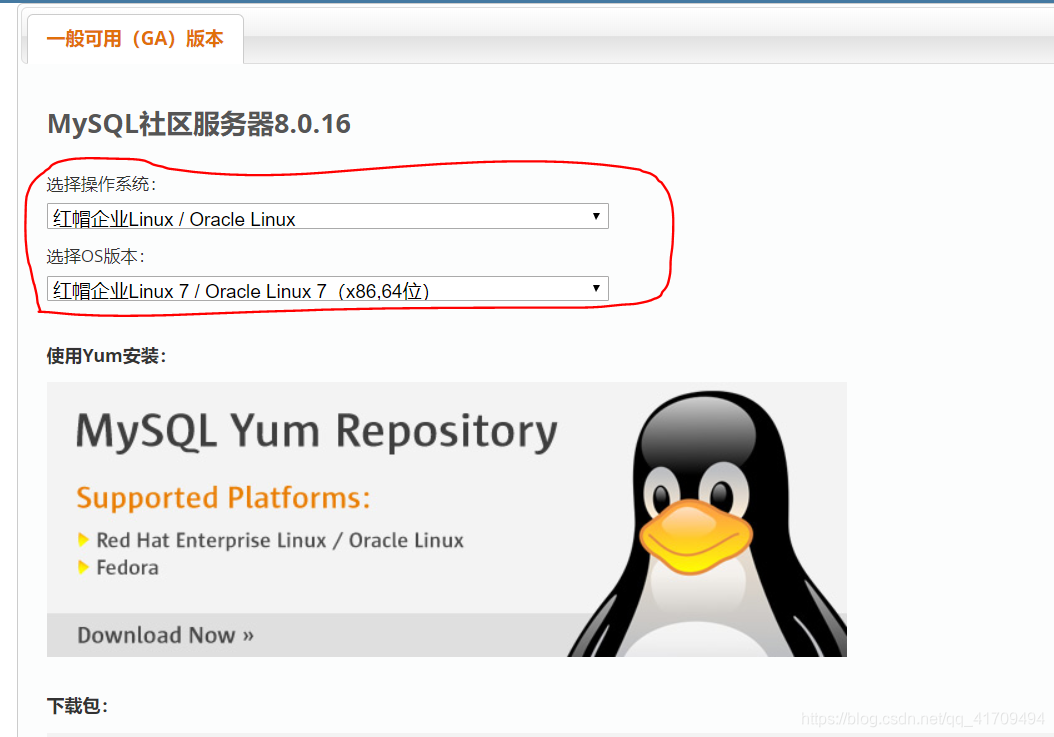
MySQL的下载地址:https://dev.mysql.com/downloads/mysql/
1.由于企业版的要收费,这里就下载社区版的MySQL

1-1.按红圈的下载

2.下载完成后,上传到服务器
[root@node1 ~]# rz                               #上传文件

[root@node1 ~]# ls                               #查看当前的文件
anaconda-ks.cfg  mysql-community-server-8.0.16-2.el7.x86_64.rpm
3.安装Mysql文件
[root@node1 ~]# yum install mysql-community-server-8.0.16-2.el7.x86_64.rpm

...
错误:软件包:mysql-community-server-8.0.16-2.el7.x86_64 (/mysql-community-server-8.0.16-2.el7.x86_64)
          需要:mysql-community-client(x86-64) >= 8.0.11
错误:软件包:mysql-community-server-8.0.16-2.el7.x86_64 (/mysql-community-server-8.0.16-2.el7.x86_64)
          需要:mysql-community-common(x86-64) = 8.0.16-2.el7
...
3-1.安装出错了需要 mysql-community-client和mysql-community-common包

3-2.下载 mysql-community-client和mysql-community-common包后,安装
[root@node1 ~]# rz

[root@node1 ~]# ls
anaconda-ks.cfg                                 mysql-community-common-8.0.16-2.el7.x86_64.rpm
mysql-community-client-8.0.16-2.el7.x86_64.rpm  mysql-community-server-8.0.16-2.el7.x86_64.rpm
[root@node1 ~]# yum install mysql-community-common-8.0.16-2.el7.x86_64.rpm \
> mysql-community-client-8.0.16-2.el7.x86_64.rpm

...
错误:软件包:mysql-community-client-8.0.16-2.el7.x86_64 (/mysql-community-client-8.0.16-2.el7.x86_64)
          需要:mysql-community-libs(x86-64) >= 8.0.11
 您可以尝试添加 --skip-broken 选项来解决该问题
 您可以尝试执行:rpm -Va --nofiles --nodigest
...
3-3.安装出现错误 了需要mysql-community-libs包

3-4.下载mysql-community-libs包后,安装
[root@node1 ~]# rz

[root@node1 ~]# ls
anaconda-ks.cfg                                 mysql-community-libs-8.0.16-2.el7.x86_64.rpm
mysql-community-client-8.0.16-2.el7.x86_64.rpm  mysql-community-server-8.0.16-2.el7.x86_64.rpm
mysql-community-common-8.0.16-2.el7.x86_64.rpm
[root@node1 ~]# yum install mysql-community-libs-8.0.16-2.el7.x86_64.rpm \
> mysql-community-common-8.0.16-2.el7.x86_64.rpm \
> mysql-community-client-8.0.16-2.el7.x86_64.rpm

...
错误:软件包:2:postfix-2.10.1-6.el7.x86_64 (@anaconda)
          需要:libmysqlclient.so.18(libmysqlclient_18)(64bit)
          正在删除: 1:mariadb-libs-5.5.56-2.el7.x86_64 (@anaconda)
              libmysqlclient.so.18(libmysqlclient_18)(64bit)
          取代,由: mysql-community-libs-8.0.16-2.el7.x86_64 (/mysql-community-libs-8.0.16-2.el7.x86_64)
              未找到
错误:软件包:2:postfix-2.10.1-6.el7.x86_64 (@anaconda)
          需要:libmysqlclient.so.18()(64bit)
          正在删除: 1:mariadb-libs-5.5.56-2.el7.x86_64 (@anaconda)
              libmysqlclient.so.18()(64bit)
          取代,由: mysql-community-libs-8.0.16-2.el7.x86_64 (/mysql-community-libs-8.0.16-2.el7.x86_64)
             ~libmysqlclient.so.21()(64bit)
 您可以尝试添加 --skip-broken 选项来解决该问题
 您可以尝试执行:rpm -Va --nofiles --nodigest
...
3-5.出现了错误,要卸载mariadb的依赖包
[root@node1 ~]# yum remove maradb*
...
删除:
  mariadb-libs.x86_64 1:5.5.56-2.el7

作为依赖被删除:
  postfix.x86_64 2:2.10.1-6.el7
[root@node1 ~]# yum install mysql-community-libs-8.0.16-2.el7.x86_64.rpm mysql-community-common-8.0.16-2.el7.x86_64.rpm mysql-community-client-8.0.16-2.el7.x86_64.rpm
...
已安装:
mysql-community-client.x86_64 0:8.0.16-2.el7 mysql-community-common.x86_64 0:8.0.16-2.el7
mysql-community-libs.x86_64 0:8.0.16-2.el7
完毕!
3-6.依赖包解决完成后就安装 mysql-community-server-8.0.16-2.el7.x86_64.rpm 包
[root@node1 ~]# yun mysql-community-server-8.0.16-2.el7.x86_64.rpm
...
已安装:
  mysql-community-server.x86_64 0:8.0.16-2.el7

完毕!
4. 为了解决更快下载MySQL的依赖包,就要用到清华大学镜像,地址:https://mirrors.tuna.tsinghua.edu.cn/mysql/yum/mysql80-community-el7/

4-1.配置清华大学yum
[root@node1 ~]# vi /etc/yum.repos.d/local.repo

#centos是本地yum

[cnetos]
name=centos
baseurl=file:///opt/centos
gpgcheck=0
enabled=1

#mysql是清华大学yum

[mysql]
name=mysql
baseurl=https://mirrors.tuna.tsinghua.edu.cn/mysql/yum/mysql80-community-el7/
gpgcheck=0
enabled=1
4-2.为了实验的效果,就用强力删除模式,卸载之前安装的MySQL
[root@node1 ~]# rpm -e --nodeps mysql-community-server
[root@node1 ~]# rpm -e --nodeps mysql-community-libs
[root@node1 ~]# rpm -e --nodeps mysql-community-client
[root@node1 ~]# rpm -e --nodeps  mysql-community-common
4-3.重新安装 MySQL
[root@node1 ~]# yum install mysql
...
依赖关系解决

=============================================================================================================================================
 Package                                      架构                         版本                                源                           大
=============================================================================================================================================
正在安装:
 mysql-community-client                       x86_64                       8.0.16-2.el7                        mysql                        3
为依赖而安装:
 mysql-community-common                       x86_64                       8.0.16-2.el7                        mysql                       57
 mysql-community-libs                         x86_64                       8.0.16-2.el7                        mysql                       3.

事务概要
=============================================================================================================================================
安装  1 软件包 (+2 依赖软件包)

总下载量:35 M
安装大小:35 M
Is this ok [y/d/N]: y
...


[root@node1 ~]# yum install mysql-server
...
依赖关系解决

=============================================================================================================================================
 Package                                      架构                         版本                                源                           大
=============================================================================================================================================
正在安装:
 mysql-community-server                       x86_64                       8.0.16-2.el7                        mysql                       40

事务概要
=============================================================================================================================================
安装  1 软件包

总下载量:403 M
安装大小:403 M
Is this ok [y/d/N]: y
...
5.赋予MySQL存放目录的权限,初始化MySQL,启动MySQL服务和修改MySQL密码
[root@node1 ~]# chown mysql:mysql -R /var/lib/mysql            #赋予mysql存放目录的用户权限和所属用户组的权限


[root@node1 ~]# mysqld --initialize               #mysql初始化


[root@node1 ~]# systemctl start mysqld            #启动服务


[root@node1 ~]# systemctl status mysqld            #查看服务状态
● mysqld.service - MySQL Server
   Loaded: loaded (/usr/lib/systemd/system/mysqld.service; enabled; vendor preset: disabled)
   Active: active (running) since 六 2019-06-29 21:28:28 CST; 7s ago
     Docs: man:mysqld(8)
           http://dev.mysql.com/doc/refman/en/using-systemd.html
  Process: 2264 ExecStartPre=/usr/bin/mysqld_pre_systemd (code=exited, status=0/SUCCESS)
 Main PID: 2289 (mysqld)
   Status: "SERVER_OPERATING"
   CGroup: /system.slice/mysqld.service
           └─2289 /usr/sbin/mysqld

6月 29 21:28:26 node1 systemd[1]: Starting MySQL Server...
6月 29 21:28:28 node1 systemd[1]: Started MySQL Server.

[root@node1 ~]# mysqladmin --version                #查看版本信息
mysqladmin  Ver 8.0.16 for Linux on x86_64 (MySQL Community Server - GPL)


[root@node1 ~]# netstat -antp  | grep mysqld            #查看服务进程和端口
tcp6       0      0 :::33060                :::*                    LISTEN      2289/mysqld
tcp6       0      0 :::3306                 :::*                    LISTEN      2289/mysqld
6.连接数据库出错误:ERROR 1045 (28000): Access denied for user 'root'@'localhost' (using password: YES)
[root@node1 ~]#  grep 'temporary password' /var/log/mysqld.log   #查看临时MySQL的密码,数据库会临时产生数据库的密码
2019-07-02T04:25:20.854439Z 5 [Note] [MY-010454] [Server] A temporary password is generated for root@localhost: !ShW=A4eJskC


[root@node1 ~]# mysql -u root -p                            #连root用户的接数据库,并输入密码
Enter password:
ERROR 1045 (28000): Access denied for user 'root'@'localhost' (using password: YES)
6-1.根据官方文档:https://dev.mysql.com/doc/refman/8.0/en/linux-installation-rpm.html
 6-2.在经过反复的查找中发现了:/var/lib/mysql的目录权限为751
[root@node1 ~# ls -lh /var/lib | grep mysql
drwxr-x--x  6 mysql   mysql   4.0K 7月   2 13:42 mysql
drwxr-x---  2 mysql   mysql      6 5月   3 05:11 mysql-files
drwxr-x---  2 mysql   mysql      6 5月   3 05:11 mysql-keyring
6-3.需要修改/var/lib/mysql的目录权限,为默认目录权限755
[root@node1 ~]# chmod -R 755 /var/lib/mysql

[root@node1 ~]# systemctl restart mysqld

[root@node1 ~]# mysql -u root -p
Enter password:
Welcome to the MySQL monitor.  Commands end with ; or \g.
Your MySQL connection id is 8
Server version: 8.0.16

Copyright (c) 2000, 2019, Oracle and/or its affiliates. All rights reserved.

Oracle is a registered trademark of Oracle Corporation and/or its
affiliates. Other names may be trademarks of their respective
owners.

Type 'help;' or '\h' for help. Type '\c' to clear the current input statement.

mysql>
7.为MySQL数据库设置自定义密码
[root@node1 ~]# mysql -u root -p
Enter password:
Welcome to the MySQL monitor.  Commands end with ; or \g.
Your MySQL connection id is 8
Server version: 8.0.16

Copyright (c) 2000, 2019, Oracle and/or its affiliates. All rights reserved.

Oracle is a registered trademark of Oracle Corporation and/or its
affiliates. Other names may be trademarks of their respective
owners.

Type 'help;' or '\h' for help. Type '\c' to clear the current input statement.

mysql>
mysql> show databases;
ERROR 1820 (HY000): You must reset your password using ALTER USER statement before executing this statement.

#翻译一下:在执行此语句之前,必须使用ALTER USER语句重置密码。
7-1.重置密码
mysql> alter user 'root'@'localhost' identified by 'qwe123456';
ERROR 1819 (HY000): Your password does not satisfy the current policy requirements

翻译一下:您的密码不满足当前策略的要求7-2.到官方文档查找一下密码的注意事项,官方地址:https://dev.mysql.com/doc/refman/8.0/en/linux-installation-rpm.html

mysql> alter user 'root'@'localhost' identified by 'Qwe123456.';
Query OK, 0 rows affected (0.01 sec)
8.测实密码的是否重置成功
[root@node1 ~]# mysql -u root -pQwe123456.
mysql: [Warning] Using a password on the command line interface can be insecure.
Welcome to the MySQL monitor.  Commands end with ; or \g.
Your MySQL connection id is 9
Server version: 8.0.16 MySQL Community Server - GPL

Copyright (c) 2000, 2019, Oracle and/or its affiliates. All rights reserved.

Oracle is a registered trademark of Oracle Corporation and/or its
affiliates. Other names may be trademarks of their respective
owners.

Type 'help;' or '\h' for help. Type '\c' to clear the current input statement.

mysql> show databases;
+--------------------+
| Database           |
+--------------------+
| information_schema |
| mysql              |
| performance_schema |
| sys                |
+--------------------+
4 rows in set (0.00 sec)
mysql> 参考菜鸟:https://www.runoob.com/mysql/mysql-install.html


 710
710


 被折叠的 条评论
为什么被折叠?


