


CentOS7环境下安装mysql8
1、卸载mariadb
安装好centos系统之后,系统默认自带mariadb数据库,因为存在类库的冲突,因此要先卸载mariadb
#查找安装的mariadb软件版本信息
[root@node22 ~]# rpm -qa | grep mariadb
mariadb-libs-5.5.68-1.el7.x86_64
#卸载安装的mariadb数据库
[root@node22 ~]# rpm -e mariadb-libs-5.5.68-1.el7.x86_64
#运行过程中会进行报错,是依赖检测失败的问题,直接强制卸载即可
error: Failed dependencies:
	libmysqlclient.so.18()(64bit) is needed by (installed) postfix-2:2.10.1-9.el7.x86_64
	libmysqlclient.so.18(libmysqlclient_18)(64bit) is needed by (installed) postfix-2:2.10.1-9.el7.x86_64
#强制卸载mariadb
[root@node22 ~]# rpm -e mariadb-libs-5.5.68-1.el7.x86_64 --nodeps
#再次搜索是否还包含mariadb
[root@node22 ~]# rpm -qa | grep mariadb
2、下载mysql安装包
mysql的安装包需要去官网进行下载,下载地址:https://dev.mysql.com/downloads/mysql/
选择下图所示版本:
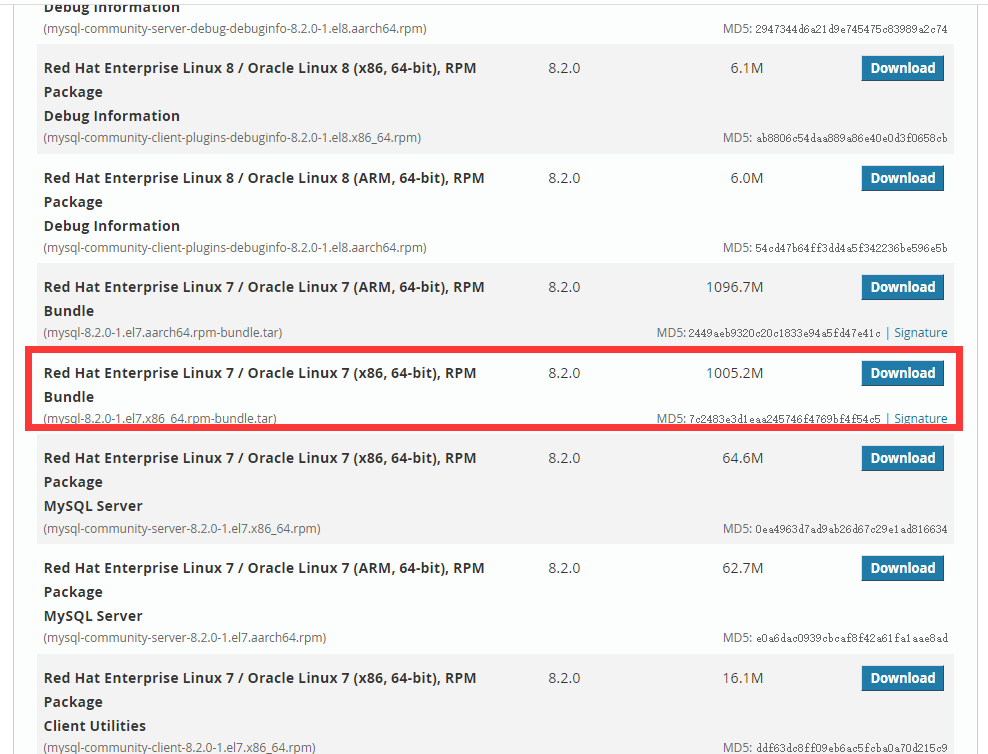
我的linux系统版本是centos7.9,如果是不同的linux系统,需要选择不同的安装包
3、安装mysql
1、将下载好的mysql的安装包放到centos的任意目录,我直接放在了root用户的家目录
2、创建文件夹并且解压mysql的安装包
#切换到对应的目录
[root@node22 ~]# cd /usr/local/
#创建mysql文件夹
[root@node22 local]# mkdir mysql
#切换到mysql文件夹
[root@node22 local]# cd mysql
#解压mysql压缩包到当前目录
[root@node22 mysql]# tar -xvf /root/mysql-8.2.0-1.el7.x86_64.rpm-bundle.tar
mysql-community-client-8.2.0-1.el7.x86_64.rpm
mysql-community-client-plugins-8.2.0-1.el7.x86_64.rpm
mysql-community-common-8.2.0-1.el7.x86_64.rpm
mysql-community-debuginfo-8.2.0-1.el7.x86_64.rpm
mysql-community-devel-8.2.0-1.el7.x86_64.rpm
mysql-community-embedded-compat-8.2.0-1.el7.x86_64.rpm
mysql-community-icu-data-files-8.2.0-1.el7.x86_64.rpm
mysql-community-libs-8.2.0-1.el7.x86_64.rpm
mysql-community-libs-compat-8.2.0-1.el7.x86_64.rpm
mysql-community-server-8.2.0-1.el7.x86_64.rpm
mysql-community-server-debug-8.2.0-1.el7.x86_64.rpm
mysql-community-test-8.2.0-1.el7.x86_64.rpm
3、安装mysql的rpm文件,在安装rpm包的时候有依赖关系,一定要按照如下的顺序去安装mysql
#1、
[root@node22 mysql]# rpm -ivh mysql-community-common-8.2.0-1.el7.x86_64.rpm
warning: mysql-community-common-8.2.0-1.el7.x86_64.rpm: Header V4 RSA/SHA256 Signature, key ID 3a79bd29: NOKEY
Preparing...                          ################################# [100%]
Updating / installing...
   1:mysql-community-common-8.2.0-1.el################################# [100%]
#2、
[root@node22 mysql]# rpm -ivh mysql-community-client-plugins-8.2.0-1.el7.x86_64.rpm
warning: mysql-community-client-plugins-8.2.0-1.el7.x86_64.rpm: Header V4 RSA/SHA256 Signature, key ID 3a79bd29: N
OKEYPreparing...                          ################################# [100%]
Updating / installing...
   1:mysql-community-client-plugins-8.################################# [100%]
#3、
[root@node22 mysql]# rpm -ivh mysql-community-libs-8.2.0-1.el7.x86_64.rpm
warning: mysql-community-libs-8.2.0-1.el7.x86_64.rpm: Header V4 RSA/SHA256 Signature, key ID 3a79bd29: NOKEY
Preparing...                          ################################# [100%]
Updating / installing...
   1:mysql-community-libs-8.2.0-1.el7 ################################# [100%]
#4、
[root@node22 mysql]# rpm -ivh mysql-community-client-8.2.0-1.el7.x86_64.rpm
warning: mysql-community-client-8.2.0-1.el7.x86_64.rpm: Header V4 RSA/SHA256 Signature, key ID 3a79bd29: NOKEY
Preparing...                          ################################# [100%]
Updating / installing...
   1:mysql-community-client-8.2.0-1.el################################# [100%]
#5、
[root@node22 mysql]# rpm -ivh mysql-community-icu-data-files-8.2.0-1.el7.x86_64.rpm
warning: mysql-community-icu-data-files-8.2.0-1.el7.x86_64.rpm: Header V4 RSA/SHA256 Signature, key ID 3a79bd29: N
OKEYPreparing...                          ################################# [100%]
Updating / installing...
   1:mysql-community-icu-data-files-8.################################# [100%]
#6、安装net-tools依赖
[root@node22 mysql]# yum install -y net-tools
#7、
[root@node22 mysql]# rpm -ivh mysql-community-server-8.2.0-1.el7.x86_64.rpm
warning: mysql-community-server-8.2.0-1.el7.x86_64.rpm: Header V4 RSA/SHA256 Signature, key ID 3a79bd29: NOKEY
Preparing...                          ################################# [100%]
Updating / installing...
   1:mysql-community-server-8.2.0-1.el################################# [100%]
#8、验证安装的mysql的组件
[root@node22 mysql]# rpm -qa | grep mysql
mysql-community-client-plugins-8.2.0-1.el7.x86_64
mysql-community-client-8.2.0-1.el7.x86_64
mysql-community-common-8.2.0-1.el7.x86_64
mysql-community-libs-8.2.0-1.el7.x86_64
mysql-community-icu-data-files-8.2.0-1.el7.x86_64
mysql-community-server-8.2.0-1.el7.x86_64
4、初始化mysql数据且开启mysql服务
# 初始化mysql
[root@node22 mysql]# mysqld --initialize
# 修改mysql的文件夹权限
[root@node22 mysql]# chown mysql:mysql /var/lib/mysql -R
# 开启mysql的服务
[root@node22 mysql]# systemctl start mysqld.service
# 设置mysql的服务开机自启动
[root@node22 mysql]# systemctl enable mysqld
5、查看mysql的临时密码,登录mysql,修改临时密码
# 查看临时密码
[root@node22 mysql]# cat /var/log/mysqld.log | grep password
2023-12-06T12:23:11.424179Z 6 [Note] [MY-010454] [Server] A temporary password is generated for root@localhost: s#
w(E1K9iyoC
# 登录mysql
[root@node22 mysql]# mysql -uroot -p
# 输入临时密码
Enter password:
Welcome to the MySQL monitor.  Commands end with ; or \g.
Your MySQL connection id is 10
Server version: 8.2.0

Copyright (c) 2000, 2023, Oracle and/or its affiliates.

Oracle is a registered trademark of Oracle Corporation and/or its
affiliates. Other names may be trademarks of their respective
owners.

Type 'help;' or '\h' for help. Type '\c' to clear the current input statement.

# 修改临时密码,此处改为123456
mysql> alter user 'root'@'localhost' identified with caching_sha2_password by '123456';
Query OK, 0 rows affected (0.01 sec)
# 创建远程连接的用户
mysql> CREATE USER IF NOT EXISTS 'root'@'%' IDENTIFIED BY '123456';
Query OK, 0 rows affected (0.01 sec)
# 给远程连接的用户进行授权
mysql> GRANT ALL ON *.* TO 'root'@'%' WITH GRANT OPTION;
Query OK, 0 rows affected (0.00 sec)
# 刷新权限
mysql>  FLUSH PRIVILEGES;
Query OK, 0 rows affected (0.00 sec)
6、使用navicat进行msyql的连接,如下所示表示成功


 643
643


 被折叠的 条评论
为什么被折叠?
被折叠的 条评论
为什么被折叠?
 到【灌水乐园】发言


