SSM(
Spring+SpringMVC+MyBatis)框架集由Spring、SpringMVC、MyBatis三个开源框架整合而成,常作为数据源较简单的web项目的框架。
①Spring是一个轻量级的控制反转(IoC)和面向切面(AOP)的容器框架。
②SpringMVC分离了控制器、模型对象、分派器以及处理程序对象的角色,这种分离让它们更容易进行定制。
③MyBatis是一个支持普通SQL查询,存储过程和高级映射的优秀持久层框架。
①Spring是一个轻量级的控制反转(IoC)和面向切面(AOP)的容器框架。
②SpringMVC分离了控制器、模型对象、分派器以及处理程序对象的角色,这种分离让它们更容易进行定制。
③MyBatis是一个支持普通SQL查询,存储过程和高级映射的优秀持久层框架。
搭建项目的过程如下:
Ⅰ第一步,创建项目(不必说,创建一个Java web项目)。
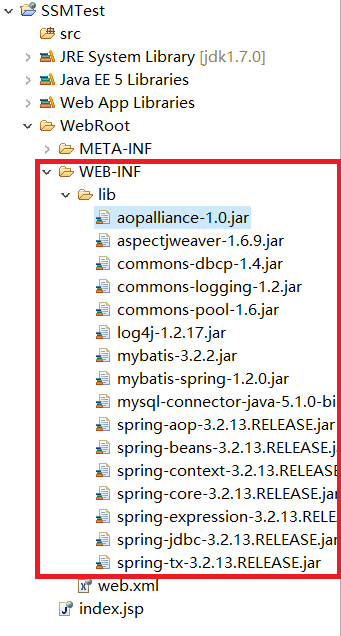
Ⅱ第二步,在项目中lib里放入SSM框架所需的Java的jdk包,下图中的文件为基础功能文件,可以实现最基础的SSM框架功能。
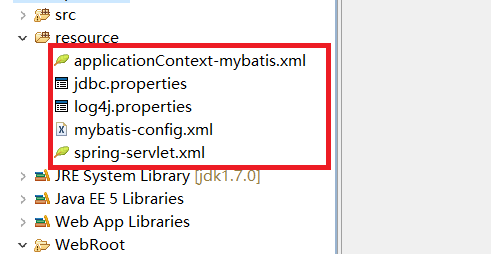
Ⅲ第三步,此时,所需的辅助包够了,接下来,我们将配置SSM框架所需的配置文件,我们在项目根目录下创建一个Source Folder包,一般情况下,我们给它起名为resource。
给resource里创建我们SSM框架的配置文件,分别为。
applicationContext-mybatis(
必要文件,SSM中的Spring,用于配置数据源以及事务处理和提供处理接口方法的功能。)
<?xml version="1.0" encoding="UTF-8"?>
<beans xmlns="http://www.springframework.org/schema/beans"
        xmlns:xsi="http://www.w3.org/2001/XMLSchema-instance"
        xmlns:aop="http://www.springframework.org/schema/aop"
        xmlns:p="http://www.springframework.org/schema/p"
        xmlns:tx="http://www.springframework.org/schema/tx"
        xmlns:context="http://www.springframework.org/schema/context"

        xsi:schemaLocation="
            http://www.springframework.org/schema/beans http://www.springframework.org/schema/beans/spring-beans-2.5.xsd
            http://www.springframework.org/schema/aop http://www.springframework.org/schema/aop/spring-aop-2.5.xsd
            http://www.springframework.org/schema/tx http://www.springframework.org/schema/tx/spring-tx-2.5.xsd
            http://www.springframework.org/schema/context
            http://www.springframework.org/schema/context/spring-context.xsd
            ">
    <!--
    	使spring扫描包下的所有类,让标注spring注解的类生效
    	若扫描到有@Component @Controller@Service等这些注解的类,则把这些类注册为bean
    -->
     <context:component-scan base-package="cn.appsys.service"/>
     <context:component-scan base-package="cn.appsys.dao"/>
    <!-- 数据库配置文件 -->
    <context:property-placeholder location="classpath:database.properties"/>
	<!-- 获取数据源(使用dbcp连接池) -->
	<bean id="dataSource" class="org.apache.commons.dbcp.BasicDataSource" destroy-method="close" scope="singleton">
		<property name="driverClassName" value="${driver}"/>
		<property name="url" value="${url}"/>
		<property name="username" value="${user}"/>
		<property name="password" value="${password}"/>
		<property name="initialSize" value="${initialSize}"/>
		<property name="maxActive" value="${maxActive}"/>
		<property name="maxIdle" value="${maxIdle}"/>
		<property name="maxWait" value="${maxWait}"/>
		<property name="removeAbandoned" value="${removeAbandoned}"/>
		<property name="removeAbandonedTimeout" value="${removeAbandonedTimeout}"/>
		<property name="testWhileIdle" value="true"/>
		<property name="testOnBorrow" value="false"/>
		<property name="testOnReturn" value="false"/>
		<property name="validationQuery" value="select 1"/>
		<property name="timeBetweenEvictionRunsMillis" value="60000"/>
		<property name="numTestsPerEvictionRun" value="${maxActive}"/>
	</bean>
	<!-- 配置SqlSessionFactoryBean -->
	<bean id="sqlSessionFactory" class="org.mybatis.spring.SqlSessionFactoryBean">
		<!-- 引用数据源组件 -->
		<property name="dataSource" ref="dataSource" />
		<property name="configLocation" value="classpath:mybatis-config.xml" />
		<!-- 配置SQL映射文件信息 -->
		<property name="mapperLocations">
			<list>
				<value>cn/appsys/dao/**/*.xml</value>
			</list>
		</property>
	</bean>
	<!-- 定义事务管理器 -->
	<bean id="transactionManager"
		class="org.springframework.jdbc.datasource.DataSourceTransactionManager">
		<property name="dataSource" ref="dataSource" />
	</bean>
	<!-- AOP事务处理 -->
	<aop:aspectj-autoproxy/>
	<aop:config proxy-target-class="true">
		<aop:pointcut expression="execution(* *cn.appsys.service..*(..))" id="transService"/>
		<aop:advisor pointcut-ref="transService" advice-ref="txAdvice"/>
	</aop:config>
	<tx:advice id="txAdvice" transaction-manager="transactionManager">
	<tx:attributes>
		<tx:method name="appsys*" propagation="REQUIRED" rollback-for="Exception"/>
	</tx:attributes>
	</tx:advice>
	<bean class="org.mybatis.spring.mapper.MapperScannerConfigurer">
		<property name="basePackage" value="cn.appsys.dao" />
	</bean>
</beans>jdbc.properties(若applicationContext-*中主动输入,则可以不需要此文件)。
driver=com.mysql.jdbc.Driver
url=jdbc:mysql://127.0.0.1:3306/appinfodb?useUnicode=true&characterEncoding=utf-8
user=root
password=root
minIdle=45
maxIdle=50
initialSize=5
maxActive=100
maxWait=100
removeAbandonedTimeout=180
removeAbandoned=true
mybatis-config.xml(
必要文件,SSM中的MyBatis部分)
<?xml version="1.0" encoding="UTF-8" ?>
<!DOCTYPE configuration PUBLIC "-//mybatis.org//DTD Config 3.0//EN"
    "http://mybatis.org/dtd/mybatis-3-config.dtd">
<configuration>
	<settings>
		<setting name="lazyLoadingEnabled" value="false"/>
	</settings>
	<!--类型别名 -->
	<typeAliases>
		<package name="cn.appsys.pojo" />
	</typeAliases>
</configuration>
spring-servlet.xml(
必要文件,SSM中是Spring MVC的角色,控制器Controller等功能包含在其中)
<?xml version="1.0" encoding="UTF-8"?>
<beans xmlns="http://www.springframework.org/schema/beans"
	xmlns:xsi="http://www.w3.org/2001/XMLSchema-instance" xmlns:mvc="http://www.springframework.org/schema/mvc"
	xmlns:p="http://www.springframework.org/schema/p" xmlns:context="http://www.springframework.org/schema/context"
	xsi:schemaLocation="
        http://www.springframework.org/schema/beans
        http://www.springframework.org/schema/beans/spring-beans.xsd
        http://www.springframework.org/schema/context
        http://www.springframework.org/schema/context/spring-context.xsd
        http://www.springframework.org/schema/mvc
        http://www.springframework.org/schema/mvc/spring-mvc.xsd">

	<context:component-scan base-package="cn.appsys.controller" />
	<!-- 消息转换器 -->
	<!--  conversion-service="myConversionService" -->
	<mvc:annotation-driven>
		<mvc:message-converters>
			<bean class="org.springframework.http.converter.StringHttpMessageConverter">
				<property name="supportedMediaTypes">
					<list>
						<value>application/json;charset=UTF-8</value>
					</list>
				</property>
			</bean>
			<bean
				class="com.alibaba.fastjson.support.spring.FastJsonHttpMessageConverter">
				<property name="supportedMediaTypes">
					<list>
						<value>text/html;charset=UTF-8</value>
						<value>application/json</value>
					</list>
				</property>
				<property name="features">
					<list>
						<!-- Date的日期转换器 -->
						<value>WriteDateUseDateFormat</value>
					</list>
				</property>
			</bean>
		</mvc:message-converters>
	</mvc:annotation-driven>
	<!-- 加载静态 -->
	<mvc:resources mapping="/statics/**" location="/statics/" />
	<!-- 完成视图的对应 -->
	<!-- 对转向页面的路径解析。prefix:前缀, suffix:后缀 -->
	<!-- <bean -->
	<!-- class="org.springframework.web.servlet.view.InternalResourceViewResolver"> -->
	<!-- <property name="prefix" value="/WEB-INF/jsp/" /> -->
	<!-- <property name="suffix" value=".jsp" /> -->
	<!-- </bean> -->
	<bean
		class="org.springframework.web.servlet.view.ContentNegotiatingViewResolver">
		<property name="favorParameter" value="true" />
		<property name="defaultContentType" value="text/html" />
		<property name="mediaTypes">
			<map>
				<entry key="html" value="text/html;charset=UTF-8" />
				<entry key="json" value="application/json;charset=UTF-8" />
				<entry key="xml" value="application/xml;charset=UTF-8" />
			</map>
		</property>
		<property name="viewResolvers">
			<list>
				<bean
					class="org.springframework.web.servlet.view.InternalResourceViewResolver">
					<property name="prefix" value="/WEB-INF/jsp/" />
					<property name="suffix" value=".jsp" />
				</bean>
			</list>
		</property>
	</bean>
	<bean
		class="org.springframework.web.servlet.handler.SimpleMappingExceptionResolver">

		<property name="exceptionMappings">
			<props>
				<prop key="java.lang.RuntimeException">error</prop>
			</props>
		</property>
	</bean>

	<bean id="multipartResolver"
		class="org.springframework.web.multipart.commons.CommonsMultipartResolver">
		<property name="maxUploadSize" value="5000000" />
		<property name="defaultEncoding" value="UTF-8" />
	</bean>
<!-- 	<bean id="myConversionService" -->
<!-- 		class="org.springframework.context.support.ConversionServiceFactoryBean"> -->
<!-- 		<property name="converters"> -->
<!-- 			<list> -->
<!-- 				<bean class="cn.smbms.tools.StringDateConverter"> -->
<!-- 					<constructor-arg type="java.lang.String" value="yyyy-MM-dd"/> -->
<!-- 				</bean> -->
<!-- 			</list> -->
<!-- 		</property> -->
<!-- 	</bean> -->
</beans>
如下图所示:
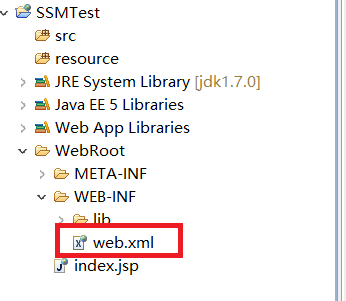
Ⅳ 第四步,当然了,既然有配置文件,那么项目中还有一个重要角色,那就是web.xml,往通俗了讲,他是用来读取Spring等配置文件以及简单的项目乱码处理功能。若不配置它,那么项目运行总会遇到些问题解决不掉。切勿忘了改造它哦!
代码部分是
<?xml version="1.0" encoding="UTF-8"?>
<web-app version="3.0"
 xmlns="http://java.sun.com/xml/ns/javaee"
 xmlns:xsi="http://www.w3.org/2001/XMLSchema-instance"
 xsi:schemaLocation="http://java.sun.com/xml/ns/javaee
 http://java.sun.com/xml/ns/javaee/web-app_3_0.xsd">
  <display-name></display-name>
  <welcome-file-list>
    <welcome-file>index.jsp</welcome-file>
  </welcome-file-list>
  <!-- 指定Spring Bean的配置文件所在目录
              在web.xml中通过contextConfigLocation配置spring,
       contextConfigLocation参数定义了要装入的 Spring 配置文件。
  -->
 <context-param>
  <param-name>contextConfigLocation</param-name>
  <param-value>classpath:applicationContext-*.xml</param-value>
 </context-param>

  <!-- spring字符编码过滤器start-->
 <filter>
  <!--① Spring 编码过滤器 -->
   <filter-name>encodingFilter</filter-name>
   <filter-class>
       org.springframework.web.filter.CharacterEncodingFilter
   </filter-class>
   <!--② 编码方式  -->
   <init-param>
       <param-name>encoding</param-name>
       <param-value>UTF-8</param-value>
   </init-param>
   <!--③ 强制进行编码转换 -->
   <init-param>
       <param-name>forceEncoding</param-name>
       <param-value>true</param-value>
   </init-param>
  </filter>
  <!-- ② 过滤器的匹配 URL -->
    <filter-mapping>
        <filter-name>encodingFilter</filter-name>
        <url-pattern>/*</url-pattern>
    </filter-mapping>
 <!-- spring字符编码过滤器end-->

 <!-- Spring MVC配置 -->
 <servlet>
  <servlet-name>spring</servlet-name>
  <servlet-class>org.springframework.web.servlet.DispatcherServlet</servlet-class>
  <init-param>
   <param-name>contextConfigLocation</param-name>
   <param-value>classpath:springmvc-servlet.xml</param-value>
  </init-param>
  <load-on-startup>1</load-on-startup>
 </servlet>
 <servlet-mapping>
  <servlet-name>spring</servlet-name>
  <url-pattern>/</url-pattern>
 </servlet-mapping>

  <!-- Spring配置 -->
 <!-- 当系统启动的时候,spring需要进行一些资源加载或者配置,都需要使用此监听去做 -->
 <listener>
  <listener-class>org.springframework.web.context.ContextLoaderListener</listener-class>
 </listener>

 <!-- log4j配置start -->
 <context-param>
  <param-name>log4jConfigLocation</param-name>
  <param-value>classpath:log4j.properties</param-value>
 </context-param>
 <context-param>
 <!-- 指定系统根目录路径 -->
     <param-name>webAppRootKey</param-name>
     <param-value>SMBMMVC.root</param-value>
    </context-param>
 <!-- Spring 加载 Log4j 的监听 -->
 <listener>
  <listener-class>
   org.springframework.web.util.Log4jConfigListener
  </listener-class>
 </listener>
 <!-- log4j配置end -->
</web-app>
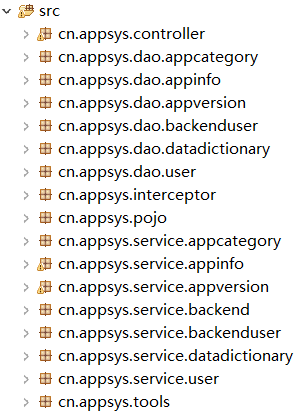
此时,基本配置文件已经配置完毕了。简单的放几个实例对象进入pojo包中,dao层接口
src中的包名文件请按配置文件中的包名配置,给个简单的例子(只可参考)
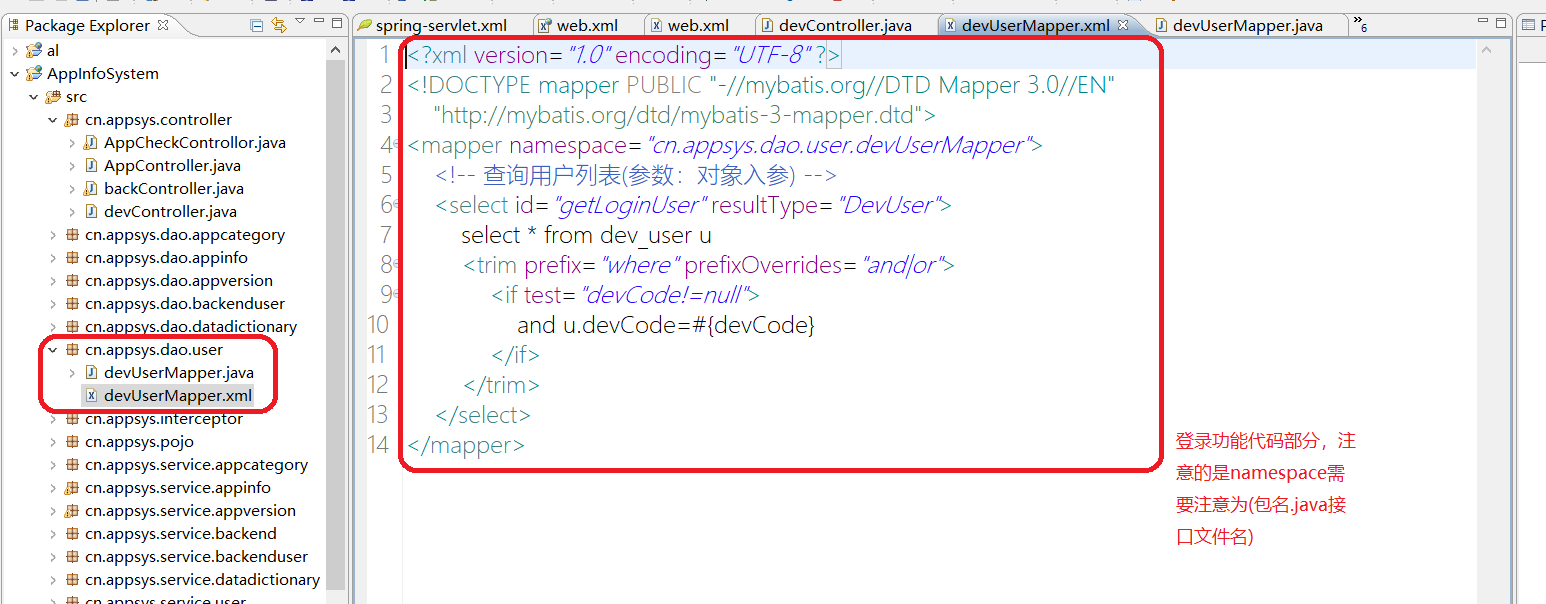
将dao,service,pojo层配置好后,需要的是controller部分以及在dao层放置其文件以及相关代码
| Controller部分,创建*Controller.java | 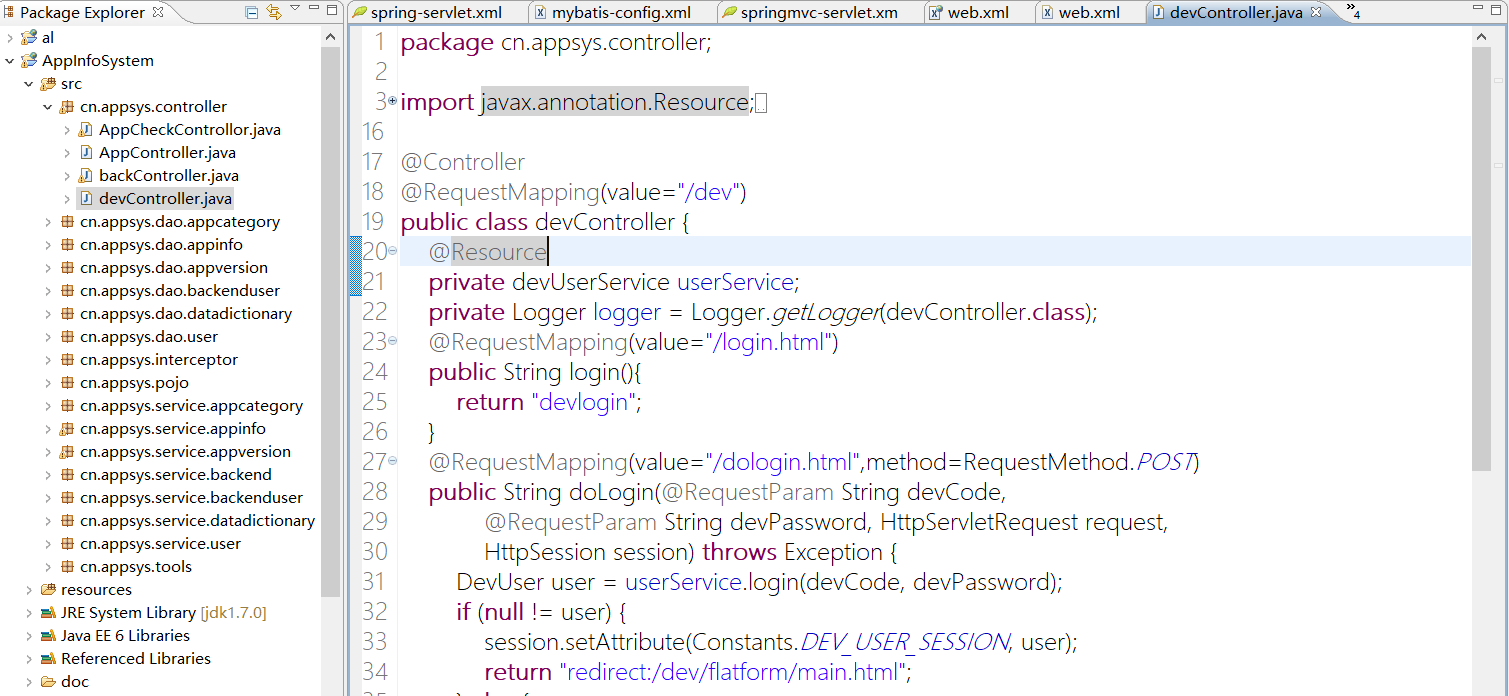 |
| 接下来是dao层,创建接口,以及与接口同名的Mapper对象 |
|
service层则为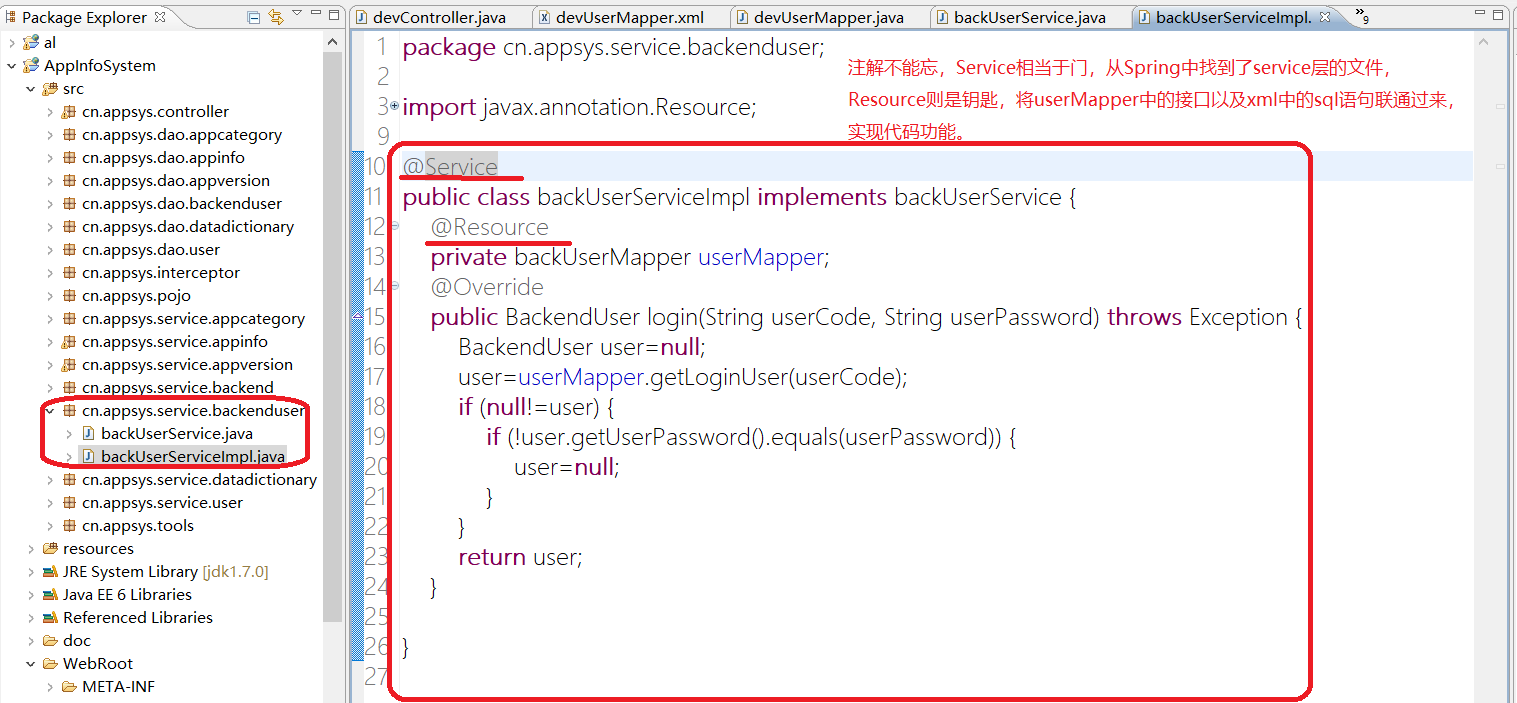 |
配置好后,就可以尝试开启服务,若开启有报错,就要检查一下之前resource中的applicationContext-*.xml和MyBatis-config.xml中数据源是否配置正确,以及注解的包名是否符合,亦或者,检查一下web.xml到底有没有加入spring的监听等功能。若是运行正常,接下来就剩下你的内部代码编写是否正确了!
最后,则是jsp部分登陆的代码,这里我就不多做介绍了,写一个form表单根据action中的url跳入对应Controller中的方法进行验证登陆即可。
希望本篇对您能有所帮助!


 1万+
1万+

 被折叠的 条评论
为什么被折叠?


