


神奇的Vue3
第一章 神奇的Vue3—基础篇
第二章 神奇的Vue3—Pinia
文章目录
了解组件
Vue3中的组件是构建应用程序时非常重要的概念。组件允许你将UI拆分为独立且可重用的部分,使得代码更易于维护和管理。在Vue3中,您可以使用单文件组件(Single-File Component)或纯JavaScript对象来定义组件。
使用单文件组件(Single-File Component)定义组件(推荐使用)
单文件组件通常使用.vue扩展名,其中包含了组件的模板、脚本和样式。一个简单的Vue3单文件组件示例:
<template>
  <div>
    <h1>{{ message }}</h1>
  </div>
</template>

<script setup>
const message = 'Hello, Vue3!'
</script>

<style>
/* 样式代码 */
</style>
使用纯JavaScript对象定义组件
如果不使用构建工具,您可以将Vue组件定义为一个纯JavaScript对象,包含组件的数据、方法和模板。一个纯JavaScript对象定义的Vue3组件示例:
const MyComponent = {
  data() {
    return {
      message: 'Hello, Vue3!'
    };
  },
  template: `
    <div>
      <h1>{{ message }}</h1>
    </div>
  `
};
一、注册组件
一个 Vue 组件在使用前需要先被“注册”,这样 Vue 才能在渲染模板时找到其对应的实现。组件注册有两种方式:全局注册和局部注册。
1. 全局注册
方式:使用 Vue 应用实例的 .component() 方法,让组件在当前 Vue 应用中全局可用。
问题:
- 未使用的组件无法在打包时被自动移除(tree-shaking)
- 相当于使用过多的全局变量,影响项目的可维护性
import { createApp } from 'vue'
import MyComponent from './App.vue'
import MyComponentA from './MyComponentA.vue'

const app = createApp({})
// 参数:组件名称,组件
// 支持链式调用
app.component('MyComponent', MyComponent).component('MyComponentA', MyComponentA);

// 也可以用遍历的方式实现多个组件注册
import componentA from "./components/componentA/index.vue";
import componentB from "./components/componentB/index.vue";
import componentC from "./components/componentC/index.vue";

const commonComponent = {
    componentA,
    componentB,
    componentC
};
Object.values(commonComponent).forEach(component => {
    app.component(component.name, component);
})
2. 局部注册
<推荐使用,本文后续都将使用此种方式,其他形式请查询Vue官方文档>在使用 <script setup> 的单文件组件中,导入的组件可以直接在模板中使用,无需注册:
<script setup>
import ComponentA from './ComponentA.vue'
</script>

<template>
  <ComponentA />
</template>
如果没有使用 <script setup>则需要使用 components 选项来显式注册:
import ComponentA from './ComponentA.js'

export default {
  // 对于每个 components 对象里的属性,它们的 key 名就是注册的组件名,而值就是相应组件的实现
  components: {
    ComponentA
  },
  setup() {
    // ...
  }
}
3. 组件命名
使用 PascalCase (首字母大写的驼峰)作为组件名的注册格式。Vue 支持将模板中使用 kebab-case(短横线分隔命名) 的标签解析为使用 PascalCase 注册的组件。这意味着一个以 MyComponent 为名注册的组件,在模板中可以通过 <MyComponent> 或 <my-component> 引用
二、属性详解
1. Props
用法:Props(属性)是用于接收父组件向子组件传递的数据,使得子组件可以接收并使用这些数据
(1)基础使用方法
- 命名:
camelCase(驼峰)命名方式,父组件传入时可使用kebab-case(短横线分隔命名)的方式传入- 所有
prop默认都是可选的,除非声明了required: true;- 除
Boolean外的未传递的可选prop将会有一个默认值undefined,Boolean类型的未传递prop将被转换为false;- 如果声明了
default值,那么在prop的值被解析为undefined时,都会改为default值。
const props = defineProps({
  // 基础类型检查
  // (给出 `null` 和 `undefined` 值则会跳过任何类型检查)
  propA: Number,
  // 多种可能的类型
  propB: [String, Number],
  // 必传,且为 String 类型
  propC: {
    type: String,
    required: true
  },
  // Number 类型的默认值
  propD: {
    type: Number,
    default: 100
  },
  // 对象类型的默认值
  propE: {
    type: Object,
    // 对象或数组的默认值
    // 必须从一个工厂函数返回。
    // 该函数接收组件所接收到的原始 prop 作为参数。
    default(rawProps) {
      return { message: 'hello' }
    }
  },
  // 自定义类型校验函数
  // 可将完整的 props 作为第二个参数传入
  propF: {
    validator(value, props) {
      // The value must match one of these strings
      return ['success', 'warning', 'danger'].includes(value)
    }
  },
  // 函数类型的默认值
  propG: {
    type: Function,
    // 不像对象或数组的默认,这不是一个
    // 工厂函数。这会是一个用来作为默认值的函数
    default() {
      return 'Default function'
    }
  }
})
(2)数据流向:单项绑定原则
定义:所有的 props 都遵循着单向绑定原则,props 因父组件的更新而变化,但不会向上修改父组件的数据。
const props = defineProps(['propA'])
// 警告!prop 是只读的
// props.propA = 1;

// 讲prop重新赋值,使 prop 和后续更新无关了
const counter = ref(props.propA)
(3)Boolean类型使用
// 子组件
const props = defineProps({
	// 可用于模态框的开关
  disabled: Boolean
});

// 父组件中
<!-- 等同于传入 :disabled="true" -->
<MyComponent disabled />

<!-- 等同于传入 :disabled="false" -->
<MyComponent />
2. 事件
(1)触发(发射)与监听事件
- 触发(发射)事件(Emitting Events):组件可以使用
$emit方法来发射(触发)自定义事件。例如,在子组件中可以使用$emit方法触发一个自定义事件:
<template>
  // 第二个参数,事件的参数
  <button @click="$emit('custom-event', eventData)">Click Me</button>
</template>
- 监听事件(Listening to Events):父组件可以使用
v-on指令或@符号来监听子组件发射的事件。例如,在父组件中可以监听子组件发射的custom-event事件:
<template>
  <ChildComponent @custom-event="handleCustomEvent" />
</template>

<script>
export default {
  methods: {
    handleCustomEvent(eventData) {
      // 处理接收到的事件数据
    }
  }
};
</script>
(2)声明事件
在Js中
<script setup>
const emit = defineEmits(['change', 'submit'])

function buttonClick() {
  emit('change', 123, false)
}
</script>
在Ts中:声明方法和入参
<script setup lang="ts">
const emit = defineEmits<{
  (e: 'change', id: number, isChange: boolean): void
  (e: 'update', value: string): void
}>();

  emit("change", 123, true);
  emit("update", "123");
</script>
(3)事件校验
为事件添加校验函数,参数为触发(发射)事件时传入 emit 的内容,返回一个布尔值来表明事件是否合法。
<script setup>
const emit = defineEmits({
  // 没有校验
  click: null,

  // 校验 submit 事件
  submit: ({ email, password }) => {
    if (email && password) {
      return true
    } else {
      console.warn('Invalid submit event payload!')
      return false
    }
  }
})

function submitForm(email, password) {
  emit('submit', { email, password })
}
</script>
3. 组件上的双向绑定(v-model,defineModel())
v-mode:v-model指令可以在表单元素(如input、textarea、select等)上创建双向数据绑定,使数据在组件和模板之间进行双向同步。
defineModel() :返回的值是一个 ref。它可以像其他 ref 一样被访问以及修改,起到在父组件和当前变量之间的双向绑定的作用:
- 它的 .value 和父组件的 v-model 的值同步;
- 当它被子组件变更了,会触发父组件绑定的值一起更新。
(1)使用方法
在子组件中使用defineModel:在子组件中使用defineModel来声明一个双向绑定的模型。
<!-- ChildComponent.vue -->
<script setup>
const model = defineModel();
</script>

<template>
  <input v-model="model" />
</template>
在父组件中使用子组件并绑定v-model:在父组件中使用子组件时,可以通过v-model指令将父组件的数据与子组件的双向绑定模型关联起来。
<!-- ParentComponent.vue -->
<template>
  <ChildComponent v-model="countModel" />
</template>

<script setup>
const countModel = ref(0);
</script>
(2)v-model 的参数,多个 v-model 绑定
① 组件上的 v-model 也可以接受一个参数:
// 通过v-model:title,可以将一个名为title的属性与父组件中的数据进行双向绑定。
<MyComponent v-model:title="bookTitle" />

<!-- MyComponent.vue -->
<script setup>
const title = defineModel('title')
</script>

<template>
  <input type="text" v-model="title" />
</template>
② 多个 v-model 绑定
<!-- ChildComponent.vue -->
<script setup>
import { defineModel } from 'vue';

const emailModel = defineModel('email');
const passwordModel = defineModel('password');
</script>

<!-- ParentComponent.vue -->
<template>
  <ChildComponent v-model:email="emailData" v-model:password="passwordData" />
</template>

<script setup>
import { ref } from 'vue';

const emailData = ref('');
const passwordData = ref('');
</script>
(3)底层机制
defineModel 是一个便利宏。编译器将其展开为以下内容:
- 一个名为
modelValue的prop,本地ref的值与其同步; - 一个名为
update:modelValue的事件,当本地ref的值发生变更时触发。子组件中接收父组件传递的数据,并使用$emit('update:modelValue', newValue)来更新父组件的数据。
<script setup>
const props = defineProps(['modelValue'])
const emit = defineEmits(['update:modelValue'])
</script>

<template>
  <input
    :value="props.modelValue"
    @input="emit('update:modelValue', $event.target.value)"
  />
</template>
4. 透传 Attributes
定义:父组件向子组件传递,却没有被该组件声明为 props 或 emits 的 attribute 或者 v-on 事件监听器等其他所有。最常见的例子就是 class、style 和 id。这使得父组件可以向子组件传递任意的 HTML 属性,而无需在子组件中显式声明这些属性。
(1)实现举例
一个组件以单个元素为根作渲染时,透传的 attribute 会自动被添加到根元素上, 同样的规则也适用于 v-on 事件监听器
① 创建一个单个元素为根的子组件
<!-- ChildComponent.vue -->
<button>click me</button>
② 一个父组件使用了这个组件,并且传入了 class:
<!-- ParentComponent.vue -->
<MyButton class="large" @click="onClick" />
③ 最后渲染出的 DOM 结果是:
<button class="large" @click="onClick">click me</button>
(2)透传进来的 attribute 用 $attrs 访问
$attrs 对象包含了除组件所声明的 props 和 emits 之外的所有其他 attribute。在script中使用useAttrs() API 来访问一个组件的所有透传 attribute。
- 和
props有所不同,透传attributes在 JavaScript 中保留了它们原始的大小写,所以像foo-bar这样的一个attribute需要通过$attrs['foo-bar']来访问。- 像
@click这样的一个v-on事件监听器将在此对象下被暴露为一个函数$attrs.onClick。
<!-- ChildComponent.vue -->
<template>
  <div>
  	// 子组件可以通过$attrs属性来访问父组件传递的所有非prop属性
    <p>Parent Component Message: {{ $attrs.message }}</p>
  </div>
</template>
<script setup>
import { useAttrs } from 'vue'
// 在script中访问$attrs
const attrs = useAttrs();
console.log(attrs.message);

</script>

<!-- ParentComponent.vue -->
<template>
  <ChildComponent message="Hello from Parent Component" />
</template>
(3)禁用 Attributes 继承
在组件选项中设置 inheritAttrs: false
defineOptions({
  inheritAttrs: false
})
5. 插槽 slot
作用:用于在子组件中渲染父组件向子组件传递的内容。Vue 3中的插槽分为默认插槽和具名插槽
(1)含义
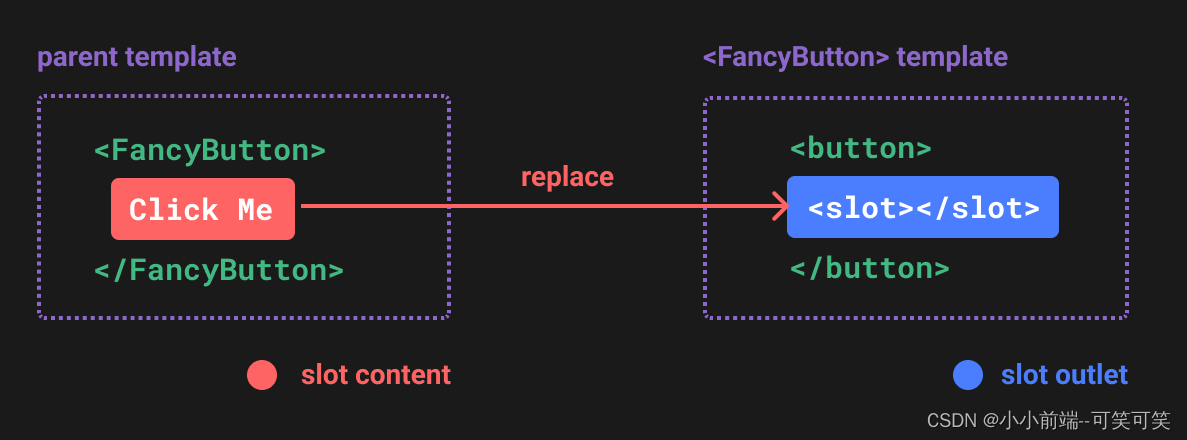
① <FancyButton> 组件
<!-- FancyButton.vue -->
<button class="fancy-btn">
  <slot></slot> <!-- 插槽出口 -->
</button>
② 在父组件中使用<FancyButton>
<!-- ParentComponent.vue -->
<FancyButton>
  Click me! <!-- 插槽内容 -->
</FancyButton>
③ 渲染结果:
<button class="fancy-btn">Click me!</button>
④ 是js来解释就是类似于
// 父元素传入插槽内容
FancyButton('Click me!')

// FancyButton 在自己的模板中渲染插槽内容
function FancyButton(slotContent) {
  return `<button class="fancy-btn">
      ${slotContent}
    </button>`
}
(2)插槽的渲染作用域,只能访问到父组件的数据作用域
插槽内容本身是在父组件模板中定义的,所以插槽内容只可以访问到父组件的数据作用域,插槽内容无法访问子组件的数据。
使用子组件域内的数据:像对组件传递 props 那样,向一个插槽的出口上传递 attributes:
<!-- MyComponent.vue -->
<div>
  <slot :text="greetingMessage" :count="1"></slot>
</div>

<!-- ParentComponent.vue -->
// 在父组件中使用,可使用解构  v-slot="{ text, count }"
<MyComponent v-slot="slotProps">
  {{ slotProps.text }} {{ slotProps.count }}
</MyComponent>
(3)默认插槽和具名插槽,一个组件中包含多个插槽出口时
带 name 的插槽被称为具名插槽 (named slots)。没有提供 name 的 <slot> 出口会隐式地命名为default。
<!-- ChildComponent.vue -->
<div class="container">
  <header>
    <!-- 标题内容放这里 -->
  </header>
  <main>
    <!-- 主要内容放这里 -->
  </main>
  <footer>
    <!-- 底部内容放这里 -->
  </footer>
</div>
<!-- ParentComponent.vue -->
<div class="container">
  <header>
    <slot name="header"></slot>
  </header>
  <main>
    <slot></slot>
  </main>
  <footer>
    <slot name="footer"></slot>
  </footer>
</div>
(4)$slots 属性
$slots 是一个特殊的属性,用于访问子组件中的插槽内容。通过 $slots,您可以在父组件中访问和操作子组件中插槽的内容。
$slots.default访问默认插槽内容$slots.header访问具名heard插槽内容
// template
<div v-if="$slots.header" class="card-header">
  <slot name="header" />
</div>

// script
import { useSlots } from 'vue'
const slots = useSlots();
// 访问默认插槽内容
const defaultSlotContent = slots.default;
// 访问具名插槽内容
const headerSlotContent = slots.header;
(5)动态插槽
<template>
  <div>
    <slot :name="slotName"></slot> <!-- 动态设置插槽名 -->
  </div>
</template>

<script setup>
import { ref } from 'vue';

const slotName = ref("header");
</script>
6. 父子组件数据传递之依赖注入
(1)prop逐级传递
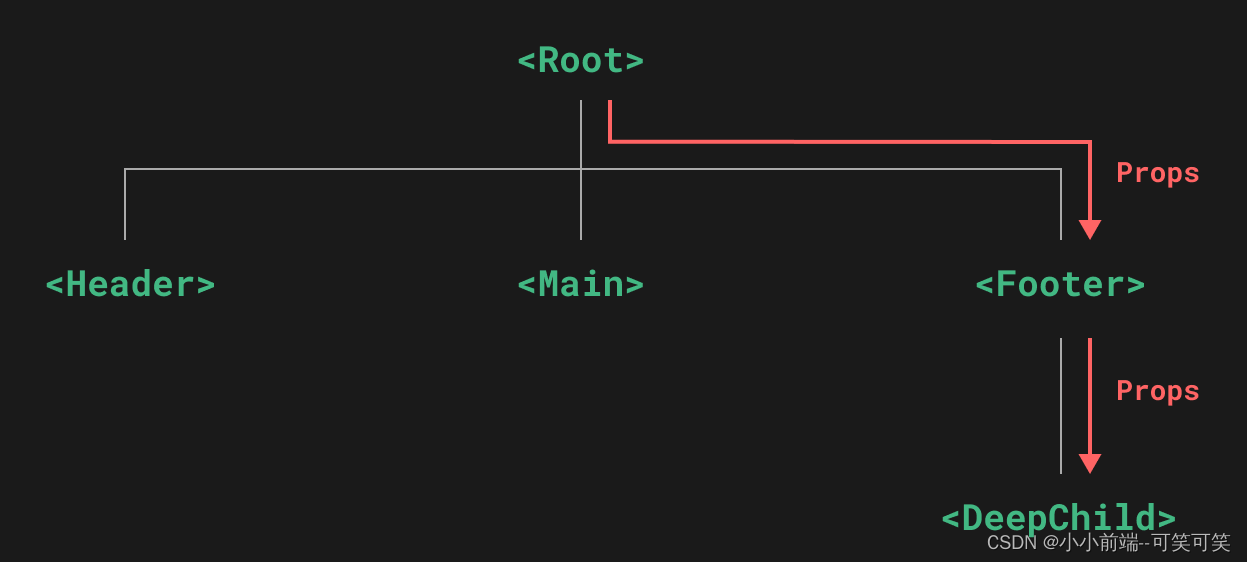
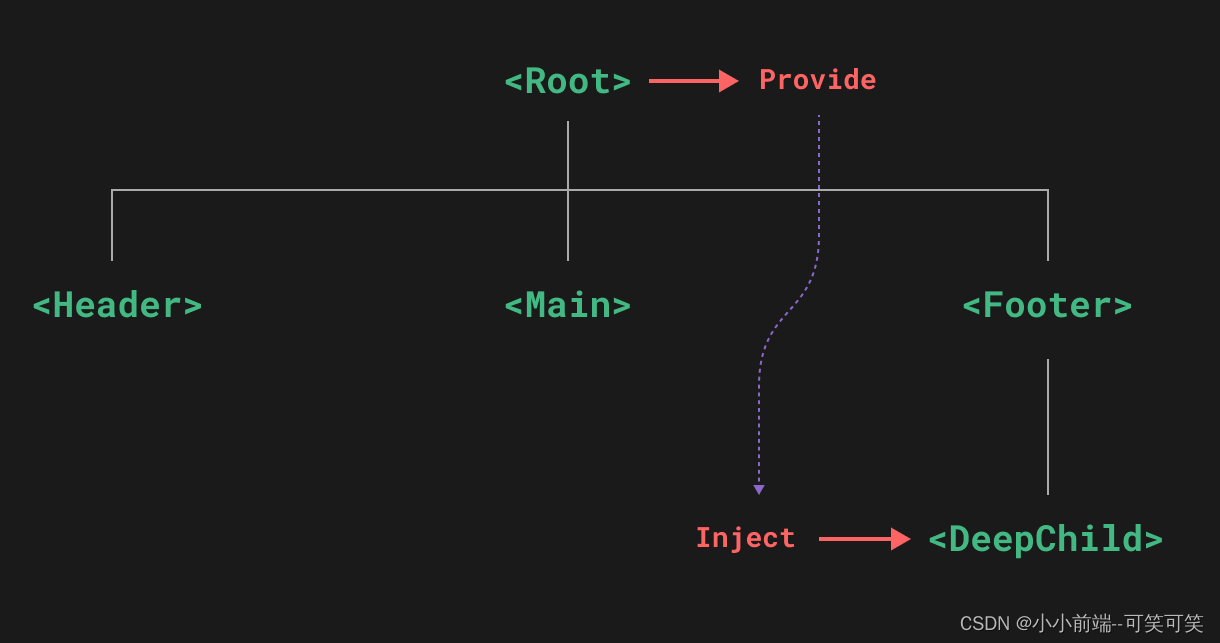
(2)Provide和Inject在组件树中的任何地方共享数据
provide和inject是一种高级的组件通信方式,用于在祖先组件和后代组件之间传递数据,而不需要通过props逐层传递。这种方式可以方便地在组件树中的任何地方共享数据。
provide: provide是在祖先组件中使用的选项,用于提供数据给其所有后代组件。通过在provide中定义数据,可以将这些数据传递给所有后代组件。
inject: inject是在后代组件中使用的选项,用于接收祖先组件通过provide提供的数据。通过在inject中指定要接收的数据属性,可以在后代组件中访问这些数据。
<!-- Root.vue -->
<script setup>
import { provide } from 'vue';

provide(/* 注入名 */ 'message', /* 值 */ 'hello!')
const location = ref('North Pole')
function updateLocation() {
  location.value = 'South Pole'
}
// 响应式数据注入,可以双向修改
provide('location', {
  location,
  updateLocation
});

const count = ref(0)
// 使属性只是可读
provide('read-only-count', readonly(count))
</script>
<!-- DeepChild.vue -->
<script setup>
import { inject } from 'vue'

const { location, updateLocation } = inject('location')
</script>
7.异步组件
defineAsyncComponent是一个用于创建异步组件的函数。defineAsyncComponent函数允许您延迟加载组件,以提高应用程序的性能和加载速度。
import { defineAsyncComponent } from 'vue';

const AsyncComp = defineAsyncComponent(() => {
  return new Promise<AsyncComponent>((resolve, reject) => {
    // 加载组件
    import("./modals/createProjectModal.vue")
      .then((module) => {
        // 返回包含组件定义的对象
        resolve(module.default);
      })
      .catch((error) => {
        reject(error); // 加载失败时的处理
      });
  });
});
// 简写
const AsyncComp = defineAsyncComponent(() => import('./components/AsyncComponent.vue'));
// 高级选项
const AsyncComp = defineAsyncComponent({
  // 加载函数
  loader: () => import('./Foo.vue'),

  // 加载异步组件时使用的组件
  loadingComponent: LoadingComponent,
  // 展示加载组件前的延迟时间,默认为 200ms
  delay: 200,

  // 加载失败后展示的组件
  errorComponent: ErrorComponent,
  // 如果提供了一个 timeout 时间限制,并超时了
  // 也会显示这里配置的报错组件,默认值是:Infinity
  timeout: 3000
})


 588
588


 被折叠的 条评论
为什么被折叠?
被折叠的 条评论
为什么被折叠?
 到【灌水乐园】发言


