


 文章详细介绍了Hi3559AV100芯片的U-Boot启动流程,包括配置、编译过程,以及启动阶段的代码执行步骤。在启动过程中,首先由BootROM加载部分代码到内部RAM,然后配置DDR、PLL等,接着解压并执行加载到DDR的U-Boot代码。文章还分析了链接脚本和启动阶段的函数调用,最后讨论了为何需要对U-Boot进行重定位。
        </h1>
        <div class="clear"></div>
        <div class="postBody">
            <div id="cnblogs_post_body" class="blogpost-body blogpost-body-html">
1、uboot配置及编译
1.1 uboot配置说明
要保证uboot正常运行需要配置ddr、flash、调试串口。ddr配置参考Hi3559A V100R001C02SPC031\ReleaseDoc\zh\02.only for reference\hardware 目录下面的对应文档,flash配置参考\Hi3559A V100R001C02SPC031\ReleaseDoc\zh\02.only for reference\software\基于Hifmcv100控制器的Flash移植指南.pdf 文档。
编译uboot参考E:\camera\Hi3559A V100R001C02SPC031\ReleaseDoc\zh\01.software\board\OSDRV\Hi3559A╱C V100 U-boot 移植应用开发指南.pdf,
1.2 生成u-boot-z.bin分析
Hi3559A╱C V100 U-boot 移植应用开发指南.pdf中是先编译uboot源码生成中间文件u-boot.bin,在将u-boot.bin 打包生成能在板端运行的u-boot-hi3559av100.bin文件,下面分析一下u-boot-hi3559av100.bin文件是如何生成的。
生成u-boot-hi3559av100.bin的命令是make CROSS_COMPILE=aarch64-himix100-linux- u-boot-z.bin,打开uboot目录下面的顶层Makefile文件,这条命令在Makefile中执行的位置如下所示:

通打开信息可以看出make的实际内容为:
make -C /home/yyfage/YY/hisi/gzcamera/Hi3559AV100_SDK_V2.0.3.0/package/osdrv/opensource/uboot/u-boot-2016.11/arch/arm/cpu/armv8/hi3559av100/hw_compressed/ \
        CROSS_COMPILE=aarch64-himix100-linux- \
        BINIMAGE=/home/yyfage/YY/hisi/gzcamera/Hi3559AV100_SDK_V2.0.3.0/package/osdrv/opensource/uboot/u-boot-2016.11/u-boot.bin TOPDIR=/home/yyfage/YY/hisi/gzcamera/Hi3559AV100_SDK_V2.0.3.0/package/osdrv/opensource/uboot/u-boot-2016.11
make -C 表示跳转的后面的目录去执行Makefile,这里是跳转到u-boot-2016.11/arch/arm/cpu/armv8/hi3559av100/hw_compressed/ 目录下去执行Makefile,这里会编译hw_compressed目录下的文件,并将uboot顶层目录下的.reg寄存器配置文件打包到u-boot-hi3559av100.bin中。下面分析一下hw_compressed目录下的Makefile文件。

################################################################################
#    Create By Hisilicon
################################################################################
PWD = $(shell pwd)
HW_CROSS_COMPILE = aarch64-himix100-linux-
TOPDIR =
BINIMAGE = $(TOPDIR)/full-boot.bin
################################################################################
CC := $(HW_CROSS_COMPILE)gcc
AR := $(HW_CROSS_COMPILE)ar
LD := $(HW_CROSS_COMPILE)ld
OBJCOPY := $(HW_CROSS_COMPILE)objcopy
OBJDUMP := $(HW_CROSS_COMPILE)objdump
################################################################################
BOOT := u-boot-KaTeX parse error: Undefined control sequence: \< at position 166: …-ffreestanding \̲<̲span style="col…(TEXTBASE) <span style=“color: rgba(0, 0, 0, 1)”>
-IKaTeX parse error: Undefined control sequence: \< at position 18: …OPDIR)/include \̲<̲span style="col…(TOPDIR)/drivers/ddr/hisilicon/default <span style=“color: rgba(0, 0, 0, 1)”>
-I
(
T
O
P
D
I
R
)
/
d
r
i
v
e
r
s
/
d
d
r
/
h
i
s
i
l
i
c
o
n
/
(TOPDIR)/drivers/ddr/hisilicon/
(TOPDIR)/drivers/ddr/hisilicon/(SOC) <span style=“color: rgba(0, 0, 0, 1)”>
-I$(TOPDIR)/arch/arm/include <span style=“color: rgba(0, 0, 0, 1)”>
-fno-pic -mstrict-align -ffunction-sections <span style=“color: rgba(0, 0, 0, 1)”>
-fdata-sections -fno-common -ffixed-r9 <span style=“color: rgba(0, 0, 0, 1)”>
-fno-common -ffixed-x18 -pipe -march=armv8-a <span style=“color: rgba(0, 0, 0, 1)”>
-Wall -Wstrict-prototypes -fno-stack-protector <span style=“color: rgba(0, 0, 0, 1)”>
-D__LINUX_ARM_ARCH__=8 -D__ARM__ <span style=“color: rgba(0, 0, 0, 1)”>
-DCONFIG_HI3559AV100 -DCONFIG_MMC -DCONFIG_UFS
$(MKFLAGS) -fno-strict-aliasing
################################################################################
START := start.o
COBJS := lowlevel_init_v300.o <span style=“color: rgba(0, 0, 0, 1)”>
init_registers.o <span style=“color: rgba(0, 0, 0, 1)”>
sdhci_boot.o <span style=“color: rgba(0, 0, 0, 1)”>
ufs.o <span style=“color: rgba(0, 0, 0, 1)”>
uart.o <span style=“color: rgba(0, 0, 0, 1)”>
ddr_training_impl.o <span style=“color: rgba(0, 0, 0, 1)”>
ddr_training_ctl.o <span style=“color: rgba(0, 0, 0, 1)”>
ddr_training_boot.o <span style=“color: rgba(0, 0, 0, 1)”>
ddr_training_custom.o <span style=“color: rgba(0, 0, 0, 1)”>
ddr_training_console.o <span style=“color: rgba(0, 0, 0, 1)”>
startup.o <span style=“color: rgba(0, 0, 0, 1)”>
image_data.o <span style=“color: rgba(0, 0, 0, 1)”>
div0.o <span style=“color: rgba(0, 0, 0, 1)”>
reset.o
SSRC := arch/arm/cpu/armv8/KaTeX parse error: Undefined control sequence: \< at position 62: …start</span>.S \̲<̲span style="col…(SOC)/reset.S <span style=“color: rgba(0, 0, 0, 1)”>
arch/arm/cpu/armv8/KaTeX parse error: Undefined control sequence: \< at position 20: …)/sdhci_boot.c \̲<̲span style="col…(SOC)/scsi.c <span style=“color: rgba(0, 0, 0, 1)”>
arch/arm/cpu/armv8/KaTeX parse error: Undefined control sequence: \< at position 14: (SOC)/scsi.h \̲<̲span style="col…(SOC)/uart.S <span style=“color: rgba(0, 0, 0, 1)”>
arch/arm/cpu/armv8/KaTeX parse error: Undefined control sequence: \< at position 13: (SOC)/ufs.c \̲<̲span style="col…(SOC)/ufs.h <span style=“color: rgba(0, 0, 0, 1)”>
arch/arm/cpu/armv8/KaTeX parse error: Undefined control sequence: \< at position 24: …it_registers.c \̲<̲span style="col…(SOC)/lowlevel_init_v300.c <span style=“color: rgba(0, 0, 0, 1)”>
drivers/ddr/hisilicon/default/ddr_training_impl.c <span style=“color: rgba(0, 0, 0, 1)”>
drivers/ddr/hisilicon/default/ddr_training_ctl.c <span style=“color: rgba(0, 0, 0, 1)”>
drivers/ddr/hisilicon/default/ddr_training_boot.c <span style=“color: rgba(0, 0, 0, 1)”>
drivers/ddr/hisilicon/default/ddr_training_console.c <span style=“color: rgba(0, 0, 0, 1)”>
drivers/ddr/hisilicon/KaTeX parse error: Undefined control sequence: \< at position 29: …ining_custom.c \̲<̲span style="col…(SOC).c <span style=“color: rgba(0, 0, 0, 1)”>
lib/hw_dec/hw_decompress_v2.c <span style=“color: rgba(0, 0, 0, 1)”>
lib/hw_dec/hw_decompress_v2.h
REG := $(wildcard $(TOPDIR)/*.reg $(TOPDIR)/.reg)
SRC := $(notdir $(SSRC))
################################################################################
.PHONY:
(
<
s
p
a
n
s
t
y
l
e
=
"
c
o
l
o
r
:
r
g
b
a
(
0
,
0
,
255
,
1
)
"
>
B
O
O
T
<
/
s
p
a
n
>
)
.
<
s
p
a
n
s
t
y
l
e
=
"
c
o
l
o
r
:
r
g
b
a
(
0
,
0
,
0
,
1
)
"
>
b
i
n
<
/
s
p
a
n
>
(<span style="color: rgba(0, 0, 255, 1)">BOOT</span>).<span style="color: rgba(0, 0, 0, 1)">bin </span>
(<spanstyle="color:rgba(0,0,255,1)">BOOT</span>).<spanstyle="color:rgba(0,0,0,1)">bin</span>(BOOT).bin: KaTeX parse error: Expected 'EOF', got '#' at position 166: …, 128, 0, 1)"> #̲(BOOT).bin就是要生成的目标文件u-boot-hi3559av100.bin,这里是将BOOT.temp打包生成的
@dd if=./KaTeX parse error: Expected 'EOF', got '&' at position 84: …bs=1 count=64 2&̲gt;/dev/<span s…(REG) of=./tmp2 bs=10240 conv=sync 2>/dev/null #temp2为.reg寄存器配置表格
@dd if=./$(BOOT).tmp of=./tmp3 bs=1 skip=10304 2>/dev/null #temp3为BOOT.temp跳转到10304字节后面的全部文件,这里为什么要跳转10304字节还不清楚
@cat tmp1 tmp2 tmp3 > $(BOOT).bin #将temp1、temp2、temp3合并成一个BOOT.bin 目标文件
@rm -f tmp1 tmp2 tmp3
@chmod 754
(
<
s
p
a
n
s
t
y
l
e
=
"
c
o
l
o
r
:
r
g
b
a
(
0
,
0
,
255
,
1
)
"
>
B
O
O
T
<
/
s
p
a
n
>
)
.
<
s
p
a
n
s
t
y
l
e
=
"
c
o
l
o
r
:
r
g
b
a
(
0
,
0
,
0
,
1
)
"
>
b
i
n
@
c
p
−
f
v
<
/
s
p
a
n
>
(<span style="color: rgba(0, 0, 255, 1)">BOOT</span>).<span style="color: rgba(0, 0, 0, 1)">bin @cp -fv </span>
(<spanstyle="color:rgba(0,0,255,1)">BOOT</span>).<spanstyle="color:rgba(0,0,0,1)">bin@cp−fv</span>@ $(TOPDIR) #将生成的BOOT.bin复制到uboot顶层目录中
@echo $(BOOT).bin is Ready.
$(BOOT).tmp: ( < s p a n s t y l e = " c o l o r : r g b a ( 0 , 0 , 255 , 1 ) " > B O O T < / s p a n > ) . < s p a n s t y l e = " c o l o r : r g b a ( 0 , 0 , 0 , 1 ) " > e l f < / s p a n > (<span style="color: rgba(0, 0, 255, 1)">BOOT</span>).<span style="color: rgba(0, 0, 0, 1)">elf </span> (<spanstyle="color:rgba(0,0,255,1)">BOOT</span>).<spanstyle="color:rgba(0,0,0,1)">elf</span>(OBJCOPY) -O srec $< KaTeX parse error: Expected 'EOF', got '#' at position 155: …0, 128, 0, 1)">#̲将BOOT.elf生成BOOT…(OBJCOPY) -j .text -O binary $< KaTeX parse error: Expected 'EOF', got '#' at position 149: …0, 128, 0, 1)">#̲BOOT.elf 总的代码段拷…(OBJCOPY) --gap-fill=0xff -O binary $< $@ #将BOOT.elf转换成二进制文件BOOT.tmp
$(BOOT).elf: image_data.gzip $(SRC) $(START) $(COBJS) #将image_data.gzip和hw_compressed目录下编译生成的目标文件链接成BOOT.elf
$(LD) -Bstatic -T u-boot.lds -Ttext $(TEXTBASE) $(START)
$(COBJS) -Map $(BOOT).map -o
<
s
p
a
n
s
t
y
l
e
=
"
c
o
l
o
r
:
r
g
b
a
(
0
,
0
,
0
,
1
)
"
>
@
<
/
s
p
a
n
>
<span style="color: rgba(0, 0, 0, 1)">@ </span>
<spanstyle="color:rgba(0,0,0,1)">@</span>(OBJDUMP) -d $@ > $@.asm
.PHONY: regfile #判断uboot顶层目录下有无.reg并给出一些提示信息
regfile:
@if [ “$(words $(REG))” = “0” ]; then (
echo ‘’ Need ‘.reg’ or '.reg’ file in directory
(
T
O
P
D
I
R
)
;
<
s
p
a
n
s
t
y
l
e
=
"
c
o
l
o
r
:
r
g
b
a
(
0
,
0
,
255
,
1
)
"
>
e
x
i
t
<
/
s
p
a
n
>
1
;
)
<
s
p
a
n
s
t
y
l
e
=
"
c
o
l
o
r
:
r
g
b
a
(
0
,
0
,
0
,
1
)
"
>
f
i
@
<
/
s
p
a
n
>
<
s
p
a
n
s
t
y
l
e
=
"
c
o
l
o
r
:
r
g
b
a
(
0
,
0
,
255
,
1
)
"
>
i
f
<
/
s
p
a
n
>
[
"
(TOPDIR); \ <span style="color: rgba(0, 0, 255, 1)">exit</span> 1; \ )<span style="color: rgba(0, 0, 0, 1)"> fi @</span><span style="color: rgba(0, 0, 255, 1)">if</span> [ "
(TOPDIR); <spanstyle="color:rgba(0,0,255,1)">exit</span>1; )<spanstyle="color:rgba(0,0,0,1)">fi@</span><spanstyle="color:rgba(0,0,255,1)">if</span>["(words $(REG))" != “1” ]; then (
echo '’ Found multi ‘.reg’ or '.reg’ file in directory $(TOPDIR);
echo ‘***’ Files: $(notdir $(REG));
exit 1;
) fi
################################################################################
start.o: start.S
$(CC) -D__ASSEMBLY__ $(CFLAGS) -o $@ $< -c #将start.s编译成start.o
# -1 : --fast -9 : --best
image_data.gzip: $(BINIMAGE) #将uboot顶层目录下编译生成的u-boot.bin压缩成image_data.gzip,程序载入后会用hi3559内部的gzip模块进行解压
gzip -fNqc -7 $< > $@
%.o: %.c #编译hw_compressed目录下的所有.c文件
$(CC) KaTeX parse error: Undefined control sequence: \< at position 36: …ict-prototypes \̲<̲span style="col…@ KaTeX parse error: Expected 'EOF', got '&' at position 1: &̲lt;<span style=…(CC) -D__ASSEMBLY__ $(CFLAGS) -o $@ $< -c
image_data.o: image_data.S image_data.gzip
$(CC) -D__ASSEMBLY__ $(CFLAGS) -o $@ $< -c
#############################################################################
(
S
R
C
)
<
s
p
a
n
s
t
y
l
e
=
"
c
o
l
o
r
:
r
g
b
a
(
0
,
0
,
0
,
1
)
"
>
:
l
n
−
s
f
<
/
s
p
a
n
>
.
.
/
.
.
/
.
.
/
.
.
/
.
.
/
.
.
/
(SRC)<span style="color: rgba(0, 0, 0, 1)">: ln -sf </span>../../../../../../
(SRC)<spanstyle="color:rgba(0,0,0,1)">:ln−sf</span>../../../../../../(filter %/
@
,
@,
@,(SSRC)) $@
################################################################################
TMPS := $(COBJS) start.o $(SRC)
$(BOOT).map $(BOOT).elf $(BOOT).srec $(BOOT).bin $(BOOT).text $(BOOT).tmp <span style=“color: rgba(0, 0, 0, 1)”>
image_data.gzip
distclean: clean
clean:
-rm -f $(TMPS)
################################################################################
.PHONY: clean
################################################################################
从上面的Makefile分析可以看出,最终生成的uboot可执行文件是

2、链接脚本分析
uboot编译分为两部分,第一部分是编译uboot源码,第二部分是编译u-boot-2016.11/arch/arm/cpu/armv8/hi3559av100/hw_compressed/下面的文件,并打包成可执行文件。
2.1 第一个链接脚本分析
第一部分编译的链接脚本在uboot根目录下
,下面截取其中一部分:
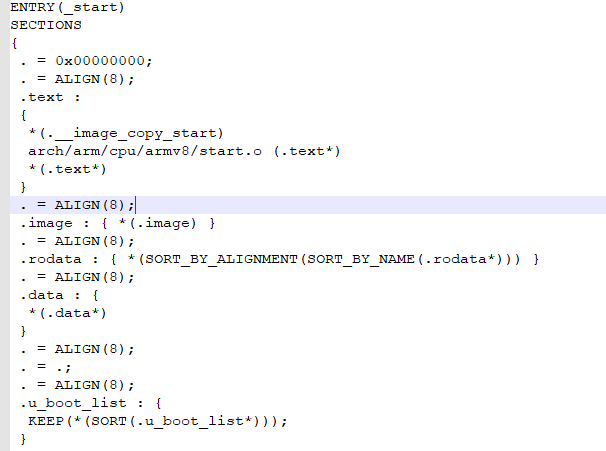
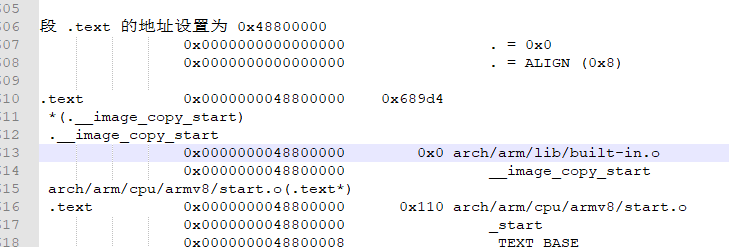
从链接脚本可以看到uboot的入口函数arch/arm/cpu/armv8/start.S文件中的_start,链接起始地址这里是0x0000000,这个最终是有Makefile指定的,从u-boot.map文件中可以看出链接的起始地址是0x48800000,uboot的链接地址在ddr中,因为hi3559的ddr寻址范围是0x0_4000_0000~0x2_3FFF_FFFF。
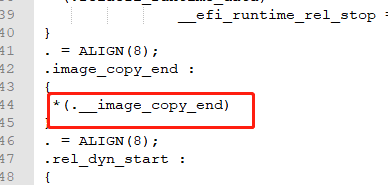
__image_copy_start和__image_copy_end表示uboot代码的拷贝其实地址和结束地址,如下所示:
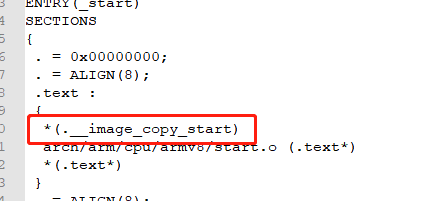
代码段中第一个段是__image_copy_start,然后是arch/arm/cpu/armv8/start.o的代码,最后是其它文件的代码段。__image_copy_start和__image_copy_end这两个段定义在文件u-boot/arch/arm/lib/section.c文件中,如下所示:
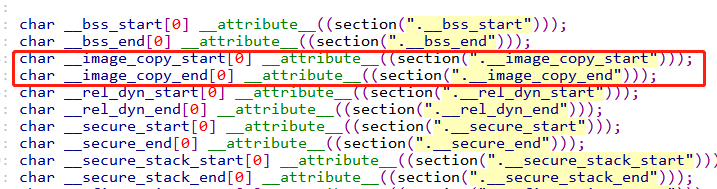
char __image_copy_start[0] __attribute__((section(".__image_copy_start")));表示零长度的数组__image_copy_start定义在__image_copy_start段,零长度数组不占用内存空间。
char __image_copy_end[0] __attribute__((section(".__image_copy_end")));表示零长度数组__image_copy_end定义在__image_copy_end段。
链接文件中代码段的第一段就是__image_copy_start段,而这个__image_copy_start段存放的char __image_copy_start变量又不占用内存空间这样就可以表示一个代码段的其实地址。
从u-boot.map文件中也可以看到__image_copy_start就是u-boot的起始地址:

__image_copy_start地址和.text代码段的起始地址一样都是0x4800000,第一个函数_start地址也是0x4800000,这也说明__image_copy_start变量不占用空间。
u-boot/arch/arm/lib/relocate_64.S中拷贝uboot代码到ddr就用到了__image_copy_start和__image_copy_end这两个变量。
2.2、第二个链接脚本分析
第二个连接脚本在执行make CROSS_COMPILE=aarch64-himix100-linux- u-boot-z.bin会用到,在第一节有分析,这个脚本是u-boot-2016.11/arch/arm/cpu/armv8/hi3559av100/hw_compressed/u-boot.lds,部分截图如下所示:
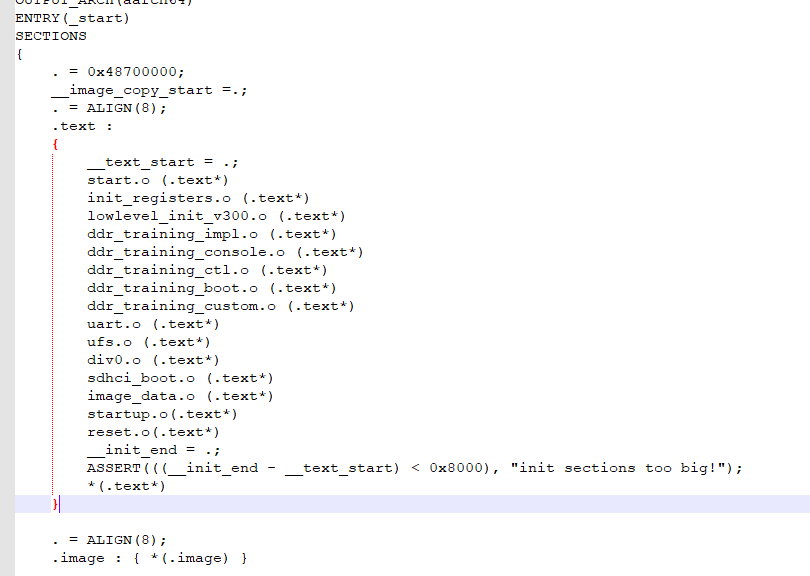
从链接脚本可以看出,hw_compressed目录下的代码入口地址是start.S文件中的_start函数,链接起始地址是0x48700000,处于最前面。hw_compressed目录下的代码主要是配置.reg文件中的寄存器,初始化pll,ddr,初始化串口等操作。由于初始化ddr代码在这部分,可以猜测,这部分代码是在soc内部的ram运行的。
3、第一部分启动流程
1、运行芯片内部rom中的引导加载程序,这部分程序主要是将uboot前一部分代码(包过.reg)拷贝到内部的ram中,拷贝的这部分代码应该就是hw_compressed目录下面的代码,因为flash是标准器件,所以引导加载程序可以对flash进行读写。
2、hw_compressed目录下的是厂家的代码,主要是配置soc的运行环境包过ddr、pll、管脚复用等。
3、解压image_data.gzip,跳转到arch/arm/cpu/armv8/start.S中有运行,这时开始运行uboot代码。
_start //u-boot-2016.11/arch/arm/cpu/armv8/hi3559av100/hw_compressed/start.S
-->reset
-->normal_start_flow
-->uart_early_init //uart.S,初始化串口,默认初始化uart0
-->uart_early_puts //打印字符串,打印的字符串是在start.S中的Str_SystemSartup,内容是System startup,这个就是uboot启动时第一条打印的信息
-->init_registers //根据.reg表格配置寄存器
-->start_ddr_training //配置ddr
-->jump_to_ddr
-->start_armboot //hw_compressed/setup.c,解压image_data.gzip,解压成功后会打印Uncompress Ok,调动0x48800000地址的函数,这个函数就是arch/arm/cpu/armv8/start.S文件中的_start
4、 第二部分启动流程分析
从第一部分启动流程可以知道,第一部分配置完寄存器后会调用arch/arm/cpu/armv8/start.S文件中的_start函数,这个函数就是二部分的入口函数。
_start //arch/arm/cpu/armv8/start.S
-->reset
-->save_boot_params //什么都没做,直接跳转到save_boot_params_ret
-->save_boot_params_ret
-->lowlevel_init
-->_main //arch/arm/lib/crt0_64.S
-->board_init_f_alloc_reserve //common/init/board_init.c
-->board_init_f_init_reserve
-->board_init_f //common/boartd_f.c
-->relocate_code //arch/arm/lib/relocate_64.S
-->board_init_r //common/boartd_r.c
4.1 _main函数分析
ENTRY(_main)
/*
- Set up initial C runtime environment and call board_init_f(0).
*/
#if defined(CONFIG_SPL_BUILD) && defined(CONFIG_SPL_STACK)
ldr x0, =(CONFIG_SPL_STACK)
#else
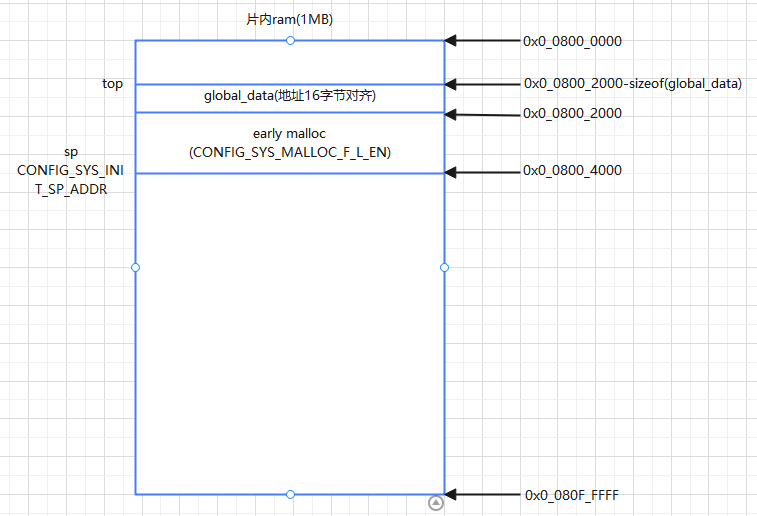
ldr x0, =(CONFIG_SYS_INIT_SP_ADDR) //CONFIG_SYS_INIT_ADDR定义在 uboot/include/configs/hi3559av100.h中,定义的值是0x08004000,是hi3559片内的RAM,hi3559片内有1MB的ram,起始地址是0x0_0800_0000
#endif
    bic    sp, x0, #0xf    /* 将x0低四位清理给sp,因为x0=0x08004000,第四位本来就是0这里sp值还是0x08004000 */
    mov    x0, sp
    bl    board_init_f_alloc_reserve
    mov    sp, x0
    /* set up gd here, outside any C code */
    mov    x18, x0
    bl    board_init_f_init_reserve

    mov    x0, #0
    bl    board_init_f

#if !defined(CONFIG_SPL_BUILD)
/*
 * Set up intermediate environment (new sp and gd) and call
 * relocate_code(addr_moni). Trick here is that we'll return
 * 'here' but relocated.
 */
    ldr    x0, [x18, #GD_START_ADDR_SP]    /* x0 <- gd->start_addr_sp */
    bic    sp, x0, #0xf    /* 16-byte alignment for ABI compliance */
    ldr    x18, [x18, #GD_BD]        /* x18 <- gd->bd */
    sub    x18, x18, #GD_SIZE        /* new GD is below bd */

    adr    lr, relocation_return
    ldr    x0, [x18, #GD_RELOCADDR]    /* x0 <- gd->relocaddr */
    adr x9, _start
    sub x9, x0, x9                    /* x9 <- gd->reloc_off */
    add    lr, lr, x9    /* new return address after relocation */
    b    relocate_code
4.2 board_init_f_alloc_reserve函数
board_init_f_alloc_reserve函数主要是计算片内ram的内存分布
ulong board_init_f_alloc_reserve(ulong top)  //top值为_main函数中堆栈指针sp的值,top = 0x08004000
{
    /* Reserve early malloc arena */
#if defined(CONFIG_SYS_MALLOC_F)
    top -= CONFIG_SYS_MALLOC_F_LEN;      //CONFIG_SYS_MALLOC_F_LEN定义在include/generated/autoconf.h中,值为0x2000,这个语句是将top向上移0x2000
#endif
    /* LAST : reserve GD (rounded up to a multiple of 16 bytes) */
    top = rounddown(top-sizeof(struct global_data), 16);  //top再向上移global_data大小
</span></span><span style="color: rgba(0, 0, 255, 1)">return</span><span style="color: rgba(0, 0, 0, 1)"> top;
}
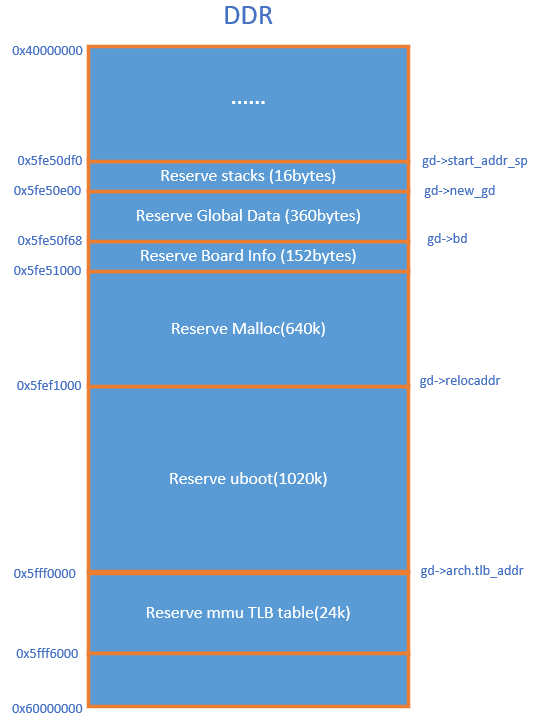
片内ram内存分布图如下所示:
4.3 board_init_f_init_reserve函数
board_init_f_init_reserve主要是将global_data的内存清理
void board_init_f_init_reserve(ulong base)  //base是board_init_f_alloc_reserve函数返回的top值
{
    struct global_data *gd_ptr;
#ifndef _USE_MEMCPY
    int *ptr;
#endif
<span style="color: rgba(0, 128, 0, 1)">/*</span><span style="color: rgba(0, 128, 0, 1)">
 * clear GD entirely and set it up.
 * Use gd_ptr, as gd may not be properly set yet.
 </span><span style="color: rgba(0, 128, 0, 1)">*/</span><span style="color: rgba(0, 0, 0, 1)">

gd_ptr </span>= (<span style="color: rgba(0, 0, 255, 1)">struct</span> global_data *)<span style="color: rgba(0, 0, 255, 1)">base</span><span style="color: rgba(0, 0, 0, 1)">;
</span><span style="color: rgba(0, 128, 0, 1)">/*</span><span style="color: rgba(0, 128, 0, 1)"> zero the area </span><span style="color: rgba(0, 128, 0, 1)">*/</span><span style="color: rgba(0, 0, 0, 1)">
#ifdef _USE_MEMCPY
memset(gd_ptr, ‘\0’, sizeof(gd));
#else
for (ptr = (int )gd_ptr; ptr < (int )(gd_ptr + 1); ) //将global_data这段内存清理
ptr++ = 0;
#endif
/ set GD unless architecture did it already /
#if !defined(CONFIG_ARM)
arch_setup_gd(gd_ptr);
#endif
/ next alloc will be higher by one GD plus 16-byte alignment /
base += roundup(sizeof(struct global_data), 16);
</span><span style="color: rgba(0, 128, 0, 1)">/*</span><span style="color: rgba(0, 128, 0, 1)">
 * record early malloc arena start.
 * Use gd as it is now properly set for all architectures.
 </span><span style="color: rgba(0, 128, 0, 1)">*/</span>
#if defined(CONFIG_SYS_MALLOC_F)
/ go down one ‘early malloc arena’ /
gd->malloc_base = base; //gd->malloc_base = 0x08002000
/ next alloc will be higher by one ‘early malloc arena’ size /
base += CONFIG_SYS_MALLOC_F_LEN;
#endif
}
4.4 board_init_f 中的初始化
board_init_f 函数中定义在//common/boartd_f.c文件中,boartd_f.c包含了uboot/include/common.h, common.h中又包含了uboot/include/configs/hi3559av100.h hi3559av100.h中包含了一些hi3559的配置。board_init_f函数会执行一个init_sequence_f初始化列表,里面包含了很多初始化函数。init_sequence_f里面的函数主要执行了两部分操作,一个是初始化串口和控制台,另一部分就是重定位uboot,第一部分启动中uboot是解压到0x48800000这个低地址的,地地址要留给kernel,所以要把uboot复制到ddr的高地址中,需要重定位操作。
4.4.1 setup_mon_len函数
setup_mon_len函数主要是设置gd->mon_len的值,这个值就是uboot的大小
4.4.2 initf_malloc函数
4.4.3 initf_console_record函数
4.4.4 arch_cpu_init函数
arch_cpu_init定义在common/boartd_f.c中,这里什么都不做,直接return 0
4.4.5 mach_cpu_init函数
mach_cpu_init定义在common/boartd_f.c中,这里什么都不做,直接return 0
4.4.6 initf_dm函数
4.4.7 arch_cpu_init_dm函数
arch_cpu_init_dm定义在common/boartd_f.c中,这里什么都不做,直接return 0
4.4.8 board_early_init_f
4.4.9 串口初始化
串口初始化如下所示:
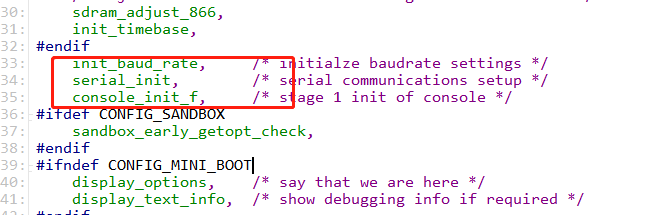
串口初始化有三个函数init_baud_rate, /* initialze_baud_rate 、 serial_init和console_init_f。下面对这三个函数做分析。
init_baud_rate函数是设置全局变量gd的baudrate成员值
static int init_baud_rate(void)
{
    gd->baudrate = getenv_ulong("baudrate", 10, CONFIG_BAUDRATE);  //CONFIG_BAUDRATE定义在uboot/include/configs/hi3559av100.h中,值为115200
  return 0;
}
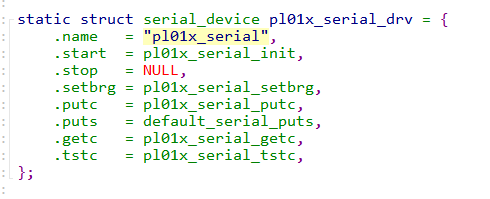
serial_init函数主要是初始化串口,hi3559的串口硬件驱动都在uboot/drivers/serial/serial_pl01x.c,serial_pl01x.c中定义了一个串口设备结构体pl01x_serial_drv,这里面定义了hi359串口初始化、发送和接收函数,如下所示:
serial_init函数调用关系如下:
serial_init  //uboot/drivers/serial/serial.c
  -->get_current
    -->default_serial_console  //获取一个串口设备serial_device,函数定义在uboot/drivers/serial/serial_pl01x.c
      -->start(pl01x_serial_init)          //初始化串口
        -->pl01x_serial_init_baud        //设置波特率
default_serial_console函数就是返回一个串口设备结构体pl01x_serial_drv
__weak struct serial_device *default_serial_console(void)
{
    return &pl01x_serial_drv;
}
pl01x_serial_init_baud是设置串口波特率函数base_regs = (struct pl01x_regs *)port[CONFIG_CONS_INDEX];语句中有port变量,这个变量存放了hi3559几个串口的起始地址,port定义在serial_pl01x.c中,如下所示:

CONFIG_PL01x_PORTS定义在uboot/include/configs/hi3559av100.h,定义了hi3559中4个串口起始地址

static void pl01x_serial_init_baud(int baudrate)
{
    int clock = 0;
#if defined(CONFIG_PL010_SERIAL)
pl01x_type = TYPE_PL010;
#elif defined(CONFIG_PL011_SERIAL)
pl01x_type = TYPE_PL011;
clock = CONFIG_PL011_CLOCK;
#endif
base_regs = (struct pl01x_regs *)port[CONFIG_CONS_INDEX]; //CONFIG_CONS_INDEX定义在hi3559av100.h,表示要初始化哪个串口
pl01x_generic_serial_init(base_regs, pl01x_type);
pl01x_generic_setbrg(base_regs, pl01x_type, clock, baudrate);
}
console_init_f定义在uboot/common/console.c中,这个函数执行完后就能使用printf打印了。
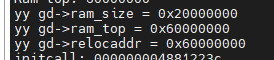
4.4.10 setup_dest_addr函数
这里主要设置这以下三个值,直接打印出来如下所示:
4.4.11 reserve_round_4k函数
用于对gd->relocaddr做4K字节对齐,setup_dest_addr中已经将relocaddr设置为4K字节对齐,这里没有改变relocaddr的值 。
4.4..11 reserve_uboot函数
预留uboot空间
4.4.12 reserve_malloc函数
预留malloc空间
4.4.13 reserve_board函数
预留并申请gd->bd空间
4.4.14 reserve_global_data函数
预留并申请新的gd->new_gd空间
4.4.15 reserve_mmu函数
预留mmu的tlb表格,
4.4.16 reserve_global_data函数
申请一个新的gd
4.4.17 reserve_fdt函数
预留设备树空间,hi3559没有用到设备树,这个函数无效
4.4.18 reserve_arch函数
reserve_arch定义在common/boartd_f.c中,这里什么都不做,直接return 0
4.4.19 reserve_stacks函数
预留栈空间
4.4.20 setup_dram_config函数
setup_dram_config调用的是dram_init_banksize,这个函数定义在common/boartd_f.c,用来设置gd变量的dram参数
__weak void dram_init_banksize(void)
{
#if defined(CONFIG_NR_DRAM_BANKS) && defined(CONFIG_SYS_SDRAM_BASE)
    gd->bd->bi_dram[0].start = CONFIG_SYS_SDRAM_BASE;    //0x40000000,hi3559的ddr空间起始地址,定义在include/configs/hi3559av100.h中
    gd->bd->bi_dram[0].size = get_effective_memsize();
#endif
}
最终uboot重定位分布如下所示:
4.5 uboot拷贝
board_init_f执行完后,就会执行relocate_code代码拷贝工作,relocate_code定义在arch/arm/lib/relocate_64.S。这部分代码是将起始地址为0x48800000的uboot拷贝到gd->relocaddr(0x5fef1000)开始处
ENTRY(relocate_code)
    stp    x29, x30, [sp, #-32]!    /* create a stack frame */
    mov    x29, sp
    str    x0, [sp, #16]
    /*
     * Copy u-boot from flash to RAM
     */
    ldr    x1, =__image_copy_start    /* x1寄存器保存uboot拷贝的起始地址*/
    subs    x9, x0, x1        /* x9 = gd->relocaddr - x1 */
    b.eq    relocate_done        /* skip relocation */
    ldr    x2, =__image_copy_end    /* x2寄存器保存uboot拷贝结束地址 */
copy_loop:
ldp x10, x11, [x1], #16 / 将x1寄存器保存地址的内存拷贝到x10和x11寄存器,x1自动递增。从ram到寄存器的拷贝,一次拷贝两个寄存器大小 /
stp x10, x11, [x0], #16 / 将x10和x11寄存器的值拷贝到x0寄存器保存的地址中,x0自动递增,从寄存器到ram的拷贝,一次拷贝两个寄存器大小 /
cmp x1, x2 / 如果x1递增到拷贝结束地址,则拷贝完成,否则跳到copy_loop循环拷贝 /
b.lo copy_loop
str x0, [sp, #24]
</span><span style="color: rgba(0, 128, 0, 1)">/*</span><span style="color: rgba(0, 128, 0, 1)">
* Fix .rela.dyn relocations
</span><span style="color: rgba(0, 128, 0, 1)">*/</span><span style="color: rgba(0, 0, 0, 1)">
ldr x2, </span>=__rel_dyn_start <span style="color: rgba(0, 128, 0, 1)">/*</span><span style="color: rgba(0, 128, 0, 1)"> x2 <- SRC &__rel_dyn_start </span><span style="color: rgba(0, 128, 0, 1)">*/</span><span style="color: rgba(0, 0, 0, 1)">
ldr x3, </span>=__rel_dyn_end <span style="color: rgba(0, 128, 0, 1)">/*</span><span style="color: rgba(0, 128, 0, 1)"> x3 <- SRC &__rel_dyn_end </span><span style="color: rgba(0, 128, 0, 1)">*/</span></pre>
4.6 board_init_r
4.6.1 initr_trace
初始化和调试跟踪相关
4.6.2 initr_reloc
标记gd->flags,说明uboot重定位完成
4.6.3 initr_caches
初始化cache
4.6.4 initr_reloc_global_data
初始化重定位后gd的一些成员变量
4.6.5 initr_malloc
初始化malloc,将malloc起始地址定位到0x5fe51000
4.6.6 initr_console_record
初始化控制台相关内容
4.6.7 initr_noncached
4.6.8 bootstage_relocate
4.6.9 initr_dm
初始化dm模型
4.6.10 initr_bootstage
打印uboot的启动阶段
static int initr_bootstage(void)
{
    /* We cannot do this before initr_dm() */
    bootstage_mark_name(BOOTSTAGE_ID_START_UBOOT_R, "board_init_r");  //BOOTSTAGE_ID_START_UBOOT_R表示在board_init_r这个阶段
  return 0;
}  -->initr_bootstage
    -->bootstage_mark_name
      -->show_boot_progress    //board/hisilison/hi3559av100/hi3559av100.c,没有宏定义CONFIG_SHOW_BOOT_PROGRESS,这里并没有打印
4.6.11 board_init
函数位于board/hisilison/hi3559av100/hi3559av100.c文件中。从0x12020000+0x008c寄存器中读取当前的启动模式
4.6.12 set_cpu_clk_info
4.6.13 efi_memory_init
4.6.14 stdio_init_tables
4.6.15 initr_serial
4.6.16 initr_announce
打印uboot重定位的地址
4.6.17 initr_manual_reloc_cmdtable
4.6.18 initr_trap
4.6.19 initr_addr_map
4.6.20 board_early_init_r
这还函数没执行
4.6.21 initr_logbuffer
4.6.22 initr_post_backlog
4.6.23 initr_icache_enable
4.6.24 initr_pci
初始化pci接口,这里没有执行
4.6.25 initr_w83c553f
4.6.26 arch_early_init_r
4.6.27 power_init_board
在board_r.c中,直接return 0
4.6.28 initr_flash
这个不执行
4.6.29 cpu_init_r
4.6.30 initr_spi
这个不执行
4.6.31 initr_snor
这个不执行
4.6.32 initr_nand
-->initr_nand //common/board_r.c
-->nand_init //drivers/mtd/nand/nand.c
-->nand_init_chip
-->board_nand_init //drivers/mtd/nand/hifmac100_nand/hifmac100_nand.c,这里实现里hi3559 flash的读写操作
-->nand_scan
-->nand_register //注册nand
4.6.33 initr_mmc
初始化mmc
4.6.34 initr_ufs
4.6.35 initr_dataflash
4.6.36 initr_env
设置环境变量,开始使用默认的环境变量,执行saveenv命令后,会将环境变量写入到flash中,后面启动就会从flash加载
4.6.37 initr_malloc_bootparams
这里没用到
4.6.38 initr_secondary_cpu
初始化其它cpu核
4.6.39 mac_read_from_eeprom
从e2prom中读取网卡mac地址,这里没用到
4.6.40 initr_pci
初始化pci,这里没用到
4.6.41 stdio_add_devices
各种输入输出设备初始化
4.6.42 initr_jumptable
初始化跳转表
4.6.43 initr_api
这个函数没用到
4.6.44 console_init_r
控制台初始化
4.6.45 show_board_info
打印板端信息,这里没用到
4.6.46 arch_misc_init
这个函数没用到
4.6.47 misc_init_r
这个函数定义在 board/hisilicon/hi3559av100/hi3559av100.c中
4.6.48 initr_kgdb
这个函数没用到
4.6.49 interrupt_init
初始化中断
4.6.50 initr_enable_interrupts
4.6.51 timer_init
初始化定时器,这里没用到
4.6.52 initr_status_led
配置板端led,这里没用到
4.6.53 initr_ethaddr
设置ip地址
4.6.54 board_late_init
4.6.55 initr_scsi
初始化sata
4.6.56 initr_doc
初始化看门狗
4.6.57 initr_bbmii
初始化mac控制器的mdio接口
4.6.58 initr_net
初始化网络
4.6.59 initr_post
4.6.60 initr_pcmcia
4.6.61 initr_ide
4.6.62 last_stage_init
4.6.63 initr_bedbug
4.6.64 initr_mem
4.6.65 initr_kbd
4.6.66 prom_init
4.6.67 initr_download
4.6.68 run_main_loop
进入3秒倒计时,如果按下空格,则进入uboot命令模式,否则进入加载linux模式
5、总结
5.1 uboot启动流程
1、BootROM阶段:芯片上电首先执行芯片内部固化的启动引导程序,该程序会检测启动方式(flash、emmc等),初始化相对应的启动介质,拷贝启动介质中的第一部分启动代码到芯片内部的ram中。
2、启动阶段1:hi3559的第一部分启动代码主要是u-boot-2016.11/arch/arm/cpu/armv8/hi3559av100/hw_compressed/中的程序,这部分程序主要是初始化pll、ddr、io复用等,然后加载启动介质中的第二部分启动代码到ddr,跳转的ddr中执行第二部分启动程序。
3、启动阶段2:完成外设初始化,重定位uboot,最后进入3秒倒计时,如果按下空格,则进入uboot命令模式,否则进入加载linux模式
5.2、uboot为什么需要重定位?
因为uboot默认拷贝到ddr低地址,为了给内核腾出空间。为什么不能直接将uboot拷贝到ddr高地址空间呢?因为ddr大小开始是不知道的,不好确定高地址空间具体是哪里。
原文路径:https://www.cnblogs.com/YYFaGe/p/16405080.html


 912
912

 被折叠的 条评论
为什么被折叠?
被折叠的 条评论
为什么被折叠?
 到【灌水乐园】发言


