


IDEA 01 搞定idea社区版本的使用
一、启动Spring
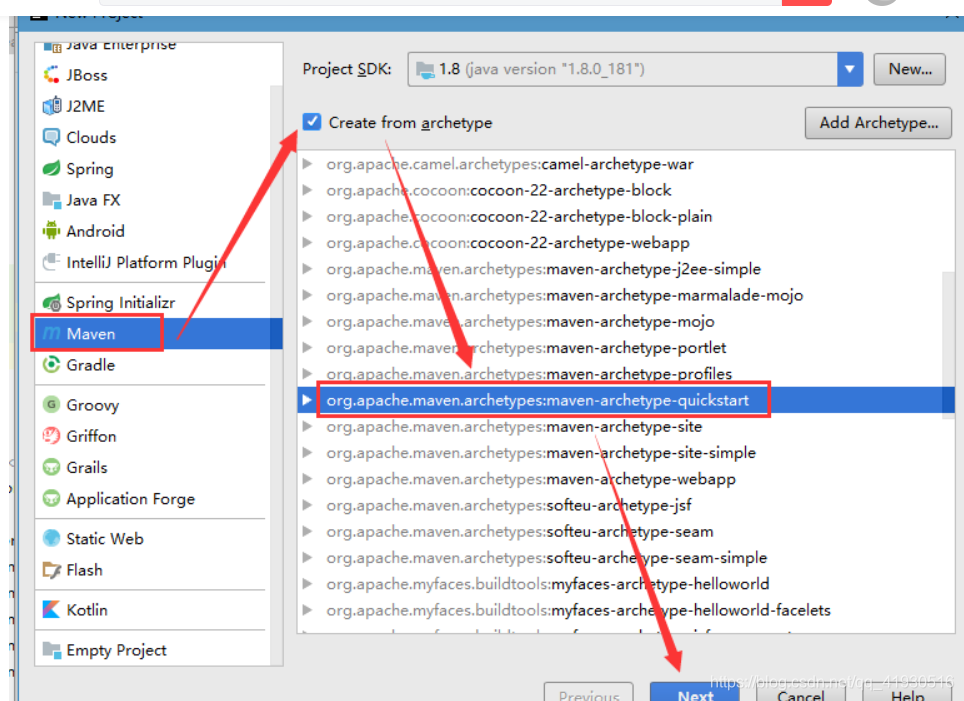
1.quickstart
2. spring核心坐标
<dependency>
<groupId>org.springframework</groupId>
<artifactId>spring-context</artifactId>
<version>4.3.9.RELEASE</version>
</dependency>
3. spring配置文件
<?xml version="1.0" encoding="UTF-8"?>
<beans xmlns="http://www.springframework.org/schema/beans"
xmlns:xsi="http://www.w3.org/2001/XMLSchema-instance"
xsi:schemaLocation="http://www.springframework.org/schema/beans
http://www.springframework.org/schema/beans/spring-beans.xsd">
<!--
xmlns 即 xml namespace xml 使用的命名空间
xmlns:xsi 即 xml schema instance xml 遵守的具体规范
xsi:schemaLocation 本文档 xml 遵守的规范 官方指定
-->
<bean id="helloSpring" class="com.jd.HelloSpring"></bean>
</beans>
4. 启动Spring
package com.jd;
import org.springframework.context.ApplicationContext;
import org.springframework.context.support.ClassPathXmlApplicationContext;

public class HelloSpring {
    public static void main(String[] args) {
        ApplicationContext context = new ClassPathXmlApplicationContext("spring.xml");
        HelloSpring helloSpring = (HelloSpring) context.getBean("helloSpring");
        System.out.println("Hello Spring!");
    }
}
二、启动Springboot
1. 新建maven项目
File>New>Project>Maven>Create from archetype>Maven-archetype-webapp>Next
2.配置pom
<!-- 定义公共资源版本 -->
    <parent>
        <groupId>org.springframework.boot</groupId>
        <artifactId>spring-boot-starter-parent</artifactId>
        <version>1.5.6.RELEASE</version>
        <relativePath />
    </parent>

    <dependencies>

        <!-- 包含 mvc,aop 等jar资源 -->
        <dependency>
            <groupId>org.springframework.boot</groupId>
            <artifactId>spring-boot-starter-web</artifactId>
        </dependency>
        <!-- 映入tomcat -->
        <dependency>
            <groupId>org.springframework.boot</groupId>
            <artifactId>spring-boot-starter-tomcat</artifactId>
        </dependency>
        <!-- jsp的整合依赖 -->
        <dependency>
            <groupId>org.apache.tomcat.embed</groupId>
            <artifactId>tomcat-embed-jasper</artifactId>
        </dependency>
        <!-- 整合ssm -->
        <dependency>
            <groupId>org.mybatis.spring.boot</groupId>
            <artifactId>mybatis-spring-boot-starter</artifactId>
            <version>1.1.1</version>
        </dependency>
        <dependency>
            <groupId>mysql</groupId>
            <artifactId>mysql-connector-java</artifactId>
        </dependency>
        <!-- 日志依赖 -->
        <dependency>
            <groupId>org.springframework.boot</groupId>
            <artifactId>spring-boot-starter-log4j2</artifactId>
        </dependency>
        <!-- jstl标签架包 -->
        <dependency>
            <groupId>javax.servlet</groupId>
            <artifactId>jstl</artifactId>
        </dependency>
        <dependency>
            <groupId>taglibs</groupId>
            <artifactId>standard</artifactId>
            <version>1.1.2</version>
        </dependency>
        <!-- 热部署 -->
        <dependency>
            <groupId>org.springframework.boot</groupId>
            <artifactId>spring-boot-devtools</artifactId>
            <optional>true</optional>
            <scope>true</scope>
        </dependency>
    </dependencies>

    <build>
        <plugins>
            <plugin>
                <groupId>org.springframework.boot</groupId>
                <artifactId>spring-boot-maven-plugin</artifactId>
                <!-- 没有该配置,devtools 不生效 -->
                <configuration>
                    <fork>true</fork>
                </configuration>
            </plugin>

        </plugins>
    </build>
3 配置application.properties文件
#修改端口
server.port=80

#数据源相关配置
spring.datasource.url=jdbc:mysql://127.0.0.1:3306/test?useUnicode=true&characterEncoding=utf-8
spring.datasource.username=root
spring.datasource.password=123
spring.datasource.driver-class-name=com.mysql.jdbc.Driver

#访问前缀和后缀
spring.mvc.view.prefix=WEB-INF/jsp/
spring.mvc.view.suffix=.jsp

mybatis.mapperLocations=classpath:com/springboot/mapper/xml/**/*.xml
4 新建启动类
@SpringBootApplication
//扫描控制器类
@ComponentScan(basePackages="com.springboot")
//扫描dao
@MapperScan(basePackages="com.springboot.mapper")
public class SpringBootStart {
    public static void main(String [] args){
        SpringApplication.run(SpringBootStart.class,args);
    }
}
5 新建控制器
@Controller
public class TestController {
    @RequestMapping("/")
    public String index(Model model, HttpServletResponse response) {
        return "index";
    }


 598
598


 被折叠的 条评论
为什么被折叠?
被折叠的 条评论
为什么被折叠?
 到【灌水乐园】发言


