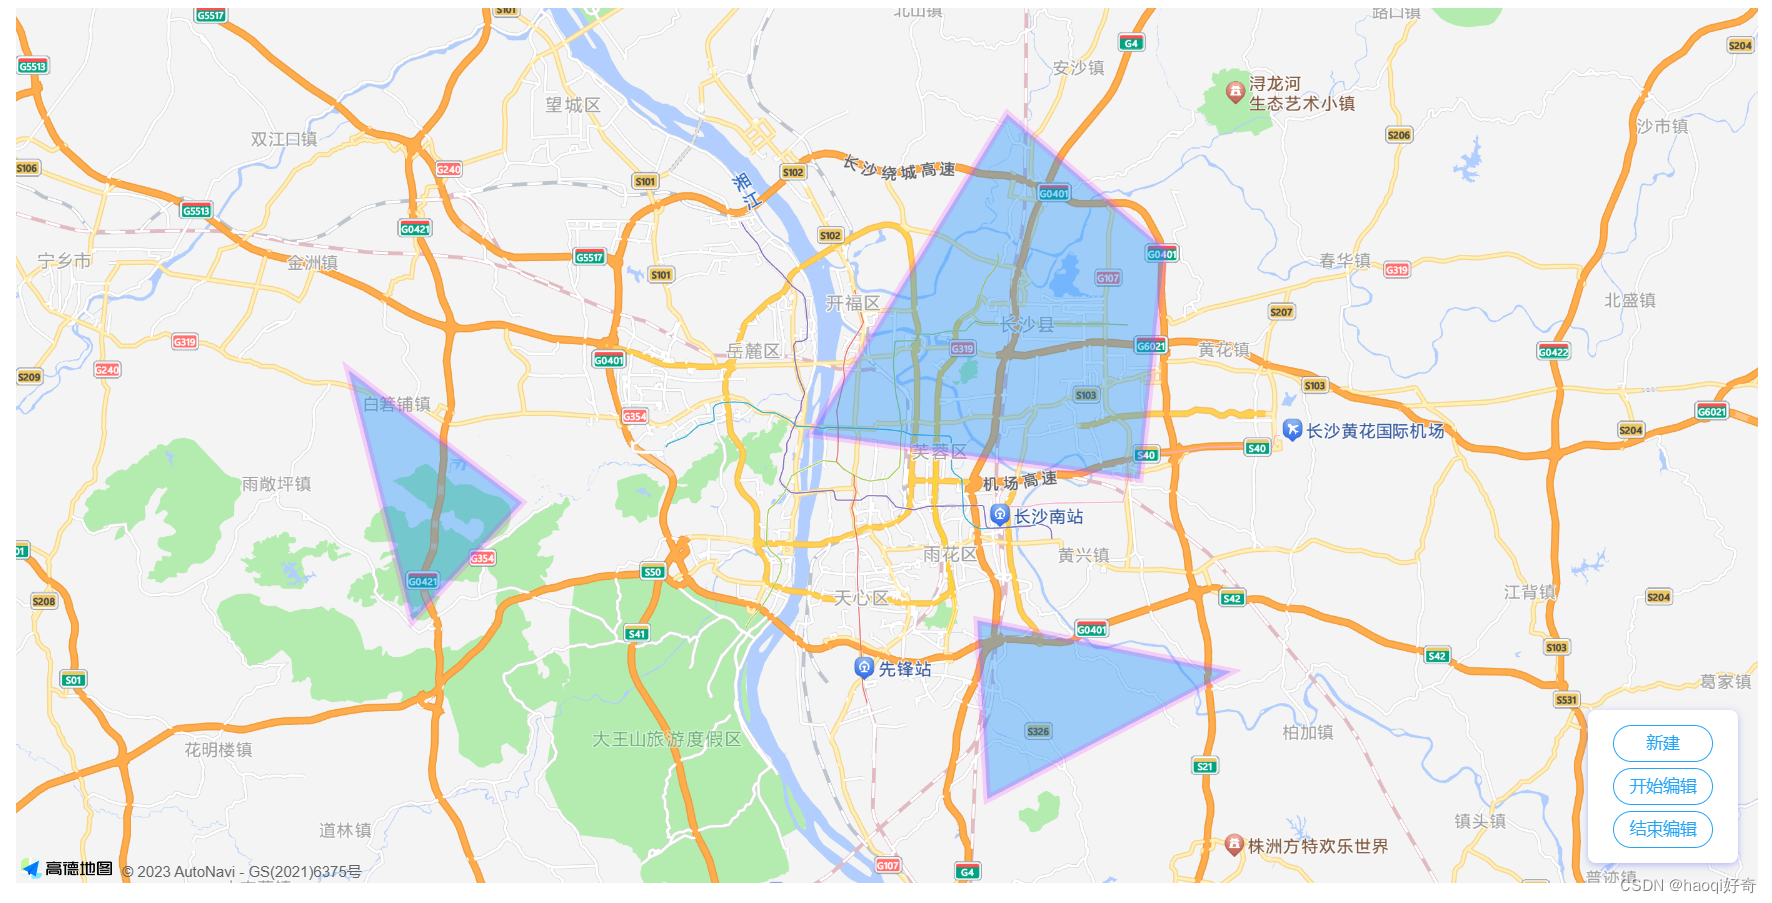
实现对地图的区域新建、编辑、样式修改、获取框选后点位合集,优化了官方案例的一些结构。
1. 效果
2. 安装插件
npm i @amap/amap-jsapi-loader --save
3.代码
<template>
  <div class="campus-page">
    <div id="campusMap"></div>
    <div class="input-card" style="width: 120px">
      <button class="btn" @click="createPolygon()" style="margin-bottom: 5px">
        新建
      </button>
      <button class="btn" @click="startPolygon()" style="margin-bottom: 5px">
        开始编辑
      </button>
      <button class="btn" @click="closePolygon()">结束编辑</button>
    </div>
  </div>
</template>

<script>
import AMapLoader from "@amap/amap-jsapi-loader";
var polyEditor = "";
export default {
  data() {
    return {
      pathArr: [],
    };
  },
  mounted() {
    //DOM初始化完成进行地图初始化
    this.initMap();
  },
  methods: {
    async initMap() {
      await AMapLoader.load({
        key: "xxxxxxxxxxxxxxx", // 申请好的Web端开发者Key,首次调用 load 时必填
        version: "2.0", // 指定要加载的 JSAPI 的版本,缺省时默认为 1.4.15
        plugins: [
          "AMap.PolygonEditor",
          "AMap.Autocomplete",
          "AMap.PlaceSearch",
          "AMap.Scale",
          "AMap.OverView",
          "AMap.ToolBar",
          "AMap.MapType",
          "AMap.PolyEditor",
          "AMap.CircleEditor",
          "AMap.Geolocation",
          "AMap.Geocoder",
          "AMap.Polygon",
          "AMap.AMapUI",
        ], // 需要使用的的插件列表,如比例尺'AMap.Scale'等
      })
        .then((AMap) => {
          this.map = new AMap.Map("campusMap", {
            //设置地图容器id
            viewMode: "3D", //是否为3D地图模式
            zoom: 11, //初始化地图级别
            center: [113.00143, 28.192922], //初始化地图中心点位置
          });
          this.map.setFitView();
        })
        .catch((e) => {
          console.log(e);
        });
      this.initEditor();
    },
    initEditor() {
      polyEditor = new AMap.PolygonEditor(this.map);
      polyEditor.on("add",  (data) => {
        var polygon = data.target;
        polyEditor.addAdsorbPolygons(polygon);
        polygon.on("dblclick", () => {
          // 双击图层进行编辑
          polyEditor.setTarget(polygon);
          polyEditor.open();
        });
      });
      polyEditor.on("end",  (data) => {
        let obj = {
          key: data.target._opts.path,
          mapId: data.target._amap_id,
        };
        if (this.pathArr.length > 0) { // 判断是否有重复的点位,如果点位重复说明是修改之前的区域面积
          let isRepeat = this.pathArr.some((item, index) => {
            if (item.mapId === obj.mapId) {
              this.pathArr[index] = obj;
              return true;
            }
          });
          if (!isRepeat) {
            this.pathArr.push(obj);
          }
        } else { // 没有点位,直接添加
          this.pathArr.push(obj);
        }
        console.log(this.pathArr) // 最终的点位合集
      });
      polyEditor.open(); // 进入组件就可以编辑
      return polyEditor;
    },
    createPolygon() {
      //新建
      polyEditor.close();
      polyEditor.setTarget();
      polyEditor.open();
    },
    closePolygon() {
      // 关闭
      polyEditor.close();
    },
    startPolygon() {
      polyEditor.open();
    },
    campusOk() {
      polyEditor.close();
      console.log(this.pathArr.length);
      if (this.pathArr.length < 1) {
        return this.$message({
          message: "请划至少划分一个区域位置!",
          type: "warning",
        });
      }
      this.$emit("onPatharr", this.pathArr);// 在这里将点位合集传给父组件或者请求接口
    },
  },
};
</script>
<style></style>
<style scoped lang="scss">
#campusMap {
  padding: 0px;
  margin: 0px;
  width: 100%;
  height: 700px;
  flex: 7;
  position: relative;
}
.campus-page {
  position: relative;
}
.input-card {
  display: flex;
  flex-direction: column;
  min-width: 0;
  word-wrap: break-word;
  background-color: #fff;
  background-clip: border-box;
  border-radius: 0.25rem;
  width: 22rem;
  border-width: 0;
  border-radius: 0.4rem;
  box-shadow: 0 2px 6px 0 rgba(114, 124, 245, 0.5);
  position: absolute;
  bottom: 1rem;
  right: 1rem;
  -ms-flex: 1 1 auto;
  flex: 1 1 auto;
  padding: 0.75rem 1.25rem;
}
.btn {
  display: inline-block;
  font-weight: 400;
  text-align: center;
  white-space: nowrap;
  vertical-align: middle;
  -webkit-user-select: none;
  -moz-user-select: none;
  -ms-user-select: none;
  user-select: none;
  border: 1px solid transparent;
  transition: color 0.15s ease-in-out, background-color 0.15s ease-in-out,
    border-color 0.15s ease-in-out, box-shadow 0.15s ease-in-out;
  background-color: transparent;
  background-image: none;
  color: #25a5f7;
  border-color: #25a5f7;
  padding: 0.25rem 0.5rem;
  line-height: 1.5;
  border-radius: 1rem;
  -webkit-appearance: button;
  cursor: pointer;
}

.btn:hover {
  color: #fff;
  background-color: #25a5f7;
  border-color: #25a5f7;
}

.btn:hover {
  text-decoration: none;
}
</style>
4. 样式修改(不需要改样式的可以忽略)
    initEditor() {
      polyEditor = new AMap.PolygonEditor(this.map);
      polyEditor._opt.createOptions = { // 创建区域的样式
        fillColor: "#FF8D8D",
        fillOpacity: 0.3,
        strokeWeight: 3,
        strokeColor: "#FF8D8D",
      };
      polyEditor._opt.editOptions = {// 编辑区域的样式
        fillColor: "#FF8D8D",
        fillOpacity: 0.3,
        strokeWeight: 3,
        strokeColor: "#FF8D8D",
      };
      polyEditor.midControlPoint = { // 点位样式
        fillColor: "#FF8D8D",
        fillOpacity: 1,
        strokeWeight: 2,
        strokeColor: "#FF8D8D",
        bubble: false,
        clickable: true,
        cursor: "pointer",
      };
      polyEditor.controlPoint = {// 点位样式
        fillOpacity: 1,
        strokeWeight: 2,
        strokeColor: "#FF8D8D",
        bubble: false,
        clickable: true,
        cursor: "pointer",
      };
      polyEditor.on("add", (data) => {
        var polygon = data.target;
        polyEditor.addAdsorbPolygons(polygon);
        polygon.on("dblclick", () => {
          // 双击图层进行编辑
          polyEditor.setTarget(polygon);
          polyEditor.open();
        });
      });
      polyEditor.on("end", (data) => {
        let obj = {
          key: data.target._opts.path,
          mapId: data.target._amap_id,
        };
        if (this.pathArr.length > 0) {
          // 判断是否有重复的点位,如果点位重复说明是修改之前的区域面积
          let isRepeat = this.pathArr.some((item, index) => {
            if (item.mapId === obj.mapId) {
              this.pathArr[index] = obj;
              return true;
            }
          });
          if (!isRepeat) {
            this.pathArr.push(obj);
          }
        } else {
          // 没有点位,直接添加
          this.pathArr.push(obj);
        }
        console.log(this.pathArr); // 最终的点位合集
      });
      polyEditor.open(); // 进入组件就可以编辑
      return polyEditor;
    },
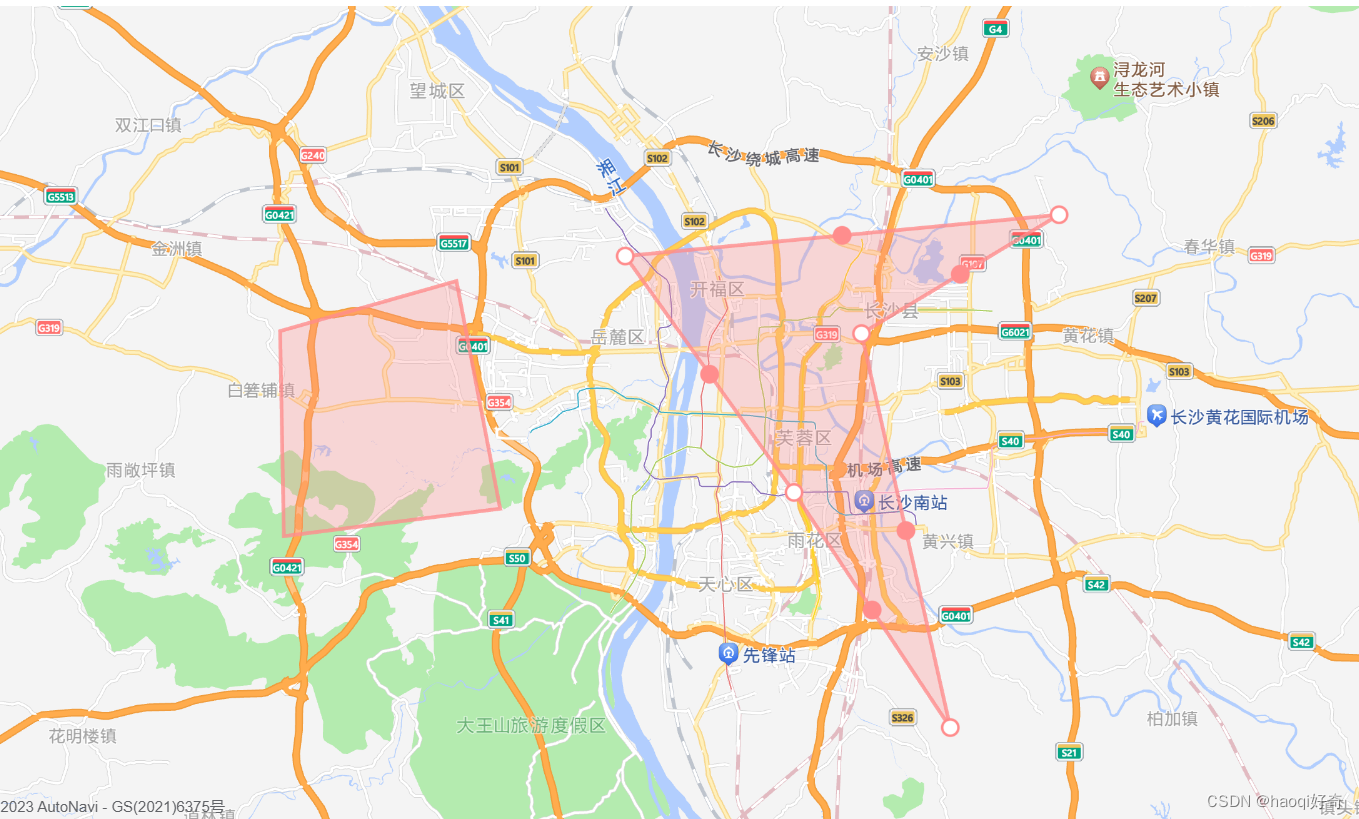
5. 修改颜色后的效果


 3381
3381

 被折叠的 条评论
为什么被折叠?
被折叠的 条评论
为什么被折叠?
 到【灌水乐园】发言


